How to Easily Add Live Tooling to Your Lathe: A Step-by-Step Guide

If you’re looking to take your lathe capabilities to the next level, adding live tooling can be a game-changer. Live tooling allows you to perform secondary operations, such as milling, drilling, and tapping, right on your lathe, eliminating the need for multiple machine setups and increasing productivity. In this step-by-step guide, we will walk you through the process of easily adding live tooling to your lathe.
Step 1: Assess Your Lathe
Before adding live tooling, it’s important to assess whether your lathe is compatible. Live tooling requires a lathe with a turret and spindle that can rotate in two axes. Check your lathe’s specifications or consult the manufacturer to ensure compatibility.
Step 2: Choose the Right Live Tooling System
Once you’ve confirmed your lathe’s compatibility, it’s time to choose the right live tooling system. There are various options available in the market, including modular systems and brand-specific systems. Consider factors such as tool selection, tool change time, and compatibility with your lathe’s specifications before making a decision.

Step 3: Install the Live Tooling System
With your chosen live tooling system in hand, it’s time to install it on your lathe. Follow the manufacturer’s instructions carefully, as the installation process may vary depending on the system. Make sure to secure the live tooling properly and check for any alignment issues before moving on to the next step.
Step 4: Test and Calibrate
Once the live tooling system is installed, it’s essential to test and calibrate it to ensure proper functionality. Start by running the lathe at various speeds to check for any vibrations or abnormalities. Then, use a test workpiece to perform milling, drilling, or tapping operations and check the results. Make any necessary adjustments or alignments to optimize the performance of your live tooling system.
Step 5: Train Operators and Maximize Efficiency

Finally, once your live tooling system is up and running smoothly, it’s crucial to train your operators on how to use it effectively. Provide thorough training on tool selection, tool change procedures, and safety precautions to minimize downtime and maximize efficiency. Regularly monitor and maintain your live tooling system to ensure peak performance.
By following these steps, you can easily add live tooling to your lathe, unlocking a whole new level of productivity and versatility. Whether you’re a hobbyist or a professional machinist, live tooling can revolutionize your turning operations and open up new possibilities for your projects.
Gather the Necessary Tools and Materials
Before you can add live tooling to your lathe, you will need to gather a few tools and materials. Here is a list of items you will need:
- Lathe: Make sure you have a lathe that is capable of accepting live tooling. Consult your lathe’s manual or contact the manufacturer to verify compatibility.
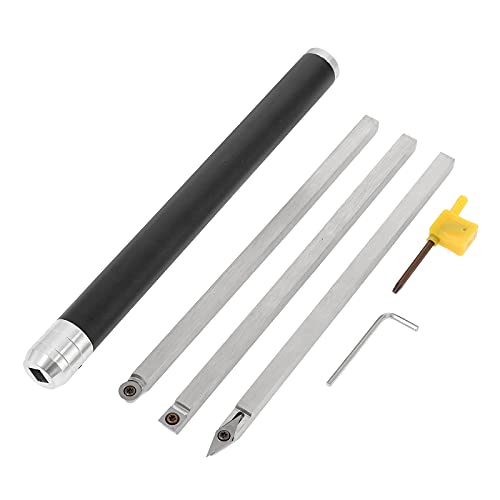
- Live Tooling: Acquire the appropriate live tooling for your lathe. Live tooling typically includes tool holders, rotary tooling, and live centers.
- Tool Blocks: Depending on the specific type of live tooling you are using, you may need tool blocks to mount the tool holders onto your lathe.
- Mounting Hardware: Obtain the necessary bolts, screws, or clamps to securely mount the live tooling onto your lathe.
- Cutting Tools: Depending on your application, you will need a variety of cutting tools such as drills, end mills, or taps. Make sure you have the appropriate sizes and types for your project.
- Tool Presetter: A tool presetter is a valuable tool for measuring and setting tool offsets. It will help ensure accuracy when using live tooling.
- Measuring Instruments: Have a set of measuring instruments on hand, such as calipers, micrometers, and dial indicators, to check the dimensions and tolerances of your workpiece.
- Personal Protective Equipment (PPE): Always prioritize safety. Wear appropriate PPE, such as safety glasses, gloves, and ear protection, when operating machinery.
By gathering these necessary tools and materials, you will be well-prepared to add live tooling to your lathe and begin exploring the many possibilities it offers.
Prepare Your Lathe for Live Tooling Installation
Before installing live tooling on your lathe, you need to make sure it is properly prepared. Follow these steps to ensure a smooth and successful installation:

1. Check the lathe compatibility
- Ensure that your lathe is compatible with live tooling. Not all lathes are designed to accommodate live tooling, so it’s important to check with the manufacturer or consult the lathe’s user manual.
- Verify the spindle speed and power requirements needed for live tooling operations. Make sure your lathe meets these specifications.
2. Gather necessary tools and equipment
- Collect all the tools and equipment you will need for the installation, such as wrenches, screwdrivers, and any specific tools mentioned in the manufacturer’s instructions.
- Prepare a clean and well-lit workspace with enough room to comfortably work around the lathe.
3. Disconnect the lathe from power
Before beginning any installation or maintenance work on your lathe, always disconnect it from the power source to ensure your safety.
4. Clean the lathe surfaces
Thoroughly clean all surfaces where the live tooling will be installed, including the lathe spindle and turret. Remove any dirt, debris, or residue that may interfere with the installation or affect the performance of the live tooling.
5. Inspect and lubricate the lathe components
- Inspect the spindle, turret, and other relevant components for any signs of damage or wear. Replace any worn-out or damaged parts before proceeding with the installation.
- Lubricate all necessary components according to the manufacturer’s recommendations. Proper lubrication is crucial for ensuring smooth operation and extending the lifespan of your lathe and live tooling.
6. Align the turret
Check and adjust the alignment of the turret if necessary. Proper alignment is essential for accurate tool positioning and optimal performance of the live tooling.
7. Follow manufacturer’s instructions
Refer to the manufacturer’s instructions for your specific live tooling kit. Follow the step-by-step guidelines provided to ensure a correct and secure installation.

8. Conduct a test run
After installing the live tooling, run a test to ensure everything is functioning properly. Check for any unusual noises, vibrations, or issues with the tool operation. Make any necessary adjustments before starting any actual machining.
Preparing your lathe properly before installing live tooling is crucial for a successful integration. By following these steps and referring to the manufacturer’s instructions, you can ensure a smooth and efficient installation process.
Choose the Right Live Tooling for Your Lathe
Adding live tooling to your lathe can greatly expand the capabilities of your machine, allowing you to perform milling, drilling, and other operations in addition to traditional turning. However, it’s important to choose the right live tooling for your lathe to ensure compatibility and optimal performance.
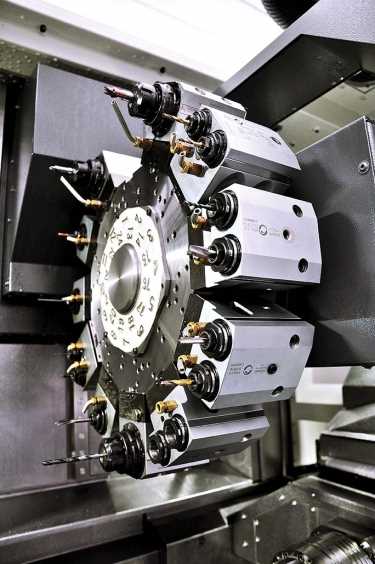
Consider the Type of Turret
The first step in choosing the right live tooling for your lathe is to consider the type of turret your machine has. There are two main types: turret-style and gang-style. Turret-style lathes have a stationary turret that holds the live tooling, while gang-style lathes have a moving gang plate that holds the tools. Make sure you choose live tooling that is compatible with the type of turret on your lathe.
Determine the Tool Holder Size
Next, you’ll need to determine the size of the tool holder for your live tooling. This will depend on the size and specifications of your lathe’s spindle. Measure the diameter of your lathe’s spindle and find a tool holder that matches that size. It’s important to choose a tool holder that fits securely to ensure optimal performance and safety.

Consider the Tooling Type
Live tooling is available in a variety of types, including turning tools, milling tools, drilling tools, and more. Consider the types of operations you plan to perform on your lathe and choose the appropriate tooling. For example, if you need to perform milling operations, choose live tooling with milling capabilities. It’s also worth considering modular tooling systems that allow you to quickly change tool heads for different operations.
Check Compatibility with Machine Controls
Before purchasing live tooling, verify that it is compatible with your lathe’s machine controls. Some live tooling requires specific control systems or software to operate properly. Check with the manufacturer or supplier to ensure compatibility with your lathe’s controls.
Consider the Quality and Reputation of the Manufacturer
Finally, consider the quality and reputation of the manufacturer when choosing live tooling for your lathe. Look for manufacturers with a proven track record of producing high-quality, reliable tooling. Read reviews and ask for recommendations from others in the industry to ensure you’re choosing a reputable manufacturer.
Conclusion
When choosing live tooling for your lathe, consider the type of turret, determine the tool holder size, consider the tooling type, check compatibility with machine controls, and consider the quality and reputation of the manufacturer. Taking the time to choose the right live tooling will ensure compatibility, optimal performance, and long-lasting use of your lathe.
Install the Live Tooling on Your Lathe
Once you have purchased the live tooling for your lathe, it’s time to install it. Follow these step-by-step instructions to ensure a successful installation:
- Begin by turning off the power to your lathe and disconnecting it from the power source for safety.
- Locate the tool turret on your lathe. This is where the live tooling will be installed. Ensure that the turret is clean and free from any debris.
- Inspect the live tooling to ensure that it is in good condition and all components are present.
- Align the mounting holes on the live tooling with the holes on the tool turret. Make sure that the live tooling is positioned correctly and securely.
- Insert the mounting bolts through the holes and tighten them securely using the appropriate tools.
- Connect the necessary hydraulic or pneumatic lines to the live tooling, if required. Follow the manufacturer’s instructions for proper connection.
- Double-check all connections and ensure that everything is tightened properly.
- Reconnect the power to your lathe and turn it on. Test the live tooling to make sure it is functioning correctly.
- If everything is working properly, you’re ready to start using your lathe with live tooling!
Remember to always follow the manufacturer’s instructions and safety guidelines when installing live tooling on your lathe. Improper installation or operation can result in damage to your lathe or injury to yourself.
Calibrate and Test the Live Tooling
Once you have installed the live tooling onto your lathe, it is important to calibrate and test it before using it for machining operations. This ensures that the live tooling is aligned correctly and functioning properly.
1. Alignment
Start by aligning the live tooling with the lathe spindle. Use a dial indicator to check the runout of the live tooling. Adjust the alignment as necessary until the runout is within acceptable limits.
2. Test Rotation
Next, test the rotation of the live tooling. Activate the rotation mechanism and observe the direction and speed of rotation. Ensure that the live tooling rotates smoothly and without any excessive vibration or noise.
3. Cutting Performance
Now it’s time to test the cutting performance of the live tooling. Select a test piece of material and set up a machining operation. Use the live tooling to perform the machining operation and pay attention to the quality of the cuts. Ensure that the live tooling is able to cut smoothly and accurately.
4. Tool Change
If you plan to use multiple live tools, it is important to test the tool change process. Remove the current live tool and install a different one. Test the tool change mechanism and ensure that it is smooth and efficient. Also, check the alignment of the new live tool after installation.
5. Safety Precautions
Always remember to follow safety precautions when working with live tooling. Wear appropriate personal protective equipment, such as safety goggles and gloves. Keep your hands and fingers away from the rotating live tooling to avoid any accidents.
By calibrating and testing the live tooling before use, you can ensure its proper functioning and optimize its performance during machining operations. This will help you achieve accurate and precise results.
Learn How to Operate Your Lathe with Live Tooling
Operating a lathe with live tooling can greatly enhance your machining capabilities, allowing you to perform complex operations and produce more intricate parts. In this guide, we will walk you through the steps of operating your lathe with live tooling, ensuring that you have a solid understanding of the process.
Step 1: Familiarize Yourself with the Machine
Before you start operating your lathe with live tooling, it is important to familiarize yourself with the machine and its components. Take the time to read the user manual and understand the various controls, including the spindle, turret, and tool holders.
Step 2: Prepare the Workpiece
Once you are comfortable with the machine, it’s time to prepare the workpiece. Determine the dimensions and specifications of the part you want to machine, and secure it firmly in the lathe using a chuck or collet. Make sure the workpiece is properly aligned and centered.
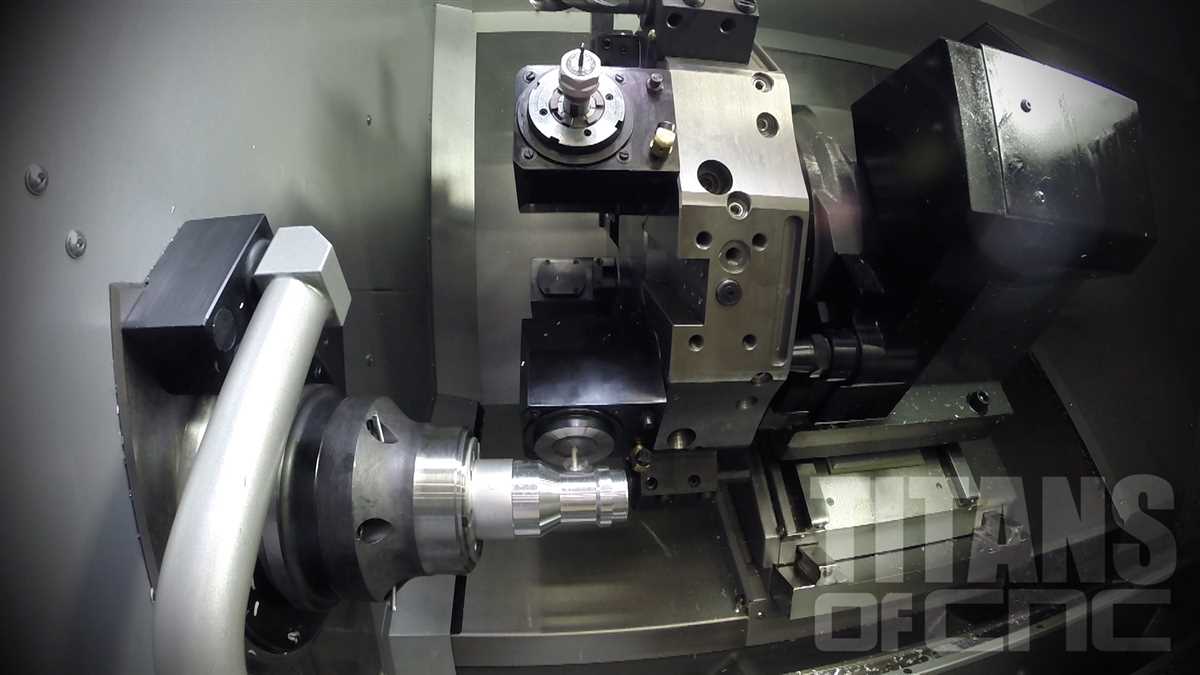
Step 3: Set Up the Live Tooling
Next, you need to set up the live tooling on your lathe. This typically involves inserting the appropriate tool holder into the turret and securing it in place. Ensure that the tool holder is aligned correctly and tighten the locking mechanism.
Step 4: Configure the Control Panel
Now it’s time to configure the control panel of your lathe. Use the interface to select the desired spindle speed, feed rate, and tool path. Make sure to consult the user manual for specific instructions on how to navigate the control panel and adjust the settings accordingly.
Step 5: Start Machining
With everything set up and configured, you can now start machining. Engage the spindle and slowly move the tool towards the workpiece using the control panel or manual controls. Pay attention to the cutting depth and feed rate to ensure accurate and precise machining.
Step 6: Monitor the Machining Process
While the lathe is in operation, it is important to closely monitor the machining process. Keep an eye on the tool position, cutting forces, and any potential issues that may arise. Make adjustments as needed to ensure optimal results.
Step 7: Finish and Inspect the Part
Once the machining is complete, carefully remove the part from the lathe and inspect it for any defects or imperfections. Use measuring tools to verify the dimensions and tolerance requirements. Make any necessary adjustments or improvements before moving on.
Step 8: Clean and Maintain the Lathe
After using live tooling on your lathe, it is important to clean and maintain the machine. Remove any chips, debris, or coolant from the work area and lubricate the moving parts as necessary. Regularly inspect the lathe for signs of wear and perform routine maintenance tasks to prolong its lifespan.
By following these steps, you can effectively operate your lathe with live tooling and unlock its full potential. Practice regularly and continue learning about different techniques and applications to further enhance your machining skills.
Explore Different Applications for Live Tooling on Your Lathe
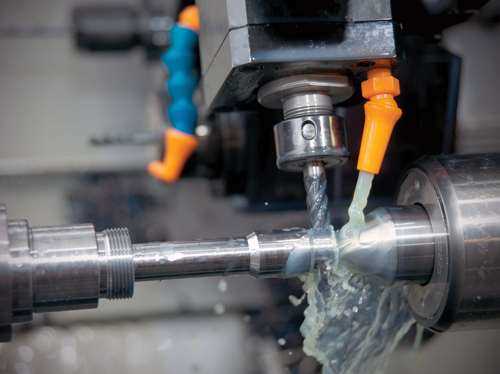
1. Drilling
One of the most common applications for live tooling on a lathe is drilling. With live tooling, you can perform both axial and radial drilling operations directly on the lathe, eliminating the need for secondary drilling operations. This allows for increased efficiency and accuracy in your machining process.
2. Milling
Live tooling also opens up the possibility of performing milling operations on your lathe. By using live tooling with a milling attachment, you can machine complex features, such as slots, keyways, and contours, directly on the lathe. This eliminates the need for dedicated milling machines and simplifies your workflow.
3. Tapping
Another application for live tooling is tapping. With live tooling, you can tap holes directly on the lathe, ensuring accurate thread pitches and eliminating the need for manual tapping operations. This saves time and increases the efficiency of your machining process.
4. Boring
Live tooling can also be used for boring operations on a lathe. By using a boring bar with live tooling, you can accurately bore holes to precise dimensions, achieving tight tolerances and smooth finishes. This eliminates the need for separate boring operations and streamlines your machining process.
5. Knurling
Live tooling can also be used for knurling operations on your lathe. Knurling is a process used to create a textured pattern on the surface of a workpiece, providing better grip and aesthetics. By using live tooling with a knurling attachment, you can easily add knurled features to your parts.
6. Facing
Live tooling can be used to perform facing operations on a lathe. With live tooling, you can face the end of a workpiece to create a smooth, flat surface. This is useful for creating parts with precise lengths or preparing surfaces for additional operations, such as threading or grooving.
7. Parting
Live tooling can also be used for parting operations on a lathe. Parting is the process of cutting a workpiece into separate pieces. With live tooling, you can perform parting operations directly on the lathe, eliminating the need for additional manual or secondary operations.
8. Grooving
Live tooling can be used for grooving operations on a lathe. Grooving is the process of cutting a narrow groove or channel on the surface of a workpiece. With live tooling, you can easily machine grooves of different sizes and depths, adding functionality and visual appeal to your parts.
Overall, live tooling on your lathe provides a wide range of applications and capabilities. By exploring and utilizing these different applications, you can enhance the productivity, efficiency, and versatility of your machining process.
Maintain and Troubleshoot Your Live Tooling Setup
Regular Maintenance
To ensure optimal performance and longevity of your live tooling setup, regular maintenance is essential. Here are some maintenance tasks you should perform:
- Cleanliness: Keep the live tooling area clean from chips, debris, and coolant buildup. Regularly inspect and clean the live tooling components to prevent any blockages or malfunctions.
- Lubrication: Apply lubrication according to the manufacturer’s recommendations to reduce friction and wear. Regularly check and replenish lubricant levels to ensure smooth operation.
- Inspection: Periodically inspect all components of the live tooling setup, including the tool holder, spindle, and bearings. Look for signs of wear, damage, or misalignment. Replace any worn or damaged parts promptly.
- Tightening: Check and tighten all fasteners, clamps, and connectors regularly to maintain proper alignment and prevent loosening during operation.
- Calibration: Calibrate the live tooling setup as recommended by the manufacturer or as needed. This ensures accurate and consistent performance.
Troubleshooting
Even with regular maintenance, issues may arise with your live tooling setup. Here are some common problems and troubleshooting steps:
- Tool chatter or vibration: This can be caused by misalignment, worn bearings, or improper tooling. Check the alignment of the live tooling components and replace any worn or damaged bearings. Make sure the tooling is properly secured and check for proper tool engagement.
- Tool slippage: If the tools are slipping or not holding their position, check the clamping mechanism. Tighten any loose clamps or replace worn clamping components.
- Poor surface finish: If the surface finish is not satisfactory, it may be due to dull or improperly aligned tools. Check the tooling for sharpness and alignment, and replace or adjust as necessary.
- Excessive noise: Unusual or excessive noise can indicate problems with the bearings, lubrication, or alignment. Inspect and lubricate the bearings, and check the alignment of the components.
- Electrical or communication issues: If there are electrical or communication problems with the live tooling, check the connections, cables, and controller settings. Ensure that the correct settings and protocols are being used.
Always refer to the manufacturer’s documentation and guidelines for specific troubleshooting steps and maintenance procedures for your live tooling setup. Proper maintenance and timely troubleshooting can help ensure smooth operation and prolong the life of your live tooling components.
FAQ
What is live tooling?
Live tooling is the capability of a lathe machine to operate tools such as drills, end mills, and taps in addition to traditional turning operations.
Why would I need live tooling on my lathe?
Live tooling allows you to perform multiple operations on a workpiece without having to remove it from the lathe, saving time and increasing efficiency.
Can live tooling be added to any lathe?
Live tooling can be added to most modern CNC lathes. However, retrofitting older manual lathes with live tooling may not be possible or practical.
How much does it cost to add live tooling to a lathe?
The cost of adding live tooling to a lathe can vary depending on the make and model of the lathe, as well as the specific live tooling attachments desired. It is best to consult with a lathe manufacturer or dealer for an accurate cost estimate.
How difficult is it to install live tooling on a lathe?
Installing live tooling on a lathe can be a complex process that requires technical knowledge and expertise. It is recommended to have a qualified technician or engineer perform the installation.
What are the benefits of using live tooling on a lathe?
The benefits of using live tooling on a lathe include increased productivity, reduced setup time, improved part accuracy, and the ability to perform a wider range of machining operations.
Are there any disadvantages to adding live tooling to a lathe?
Adding live tooling to a lathe can increase the complexity and cost of the machine. It may also require additional training for operators to learn how to use the live tooling effectively.
Video


Meet Harrison Clayton, a distinguished author and home remodeling enthusiast whose expertise in the realm of renovation is second to none. With a passion for transforming houses into inviting homes, Harrison's writing at https://thehuts-eastbourne.co.uk/ brings a breath of fresh inspiration to the world of home improvement. Whether you're looking to revamp a small corner of your abode or embark on a complete home transformation, Harrison's articles provide the essential expertise and creative flair to turn your visions into reality. So, dive into the captivating world of home remodeling with Harrison Clayton and unlock the full potential of your living space with every word he writes.