A Step-by-Step Guide to Using a Lathe – Mastering the Basics

If you’re interested in woodworking or machining, learning how to use a lathe is an essential skill to have. A lathe is a versatile machine that can be used to shape and finish a variety of projects, from bowls and spindles to complex woodturning designs. While using a lathe may seem intimidating at first, it’s actually a straightforward process that can be mastered with practice and patience.
In this step-by-step guide, we’ll walk you through the basics of using a lathe, from setting up the machine to safely operating it. We’ll cover essential tools and techniques, as well as provide tips and tricks to help you get the most out of your lathe. Whether you’re a beginner or an experienced woodworker looking to improve your skills, this guide will serve as a valuable resource.
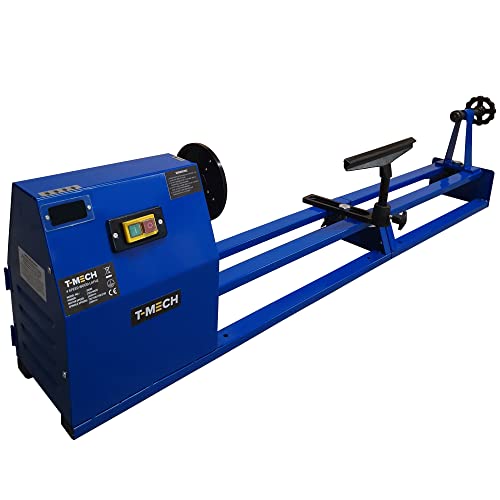
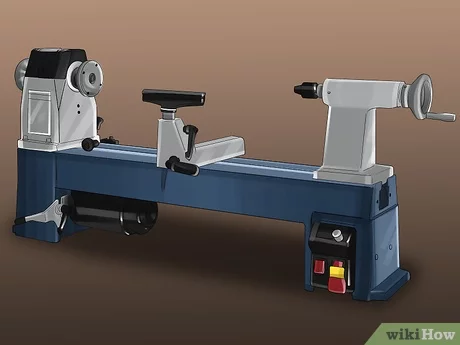
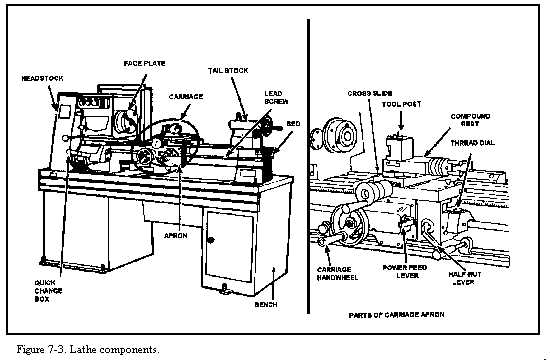
Before we dive into the details, it’s important to understand the different parts of a lathe. A lathe consists of a bed, headstock, tailstock, tool rest, and a motor. The bed is the main base of the lathe, while the headstock houses the motor and spindle. The tailstock is used to support longer pieces of material, and the tool rest is where you’ll position your tools while cutting or shaping your workpiece. Familiarizing yourself with these components will help you navigate the lathe with confidence.
Choosing the Right Lathe Machine
Factors to Consider
- Size: One of the first factors to consider when choosing a lathe machine is the size. The size of the machine will depend on the types and sizes of projects you plan to work on. If you primarily work on small projects, a mini lathe may be sufficient. However, if you work on larger projects, such as furniture making or bowl turning, a larger lathe may be necessary.
- Power: The power of the lathe machine is another important consideration. The power will determine the speed and capability of the machine. Higher horsepower machines are capable of handling larger and tougher materials.
- Speed: The speed at which the lathe machine operates is also important. Different types of turning projects require different speeds. A lathe machine with multiple speed settings will give you more flexibility and control over your work.
- Bed Length: The bed length of the lathe machine is the distance between the headstock and the tailstock. A longer bed length allows you to work on longer materials and turn larger projects.
- Swing: The swing of the lathe machine refers to the maximum diameter of the workpiece that can be turned. The swing will determine the size of the projects you can work on.
- Features: Consider the additional features that the lathe machine offers. Some machines may come with digital readouts, indexing capabilities, or variable speed controls, which can make your work easier and more precise.
Types of Lathe Machines
There are several types of lathe machines available, each designed for specific purposes:
- Benchtop Lathe: These are compact and lightweight machines that are perfect for small projects and hobbyists.
- Mini Lathe: Mini lathes are smaller versions of benchtop lathes, ideal for intricate and delicate work.
- Wood Lathe: Wood lathes are specifically designed for turning wood and are commonly used by woodworkers and craftsmen.
- Metal Lathe: Metal lathes are heavy-duty machines designed for turning metal and other harder materials.
- CNC Lathe: CNC lathes are computer-controlled machines that offer precision and automation, suitable for advanced and complex projects.
Price Range
The price of a lathe machine can vary significantly depending on its size, power, features, and brand. Entry-level benchtop or mini lathes can range from $200 to $1000. Mid-range wood or metal lathes typically cost between $1000 and $5000. High-end CNC lathes can range from $10,000 to several hundred thousand dollars.

Conclusion
Choosing the right lathe machine requires careful consideration of factors such as size, power, speed, bed length, swing, and additional features. Knowing the type of projects you will be working on and your budget will help you make an informed decision. Whether you’re a hobbyist or a professional, finding the right lathe machine will enhance your woodworking or metalworking experience.
Preparing the Workpiece
Before you can start using the lathe, it is important to properly prepare the workpiece you will be working on. Taking the time to prepare the workpiece will ensure the best possible results and help to avoid any accidents or damage to the lathe.
Gather the Necessary Tools
- Measuring Tools: You will need measuring tools such as calipers or a dial indicator to accurately measure the dimensions of the workpiece.
- Cutting Tools: Depending on the type of workpiece and the desired outcome, you will need different types of cutting tools such as gouges or chisels.
- Safety Equipment: Always wear appropriate safety equipment, including safety glasses, gloves, and a dust mask to protect yourself from any potential hazards.
Inspect the Workpiece
Before placing the workpiece on the lathe, inspect it for any defects or imperfections. This includes checking for cracks, knots, or other abnormalities that could affect the turning process.
Measure and Mark the Workpiece
Use the measuring tools to determine the dimensions of the workpiece. Mark the areas that need to be turned or shaped with reference lines or dots. This will serve as a guide during the turning process.

Secure the Workpiece on the Lathe
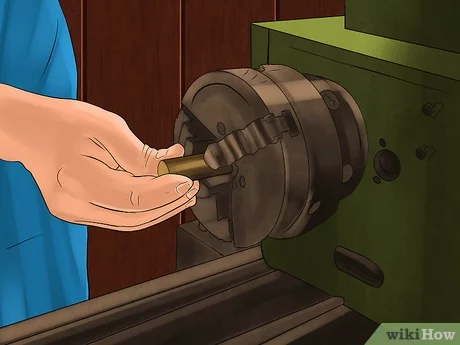
Once you have properly measured and marked the workpiece, securely attach it to the lathe using appropriate holding devices such as a chuck or faceplate. Make sure the workpiece is centered and secured tightly to prevent any movement during the turning process.
Protective Measures
Before starting the lathe, it is important to take some protective measures to ensure your safety and the longevity of the lathe:
- Make sure the lathe is set up in a well-ventilated area to avoid inhaling any dust or debris.
- Ensure all guards are in place and functioning properly before operating the lathe.
- Keep the lathe clean and free from any excess debris or materials that could interfere with the turning process.
- Follow all safety guidelines and instructions provided by the manufacturer.
By properly preparing the workpiece and taking necessary precautions, you can ensure a safe and successful turning process on the lathe.

Setting Up the Lathe
1. Safety First
Before you begin setting up the lathe, it’s important to prioritize safety. Make sure you are wearing the necessary protective gear, such as safety goggles and hearing protection, to protect yourself from potential hazards.
2. Positioning the Lathe
Place the lathe on a sturdy workbench or stand that can support its weight. Ensure that there is enough space around the lathe for you to move freely and operate the machine comfortably.
3. Leveling the Lathe
Use a spirit level to ensure that the lathe is level and stable. Adjust the height of the lathe’s legs or use shims if necessary. A level lathe will produce more accurate and consistent results.
4. Securing the Lathe
Once the lathe is positioned and leveled, secure it to the workbench or stand using bolts or clamps. This will prevent the lathe from moving or vibrating during operation.
5. Cleaning and Lubricating
Before you start using the lathe, clean the machine and lubricate any moving parts. This will help reduce friction and extend the lifespan of the lathe. Refer to the manufacturer’s instructions for the recommended cleaning and lubrication procedures.

6. Checking the Accessories
Inspect all the accessories that come with the lathe, such as chucks, faceplates, and tool rest. Ensure they are in good condition and properly installed. If any accessories are damaged or missing, replace them before using the lathe.
7. Setting Up the Tool Rest
Position the tool rest parallel to the lathe bed and secure it in place. Adjust the distance between the tool rest and the workpiece based on the desired cutting depth and the type of turning operation you will be performing.
8. Installing the Cutting Tools
Choose the appropriate cutting tool for your project and install it securely in the tool post. Make sure the cutting edge is sharp and properly aligned with the workpiece. Refer to the lathe’s manual for guidance on installing and adjusting the cutting tools.
9. Checking the Speed and Direction
Determine the appropriate speed for the lathe based on the type of material you will be turning and the desired cutting operation. Set the lathe to the recommended speed and ensure that it is rotating in the correct direction (usually clockwise).
10. Final Inspection


Before you start using the lathe, take a final inspection of the setup. Ensure that all safety guards are in place and functioning properly. Double-check that the workpiece is securely mounted and there are no obstructions or loose objects near the lathe.
Once you have completed these steps, you are ready to start using the lathe and master the basics of this versatile woodworking tool.
Understanding Lathe Tools and Accessories
When it comes to using a lathe, having the right tools and accessories is essential for achieving the best results. Whether you are a beginner or an experienced woodworker, understanding the different types of lathe tools and accessories available can help enhance your woodworking projects.
Lathe Tools
There are various types of lathe tools that are used for different purposes. Some common lathe tools include:
- Turning Tools: These are the most commonly used tools on a lathe. They are used to shape and create details on the workpiece. Turning tools come in different shapes and sizes, such as gouges, skews, and parting tools.
- Chisels: Chisels are used for cutting, trimming, and shaping the workpiece. They are available in different blade shapes, such as gouge, skew, and parting chisels.
- Drills: Drills are used to create holes in the workpiece. They come in various sizes and types to accommodate different hole diameters and materials.
- Scrapers: Scrapers are used for smoothing and finishing the workpiece. They are designed to remove small amounts of material and leave a smooth surface.
Lathe Accessories
In addition to lathe tools, there are also various accessories that can enhance the functionality and versatility of your lathe. Some common lathe accessories include:
- Chucks: Chucks are used to hold the workpiece securely and allow for easy rotation. They come in different sizes and types, such as four-jaw chucks and collet chucks, to accommodate different workpiece sizes and shapes.
- Faceplates: Faceplates are used to secure the workpiece to the lathe. They are typically attached to the headstock and provide a flat surface for holding irregularly shaped workpieces.
- Steady Rests: Steady rests are used to support long and thin workpieces that may vibrate or flex during turning. They help to stabilize the workpiece and improve the quality of the turning operation.
- Centers: Centers are used to support the workpiece during turning. They are typically made of hardened steel and provide a point of contact for the workpiece to rotate around.
- Tool Rests: Tool rests are used to support the lathe tool during turning. They are adjustable and provide a stable platform for the tool to rest on while shaping the workpiece.
Conclusion
Understanding the various lathe tools and accessories available is essential for achieving the best results in your woodworking projects. Whether you are shaping, cutting, drilling, or finishing, having the right tools and accessories can make a significant difference in the quality of your work. Remember to choose tools and accessories that are suitable for your specific lathe and project requirements.
Safe Operation of the Lathe
When using a lathe, it is important to prioritize safety to prevent accidents and injuries. By following these guidelines, you can ensure a safe operating environment for yourself and others.
Wear Safety Equipment
- Always wear safety glasses to protect your eyes from flying debris.
- Wear ear protection to reduce the risk of hearing damage from the loud noise of the lathe.
- Use a dust mask or a respirator to avoid inhaling fine particles and dust.
- Wear appropriate clothing that is not loose or baggy to prevent it from getting caught in the lathe’s moving parts.
Familiarize Yourself with the Lathe
Prior to operating the lathe, it is essential to familiarize yourself with its components and their functions. Read the manufacturer’s instructions and understand how to properly operate the lathe. Ensure that you know how to stop the lathe quickly in case of an emergency.
Secure the Workspace
- Keep the lathe and the surrounding area clean and free of clutter to prevent tripping hazards.
- Ensure that the lathe is properly secured to the workbench or floor to minimize vibrations.
- Do not operate the lathe near flammable materials or liquids.
- Provide ample lighting in the workspace to improve visibility.
Inspect and Maintain the Lathe

- Before each use, inspect the lathe for any signs of damage or wear. Do not operate the lathe if you notice any issues.
- Regularly clean and lubricate the lathe to keep it in good working condition.
- Replace worn or damaged parts immediately.
Use Proper Techniques
- Always secure the workpiece properly using the lathe’s chuck or other holding devices.
- Start the lathe at the lowest speed and gradually increase it as needed.
- Maintain a firm grip on the tools and keep your fingers away from the cutting area.
- Avoid wearing gloves while operating the lathe as they can get caught in the rotating parts.
Know Your Limits
Lastly, it is important to know your skill level and work within your limits. If you are unfamiliar with a particular operation or technique, seek guidance from an experienced individual before attempting it. Never rush and always take the necessary precautions to ensure your own safety.
Basic Lathe Techniques
1. Facing
Facing is the process of cutting a flat surface perpendicular to the rotational axis of the workpiece. This technique is commonly used to create a smooth and even surface on the end of a workpiece. The facing tool is positioned and secured in the tool post, and the lathe is set to a slow speed. The tool is then brought into contact with the workpiece and moved along its surface to remove material until the desired flat surface is achieved.
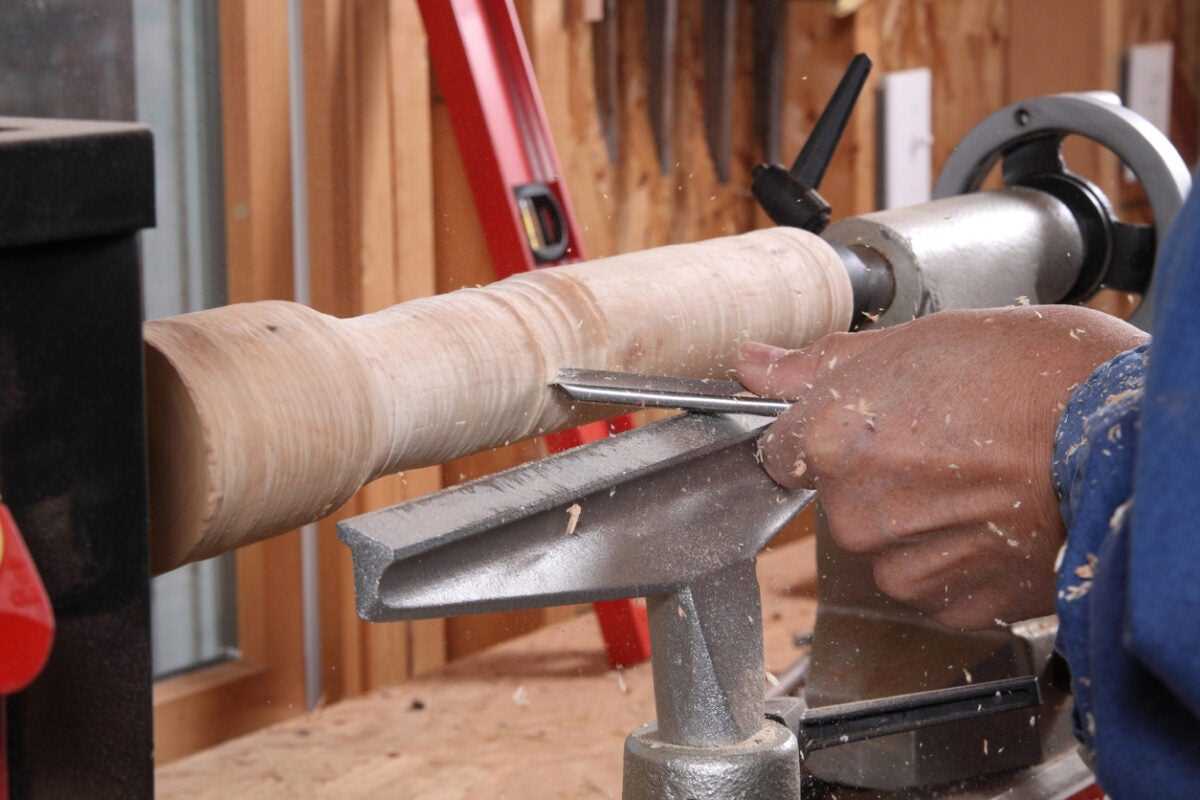
2. Turning
Turning is one of the most fundamental lathe techniques. It involves removing material from the outer diameter of the workpiece to create a cylindrical shape. The lathe is set to an appropriate speed, and the tool is positioned on the tool rest. The tool is gradually brought into contact with the workpiece and moved along its length to remove material and create the desired shape. Turning can be used to create various forms such as straight, tapered, or curved surfaces.
3. Taper Turning
Taper turning is the process of gradually reducing the diameter of a cylindrical workpiece to create a tapered shape. This technique is often used to create parts like tool handles or machine parts with an angled or tapered design. To taper turn, the compound rest is adjusted to the desired angle, and the tool is positioned on the tool rest. The lathe is set to an appropriate speed, and the tool is brought into contact with the workpiece. As the workpiece rotates, the tool is fed at an angle to remove material and create the taper.
4. Drilling
Lathe machines can also be used for drilling holes in workpieces. A drill bit is secured in the tailstock, and the workpiece is positioned and clamped on the lathe bed. The tailstock is brought forward, and the drill bit is fed into the workpiece to create the hole. The lathe can be adjusted to control the drilling speed and depth. Drilling on a lathe allows for precise and accurate hole creation.
5. Parting Off
Parting off is the process of cutting a workpiece to separate it into two parts. This technique is commonly used to create separate pieces, remove excess material, or create grooves. Parting off is typically done using a parting tool, which is positioned in the tool post. The tool is gradually fed into the workpiece, and the lathe is set to an appropriate speed. As the tool cuts through the workpiece, the parts are separated.
6. Thread Cutting
Lathe machines can also be used for cutting threads on workpieces. This technique is often used to create threaded screws, bolts, or other fastening components. To cut threads on a lathe, a thread-cutting tool is positioned in the tool post. The lathe is set to a slow speed, and the tool is gradually fed into the workpiece to create the desired thread profile. Thread cutting requires precise positioning and accurate tool control to create threads with the correct pitch and depth.
7. Knurling
Knurling is a process used to create a textured pattern on the surface of a workpiece for improved grip or aesthetics. This technique is often applied to cylindrical objects such as handles, knobs, or handwheels. Knurling is done using a specialized knurling tool, which is positioned in the tool post. The tool is brought into contact with the rotating workpiece, and the knurls on the tool press against the surface to create the desired pattern. Knurling can be performed in straight or diamond patterns, depending on the desired outcome.
8. Boring
Boring is the process of enlarging an existing hole or creating a precise cylindrical cavity in a workpiece. This technique is commonly used to create accurate and precise bores in parts such as engine cylinders or bearing housings. Boring is achieved using a boring tool, which is positioned in the tool post. The tool is gradually fed into the workpiece while it rotates, removing material and creating the desired cavity or enlarged hole.
9. Sanding and Polishing
In addition to cutting and shaping, lathes can also be used for sanding and polishing workpieces. By attaching sandpaper or polishing pads to the lathe’s spindle or chuck, the workpiece can be rotated and brought into contact with the abrasive material. This allows for the smoothing, shaping, or polishing of the workpiece’s surface. Sanding and polishing on a lathe can be done by hand or with the use of specialized sanding or polishing attachments.
10. Use of Lathe Accessories
Lathe machines often come with a variety of accessories that can expand their capabilities and enable specific operations. These accessories include attachments for cutting gears, grinding wheels for sharpening tools, steady rests for supporting long workpieces, and chucks for securely holding irregularly shaped workpieces. Understanding and using these accessories can enhance the versatility and functionality of a lathe.
Advanced Lathe Techniques
1. Thread Cutting
Thread cutting is an advanced lathe technique that allows you to create threaded parts. This technique is commonly used in the production of screws, bolts, and other threaded components.
Steps for thread cutting:
- Choose the appropriate threading tool and insert it into the lathe.
- Set the lathe to the desired thread pitch.
- Create a starting groove by hand-feeding the tool into the workpiece.
- Engage the automatic feed mechanism and make the thread cuts by traversing the tool along the workpiece.
- Repeat the process until the desired length of the thread is achieved.
2. Faceplate Turning
Faceplate turning is a technique used to turn irregularly shaped or oversized workpieces that cannot be held securely using a chuck. This technique is often used in woodworking to create bowls, vases, and other hollow forms.
Steps for faceplate turning:
- Mount the workpiece securely on the faceplate using screws or other fasteners.
- Attach the faceplate to the lathe spindle and ensure it is balanced and centered.
- Begin turning the workpiece, starting from the center and working outwards.
- Use appropriate gouges, chisels, and other cutting tools to shape the workpiece according to your design.
- Sand and finish the turned piece to achieve the desired smoothness and appearance.
3. Parting Off
Parting off is a technique used to separate a finished workpiece from the rest of the material. This technique is useful when creating multiple parts from a single piece or when finishing a project.
Steps for parting off:
- Select a narrow parting tool and set it at the desired depth of cut.
- Position the tool perpendicular to the workpiece and align it with the parting line.
- Gently engage the tool and start cutting through the workpiece, ensuring a steady and controlled feed rate.
- Continue cutting until the workpiece is completely separated.
- Remove any burrs or sharp edges left from the parting operation.
4. Boring
Boring is a technique used to enlarge or refine existing holes in a workpiece. This technique is commonly used to create cylindrical holes with precise dimensions.
Steps for boring:
- Select an appropriate boring tool, such as a boring bar or an adjustable boring head.
- Align the tool with the existing hole and securely mount it on the lathe.
- Engage the lathe’s automatic feed mechanism and start cutting, moving the tool back and forth along the length of the hole to remove material.
- Measure the diameter of the hole with calipers or a micrometer to ensure it meets the desired specifications.
- Continue boring and measuring until the desired hole size is achieved.
5. Off-center Turning
Off-center turning is a technique used to create unique and visually appealing turned pieces with off-center designs. This technique allows you to create asymmetric or eccentric shapes.
Steps for off-center turning:
- Mount the workpiece securely on the lathe, using either a chuck or faceplate depending on the shape and size of the workpiece.
- Select an off-center turning attachment, such as a crank or an offset chuck, and attach it to the lathe from which you will rotate the workpiece.
- Turn on the lathe and adjust the offset to the desired amount.
- Use cutting tools to shape the workpiece, taking advantage of the off-center rotation to create unique design elements.
- Sand and finish the turned piece to achieve the desired smoothness and appearance.
6. Indexing
Indexing is a technique used to create precise divisions or patterns on a workpiece. This technique is commonly used to create gears, flutes, or other repeating patterns.
Steps for indexing:
- Attach an indexing attachment, such as an indexing wheel or a dividing plate, to the lathe.
- Secure the workpiece on the lathe using a chuck or faceplate.
- Select the desired number of divisions or pattern and engage the indexing mechanism.
- Use appropriate cutting tools to create the desired pattern, following the indexing mechanism to ensure accurate spacing.
- Continue cutting until the pattern is complete.
| Technique | Common Applications |
|---|---|
| Thread Cutting | Screws, bolts, threaded components |
| Faceplate Turning | Bowls, vases, hollow forms |
| Parting Off | Making multiple parts, finishing projects |
| Boring | Enlarging or refining holes |
| Off-center Turning | Creating asymmetric or eccentric shapes |
| Indexing | Gears, flutes, repeating patterns |
Finishing and Polishing the Workpiece
Once you have completed shaping and turning the workpiece on the lathe, the next step is to finish and polish it to achieve a smooth and professional-looking surface. This process involves removing any tool marks or imperfections and enhancing the color and sheen of the wood.
Sanding
The first step in finishing the workpiece is sanding. Sanding helps to remove any rough areas, tool marks, or unevenness on the surface. You can start with a coarse grit sandpaper and gradually work your way up to a finer grit for a smoother finish. Make sure to sand with the grain of the wood to avoid scratching or damaging the surface.
Tip: Use a sanding block or pad to ensure even pressure and avoid over-sanding in certain areas.
Applying a Finish
After sanding, you can apply a finish to protect the surface and enhance the appearance of the wood. There are various finishes available, such as oils, varnishes, lacquers, or waxes. The choice of finish will depend on the desired look, durability, and ease of application.
- Oils: Oils penetrate the wood and provide a natural and matte finish. They enhance the grain and color of the wood, but may require multiple coats for adequate protection.
- Varnishes: Varnishes create a durable and glossy finish. They can be brushed or sprayed on and provide excellent protection against moisture and wear.
- Lacquers: Lacquers also offer a glossy finish and quick drying time. They are typically applied with a spray gun and provide a hard protective layer.
- Waxes: Waxes give the wood a soft and smooth finish. They are easy to apply, but may require regular maintenance to maintain their appearance.
Polishing
After applying the finish, you can further enhance the shine and smoothness of the workpiece by polishing it. Polishing can be done using a soft cloth or a buffing wheel attached to the lathe. Apply a polishing compound or wax and gently buff the surface in circular motions until you achieve the desired shine.
Final Inspection
Once you have finished sanding, applying the finish, and polishing, it is important to carefully inspect the workpiece for any remaining imperfections or areas that may need touch-ups. Make any necessary adjustments and ensure that the surface is smooth and blemish-free before considering the project complete.
Note: Always follow the manufacturer’s instructions when applying finishes and take proper safety precautions, such as wearing protective gloves and working in a well-ventilated area.
FAQ
What is a lathe and what is it used for?
A lathe is a machine tool that rotates a workpiece on its axis to perform various operations such as cutting, sanding, drilling, and turning. It is used in metalworking, woodworking, and other industries to shape or mold a material into a desired shape.
What are the basic components of a lathe?
The basic components of a lathe include a bed, headstock, tailstock, carriage, and tool post. The bed provides a foundation and supports other components. The headstock houses the main spindle and the gears that control the speed of rotation. The tailstock is used to support the other end of the workpiece. The carriage moves along the bed and holds the cutting tool. The tool post holds the cutting tool and allows for adjustments.
How do you set up a lathe?
To set up a lathe, first, ensure that the lathe is properly secured to the workbench or stand. Then, install the necessary cutting tools and adjust the tool post to the desired height. Make sure the workpiece is properly mounted and centered on the lathe’s spindle. Finally, adjust the speed and feed rate according to the requirements of the workpiece and the operation you will be performing.
What are some safety precautions to take when using a lathe?
When using a lathe, it is important to wear appropriate safety gear such as safety glasses and gloves. Ensure that the workpiece is properly secured before starting the lathe. Keep hands and loose clothing away from the rotating parts. Always use a guard when operating the lathe. Additionally, be cautious of any flying chips or debris and keep a clean work area to prevent tripping hazards.
Video


Meet Harrison Clayton, a distinguished author and home remodeling enthusiast whose expertise in the realm of renovation is second to none. With a passion for transforming houses into inviting homes, Harrison's writing at https://thehuts-eastbourne.co.uk/ brings a breath of fresh inspiration to the world of home improvement. Whether you're looking to revamp a small corner of your abode or embark on a complete home transformation, Harrison's articles provide the essential expertise and creative flair to turn your visions into reality. So, dive into the captivating world of home remodeling with Harrison Clayton and unlock the full potential of your living space with every word he writes.