How to use electric glue gun

An electric glue gun is a versatile tool that can be used for a wide range of DIY projects and crafts. Whether you are a beginner or an experienced crafter, learning how to use an electric glue gun is essential for successful and efficient crafting.
Step 1: Choose the right glue sticks for your project. There are different types of glue sticks available, such as high temperature, low temperature, and multi-temperature. High temperature glue sticks are ideal for materials like wood, metal, and glass, while low temperature glue sticks work best with delicate materials like foam and fabric.
Step 2: Plug in the electric glue gun and allow it to heat up. Most electric glue guns have an indicator light that will let you know when the glue gun is ready to use. This usually takes about 5 minutes.
Step 3: While you wait for the glue gun to heat up, prepare your workspace by placing a protective covering like a silicone mat or a piece of cardboard. This will prevent any glue from sticking to your work surface.
Step 4: Once the glue gun is heated, insert a glue stick into the back of the glue gun. Use the trigger mechanism to feed the glue stick into the heating element. The glue stick will gradually melt in the heating chamber.

Step 5: Squeeze the trigger to apply the melted glue onto your project. Be careful not to touch the nozzle of the glue gun, as it can get extremely hot. Apply the glue in a steady and even motion, making sure to cover the desired area completely.
Remember to work quickly, as the glue tends to harden fast. If you need to reposition or remove the glue, do it before it fully dries.
Step 6: Once you have finished using the glue gun, unplug it from the power source and allow it to cool down. Do not attempt to touch the glue gun or remove the glue stick until it has completely cooled.
Using an electric glue gun can be a fun and rewarding experience, allowing you to create beautiful and functional crafts. By following these steps and practicing proper safety precautions, you can become a master of the glue gun in no time!
What is an electric glue gun?
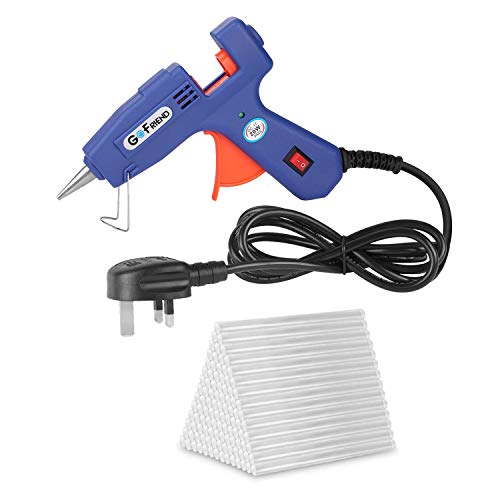
An electric glue gun is a handheld tool that is used to dispense hot adhesive. It is often used for arts and crafts, DIY projects, and even in professional settings. The glue gun is powered by electricity and heats up a solid glue stick, which is then melted and dispensed through a nozzle.

The electric glue gun consists of a body, a trigger, a nozzle, and a built-in heating element. The glue sticks are inserted into the back of the glue gun, and when the trigger is pulled, the glue stick is pushed forward and melted by the heating element. The melted adhesive is then squeezed out through the nozzle, allowing for precise application.
Electric glue guns are widely used because they are convenient and easy to use. They heat up quickly and provide a steady stream of adhesive, making them ideal for tasks that require a strong bond. The glue dries quickly and forms a strong hold on various materials such as paper, fabric, wood, plastic, and metal.
There are different types of electric glue guns available in the market, ranging from small handheld models to larger industrial-grade guns. The size and power output of the glue gun can vary, so it is important to choose the right one for your specific needs. Some glue guns also come with additional features such as adjustable temperature settings and interchangeable nozzles.
When using an electric glue gun, it is important to follow safety precautions. The glue and nozzle can become extremely hot, so it is recommended to wear protective gloves and work in a well-ventilated area. Always unplug the glue gun when not in use and never leave it unattended while it is still hot. It is also important to keep the glue gun out of reach of children.
Overall, an electric glue gun is a versatile tool that can be used for a wide range of projects. Whether you are working on crafts, home repairs, or professional projects, an electric glue gun can provide a strong and reliable bond.

Advantages of using an electric glue gun
An electric glue gun is a versatile and convenient tool that offers many advantages over traditional glue and other adhesive methods. Here are some of the key benefits:
| 1. Efficiency: | Electric glue guns heat up quickly and provide a steady stream of glue, allowing for efficient and fast bonding of materials. This can save you time and effort, especially when working on larger projects. |
| 2. Precision: | The precise application of glue is essential in many projects, and electrical glue guns offer excellent control over the amount and placement of adhesive. This helps to ensure clean and accurate bonding, even in intricate or delicate work. |
| 3. Versatility: | Electric glue guns can be used with a wide range of materials, including wood, plastic, fabric, and metal. This makes them suitable for various crafts, repairs, and DIY projects. |
| 4. Safety: | Unlike traditional glue methods that require open flames or hot surfaces, electric glue guns are designed with safety features such as heat-resistant nozzles and built-in stands. These features reduce the risk of accidents and make the tool safer to use. |
| 5. Reusability: | Electric glue guns use adhesive sticks that can be easily replaced when empty. This means that the tool can be reused multiple times, making it a cost-effective option for long-term use. |
| 6. Portability: | Many electric glue guns are designed to be lightweight and compact, making them easy to carry and use anywhere. This portability allows for greater flexibility in completing projects in different locations. |
Overall, an electric glue gun provides efficiency, precision, versatility, safety, reusability, and portability, making it an essential tool for any DIY enthusiast, crafter, or professional.
How to use an electric glue gun
An electric glue gun is a versatile tool that can be used for a variety of projects. Whether you’re a DIY enthusiast or a professional, knowing how to use an electric glue gun properly is essential. Here’s a step-by-step guide to get you started:
Step 1: Choose the right glue sticks for your project. Electric glue guns typically use either 5/16 inch or 7/16 inch glue sticks. Make sure to read the packaging to ensure compatibility.
Step 2: Plug in the glue gun and switch it on. Most electric glue guns have an indicator light that turns on when it’s ready to use. It’s essential to let the glue gun heat up for a few minutes before using it.

Step 3: Insert a glue stick into the rear of the glue gun. Apply gentle pressure and push the glue stick until it reaches the heating element or trigger mechanism. Ensure that the glue stick is secure and properly seated.
Step 4: Allow the glue gun a few minutes to heat the glue stick. The time may vary depending on the model, so refer to your glue gun’s instructions for specific heating times.
Step 5: Once the glue stick has melted and the glue gun is ready to use, squeeze the trigger gently to dispense the glue. Start with a small amount of glue and increase as needed. Be careful not to apply too much pressure, as it can lead to excessive glue flow.
Step 6: While using the glue gun, be mindful of your safety. Avoid touching the hot glue or the nozzle, as they can cause burns. Work in a well-ventilated area, as the glue may emit fumes.
Step 7: After finishing your project, switch off the glue gun and unplug it from the power source. Allow the glue gun to cool down completely before storing it away.

By following these steps, you’ll be able to use an electric glue gun safely and effectively for all your crafting and repair needs.
Step 1: Preparing the glue gun
Before using the electric glue gun, you will need to prepare it for use. Follow these steps to ensure that the glue gun is ready to use:
- Plug in the glue gun and allow it to heat up. It usually takes a few minutes for the glue gun to reach the desired temperature. Check the user manual or instructions provided with your glue gun for the recommended heating time.
- While the glue gun is heating up, gather the glue sticks that you will be using. Make sure the glue sticks are compatible with your glue gun model. Insert the glue stick into the back of the glue gun, making sure it is secure.
- Place a protective covering, such as newspaper or a silicone mat, on your work surface to catch any drips or spills.
- Check the glue gun to ensure there are no visible cracks or damage. If you notice any damage, do not use the glue gun and contact the manufacturer for further assistance.
- Once the glue gun has reached the desired temperature, a small amount of melted glue may start to ooze out of the nozzle. This is normal and is referred to as “drip feed.” To avoid any mess, place a small tray or piece of cardboard beneath the glue gun’s nozzle.
By preparing the glue gun for use, you will have a hassle-free experience when working on your projects. Make sure to familiarize yourself with the safety instructions and guidelines provided by the manufacturer before using the glue gun.
Step 2: Inserting the glue stick
Now that you have your electric glue gun ready, it’s time to insert the glue stick. Follow these steps to ensure proper insertion:
1. Prepare the glue gun
Before inserting the glue stick, make sure the glue gun is turned off and unplugged. This will prevent any accidental burns or injuries.

2. Locate the glue stick compartment
Most electric glue guns have a removable glue stick compartment located at the rear end of the gun. Look for a latch or button that will release the compartment.
3. Open the compartment
Once you have located the compartment, press the latch or button and open it. Be gentle while doing this to avoid any damage to the compartment or the glue gun.
4. Insert the glue stick
Take a glue stick and ensure it matches the size specified for your glue gun. Insert one end of the glue stick into the open compartment until it reaches the back of the gun.
5. Close the compartment
After inserting the glue stick, close the compartment by pressing it firmly until you hear a click. This indicates that the compartment is securely closed.
6. Allow the glue gun to heat up
Once the glue stick is inserted, plug in the glue gun and turn it on. Allow the glue gun to heat up for a few minutes until the glue stick melts and is ready to use.

Now that the glue stick is properly inserted, you are ready to start using your electric glue gun for various projects. Remember to always handle the glue gun with care and follow safety instructions to prevent accidents.
Step 3: Heating up the glue gun
Before using the electric glue gun, it is important to ensure that it is properly heated up. This will ensure that the glue flows smoothly and effectively.
To begin, plug in the glue gun and switch it on. The indicator light will usually turn on indicating that the gun is receiving power.
Allow the glue gun a few minutes to heat up. During this time, the glue will start to melt and become more liquid. It is essential to let the gun heat up fully to ensure that the glue is at the optimal temperature for use.
While waiting for the glue gun to heat up, prepare your work area. Lay down newspaper or a protective mat to catch any drips or spills. This will make clean-up easier.
Once the glue gun is heated up, carefully check the temperature. Use caution as the nozzle may be hot. The glue gun is now ready for use.
Important safety tip: Always remember to unplug the glue gun when you are finished using it to prevent any accidents or injuries.
FAQ
What is an electric glue gun?
An electric glue gun is a tool that uses heat to melt a glue stick and dispense the adhesive. It is commonly used for crafts, DIY projects, and repairs.
How do I use an electric glue gun?
To use an electric glue gun, first plug it in and allow it to heat up. Insert a glue stick into the back of the gun and wait for the glue to melt. Squeeze the trigger to dispense the adhesive onto the desired surface. Be careful as the glue can be hot.
Can I use an electric glue gun on different materials?
Yes, an electric glue gun can be used on various materials such as plastic, wood, fabric, and metal. However, it is important to ensure that the glue is suitable for the specific material. Different glues have different bonding strengths and properties.
Are there any safety precautions to keep in mind when using an electric glue gun?
Yes, there are some safety precautions to consider when using an electric glue gun. Always unplug the gun when not in use to avoid accidents. Be careful not to touch the nozzle or the adhesive as they can be hot. It is also important to work in a well-ventilated area to avoid inhaling any fumes. Lastly, keep the gun away from children and pets.

Meet Harrison Clayton, a distinguished author and home remodeling enthusiast whose expertise in the realm of renovation is second to none. With a passion for transforming houses into inviting homes, Harrison's writing at https://thehuts-eastbourne.co.uk/ brings a breath of fresh inspiration to the world of home improvement. Whether you're looking to revamp a small corner of your abode or embark on a complete home transformation, Harrison's articles provide the essential expertise and creative flair to turn your visions into reality. So, dive into the captivating world of home remodeling with Harrison Clayton and unlock the full potential of your living space with every word he writes.