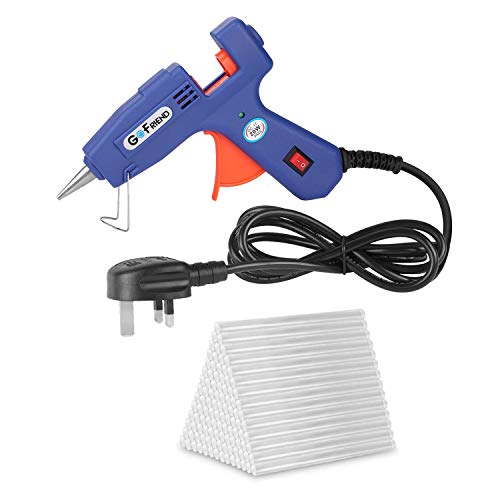
How to start a glue gun

A glue gun is a useful tool for various arts and crafts projects. Whether you are a beginner or an experienced crafter, knowing how to start a glue gun correctly is essential to ensure safe and effective usage. In this article, we will guide you through the step-by-step process of starting a glue gun.
Step 1: Choose the Right Glue Gun
Before starting, it is important to select the right glue gun for your project. There are two main types: low-temperature and high-temperature glue guns. The low-temperature glue guns are suitable for delicate materials such as fabric, foam, and paper, while the high-temperature glue guns are perfect for more heavy-duty materials like wood and metal. Make sure to choose a glue gun that suits the materials you will be working with.
Pro tip: If you are unsure which glue gun to choose, opt for a dual-temperature glue gun that allows you to switch between low and high temperature settings.
Step 2: Prepare the Glue Sticks

Once you have chosen the right glue gun, it’s time to prepare the glue sticks. Glue sticks are cylindrical pieces of adhesive that are placed in the gun. Make sure to use glue sticks that are compatible with your glue gun. Insert the glue stick into the back of the glue gun, ensuring that it fits securely.
Pro tip: It is a good idea to have extra glue sticks on hand, as you may need to replace them during your project.
Step 3: Heat Up the Glue Gun
After preparing the glue sticks, plug in the glue gun and allow it to heat up. The heating time may vary depending on the type of glue gun you have. Generally, it takes a few minutes for the glue gun to reach the desired temperature. While waiting, make sure to place the glue gun on a heat-resistant surface to avoid any potential damage.
Pro tip: Some glue guns have an indicator light that indicates when the glue gun is ready for use. Keep an eye out for this light during the heating process.

Step 4: Test the Glue Gun
Once the glue gun has reached the appropriate temperature, it’s time to test it before starting your project. Squeeze the trigger gently to ensure that the glue flows smoothly. If the glue gun is working properly, a steady stream of glue should come out of the nozzle.
Pro tip: Test the glue gun on a scrap piece of material to ensure it is applying the glue evenly.
Congratulations! You have successfully started your glue gun. Now you can confidently embark on your arts and crafts projects, knowing that you have the knowledge to use a glue gun safely and effectively.
Choosing the right glue gun
When it comes to choosing a glue gun, there are a few factors to consider to ensure you select the right one for your needs. Here are some key points to keep in mind:

Type of glue gun
There are two main types of glue guns: high-temperature and low-temperature. High-temperature glue guns are suitable for heavy-duty projects and materials like metal, glass, and wood. Low-temperature glue guns are ideal for more delicate materials like fabric and foam. Consider the type of projects you will be working on to determine which type of glue gun will best suit your needs.
Glue stick compatibility
Check the glue stick compatibility of the glue gun before making a purchase. Glue guns typically use either standard-size glue sticks or mini-size glue sticks. Make sure the glue gun you choose is compatible with the glue sticks you have or can easily find in stores.
Additionally, consider the variety of glue stick options available for the glue gun. Some glue guns may have limited options in terms of glue stick types, while others may have a wider range of options including colored or specialty glue sticks.
Remember to also pay attention to the glue gun’s melting time and glue flow rate. These factors can affect how efficiently you can complete your projects and the quality of the adhesive bond.
By considering the type of glue gun and glue stick compatibility, you can choose the right glue gun that meets your specific crafting and DIY needs.

Consider the type of projects
Before you start using a glue gun, it’s important to consider the type of projects you will be working on. Different projects require different types of glue guns or glue sticks.
If you are planning to work on small, delicate projects such as crafting or jewelry making, a low-temperature glue gun may be more suitable. These glue guns operate at a lower temperature, which reduces the risk of damaging or melting delicate materials.
On the other hand, if you are working on larger, heavy-duty projects such as home repairs or woodworking, a high-temperature glue gun may be necessary. These glue guns are capable of melting stronger adhesive sticks that can withstand the stress and weight of heavy objects.
Low-temperature glue guns
Low-temperature glue guns typically heat the glue to around 250 degrees Fahrenheit (120 degrees Celsius). They are ideal for bonding lightweight materials such as paper, fabric, and foam. These glue guns are also safer to use as they reduce the risk of burns or accidental injuries.
If you are working with heat-sensitive materials or working with children, it is recommended to use a low-temperature glue gun to avoid any accidents or damage.

High-temperature glue guns
High-temperature glue guns, on the other hand, heat the glue to around 380 degrees Fahrenheit (193 degrees Celsius) or higher. They are suitable for heavy-duty projects that require a stronger bond, such as bonding metal, wood, or plastic. Due to the higher temperature, these glue guns require extra caution to avoid burns or injuries.
Always consider the type of projects you will be working on to ensure that you are using the appropriate glue gun and glue sticks. Using the wrong type of glue gun can result in weak bonds, damage to materials, or even personal injury.
Look for a reliable brand
When it comes to purchasing a glue gun, it’s important to choose a reliable brand. There are many different options available on the market, but not all brands are created equal. It’s worth doing some research and reading reviews to find a brand that is known for its quality and durability.
One way to determine if a brand is reliable is to look for one that has a good reputation. Check online forums and websites to see what other users are saying about the brand. Are they satisfied with their glue guns? Do they mention any common issues or concerns?
Another factor to consider is the warranty offered by the brand. A reliable brand will often offer a warranty that covers any defects or malfunctions that may occur within a certain period of time. This shows that the brand has confidence in its product and is willing to stand behind it.

You may also want to consider the availability of replacement parts for the glue gun. Over time, certain parts may wear out or need to be replaced. Having easy access to replacement parts can extend the lifespan of your glue gun and save you money in the long run.
- Do some research to find a reliable brand
- Read reviews and check for a good reputation
- Consider the warranty offered
- Look for availability of replacement parts
By taking the time to find a reliable brand, you can ensure that your glue gun will work effectively and last for a long time.
Preparing the glue gun
Before you can start using a glue gun, it’s important to properly prepare it. Follow these steps to get your glue gun ready:
1. Plug in the glue gun and wait for it to heat up. Most glue guns have a built-in indicator light that will turn on when the gun is ready to use.
2. Lay down a protective surface, such as a drop cloth or old newspaper, to catch any drips of hot glue.

3. Insert a glue stick into the back of the glue gun. Make sure it is fully inserted and seated securely.
4. Allow the glue stick to heat up and melt in the gun for a few minutes. This will ensure that the glue flows smoothly and evenly.
5. While waiting for the glue to heat up, gather all of your materials and make sure you have everything you need within easy reach. This will help to prevent any interruptions once you start using the glue gun.
Following these steps will help you properly prepare your glue gun for use. Once it’s ready, you’ll be able to tackle all sorts of crafting and DIY projects with ease.
Plug in the glue gun
Before you can start using your glue gun, you need to plug it in and let it heat up. Find a suitable electrical outlet near your workspace and insert the plug of the glue gun securely into it.
Make sure the outlet has power by checking if other devices are working properly when plugged into it. It’s important to use a reliable electrical source to prevent any accidents or malfunctioning of the glue gun.
While waiting for the glue gun to heat up, take this time to prepare your working area. Clear any clutter and make sure there is enough space for you to move around comfortably. Place a protective mat or a piece of cardboard on your work surface to catch any drips or spills from the glue gun.
Note: Never leave your glue gun plugged in and unattended. Always unplug it from the electrical outlet when you are finished using it to ensure your safety.
Wait for it to heat up
Before using the glue gun, it is important to let it heat up and reach the desired temperature. This process usually takes a few minutes, but it may vary depending on the model and brand of the glue gun.
Most glue guns have an indicator light that turns on when the gun is heating up. Once the glue gun reaches the correct temperature, the indicator light will typically turn off or change color. It is important to wait until this indicator signals that the glue gun is ready to use.
During the heating process, it is advisable to place the glue gun on a heat-resistant surface, such as a silicone mat or a metal stand. This will prevent any potential damage to the working surface and ensure safety during use.
While waiting for the glue gun to heat up, it is a good idea to prepare the materials and surfaces that will be joined together. This includes cleaning the surfaces and gathering any additional tools or accessories that may be needed.
Note: It is important to follow the specific instructions provided by the manufacturer of your glue gun. Different models may have slightly different heating times and temperature settings, so it is always best to refer to the user manual for accurate information.
Using the glue gun
Once you have successfully started your glue gun, you can begin using it for various projects and tasks. Here are some tips on how to effectively use a glue gun:
1. Preparing the surface
Before applying the glue, make sure the surface is clean and free of dust or debris. This will ensure a strong bond between the materials you are working with.
2. Applying the glue
When using a glue gun, it’s important to apply the glue in a controlled manner. Slowly squeeze the trigger to release the desired amount of glue. Start with a small amount and add more if needed.
3. Bonding materials
Once the glue has been applied, quickly join the materials together. Make sure to align them properly before the glue starts to dry. Press firmly to ensure a strong bond.
4. Avoiding burns
Be cautious while using a glue gun to avoid burns. The glue can be extremely hot and can cause injury if it comes into contact with your skin. It’s recommended to wear protective gloves to minimize the risk of burns.
5. Cleaning up
After you have finished using the glue gun, allow it to cool down before cleaning. Any excess glue can be removed with a damp cloth or by gently scraping it off. Always store your glue gun in a safe place, away from children and pets.
Following these guidelines will help you use a glue gun safely and effectively for your DIY projects or any other applications that require strong adhesive bonds.
Load the glue stick
Before starting your glue gun, you’ll need to make sure it is loaded with a glue stick. Follow these simple steps to load the glue stick:
- Insert the glue stick into the back of the glue gun.
- Push the glue stick firmly into the glue gun until it is snugly in place.
- Plug in the glue gun and allow it to heat up for a few minutes. The glue stick will begin to melt and become ready for use.
It is important to note that different glue guns may have slightly different loading mechanisms. Consult your glue gun’s instruction manual for specific loading instructions if needed.
FAQ
What is a glue gun and what is it used for?
A glue gun is a handheld tool that is used for applying hot glue to different surfaces. It is commonly used in crafts, DIY projects and woodworking to bond materials together.
Why would I need a glue gun?
You might need a glue gun for various purposes. It is a versatile tool that can be used for repairs, creating crafts, home improvement projects, and even for small-scale construction. It provides a strong and durable bond between materials.

Meet Harrison Clayton, a distinguished author and home remodeling enthusiast whose expertise in the realm of renovation is second to none. With a passion for transforming houses into inviting homes, Harrison's writing at https://thehuts-eastbourne.co.uk/ brings a breath of fresh inspiration to the world of home improvement. Whether you're looking to revamp a small corner of your abode or embark on a complete home transformation, Harrison's articles provide the essential expertise and creative flair to turn your visions into reality. So, dive into the captivating world of home remodeling with Harrison Clayton and unlock the full potential of your living space with every word he writes.