How to make crayon art without a hot glue gun

Creating crayon art can be a fun and creative way to express yourself. However, not everyone has access to a hot glue gun, which is often used to attach the crayons to the canvas. But fear not! There are alternative methods that you can use to achieve beautiful results without the need for a hot glue gun.
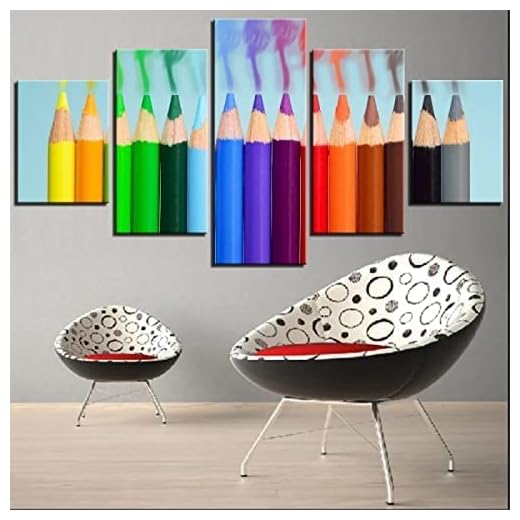
One method is to use double-sided tape or adhesive glue dots to attach the crayons to the canvas. Simply peel off the backing of the tape or glue dot, and carefully press the crayon onto it. Make sure to space out the crayons evenly along the top edge of the canvas, leaving enough room for them to melt and create a beautiful rainbow effect.
Another option is to use a hair dryer or heat gun to melt the crayons directly onto the canvas. Place the canvas on a protected surface and position the crayons along the top edge. Turn on the hair dryer or heat gun and hold it close to the crayons, allowing the heat to melt them and create drips of color down the canvas. Be cautious not to hold the hair dryer or heat gun too close, as it may cause the crayons to splatter.
A word of caution: While making crayon art can be a fun and enjoyable activity, it is important to prioritize safety. Always work in a well-ventilated area, as melting crayons can release fumes. Additionally, be careful when handling the hair dryer or heat gun, as they can become hot during use. And finally, supervise children closely if they are participating in this activity to ensure their safety at all times.
Supplies you will need for crayon art
To create crayon art without a hot glue gun, you will need the following supplies:

| Supplies | Description |
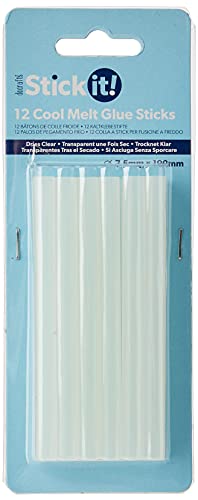
| Crayons | A pack of crayons in assorted colors. Make sure the crayons are not broken or melted. |
| Canvas | A canvas or thick drawing paper of your desired size. This will serve as the base for your crayon art. |
| Hairdryer | A hairdryer with adjustable heat and speed settings. This will be used to melt the crayons. |
| Masking tape | Masking tape or painter’s tape to secure the crayons to the canvas. This will help in creating a neat and controlled melting process. |
| Newspaper or any protective covering | It is recommended to lay down newspaper or any protective covering on your work surface to catch any drips or splatters from the melted crayons. |
| Clear sealer (optional) | You may choose to apply a clear sealer over your finished artwork to protect it and give it a glossy finish. |
With these supplies in hand, you’ll be ready to create beautiful crayon art without a hot glue gun.
Gather your materials for crayon art without a hot glue gun
To create crayon art without a hot glue gun, you will need a few simple materials. Gathering these materials before you start your project will help ensure that you have everything you need to create your masterpiece.
Materials you will need:
- A canvas or some thick paper
- A pack of crayons
- Clear tape
- A hairdryer
- A newspaper or a plastic sheet to protect your work area
Canvas or thick paper: The base for your crayon art can be a canvas or any thick paper. Canvas tends to work best, as it is sturdy and can withstand the heat of the hairdryer without warping. However, if you don’t have a canvas, you can use thick paper like watercolor paper or cardstock.
Pack of crayons: Choose a pack of crayons in the colors you want to use for your artwork. You can get a pack with a wide range of colors or stick to a specific color scheme.
Clear tape: Clear tape will be used to hold the crayons in place on the canvas or paper. Make sure to have enough tape to secure all your crayons.
Hairdryer: A hairdryer will be used to melt the crayons and create the colorful drips. Make sure you have a hairdryer with adjustable heat settings so you can control the melting process.
Newspaper or plastic sheet: To protect your work area from any dripping crayon wax, lay down a newspaper or a plastic sheet. This will make the clean-up process much easier.
Once you have gathered all your materials, you are ready to start creating your crayon art masterpiece without a hot glue gun!
Preparing your canvas for crayon art
Before you start creating your crayon art masterpiece, you’ll need to prepare your canvas. Whether you’re using a traditional canvas or a different surface like cardboard or watercolor paper, there are a few steps you should take to ensure the best results.
Gather your materials
First, gather all the materials you’ll need for your project. This includes your chosen canvas, crayons, a hairdryer or heat gun, and any additional tools or decorations you want to use. Make sure you have a flat surface to work on, like a table or easel.

Prepare your canvas
If you’re using a traditional canvas, make sure it’s clean and free from any dust or debris. You can gently wipe it down with a damp cloth if necessary. If you’re using a different surface like cardboard or watercolor paper, ensure it’s flat and smooth, as any bumps or creases can affect the final result.
Next, decide on the orientation of your canvas. Do you want a portrait or landscape layout? This will determine how you position your crayons and create the final design.
Protect your workspace
Creating crayon art can be messy, so it’s important to protect your workspace. Cover your table or easel with newspaper or a plastic sheet to catch any drips or splatters. This will make cleanup much easier.
Set up your work area
Arrange your materials in a way that is comfortable and accessible. Place your canvas in the center of your workspace and have your crayons nearby. Plug in your hairdryer or heat gun and have it ready to use.
Now that your canvas is prepared and your workspace is ready, you’re all set to start your crayon art project! Remember to have fun and experiment with different techniques and colors to create a unique and beautiful piece.

Create a blank canvas for your crayon art masterpiece
To make crayon art without a hot glue gun, the first step is to create a blank canvas for your masterpiece. This canvas will be used as the background for your crayon design. There are several options for creating a blank canvas:
|
Paper or canvas: You can use a plain piece of paper or a canvas as your blank canvas. Paper is a more affordable option, while canvas provides a more durable and professional look. Choose the one that fits your preference and budget. |
|
Pre-painted canvas: If you want to add more depth and texture to your crayon art, you can start with a pre-painted canvas. Look for a canvas that has a solid color or an interesting background design. This will enhance the overall look of your crayon art. |
|
Recycled materials: If you’re feeling creative and eco-friendly, you can repurpose old materials as your blank canvas. Cardboard, wood, or even discarded canvases can be used as a base for your crayon art. Giving new life to these materials adds a unique touch to your artwork. |

Once you have chosen your blank canvas, make sure it is clean and free from any dust or debris. This will ensure that your crayon art sticks properly and looks its best. Now that you have your blank canvas ready, it’s time to move on to the exciting part – creating your crayon art masterpiece!
Setting up your workspace for crayon art
Before you begin creating your crayon art masterpiece, it’s important to set up your workspace properly to ensure a smooth and enjoyable crafting experience. Here are some tips to help you create the perfect creative environment:
1. Choose a well-ventilated area: Crayons can emit fumes when they are melted, so it’s important to work in a space with good airflow. Open a window or work in a room with a fan to keep the air circulating and prevent any discomfort.

2. Use a protective surface: To avoid any damage to your table or work area, place a protective covering such as newspaper or a plastic tablecloth before you start. This will catch any drips or spills and make cleanup easier.
3. Gather your materials: Before you begin, make sure you have all your materials in one place. This includes your crayons, a canvas or art board, a hairdryer, and any additional decorations or tools you plan to use.
4. Arrange your crayons: Decide on the order in which you would like your crayons to melt and create a gradient effect. Lay them out in this order on your canvas or art board to ensure you have them ready when needed.
5. Organize your tools: Keep your hairdryer, hot glue gun alternatives such as tape or adhesive putty, and any other tools within arm’s reach. This will make the process more efficient and prevent any interruptions while creating your art.
6. Set up proper lighting: Adequate lighting is essential for accurate color selection and precision work. Make sure your workspace is well-lit, either by natural light or by using a desk lamp. This will help you see the true colors of your crayons and ensure the best results.

7. Create a comfortable environment: Crayon art can be a time-consuming process, so it’s important to make your workspace comfortable. Use a comfortable chair or cushion, play some relaxing music, and have a snack or drink nearby to keep you motivated and hydrated.
By following these simple steps, you can create a functional and inspiring workspace that will help you unleash your creativity and make beautiful crayon art without the use of a hot glue gun.
Create a clean and organized workspace for your crayon art project
Creating a clean and organized workspace is crucial for any art project, and crayon art is no exception. Follow these steps to set up the perfect space for your crayon art project:
Gather your materials: Before you start, make sure you have all the necessary materials at hand. This includes a large canvas or poster board, crayons, a hairdryer, masking tape or painter’s tape, and newspaper or a drop cloth to protect your workspace.
Clean your workspace: Start by clearing your workspace of any clutter or unnecessary items. Wipe down surfaces to remove any dust or dirt that could interfere with your project.
Protect the area: Lay down newspaper or a drop cloth to protect your workspace from any potential drips or splatters. This will make cleanup much easier once you’re finished.
Prepare your canvas: If you’re using a canvas, apply a layer of gesso or white paint to create a smooth, even surface for the crayons to adhere to. Allow it to dry completely before moving on to the next step.
Arrange your crayons: Sort your crayons by color and arrange them in the desired order. This will make it easier to find the colors you need as you work on your project.
Secure your crayons: Use masking tape or painter’s tape to secure the crayons to the top edge of the canvas. Make sure they are positioned vertically and tightly against the canvas.
Protect your surroundings: If you’re using a hairdryer to melt the crayons, consider using a makeshift shield to protect the surrounding surfaces from any splatters. A piece of cardboard or a plastic folder can work well for this purpose.
Set up your hairdryer: Position your hairdryer on low heat and high speed, pointing it towards the crayons. Test the distance and angle to make sure it’s melting the crayons evenly.
Start melting: Turn on the hairdryer and begin melting the crayons. Move the hairdryer back and forth to distribute the melted wax evenly across the canvas.
Check for desired effect: Keep a close eye on the melting process and adjust the heat or speed settings as needed. You can also experiment with tilting the canvas or layering colors to achieve different effects.
Allow to cool and dry: Once you’re satisfied with the design, turn off the hairdryer and allow the melted wax to cool and dry completely before handling or displaying your artwork.
By creating a clean and organized workspace, you’ll be able to focus on your crayon art project and ensure the best possible outcome. Happy crafting!
Choosing the right crayons for crayon art
Creating crayon art without a hot glue gun is an exciting and creative way to make colorful and vibrant artwork. One of the most important aspects of this process is choosing the right crayons, as they play a crucial role in the final result. Here are a few factors to consider when selecting crayons for your crayon art:
Quality
When it comes to crayons, quality matters. Investing in good-quality crayons will give you better pigmentation and color payoff. Look for crayons that are made with non-toxic materials, have a smooth texture, and blend easily. Additionally, high-quality crayons are less likely to break or crumble, which can be frustrating when creating detailed artwork.
Color Variety
Having a wide range of colors is essential for creating vibrant and eye-catching crayon art. Look for sets that offer a diverse range of hues, including primary colors, secondary colors, and various shades in between. This will give you more flexibility and creativity in your artwork, allowing you to mix and match colors to achieve desired effects.
| Quality | Color Variety | Brand |
|---|---|---|
| Smooth texture | Wide range of hues | Non-toxic materials |
| Blend easily | Primary and secondary colors | Less likely to break |
With a wide variety of crayon brands available in the market, it’s important to do your research and read reviews to find the best options for your crayon art. Some popular and reliable brands include Crayola, Faber-Castell, and Sargent Art.
By considering the quality and color variety of your crayons, you can ensure that your crayon art will be visually appealing and enjoyable to create. So, gather your choice of crayons, unleash your creativity, and start making beautiful crayon art!
Select the perfect crayons for vibrant and unique crayon art pieces
When it comes to creating vibrant and unique crayon art, selecting the right crayons is essential. The type of crayons you choose can greatly impact the outcome of your artwork. Here are some tips for selecting the perfect crayons:
| Tip | Description |
|---|---|
| 1 | Choose high-quality crayons: Opt for crayons that are known for their vibrant pigments and smooth application. Brands like Crayola and Faber-Castell are known for producing high-quality crayons that blend well and create rich, saturated colors. |
| 2 | Consider the color range: Look for crayon sets that offer a wide range of colors. This will give you more options when it comes to creating your artwork. Some sets also include specialty colors like metallic or neon, which can add a fun and unique touch to your creations. |
| 3 | Check for non-toxicity: If you’re creating crayon art with children, it’s important to choose crayons that are safe and non-toxic. Many crayon brands, including Crayola, clearly label their products as non-toxic, making it easy to ensure the safety of your young artists. |
| 4 | Try different types of crayons: While traditional wax crayons are the most common choice for crayon art, don’t be afraid to experiment with different types of crayons. Oil pastel crayons, for example, can create a softer and more blendable effect, while watercolor crayons can add a unique watercolor wash to your artwork. |
| 5 | Consider the size: Depending on the size of your artwork and your personal preference, you may want to choose crayons in different sizes. Larger crayons can cover more space quickly, while smaller ones allow for more precise detailing. |
By keeping these tips in mind, you’ll be able to select the perfect crayons for your crayon art projects. Remember, the key is to choose crayons that inspire you and allow you to unleash your creativity!
FAQ
Can I make crayon art without using a hot glue gun?
Yes, you can make crayon art without using a hot glue gun. There are alternative methods to attach the crayons to the canvas, such as using double-sided tape or an adhesive spray.
What materials do I need to make crayon art without a hot glue gun?
To make crayon art without a hot glue gun, you will need a canvas, crayons, double-sided tape or adhesive spray, a hairdryer, and optionally, a stencil or template for your design.
Can I use any type of canvas for crayon art?
Yes, you can use any type of canvas for crayon art. However, it is recommended to use a canvas that has been primed or gessoed to provide a smooth surface for the crayon to adhere to.
Is it necessary to use a hairdryer for crayon art without a hot glue gun?
Yes, a hairdryer is necessary for crayon art without a hot glue gun. The heat from the hairdryer helps to melt the crayons, allowing the colors to blend and create the desired effect.
Are there any safety precautions I should take when making crayon art without a hot glue gun?
Yes, there are a few safety precautions you should take when making crayon art without a hot glue gun. It is important to work in a well-ventilated area, as the melting crayon fumes can be strong. Additionally, be cautious when using the hairdryer and avoid overheating the crayons, as this can cause them to catch fire.


Meet Harrison Clayton, a distinguished author and home remodeling enthusiast whose expertise in the realm of renovation is second to none. With a passion for transforming houses into inviting homes, Harrison's writing at https://thehuts-eastbourne.co.uk/ brings a breath of fresh inspiration to the world of home improvement. Whether you're looking to revamp a small corner of your abode or embark on a complete home transformation, Harrison's articles provide the essential expertise and creative flair to turn your visions into reality. So, dive into the captivating world of home remodeling with Harrison Clayton and unlock the full potential of your living space with every word he writes.