How to make a bauble wreath with glue gun
When the holiday season approaches, it’s time to bring out the festive decorations. One popular and eye-catching decoration is a bauble wreath. This unique wreath adds a touch of elegance and charm to any door or wall. If you want to create your own bauble wreath, using a glue gun is a quick and easy way to assemble it.
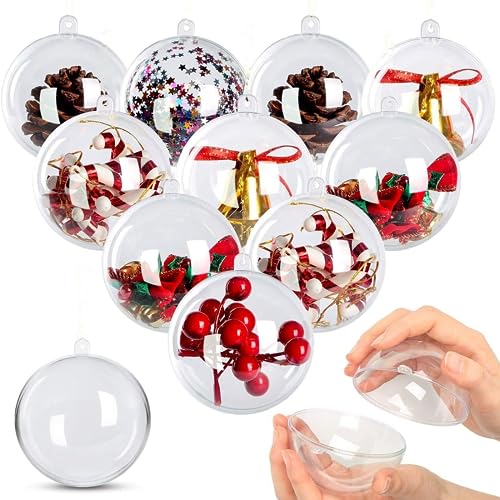
To start off, gather all the materials you’ll need. You’ll need a foam wreath ring, a variety of baubles in different sizes and colors, a glue gun, and glue sticks. It’s a good idea to choose baubles with different finishes, such as matte, shiny, and glittery, to add texture and variety to your wreath.
First, determine the placement of the baubles on the wreath. You can start by arranging them on the wreath ring without glue to see how they fit together. Once you’re satisfied with the layout, begin attaching the baubles to the ring using the glue gun. Apply a small amount of glue to the bottom of each bauble and press it firmly onto the wreath ring. Be careful not to burn yourself with the hot glue!
Continue adding baubles to the wreath, overlapping them slightly to create a full and dimensional look. You can use different sizes and colors of baubles to create a pattern or arrange them randomly for a more eclectic appearance. Take your time and be patient as you work your way around the wreath, ensuring that each bauble is securely attached.
Once all the baubles are attached, let the wreath dry completely. If desired, you can add a ribbon bow or other embellishments to the wreath to further customize it. Hang your bauble wreath on a door or wall to instantly enhance your holiday decor. With a glue gun and a little creativity, you can create a beautiful bauble wreath that will impress your guests and bring festive joy to your home.

Materials for making a bauble wreath with glue gun
Before starting to create your bauble wreath, make sure you have all the necessary materials in hand. Here is a list of items you will need:
1. Styrofoam wreath form
A styrofoam wreath form will serve as the base for your bauble wreath. It is lightweight and easy to work with.
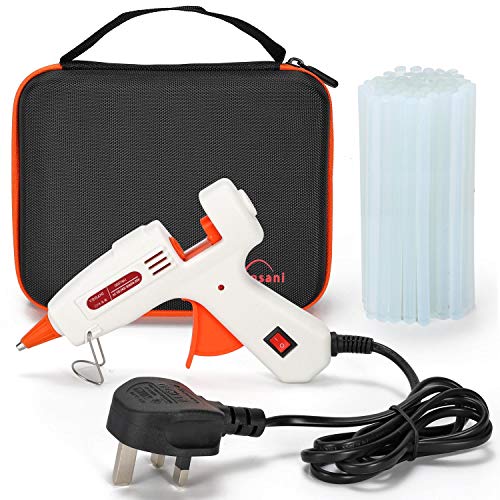
2. Glue gun
A glue gun is an essential tool for this project. It will help you secure the baubles onto the wreath form.
3. Baubles
Choose a variety of baubles in different sizes, colors, and finishes. The choice of baubles will determine the overall look of your wreath.
4. Ribbon or wire
A ribbon or wire will be needed to hang the wreath. Choose a color that matches the baubles or complements the overall design.

5. Scissors
A pair of scissors will be handy for cutting the ribbon or wire to the desired length.
6. Optional decorations
You can add additional decorations such as bows, pinecones, or faux greenery to enhance the look of your bauble wreath.
Having these materials ready will ensure a smooth and enjoyable crafting process, resulting in a beautiful bauble wreath to decorate your home.
Gather these supplies before you begin
Before starting the process of making a bauble wreath with a glue gun, it’s important to gather all the necessary supplies. Having everything ready beforehand will make the crafting experience more smooth and enjoyable. Here are the supplies you will need:
1. Glue gun
A glue gun is the main tool you will use to assemble the bauble wreath. Make sure you have a glue gun that is in good working condition and has enough glue sticks.

2. Wreath base
You will need a wreath base to attach the baubles onto. The base can be made of different materials such as foam, wire, or even a cardboard cutout. Choose a wreath base that suits your preferences and is sturdy enough to hold the baubles securely.
3. Baubles
The baubles are the main decorative elements of the wreath. You can use baubles of different sizes, shapes, and colors to create a unique design. Ensure you have enough baubles to cover the entire wreath base.
4. Ribbon or wire
To hang the wreath, you will need either ribbon or wire. Choose a ribbon or wire that matches the theme or color scheme of your baubles. Make sure it is long enough to create a loop for hanging.
5. Scissors
Scissors will be needed for cutting the ribbon or wire, as well as any other trimming that may be required during the process. It’s recommended to use sharp scissors for clean and precise cuts.
6. Optional decorations
If you want to add extra embellishments to your bauble wreath, consider gathering optional decorations such as glitter, sequins, artificial greenery, or small ornaments. These can be used to enhance the overall look of the wreath.

Once you have all these supplies ready, you can begin creating your bauble wreath using a glue gun. Make sure to follow the steps carefully and take your time to ensure the wreath turns out just the way you want it to.
Step-by-step guide to making a bauble wreath with a glue gun
Making your own bauble wreath is a fun and festive way to decorate your home during the holiday season. With just a few materials and a glue gun, you can create a beautiful and unique wreath that will impress your guests. Follow these simple steps to make your own bauble wreath:
Materials you will need:
- A foam wreath base
- A variety of baubles in different sizes and colors
- A glue gun
- Ribbon or string for hanging
Step 1: Prepare your materials
Start by gathering all your materials in one place. Make sure you have enough baubles to cover the entire wreath base. You can choose baubles in a specific color scheme or mix and match different colors for a more eclectic look.
Step 2: Attach the baubles to the wreath base
Using a glue gun, carefully attach the baubles to the foam wreath base. Start by applying a small amount of glue to the top of the bauble and press it firmly onto the wreath. Continue attaching the baubles, making sure to space them evenly and cover the entire wreath base.
Step 3: Add ribbon or string for hanging
Once all the baubles are securely attached to the wreath base, attach a ribbon or string to the top of the wreath for hanging. Make sure the ribbon is securely tied and can support the weight of the wreath.

Step 4: Hang and enjoy!
Find a suitable place to hang your bauble wreath, such as on a door or wall. Admire your handiwork and enjoy the festive atmosphere it brings to your home. Feel free to add additional decorations such as ribbons or bows to enhance the wreath even further.
Remember, making a bauble wreath with a glue gun is a creative process, so feel free to experiment with different colors, sizes, and arrangements of baubles. Have fun and enjoy the holiday season!
Follow these instructions closely for a beautiful result
Step 1: Gather all the materials you will need for your bauble wreath project. This includes a wreath form, a glue gun, assorted baubles, and any other decorations you may want to add.
Step 2: Heat up your glue gun and make sure you have plenty of glue sticks on hand. It’s important to use a high-temperature glue gun for this project to ensure a secure bond.
Step 3: Begin by arranging your baubles on the wreath form to get an idea of how you want the final design to look. This will help you plan where to place each bauble and create a balanced arrangement.

Step 4: Once you have your design planned out, start attaching the baubles to the wreath form using the hot glue gun. Apply a small amount of glue to the base of each bauble and press it firmly onto the wreath form. Hold it in place for a few seconds to allow the glue to dry and set.
Step 5: Continue attaching the baubles to the wreath form, working in small sections at a time. This will help ensure that the glue doesn’t dry before you can attach the bauble.
Step 6: As you work, step back occasionally to assess your progress and make any necessary adjustments. This will help you maintain the desired balance and symmetry in your design.
Step 7: Once all the baubles are attached, you can add any additional decorations, such as ribbon or pinecones, using the glue gun.
Step 8: Allow the glue to fully dry and set before hanging up your bauble wreath. This will ensure that the baubles are securely attached and won’t come loose.

Note: It’s important to be careful when working with a hot glue gun to avoid burns. Use caution and take breaks if needed to prevent injuries.
Follow these instructions closely and you’ll have a beautiful bauble wreath for your home. Enjoy the process and get creative with your design!
Tips and tricks for creating your bauble wreath
Creating a bauble wreath with a glue gun can be a fun and rewarding DIY project. Here are some tips and tricks to help you create a beautiful wreath:
1. Choose the right baubles
When selecting baubles for your wreath, consider the color scheme you want to achieve. Choose baubles that complement each other and create a cohesive look. You can mix and match different sizes and textures to add visual interest to your wreath.
2. Prepare your workspace
Before you start assembling your bauble wreath, make sure you have a clear and organized workspace. Lay out all your materials and tools in a way that is easily accessible. This will make the process smoother and more efficient.
3. Plan your design
Before gluing the baubles onto the wreath form, plan out your design. Lay the baubles on top of the wreath to get an idea of how they will look together. Experiment with different arrangements until you find the one you like the best.
4. Use a sturdy wreath form
To ensure that your bauble wreath holds its shape, use a sturdy wreath form as the base. A foam or wire wreath form works well for this project. Avoid using a thin or flimsy form that may not provide enough support for the baubles.
5. Secure the baubles with hot glue
When attaching the baubles to the wreath form, use a hot glue gun for a secure bond. Apply a small amount of glue to the bottom of each bauble and press it firmly onto the wreath. Hold it in place for a few seconds to allow the glue to set.
6. Add embellishments
Once all the baubles are attached, you can add extra embellishments to enhance the wreath’s appearance. Consider adding ribbons, bows, or other festive decorations to make your wreath stand out.
7. Hang and display your wreath
Finally, find the perfect spot to hang and display your bauble wreath. You can use a wreath hanger or a ribbon to hang it on your front door, fireplace, or wall. Enjoy your beautiful creation!
Follow these tips and tricks to create a stunning bauble wreath that will add a festive touch to your home decor. Have fun and let your creativity shine!
Learn from experienced crafters to improve your technique
If you’re new to making bauble wreaths with a glue gun, it’s always helpful to learn from experienced crafters who have mastered the technique. Their tips and tricks can help you avoid common pitfalls and create a stunning wreath. Here are a few suggestions to help you improve your bauble wreath-making skills:
1. Choose the right baubles
Experienced crafters know that not all baubles work well for wreath-making. Look for baubles that have a small loop at the top, as they can easily be attached to the wreath form using hot glue. Avoid baubles with large loops or other decorations that may make it difficult to attach them securely.
2. Plan your design
Before you start gluing baubles onto your wreath form, take the time to plan your design. Lay out your baubles on a table or flat surface and experiment with different arrangements. This will help you determine the best placement and spacing for your baubles and ensure a balanced and visually appealing wreath.
3. Use a high-quality glue gun
Invest in a good quality glue gun to ensure a strong bond between the baubles and the wreath form. A low-quality glue gun may not provide enough adhesive power, causing the baubles to come loose over time. Look for a glue gun with temperature control settings, as different types of baubles and wreath forms may require different heat levels.
4. Practice proper glue gun technique
Experienced crafters have mastered the art of using a glue gun effectively. Practice applying the right amount of glue on the baubles and wreath form to avoid excess glue squeezing out and creating unsightly clumps. Work in small sections, applying the glue quickly and pressing the baubles firmly onto the form before the glue cools.
5. Take your time
Don’t rush the process of making a bauble wreath. Take your time to ensure each bauble is securely attached and properly spaced. Rushing may result in a messy and uneven wreath. Enjoy the process and allow yourself to make adjustments as you go to create a wreath that you’ll be proud to display.
| Learn From Experienced Crafters | Benefits |
|---|---|
| 1. Choose the right baubles | Easy attachment to wreath form |
| 2. Plan your design | A balanced and visually appealing wreath |
| 3. Use a high-quality glue gun | A strong bond between baubles and form |
| 4. Practice proper glue gun technique | Avoid excess glue and ensure a clean look |
| 5. Take your time | Avoid a messy and uneven wreath |
Alternative methods to make a bauble wreath
If you don’t have a glue gun or prefer not to use one, there are alternative methods to make a bauble wreath. Here are a few options:
1. Wire wreath frame
Instead of using a foam wreath base, you can use a wire wreath frame to attach the baubles. Start by wrapping the wire wreath frame with ribbon or garland to give it a decorative touch. Then, use either wire or floral tape to attach the baubles to the frame. Simply wrap the wire or floral tape around the top of each bauble and then attach them to the frame as desired. This method allows for more flexibility in arranging the baubles, as you can easily adjust their position until you are satisfied with the final look.
2. Floral foam wreath base
If you prefer a more secure and stable base for your bauble wreath, you can use a floral foam wreath base. This is especially useful if you have heavier baubles that need extra support. Start by wrapping the foam wreath base with ribbon or fabric to give it a polished look. Then, use floral pins or hot glue to attach the baubles to the foam. Simply insert the pins or apply a small amount of hot glue to the top of each bauble and press it firmly into the foam. This method ensures that the baubles will stay securely in place, even if the wreath is moved or hung in a high-traffic area.
Remember, each of these alternative methods has its own benefits and drawbacks. Choose the one that best suits your preferences and materials available, and enjoy creating a beautiful bauble wreath without the use of a glue gun!
FAQ
What materials do I need to make a bauble wreath with a glue gun?
To make a bauble wreath with a glue gun, you will need a foam wreath base, a variety of baubles in different sizes and colors, a glue gun, and some ribbon or twine for hanging.
Can I use a different type of wreath base instead of foam?
Yes, you can use a different type of wreath base if you prefer. Some other options include a wire wreath frame or a straw wreath base. Just make sure it is sturdy enough to support the weight of the baubles.
How do I attach the baubles to the wreath base?
To attach the baubles to the wreath base, you will need to use a glue gun. Simply apply a small dab of hot glue to the top of the bauble and press it onto the wreath base. Hold it in place for a few seconds to allow the glue to dry and secure the bauble.
Can I use different types of ornaments instead of baubles?
Yes, you can definitely use different types of ornaments instead of baubles. You can use ornaments in various shapes and sizes, such as snowflakes, stars, or even small figurines. Just make sure they are lightweight enough to be attached to the wreath base.
Can I paint the wreath base before attaching the baubles?
Yes, you can paint the wreath base before attaching the baubles if you prefer. You can use acrylic paint in a color that complements the baubles or matches your home decor. Just make sure to allow the paint to dry completely before attaching the baubles.


Harrison Clayton
Meet Harrison Clayton, a distinguished author and home remodeling enthusiast whose expertise in the realm of renovation is second to none. With a passion for transforming houses into inviting homes, Harrison's writing at https://thehuts-eastbourne.co.uk/ brings a breath of fresh inspiration to the world of home improvement. Whether you're looking to revamp a small corner of your abode or embark on a complete home transformation, Harrison's articles provide the essential expertise and creative flair to turn your visions into reality. So, dive into the captivating world of home remodeling with Harrison Clayton and unlock the full potential of your living space with every word he writes.