Where is Disk Drill on Mac: A Step-by-Step Guide

Disk Drill is a popular data recovery software for Mac that allows users to recover lost or deleted files from various storage devices. Whether you accidentally deleted an important document, formatted your hard drive, or experienced a system crash, Disk Drill can help you retrieve your data. However, one common question that many Mac users have is: “Where is Disk Drill on my Mac?” In this step-by-step guide, we will show you how to find Disk Drill on your Mac and get started with the data recovery process.
First, open the Finder application on your Mac. You can do this by clicking on the Finder icon in the Dock or by selecting “Finder” from the menu bar at the top of the screen. Once Finder is open, navigate to the “Applications” folder. This is where all of your installed applications are stored.
Within the “Applications” folder, you will find a list of all the applications installed on your Mac. Look for an application called “Disk Drill” in the list. If you have recently installed Disk Drill, it should be near the top of the list. If you cannot find it, try using the search bar at the top-right corner of the Finder window. Type “Disk Drill” in the search bar and press enter. The search results should display the Disk Drill application.
Once you have located the Disk Drill application, you can click on it to open it. Alternatively, you can drag the Disk Drill application icon to the Dock for quick and easy access in the future. With Disk Drill open, you can now start the data recovery process by selecting the storage device you want to recover data from and following the on-screen instructions.
In conclusion, if you are looking for Disk Drill on your Mac, you can find it in the “Applications” folder. Open the Finder application, navigate to the “Applications” folder, and look for the Disk Drill application. If you cannot find it, use the search bar in Finder to locate it. Once you have located Disk Drill, you can open it to start the data recovery process. Remember to select the appropriate storage device and follow the on-screen instructions to recover your lost or deleted files.

Installation of Disk Drill on Mac
If you want to install Disk Drill on your Mac, follow these simple steps:
- Go to the official CleverFiles website.
- Click on the “Download” button located on the homepage.
- Wait for the Disk Drill installer to finish downloading.
- Locate the downloaded installer file in your “Downloads” folder.
- Double-click on the installer file to launch the installation process.
- Follow the on-screen instructions and agree to the terms and conditions.
- Choose the destination where you want to install Disk Drill.
- Click on the “Install” button to start the installation.
- Enter your administrator password and click “OK” to authorize the installation.
- Wait for the installation to complete.
Congratulations! You have successfully installed Disk Drill on your Mac. Now you can start using it to recover lost or deleted files.
Launching Disk Drill on Mac
If you have already downloaded and installed Disk Drill on your Mac, follow these steps to launch the application:
- Locate the Disk Drill icon on your desktop or in the Applications folder.
- Double-click on the Disk Drill icon to launch the application.
- Once the application is launched, you will see the Disk Drill main interface.
Note: If this is the first time you are launching Disk Drill on your Mac, you may need to grant necessary permissions for the application to access your files and drives. Follow the prompts on your screen to proceed with the permissions setup.

After launching Disk Drill, you can start using the various features and tools available to you. These include:
- Data Recovery: Recover lost or deleted files from your Mac’s internal or external storage devices.
- File Protection: Enable data protection to prevent accidental data loss in the future.
- Disk Health: Monitor the health of your hard drives and detect potential issues.
- Duplicate Finder: Find and remove duplicate files to free up storage space.
Each feature in Disk Drill offers a range of options and settings to customize your experience and cater to your specific needs. Explore the interface, menus, and settings to familiarize yourself with the application.
Tip: If you are unsure about how to use a specific feature or need assistance with any aspect of Disk Drill, refer to the comprehensive user guide available on the Disk Drill website or reach out to the support team for help.
Scanning for Lost Data with Disk Drill on Mac
Once you have installed Disk Drill on your Mac, you can start scanning for lost data. Disk Drill offers two scanning methods: Quick Scan and Deep Scan. Here is a step-by-step guide on how to use Disk Drill to scan for lost data on your Mac.
Step 1: Launching Disk Drill
Open the Disk Drill application on your Mac. You can find it in your Applications folder or by searching for it using Spotlight.

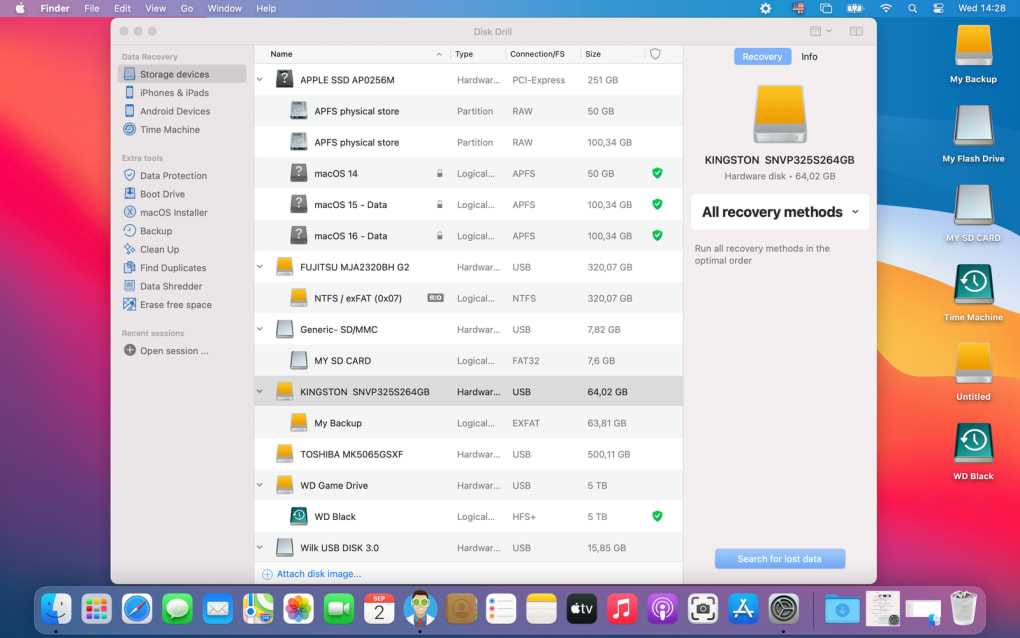
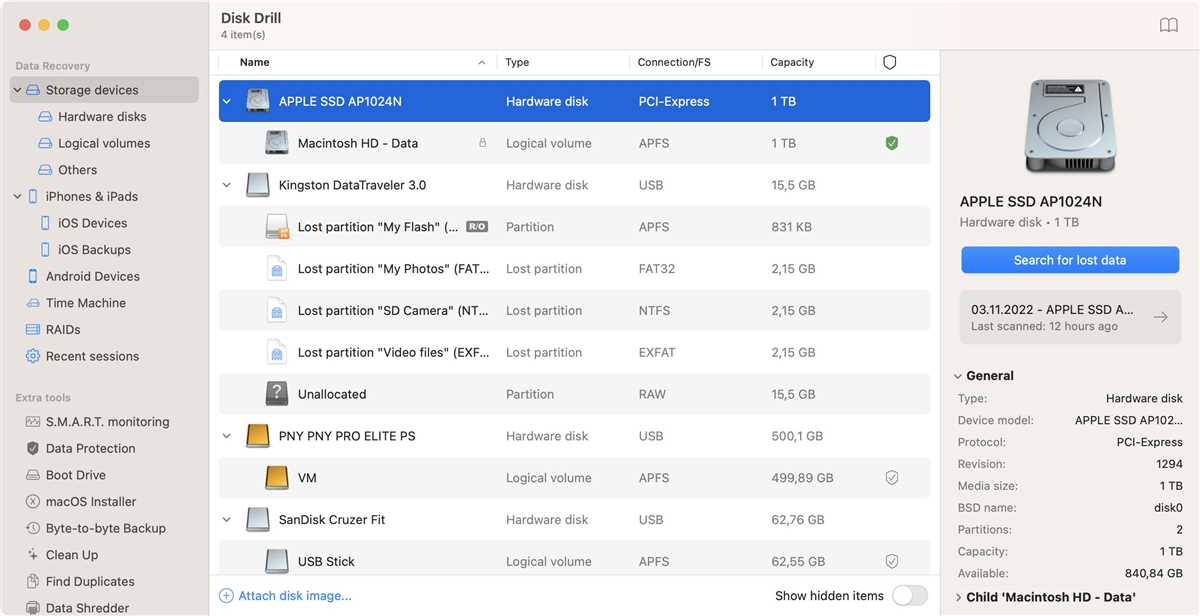
Step 2: Selecting the Drive or Partition
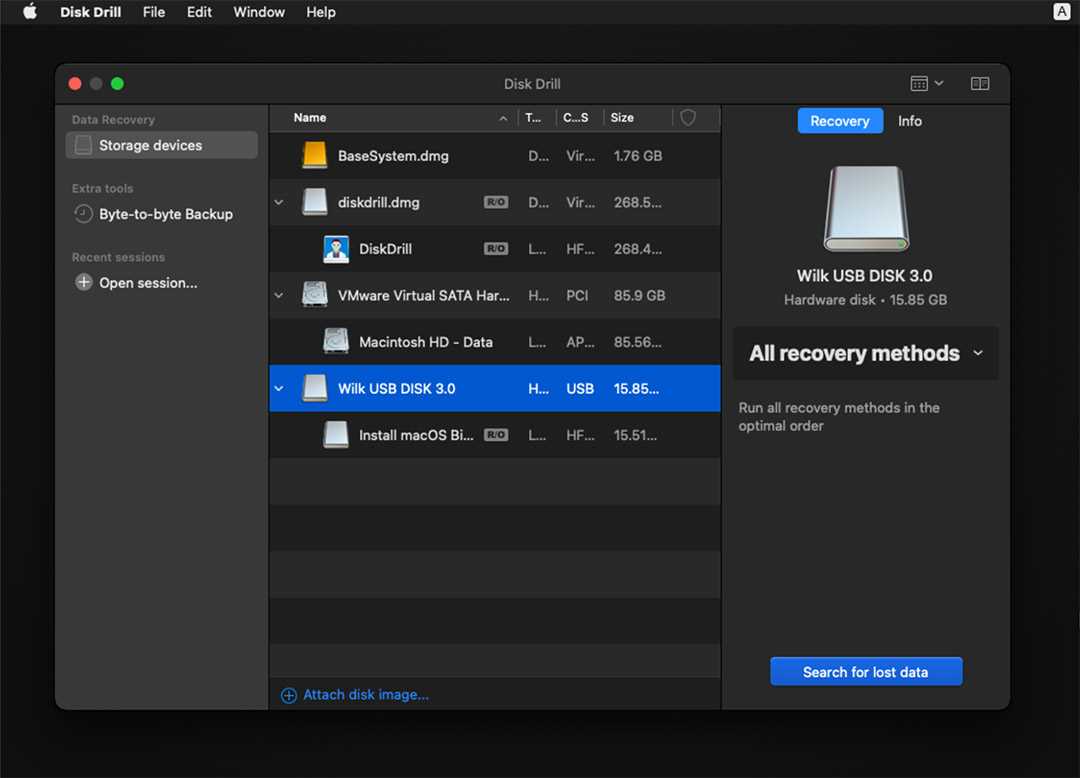
Disk Drill will display a list of available drives and partitions on your Mac. Choose the drive or partition that contains the data you want to recover.
Step 3: Choosing the Scanning Method
Once you have selected the drive or partition, you can choose the scanning method. The Quick Scan is the fastest option and can recover recently deleted files. The Deep Scan is a more thorough scan that can recover files even from formatted or corrupted drives, but it takes longer.
Step 4: Starting the Scan
Click on the “Search for lost data” button to start the scanning process. Disk Drill will analyze the selected drive or partition and search for recoverable files.
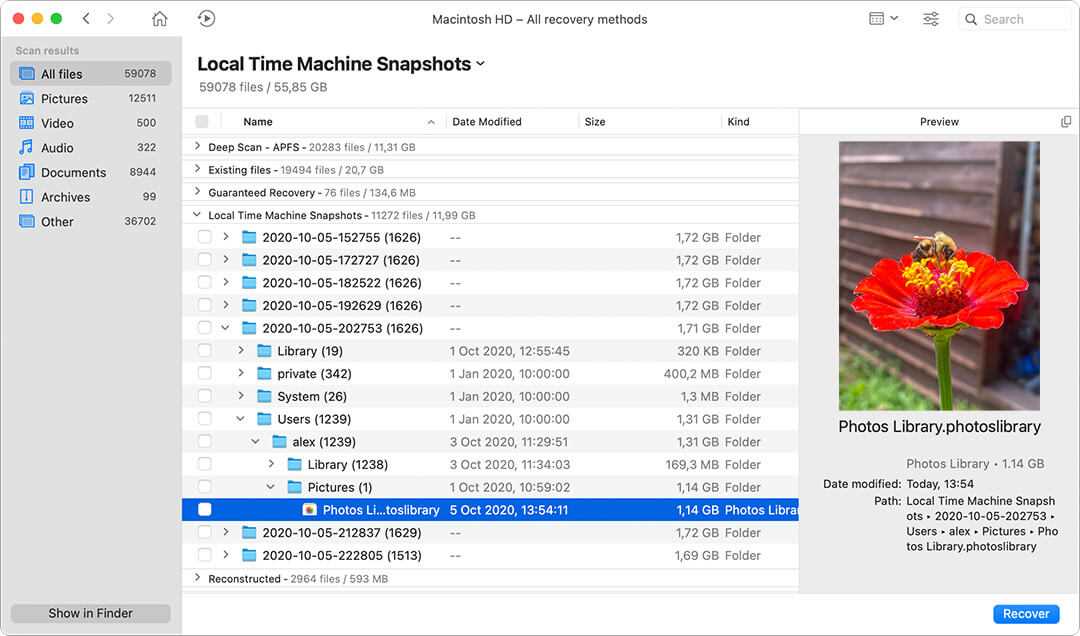
Step 5: Previewing and Recovering Files
Once the scan is complete, Disk Drill will display a list of recoverable files. You can preview the files to confirm their integrity before recovering them. Select the files you want to recover and click on the “Recover” button.
Step 6: Choosing a Recovery Location
Disk Drill will prompt you to choose a location to save the recovered files. It is recommended to choose a different drive or partition to avoid overwriting the lost data.

Step 7: Completing the Recovery Process
After selecting the recovery location, Disk Drill will begin the recovery process. Once the recovery is complete, you will be notified, and you can access your recovered files in the chosen location.
That’s it! You have successfully scanned for and recovered lost data using Disk Drill on your Mac. Remember to regularly back up your important files to prevent data loss in the future.
Previewing and Selecting Recoverable Files with Disk Drill on Mac
Once Disk Drill on Mac has completed the scanning process, you can preview and select the recoverable files before performing the actual recovery. This feature allows you to ensure that the files you want to recover are intact and can be successfully restored.
To preview and select recoverable files with Disk Drill on Mac, follow these steps:

- Open Disk Drill on Mac.
- Navigate to the location where the scan results are displayed.
- Click on the folder or file to preview its contents.
- If the file is recoverable and you want to restore it, select it by checking the box next to its name.
- If you want to recover multiple files at once, you can select them by checking the boxes next to their names.
- Once you have selected all the files you want to recover, click on the “Recover” button.
- Choose a location on your Mac where you want to save the recovered files.
- Click on “Recover” to start the recovery process.
It is important to note that some files may be listed as “unrecognized” or “corrupted” during the preview process. In such cases, it may not be possible to recover these files successfully. However, Disk Drill on Mac provides a comprehensive preview feature that allows you to evaluate the recoverability of your files before proceeding with the recovery process.
Additionally, Disk Drill on Mac supports the preview of various file formats, including documents, images, videos, audio files, and more. This allows you to have a clear idea of the content and quality of the files you are about to recover.
Summary
Previewing and selecting recoverable files with Disk Drill on Mac is a crucial step in the data recovery process. It allows you to verify the integrity of the files before performing the recovery, ensuring that the recovered data is complete and usable. Take advantage of the comprehensive preview feature in Disk Drill on Mac to make informed decisions about the files you want to recover.
Recovering Lost Data with Disk Drill on Mac
Disk Drill is a powerful data recovery tool that you can use to recover lost or deleted files on your Mac. With its intuitive interface and advanced scanning algorithms, Disk Drill makes it easy to recover data from a variety of storage devices, including hard drives, USB flash drives, memory cards, and more.
Step 1: Install and Launch Disk Drill
Start by downloading and installing Disk Drill on your Mac. Once the installation is complete, launch the application from your Applications folder or the Dock.
Step 2: Select a Disk for Recovery
From the list of available disks and partitions, select the one from which you want to recover your lost data. Click on the “Recover” button next to the selected disk.
Step 3: Scan for Lost Data
Disk Drill offers two scanning options: Quick Scan and Deep Scan. Quick Scan is faster and suitable for recently deleted files, while Deep Scan conducts a thorough scan of the entire disk and is more effective in retrieving lost or formatted data. Choose the appropriate scanning method and click on the “Scan” button to start the process.
Step 4: Preview and Select the Files to Recover
After the scanning process is complete, Disk Drill will display the recoverable files in a categorized list. You can preview each file to verify its content and quality. Select the files you want to recover by checking the corresponding checkboxes next to their names.
Step 5: Recover the Lost Data
Finally, click on the “Recover” button to start the recovery process. Choose a location to save the recovered files that is different from the original disk to avoid overwriting the lost data.
- Make sure you have enough free space on the destination disk.
- Do not save the recovered files back to the same disk you are recovering from to prevent data loss.
- If you are unable to find the desired files, you can also try the “All Files” option in the file type filters.
By following these steps, you should be able to recover your lost data with Disk Drill on Mac. Remember to regularly back up your important files to prevent data loss in the future.
Preventing Data Loss with Disk Drill on Mac
1. Install Disk Drill

Before you can start preventing data loss with Disk Drill on your Mac, you’ll need to install the software. You can download Disk Drill from the official website and follow the installation instructions provided. Make sure to download the correct version for your operating system.
2. Enable Data Protection Features
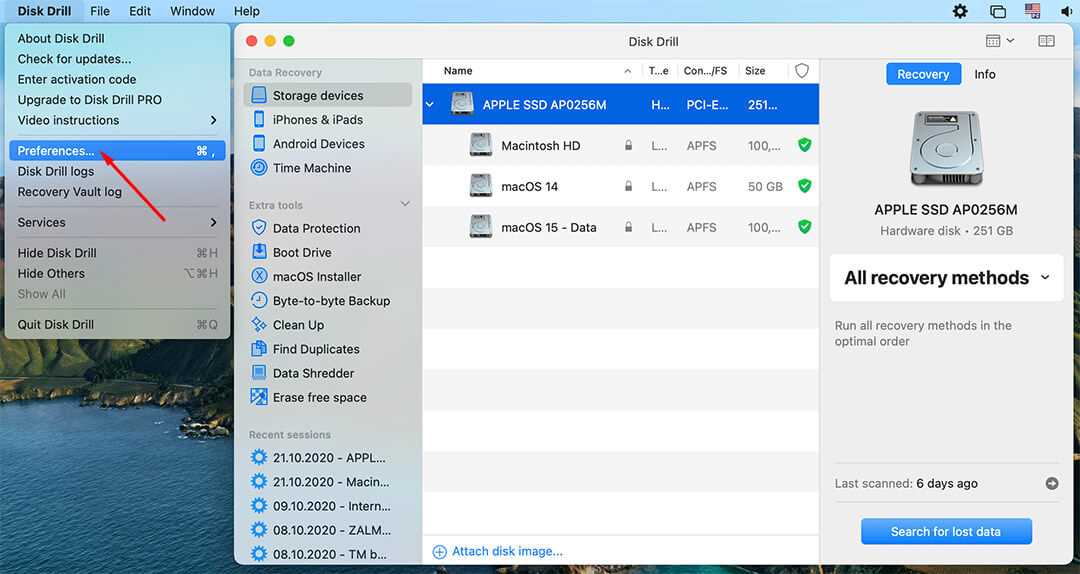
Disk Drill offers several data protection features that can help prevent data loss on your Mac. To enable these features, open Disk Drill and go to the Preferences menu. From there, select the “Data Protection” tab and choose the options you’d like to enable. Some of the available features include “Recovery Vault” and “Guaranteed Recovery”.
3. Set up Regular Backups
In addition to the data protection features offered by Disk Drill, it is also important to regularly back up your data to prevent loss. Disk Drill allows you to schedule automatic backups, ensuring that your files are consistently saved in a safe location. To set up regular backups, go to the “Backups” tab in the Preferences menu and configure the desired settings.
4. Monitor Disk Health
Disk Drill includes a feature that allows you to monitor the health of your disks. By regularly checking the status of your disks, you can identify any potential issues and take action before data loss occurs. To monitor your disk health, go to the “S.M.A.R.T. Monitoring” tab in the Preferences menu and enable the feature. Disk Drill will then provide regular updates on the status of your disks.
5. Educate Yourself on Data Recovery
Even with preventative measures in place, data loss can still occur. It’s important to educate yourself on data recovery techniques in case you ever find yourself in a situation where you need to restore lost files. Disk Drill provides resources and tutorials on data recovery, so take the time to familiarize yourself with the process.
6. Keep Disk Drill Updated
To ensure that you are benefiting from the latest features and improvements, it’s important to keep Disk Drill updated. Regularly check for updates by going to the “Disk Drill” menu and selecting “Check for Updates”. If a new version is available, follow the prompts to download and install it.
Conclusion
Preventing data loss is crucial for protecting your files and ensuring that you don’t lose important information. By installing Disk Drill on your Mac and following these steps, you can significantly reduce the risk of data loss and have peace of mind knowing that your files are safe.
FAQ:
How do I find Disk Drill on my Mac?
To find Disk Drill on your Mac, you can follow these steps:
Is Disk Drill pre-installed on Mac?
No, Disk Drill is not pre-installed on Mac. You need to download and install it separately.
Where can I download Disk Drill for Mac?
You can download Disk Drill for Mac from the official website of CleverFiles. Just go to their website and find the download link.
How do I install Disk Drill on my Mac?
To install Disk Drill on your Mac, you need to download the DMG file from the official website. Once downloaded, double-click on the DMG file and drag the Disk Drill icon into your Applications folder. That’s it, Disk Drill is now installed on your Mac.
Is Disk Drill free to use on Mac?
Disk Drill offers a free version for Mac with limited features. However, if you need all the advanced features, you can upgrade to the Pro version with a one-time payment.
Video:

Meet Harrison Clayton, a distinguished author and home remodeling enthusiast whose expertise in the realm of renovation is second to none. With a passion for transforming houses into inviting homes, Harrison's writing at https://thehuts-eastbourne.co.uk/ brings a breath of fresh inspiration to the world of home improvement. Whether you're looking to revamp a small corner of your abode or embark on a complete home transformation, Harrison's articles provide the essential expertise and creative flair to turn your visions into reality. So, dive into the captivating world of home remodeling with Harrison Clayton and unlock the full potential of your living space with every word he writes.


