What You Need to Know About Drilling Through Angle Iron

Drilling through angle iron can be a tricky task if you’re not familiar with the process. Angle iron is a versatile and commonly used material in construction, but drilling through it requires the right tools and techniques. Whether you’re a DIY enthusiast or a professional contractor, understanding how to drill through angle iron is an essential skill to have.
One of the first things you need to consider when drilling through angle iron is the type of drill bit you will use. A high-speed steel (HSS) drill bit is the most common choice for drilling through metal. It is durable and can withstand the heat generated during the drilling process. However, if you’re drilling through thicker angle iron or other tough materials, you may need to use a cobalt drill bit, which is even more heat-resistant and can handle higher drilling speeds.
Another important factor to consider is the speed at which you should drill through angle iron. Using the right speed is crucial to avoid damaging the drill bit or the angle iron. Start drilling at a slower speed to create a small pilot hole, and then gradually increase the speed as you drill deeper into the metal. This will prevent the drill bit from overheating and prolong its lifespan.
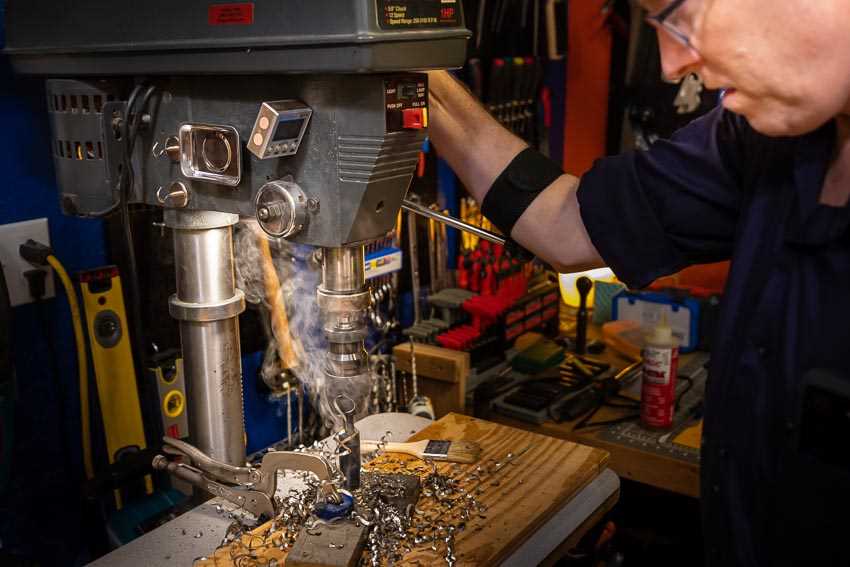
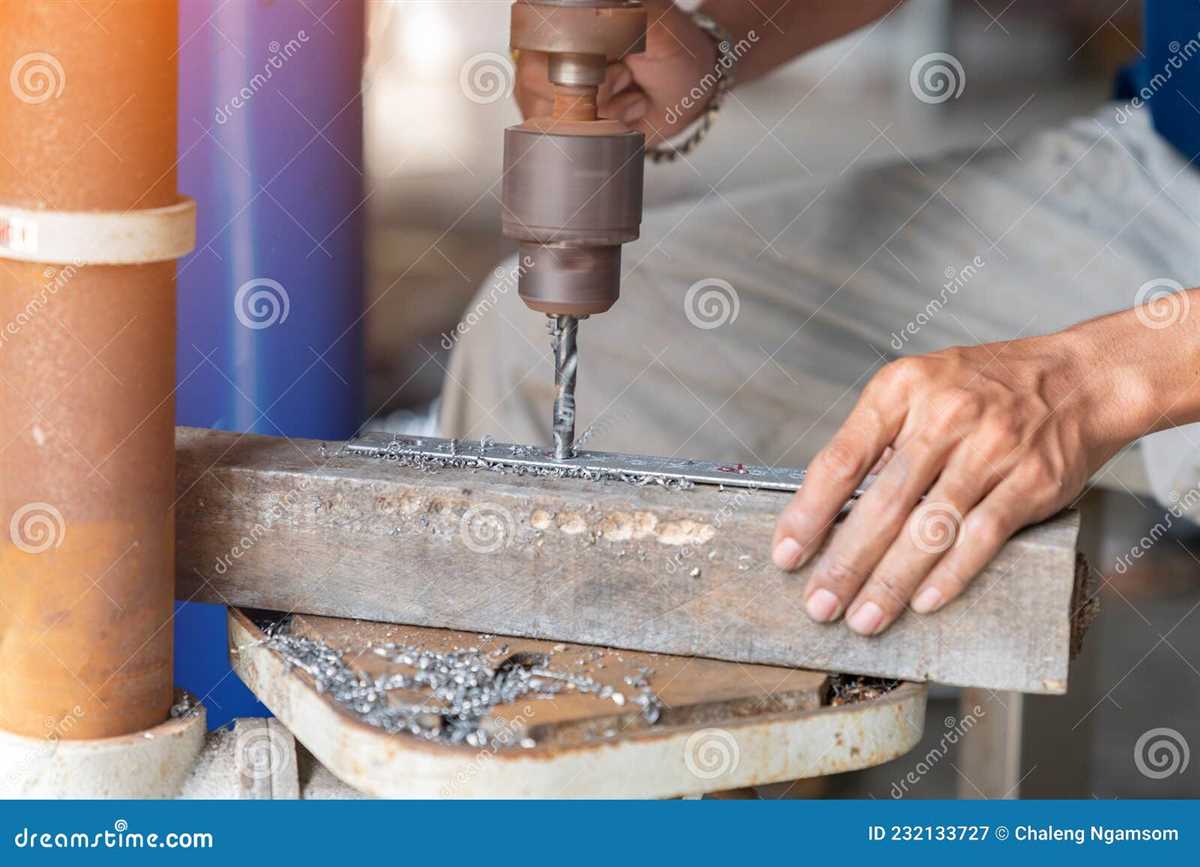
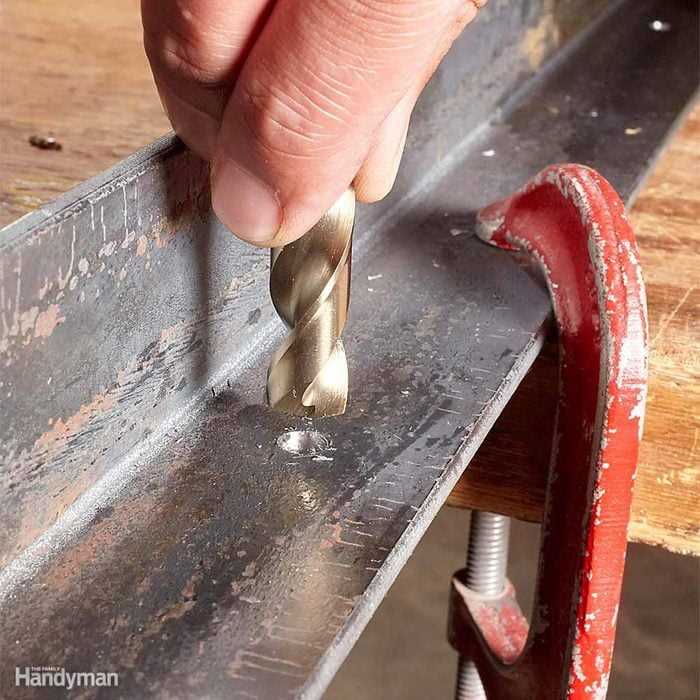
It’s also essential to use the right technique when drilling through angle iron. Make sure to secure the angle iron in place using clamps or a vise to prevent it from moving during the drilling process. Apply steady, even pressure while drilling, and avoid using excessive force, as this can cause the drill bit to break or damage the angle iron. Additionally, you may want to consider using cutting fluid or lubricant to reduce friction and heat generation while drilling.
By following these tips and techniques, you can successfully drill through angle iron with ease and precision. Whether you’re installing shelves, constructing a metal frame, or working on any other project that requires drilling through angle iron, having a good understanding of the process will save you time, effort, and frustration in the long run.

Drilling Through Angle Iron: What You Should Keep in Mind
Choose the Right Drill Bit
When drilling through angle iron, it is important to choose the right drill bit for the job. A standard twist drill bit is usually sufficient for drilling through angle iron, but you may also consider using a cobalt or titanium-coated drill bit for added durability and strength.
Use a Center Punch
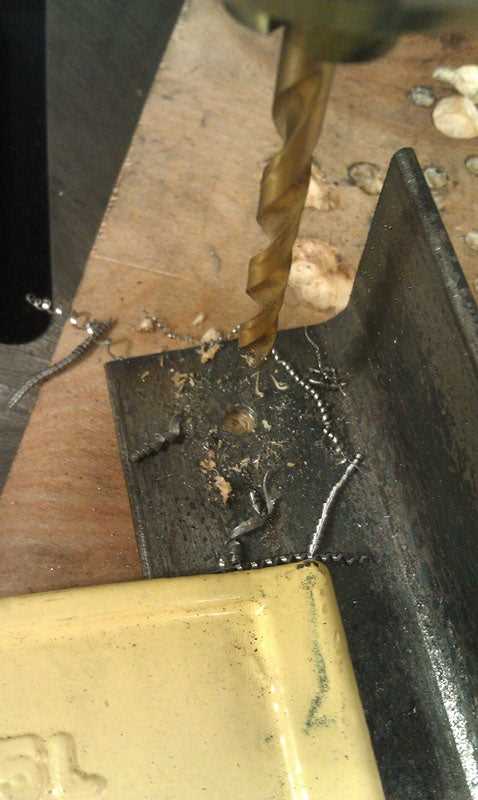
Prior to drilling, it is recommended to use a center punch to create a small indentation in the area where you plan to drill. This will help guide the drill bit and prevent it from slipping or wandering off track.
Apply Cutting Fluid
Applying cutting fluid while drilling through angle iron can help reduce heat and friction, prolonging the life of the drill bit and making the drilling process smoother. Be sure to apply cutting fluid generously and periodically throughout the drilling process.
Start Slow and Steady
When drilling through angle iron, it is best to start at a slower speed and gradually increase the speed as needed. This will help prevent the drill bit from overheating and breaking, especially when drilling through thicker iron.

Secure the Angle Iron
Before drilling, make sure the angle iron is securely clamped or mounted in place. This will prevent the metal from moving or vibrating during the drilling process, resulting in a more accurate and clean hole.
Wear Safety Gear
Always remember to wear appropriate safety gear when drilling through angle iron. Safety glasses or goggles, gloves, and ear protection are recommended to protect against flying metal chips, sharp edges, and noise.
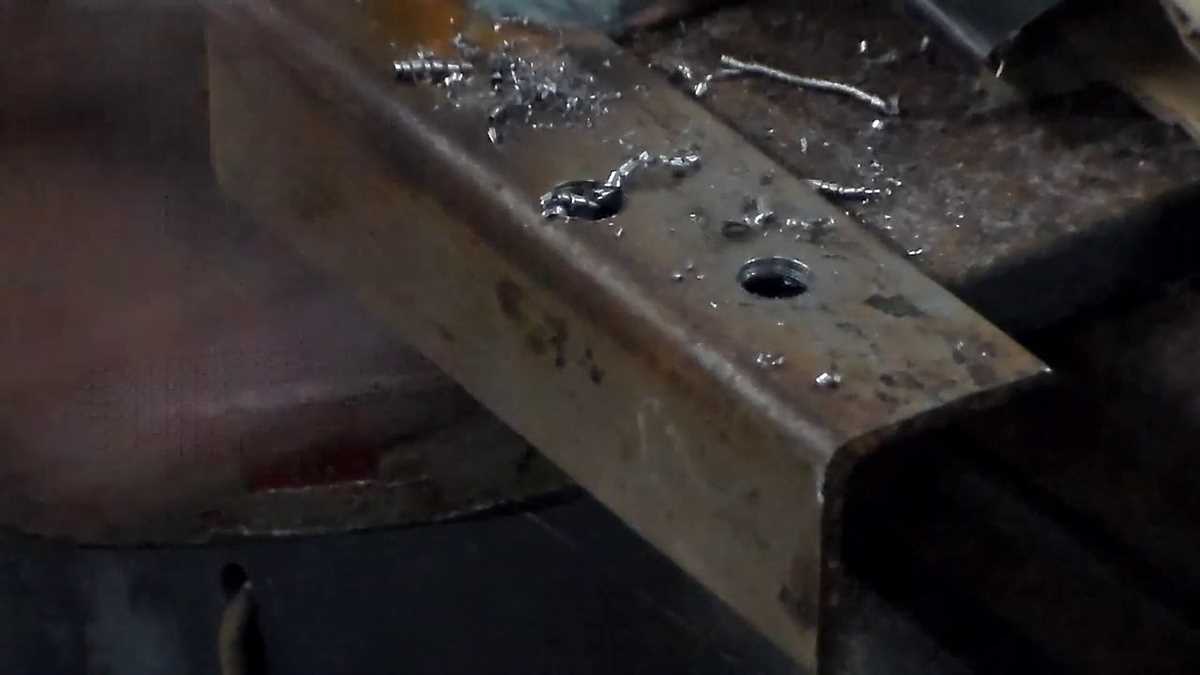
Clean Up and Deburr
After drilling through angle iron, it is important to clean up the work area and remove any metal chips or debris. Additionally, be sure to deburr the drilled hole using a file or deburring tool to remove any sharp edges or burrs.
Consider Professional Help
If you are unfamiliar with drilling through angle iron or lack the necessary tools, it may be best to seek professional help. A skilled metalworker or fabrication shop can provide the expertise and equipment needed to ensure a successful and precise drilling process.
Conclusion
Drilling through angle iron requires careful preparation and attention to detail. By following these tips and guidelines, you can achieve accurate and clean holes in angle iron for various applications.

Understanding Angle Iron and Its Applications
What is Angle Iron?
Angle iron, also known as L bracket or angle bar, is a versatile and commonly used structural steel shape. It is L-shaped with two legs of equal length and a 90-degree angle between them. The legs are typically named as the “long leg” and the “short leg.”
Properties of Angle Iron
Angle iron is made from hot-rolled steel and is known for its strength and durability. It is available in various sizes and thicknesses, providing flexibility in applications. The most common types are equal leg angle iron and unequal leg angle iron.
Applications of Angle Iron
Angle iron finds wide usage in various industries and applications, thanks to its structural properties. Some common applications include:
- Construction: Angle iron is commonly used for structural support in buildings, bridges, and other construction projects. It provides strength and stability.
- Frames and Supports: Angle iron is often used to create frames and supports for shelves, tables, and other furniture. It adds stability and rigidity.
- Reinforcement: Angle iron is utilized to reinforce corners and edges, providing additional strength to structures.
- Industrial Equipment: Angle iron is commonly used for manufacturing equipment and machinery. It provides a sturdy base and support for various components.
Drilling Through Angle Iron
When drilling through angle iron, it is important to use the appropriate drill bit and drilling technique. The hardness of the steel requires a high-speed steel (HSS) or cobalt drill bit. Lubricating the drill bit and using a slow drilling speed can help prevent overheating and prolong the life of the drill bit. Additionally, using a center punch to create a starting point can improve accuracy and minimize wandering of the drill bit.

Conclusion
Angle iron is a versatile and widely used structural steel shape with numerous applications across various industries. Understanding its properties and applications can help ensure its proper usage and maximize its benefits.
Key Considerations Before Drilling Through Angle Iron
- Material Quality: Before drilling through angle iron, it is important to ensure that the material is of high quality. Angle iron with defects or inconsistencies may lead to difficulties during the drilling process and may result in a weakened structure.
- Drill Bit Selection: Choosing the right drill bit is essential for successfully drilling through angle iron. Consider the thickness and hardness of the angle iron to select the appropriate drill bit material and size. Carbide or cobalt drill bits are often recommended for drilling through metal.
- Drill Speed: Maintaining an appropriate drill speed is crucial for achieving clean and precise holes in angle iron. High speeds may cause the drill bit to overheat or result in a rough hole, while low speeds may cause the drill bit to dull quickly or create excessive friction.
- Drill Lubrication: Using lubrication during the drilling process can help reduce friction, ease the drilling operation, and prolong the life of the drill bit. Applying a suitable cutting oil or lubricant will also help to dissipate heat and prevent the drill bit from sticking or binding.
- Clamping: Properly securing the angle iron in place before drilling is crucial to prevent movement or shifting during the drilling process. Using clamps or a vise can help ensure stability and accuracy.
Additional Tips:
- Start with a smaller pilot hole before drilling a larger hole through the angle iron.
- Use a center punch to create a small indentation at the drilling point to help guide the drill bit and prevent it from slipping.
- Apply steady pressure while drilling to maintain control and prevent the drill bit from wandering.
- Ensure that the drill is properly aligned with the desired hole location to prevent mistakes or misalignment.
- Wear appropriate personal protective equipment, such as safety glasses and gloves, to protect against flying metal chips and debris.
By considering these key factors and following best practices, drilling through angle iron can be done effectively and safely.
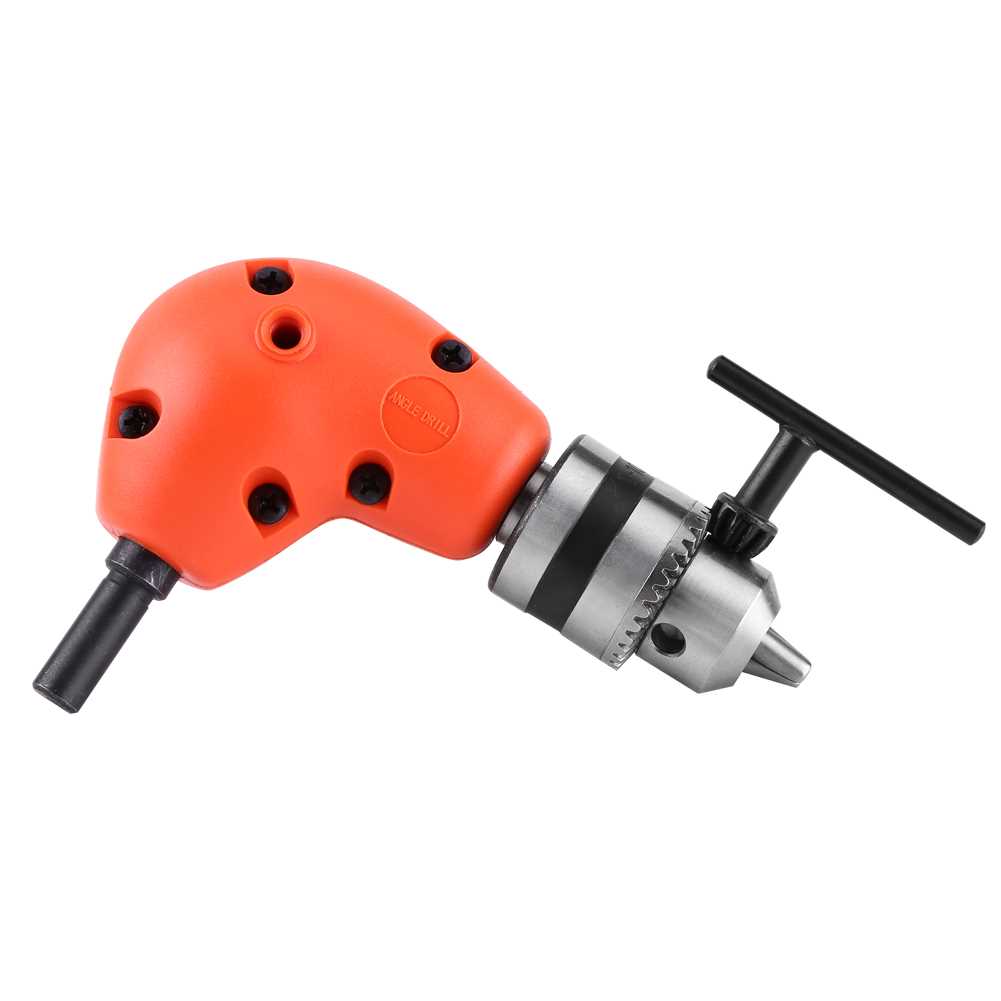
Choosing the Right Tools for Drilling Angle Iron
Drilling through angle iron requires the use of the right tools to ensure efficient and effective drilling. The following are some tools that are commonly used for drilling angle iron:
Drill
The most basic tool needed for drilling angle iron is a drill. There are two main types of drills that can be used: handheld drills and drill presses.

- A handheld drill is a versatile tool that can be used for various drilling tasks. It provides more mobility but may require more effort to operate.
- A drill press is a stationary tool that holds the angle iron in place, providing stability and precision. It is best suited for drilling larger holes or when multiple holes need to be drilled.
Drill Bits
The choice of drill bits is crucial for drilling through angle iron. Different types of drill bits are available, including:
- HSS (High-Speed Steel) drill bits are the most common type used for general drilling tasks.
- Cobalt drill bits are more suitable for drilling harder materials like stainless steel.
- Carbide drill bits are extremely durable and can be used for drilling through angle iron as well as other tough materials.
Clamps
Clamps are essential for holding the angle iron securely in place during drilling. They help prevent movement and ensure accurate drilling. There are various types of clamps available, including C-clamps and bar clamps, that can be used depending on the size and shape of the angle iron.
Lubricant
Using a lubricant while drilling angle iron can help reduce friction and heat build-up, making the drilling process smoother. Cutting fluid or a lubricating oil can be applied to the drill bit before drilling.
Safety Gear
When drilling angle iron or any other material, it is important to wear appropriate safety gear. This includes safety glasses to protect the eyes from flying debris, gloves to protect the hands, and ear protection if using a drill press or working with loud tools.
By choosing the right tools for drilling angle iron and taking necessary safety precautions, you can ensure a successful drilling experience.
Ensuring Proper Safety Measures for Drilling
1. Wear Protective Gear
Before starting any drilling project involving angle iron, it is crucial to ensure your personal safety by wearing the appropriate protective gear. This includes safety glasses or goggles to protect your eyes from flying debris, gloves to protect your hands, and ear protection to prevent hearing damage from the noise produced by the drilling.
2. Choose the Right Drill Bit
Using the correct drill bit is essential for drilling through angle iron. A drill bit made specifically for metal or a cobalt drill bit is recommended. These types of drill bits are designed to withstand the hardness of the angle iron and provide better control and precision during the drilling process.
3. Secure the Angle Iron
Prior to drilling, make sure to secure the angle iron firmly in place. This can be done by using clamps or a vise to prevent the iron from moving or vibrating during the drilling process. A secure and stable work surface is also important to ensure accuracy and reduce the risk of accidents.
4. Mark the Drilling Points
Before you start drilling, use a marker or a center punch to mark the exact points where you want to drill. This will help you maintain accuracy and avoid drilling in the wrong place. Double-check your markings to ensure they are aligned and clear.
5. Start with a Pilot Hole
When drilling through angle iron, it is recommended to start with a pilot hole. A pilot hole is a smaller hole drilled first to provide guidance for the larger drill bit. This helps prevent the drill bit from wandering or slipping, especially when drilling into harder metals.
6. Use Lubrication
Using a lubricant, such as cutting oil or a lubricating spray, can help reduce friction and heat during the drilling process. This can prolong the life of your drill bits and prevent overheating. Apply the lubricant to the drill bit and the area being drilled to ensure smooth and efficient drilling.
7. Drill at the Right Speed and Pressure
To achieve clean and accurate holes in angle iron, it is important to drill at the right speed and pressure. Using excessive speed or pressure can cause the drill bit to dull or break. Start drilling at a slower speed and gradually increase the speed if needed. Apply consistent and moderate pressure to maintain control and prevent the drill bit from “grabbing” the material.
8. Check for Burrs and Sharp Edges
After drilling through angle iron, inspect the drilled holes for any burrs or sharp edges that may have been created. Use a deburring tool or a file to remove any burrs or sharp edges to prevent injury and ensure a clean and safe finish.
By following these proper safety measures, you can minimize the risk of accidents and injuries when drilling through angle iron. Remember to always prioritize your safety and use caution when working with power tools and metal materials.
Step-by-Step Guide on How to Drill through Angle Iron
Gather the Necessary Tools and Materials
Before you start drilling through angle iron, make sure you have all the necessary tools and materials:
- Angle iron
- Drill
- Drill bits suitable for metal
- Clamps
- Center punch
- Hammer
- Safety goggles
- Work gloves
Prepare the Work Area
Clean the work area and ensure it is free from any hazards or debris. Place the angle iron securely on a stable surface and use clamps to hold it in place.
Mark the Drilling Points
Using a center punch and a hammer, mark the drilling points on the angle iron. The center punch will create a small indent that will help prevent the drill from slipping.
Select the Right Drill Bit
Choose a drill bit suitable for drilling through metal. The size of the drill bit should be appropriate for the hole you want to create in the angle iron.
Put on Safety Gear
Before you begin drilling, put on safety goggles to protect your eyes and work gloves to protect your hands.
Start Drilling
- Align the drill bit with the marked drilling point.
- Hold the drill firmly and apply steady pressure as you start drilling.
- Keep the drill perpendicular to the angle iron to ensure straight and accurate holes.
- Apply lubricant or cutting oil to the drill bit to reduce friction and prevent overheating.
- Drill at a slow speed, especially when the drill bit is about to penetrate the other side of the angle iron.
- Periodically pause and remove the drill bit to clear any metal shavings.
Clean the Drill Holes
Once you have completed drilling, use a file or deburring tool to clean any sharp edges or burrs around the drill holes.
Inspect and Test the Holes
Inspect the drilled holes for any irregularities or issues. Test the holes by inserting bolts or screws to ensure they fit properly.
Done!
Congratulations! You have successfully drilled through angle iron. Make sure to clean up your work area and safely store your tools.
Common Mistakes to Avoid When Drilling Angle Iron

1. Using the Wrong Drill Bit
One of the most common mistakes people make when drilling angle iron is using the wrong drill bit. Angle iron is a hard and durable material, so you need to use a drill bit that is designed to cut through metal. Using a wood or masonry drill bit can result in a poor-quality hole or even damage to the drill bit.
2. Not Using Lubricant
Another mistake to avoid is not using lubricant when drilling angle iron. The heat generated by drilling can cause the metal to become hot and can make the drilling process more difficult. Using a lubricant such as cutting oil can help to cool down the metal and reduce friction, making it easier to drill through.
3. Using the Wrong Speed
Using the wrong drilling speed can also lead to problems when drilling angle iron. If you go too fast, you risk overheating the metal and dulling the drill bit. If you go too slow, you may not be able to penetrate the metal effectively. It’s important to find the right balance and use a moderate drilling speed to achieve the best results.
4. Not Securing the Angle Iron Properly
When drilling angle iron, it’s important to secure it properly to prevent it from moving during the drilling process. If the angle iron is not firmly held in place, it can vibrate or move, resulting in an inaccurate hole or a broken drill bit. Use clamps or a vise to secure the angle iron securely before drilling.
5. Ignoring Safety Precautions
Finally, one of the biggest mistakes to avoid when drilling angle iron is ignoring safety precautions. Angle iron can be sharp and may have burrs or rough edges, so it’s essential to wear protective gloves and eye goggles to prevent injury. Additionally, ensure that the work area is clear of any obstacles that could cause accidents during the drilling process.
By avoiding these common mistakes, you can ensure a successful and efficient drilling process when working with angle iron.
Tips for Achieving Clean and Precise Holes in Angle Iron
Drilling through angle iron can be a challenging task, but with the right techniques and tools, you can achieve clean and precise holes. Here are some tips to help you get the job done effectively:
1. Choose the Right Drill Bit
When drilling through angle iron, it’s important to use a drill bit that is specifically designed for metal. High-speed steel (HSS) drill bits are a popular choice for drilling into angle iron due to their durability and ability to cut through tough materials. Make sure to select a drill bit that matches the diameter of the hole you want to create.
2. Mark the Hole Location
Before drilling, mark the exact location where you want to create the hole on the angle iron. Use a pencil or a center punch to make a small indentation, which will prevent the drill bit from slipping as you begin to drill.
3. Secure the Angle Iron
Angle iron can be difficult to hold steady while drilling, so it’s essential to secure it properly. You can use clamps or vises to hold the angle iron firmly in place, ensuring that it doesn’t shift or move during the drilling process. This will help prevent any accidental damage or injuries.
4. Start with a Pilot Hole
A pilot hole is a small hole drilled before creating the final hole. It guides the drill bit and helps prevent it from wandering off course. Start by drilling a pilot hole using a smaller drill bit than the one you’ll use for the final hole. This will make it easier to achieve a clean and accurate hole in the angle iron.
5. Use Lubrication
Drilling through angle iron can generate a lot of heat, which can potentially damage the drill bit. To reduce friction and heat, apply a lubricant such as cutting oil or a coolant to the drill bit. This will prolong the life of the drill bit and ensure smooth drilling.
6. Maintain Proper Speed and Pressure
When drilling through angle iron, it’s important to maintain a consistent speed and pressure. Using too much force or drilling too quickly can cause the drill bit to overheat or break. Apply moderate pressure and drill at a slow and steady pace to achieve the best results.
7. Check the Drill Bit Frequently
Throughout the drilling process, periodically check the drill bit for any signs of dullness or damage. If the drill bit becomes dull, it may not cut through the angle iron efficiently, resulting in a less clean and precise hole. If necessary, replace the drill bit with a new one to ensure the best drilling performance.
8. Clean Up the Hole
After drilling through the angle iron, it’s important to clean up the hole to remove any burrs or debris. You can use a deburring tool or a metal file to smooth out the edges of the hole and create a clean finish.
By following these tips, you can achieve clean and precise holes in angle iron, making your drilling projects more successful. Remember to prioritize safety and always wear protective equipment, such as safety goggles and gloves, when working with power tools.
Troubleshooting and Solutions When Facing Difficulties in Drilling Through Angle Iron
1. Dull Drill Bit
If you are experiencing difficulties in drilling through angle iron, one potential issue could be a dull drill bit. Over time, drill bits can become worn down and lose their sharpness, making it difficult to penetrate tough materials like angle iron.
• Solution: Replace the drill bit with a new one that is specifically designed for drilling through metal. A sharp drill bit will make the task much easier and more efficient.
2. Insufficient Cutting Lubrication
Another common problem when drilling through angle iron is insufficient lubrication. Without proper lubrication, the drill bit can overheat and become dull, leading to difficulties in drilling.
• Solution: Apply a cutting lubricant or coolant to the drill bit and the angle iron. This will help reduce friction and heat buildup, making the drilling process smoother. Make sure to reapply the lubricant as needed during the drilling process.
3. Improper Drill Speed or Pressure
If you are still facing difficulties, it could be due to improper drill speed or pressure. Using the wrong drill speed or applying too much pressure can lead to the drill bit not effectively cutting through the angle iron.
• Solution: Adjust the drill speed and pressure according to the material you are drilling. For angle iron, it is generally recommended to use a lower drill speed and moderate pressure. Slow and steady progress will help prevent the drill bit from overheating and increase drilling efficiency.
4. Incorrect Drill Bit Size
Using the wrong drill bit size can also cause difficulties when drilling through angle iron. If the drill bit is too small, it may not be able to create a clean hole, or it may get stuck in the material.
• Solution: Choose a drill bit that is specifically designed for metal and has the appropriate size for the hole you need to create. Ensure that the drill bit is securely attached to the drill chuck to prevent any slippage or wobbling that could damage the material.
5. Lack of Clamping or Support
When drilling through angle iron, insufficient clamping or support can cause the material to vibrate or move, making it difficult to control the drill and create accurate holes.
• Solution: Use clamps or other types of secure supports to hold the angle iron firmly in place. This will help stabilize the material and prevent it from moving or vibrating during the drilling process.
6. Inadequate Personal Protective Equipment
Drilling through angle iron can generate metal shavings, sparks, and other debris that can be potentially hazardous. If you are facing difficulties, it is important to ensure that you have proper personal protective equipment (PPE).
• Solution: Wear safety goggles to protect your eyes from flying debris and sparks. Additionally, use gloves and protective clothing to prevent injuries from sharp metal edges.
By troubleshooting and applying the appropriate solutions, you can overcome difficulties when drilling through angle iron and successfully complete your project. Remember to prioritize safety and use caution when working with power tools and metal materials.
FAQ:
What is angle iron and why is it used in construction?
Angle iron is a type of steel that has been bent into an L-shaped cross-section. It is commonly used in construction because it provides structural support and stability. Angle iron is used to create framework, braces, and supports for various structures such as buildings, bridges, and machinery.
Can I drill through angle iron without damaging it?
Yes, you can drill through angle iron without damaging it as long as you take the proper precautions. It is important to use the right drill bit and drilling technique to prevent the angle iron from becoming deformed or warped. Using a pilot hole and lubricating the drill bit can help reduce the risk of damage.
What type of drill bit should I use to drill through angle iron?
When drilling through angle iron, it is recommended to use a high-speed steel (HSS) drill bit or a cobalt drill bit. These drill bits are specifically designed to handle the toughness of steel and can provide better cutting performance. It is important to choose the right size of drill bit for the hole you want to create.
Do I need to use a pilot hole when drilling through angle iron?
Using a pilot hole is highly recommended when drilling through angle iron. A pilot hole is a smaller hole that is drilled before the main drilling operation. It helps to guide the drill bit and prevents it from wandering off course. This can lead to a more precise and clean hole in the angle iron.
What lubricant should I use when drilling through angle iron?
When drilling through angle iron, it is beneficial to use a lubricant such as cutting oil or drilling fluid. These lubricants help to reduce friction, heat, and wear on the drill bit, which can prolong its lifespan and improve drilling performance. Applying the lubricant to the drill bit and the surface of the angle iron can also help to prevent overheating and damage.
Video:


Meet Harrison Clayton, a distinguished author and home remodeling enthusiast whose expertise in the realm of renovation is second to none. With a passion for transforming houses into inviting homes, Harrison's writing at https://thehuts-eastbourne.co.uk/ brings a breath of fresh inspiration to the world of home improvement. Whether you're looking to revamp a small corner of your abode or embark on a complete home transformation, Harrison's articles provide the essential expertise and creative flair to turn your visions into reality. So, dive into the captivating world of home remodeling with Harrison Clayton and unlock the full potential of your living space with every word he writes.


