What Size Pre Drill for 1/4 Lag Bolt

When it comes to using lag bolts in your woodworking or construction projects, it’s important to predrill the holes properly. This helps prevent the wood from splitting and ensures a secure and tight fit for the bolts. One common question that often arises is what size pre drill is needed for a 1/4 lag bolt?
The answer to this question depends on the type of wood you are working with and the specific application. Generally, a pilot hole that is slightly smaller than the diameter of the lag bolt is recommended. In the case of a 1/4 inch lag bolt, a 3/16 inch pilot hole is typically appropriate.
By pre drilling a hole that is slightly smaller than the diameter of the lag bolt, you enable the threads of the bolt to bite into the wood and create a tight connection. This prevents the wood from splitting and ensures that the lag bolt can be fully tightened without any issues.
It’s worth noting that it can also be helpful to use a countersink bit to create a recessed area for the lag bolt head. This allows the bolt to sit flush with the surface of the wood, resulting in a neater and more professional appearance.
If you are unsure about the specific size of the pre drill hole to use for your particular project, it’s always a good idea to consult the manufacturer’s recommendations or seek advice from a professional. They can provide guidance based on the specific materials and conditions you are working with.

Understanding the Importance
When it comes to using lag bolts for various projects, understanding the importance of pre-drilling the right size hole is crucial. Pre-drilling helps to ensure that the lag bolt can be inserted smoothly and securely, without causing damage or splitting the wood.
The size of the pre-drill hole for a 1/4 lag bolt is an essential factor to consider. Using the wrong size drill bit can lead to problems such as loose or weak connections, stripped threads, or even breakage of the lag bolt itself.
Why is pre-drilling necessary?
Pre-drilling a hole prior to inserting a lag bolt allows for easier and more precise installation. The hole acts as a pilot, guiding the lag bolt into the wood, reducing the risk of it veering off course or getting stuck. This can be especially important when working with harder or denser types of wood.
Additionally, pre-drilling helps to prevent the wood from splitting. When a lag bolt is screwed directly into wood without a pilot hole, the threads of the bolt can put pressure on the surrounding wood fibers, causing them to separate and crack. This not only weakens the joint but can also compromise the overall structural integrity of the project.
What size pre-drill is needed for a 1/4 lag bolt?
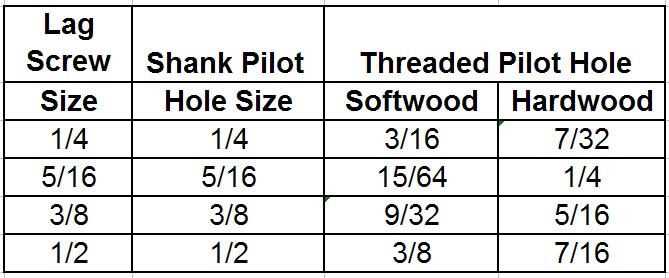
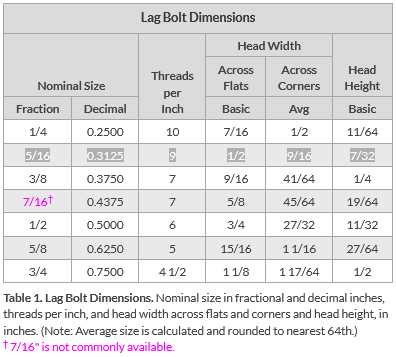
The nut size for a 1/4 lag bolt is typically 7/16 or 1/2 inch. To ensure a tight and secure fit, it is recommended to pre-drill a hole that is slightly smaller than the outer diameter of the lag bolt. For a 1/4 lag bolt, a 3/16 inch pre-drill hole is commonly used.

Factors to consider
It is important to consider the type of wood and the specific project requirements when determining the appropriate pre-drill size. Softer woods may require a slightly smaller pre-drill hole, while harder woods may necessitate a larger hole.
Additionally, the length and structural load bearing capacity of the lag bolt should be taken into account. Longer lag bolts or those that will be supporting heavier loads may require a slightly larger pre-drill hole to ensure proper anchoring and prevent splitting or breakage.
Conclusion
Understanding the importance of pre-drilling the right size hole for a 1/4 lag bolt is essential for safe and successful installations. Proper pre-drilling helps to ensure a secure connection, prevents damage to the wood, and maintains the overall strength and durability of the project. By taking into account the type of wood, project requirements, and considering the length and load bearing capacity of the lag bolt, you can confidently select the appropriate pre-drill size and achieve optimal results.
The Purpose of Pre Drilling
Pre drilling refers to the process of drilling a hole before inserting a fastener, such as a lag bolt, into a material. This step is often necessary to ensure a more secure and effective installation. The purpose of pre drilling is to create a pilot hole that helps guide the fastener into the material and reduces the risk of splitting or cracking the wood.
There are several reasons why pre drilling is important:

1. Preventing Material Damage
Pre drilling helps prevent damage to the material being fastened. When a fastener is driven directly into wood without a pilot hole, it can cause the wood to split or crack. By pre drilling a hole, the fastener can be inserted smoothly without putting unnecessary stress on the material.
2. Improving Accuracy
Pre drilling allows for greater accuracy and precision during the installation process. The pilot hole ensures that the lag bolt is inserted at the desired angle and depth, resulting in a more secure connection. This is especially important for projects that require multiple fasteners, as pre drilling helps to align the holes properly.
3. Increasing Fastener Strength
By pre drilling a hole, the fastener can grip the material more effectively. This increases the overall strength and stability of the connection. In the case of lag bolts, pre drilling ensures that the threads have a proper grip on the material, reducing the risk of the fastener becoming loose over time.

4. Preventing Splitting
One of the main reasons for pre drilling is to prevent splitting of the wood. This is particularly important when working with hardwood or dense materials. The pilot hole allows the fastener to be inserted without exerting excessive force on the wood fibers, reducing the risk of splitting.
Overall, pre drilling is an essential step in the installation process when using lag bolts or other fasteners. It helps to ensure a secure and long-lasting connection while minimizing the risk of damage to the material. By taking the time to pre drill, you can greatly improve the success and quality of your project.
Choosing the right Drill Bit
When it comes to drilling holes for lag bolts, it is crucial to choose the right drill bit size. The drill bit size determines the diameter of the hole, which should ideally match the size of the lag bolt being used. This ensures a secure and tight connection.
Determining the Drill Bit Size
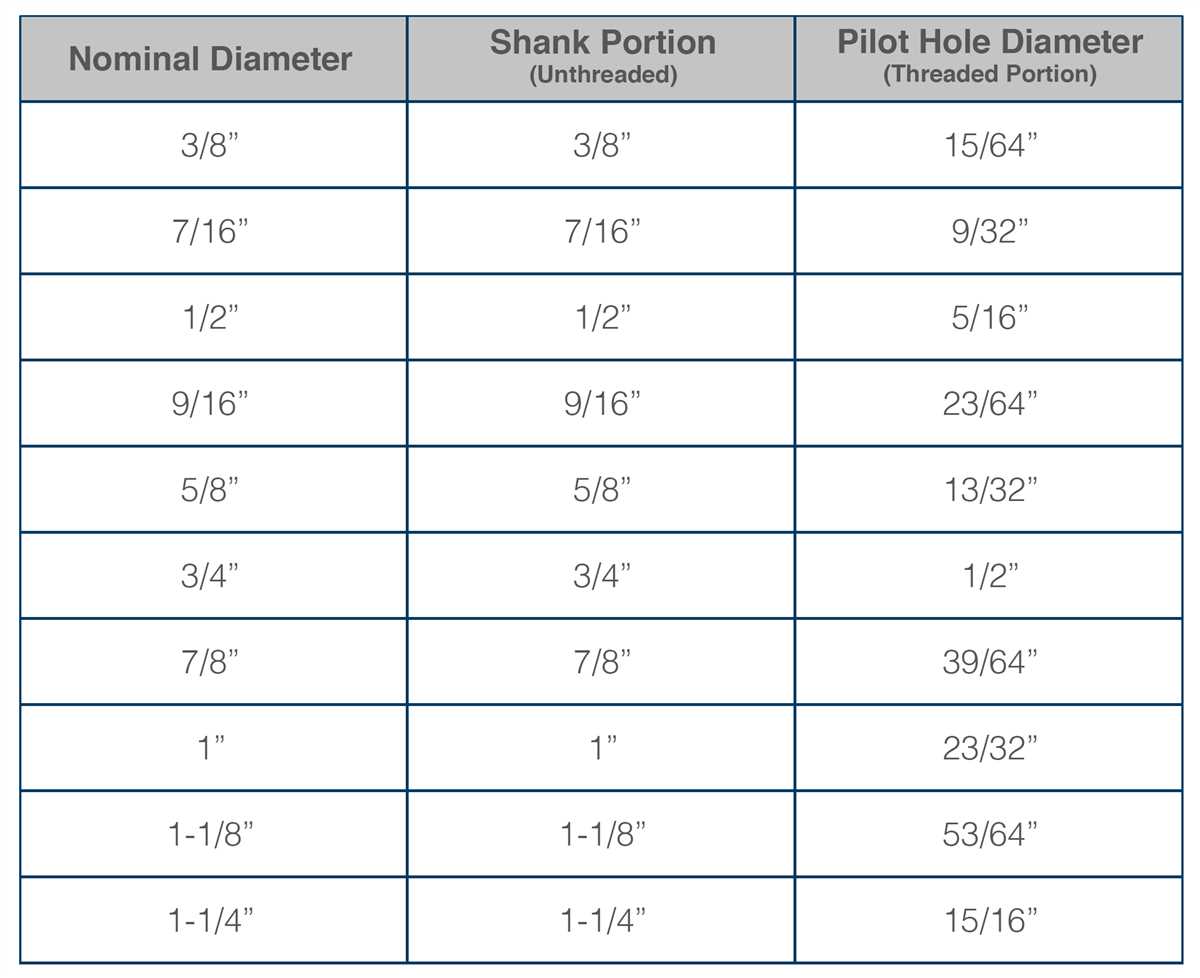
To determine the appropriate drill bit size for a 1/4 lag bolt, you need to consider the shank diameter of the bolt itself. The shank diameter refers to the smooth part of the bolt shaft, excluding the threads.
For a 1/4 lag bolt, the shank has a diameter of approximately 1/4 inch. The drill bit size should be slightly smaller than the shank diameter to allow for a snug fit. In this case, a 7/32 inch drill bit would be an appropriate choice.

Drilling the Hole
Once you have the right drill bit size, it’s important to use the drill properly to create the hole for the lag bolt. Follow these steps:
- Ensure that the drill is set to the correct rotation direction (usually clockwise).
- Insert the drill bit into the chuck of the drill and tighten it securely.
- Position the drill bit at the desired location for the hole.
- Apply steady pressure and start drilling at a slow speed.
- Gradually increase the speed as the hole gets deeper.
- Stop drilling once the desired depth is reached.
Tips for Successful Drilling
- Always wear safety goggles when drilling to protect your eyes from flying debris.
- Hold the drill steady and maintain control throughout the drilling process.
- Use a hammer drill or impact driver for harder materials.
- Use a backing board or clamp to prevent tear-out on the opposite side of the material.
- Keep the drill bit lubricated with cutting oil or lubricant to reduce friction and heat.
Conclusion
Choosing the right drill bit size is essential for creating a secure connection when using lag bolts. By using the appropriate size and following proper drilling techniques, you can ensure a strong and reliable installation.
Factors to Consider
- Wood Type: The type of wood you are using will determine the optimal pre-drill size for a 1/4 lag bolt. Hardwoods like oak or maple require a larger pre-drill size compared to softwoods like pine or cedar.
- Bolt Length: The length of the lag bolt you are using also plays a role in determining the pre-drill size. Longer bolts require a larger pre-drill size to ensure proper installation and hold.
- Pilot Hole Depth: It is important to consider the depth of the pilot hole when determining the pre-drill size. The pilot hole should be slightly deeper than the length of the bolt to allow for proper installation and prevent splitting of the wood.
- Thread Engagement: The amount of thread engagement (how far the bolt screws into the wood) can affect the pre-drill size. If you require more thread engagement, a smaller pre-drill size may be necessary to ensure a secure hold.
- Weight Load: The weight load that will be placed on the lag bolt is another important factor to consider. Heavier loads may require a larger pre-drill size to provide sufficient support and prevent the lag bolt from pulling out.
- Drill Bit Quality: Lastly, the quality and sharpness of the drill bit used for pre-drilling can also impact the size of the pre-drill hole. Dull or worn-out drill bits may result in a larger hole than desired, which can compromise the strength and stability of the lag bolt.
Proper Pre Drilling Technique
1. Choose the Right Drill Bit Size
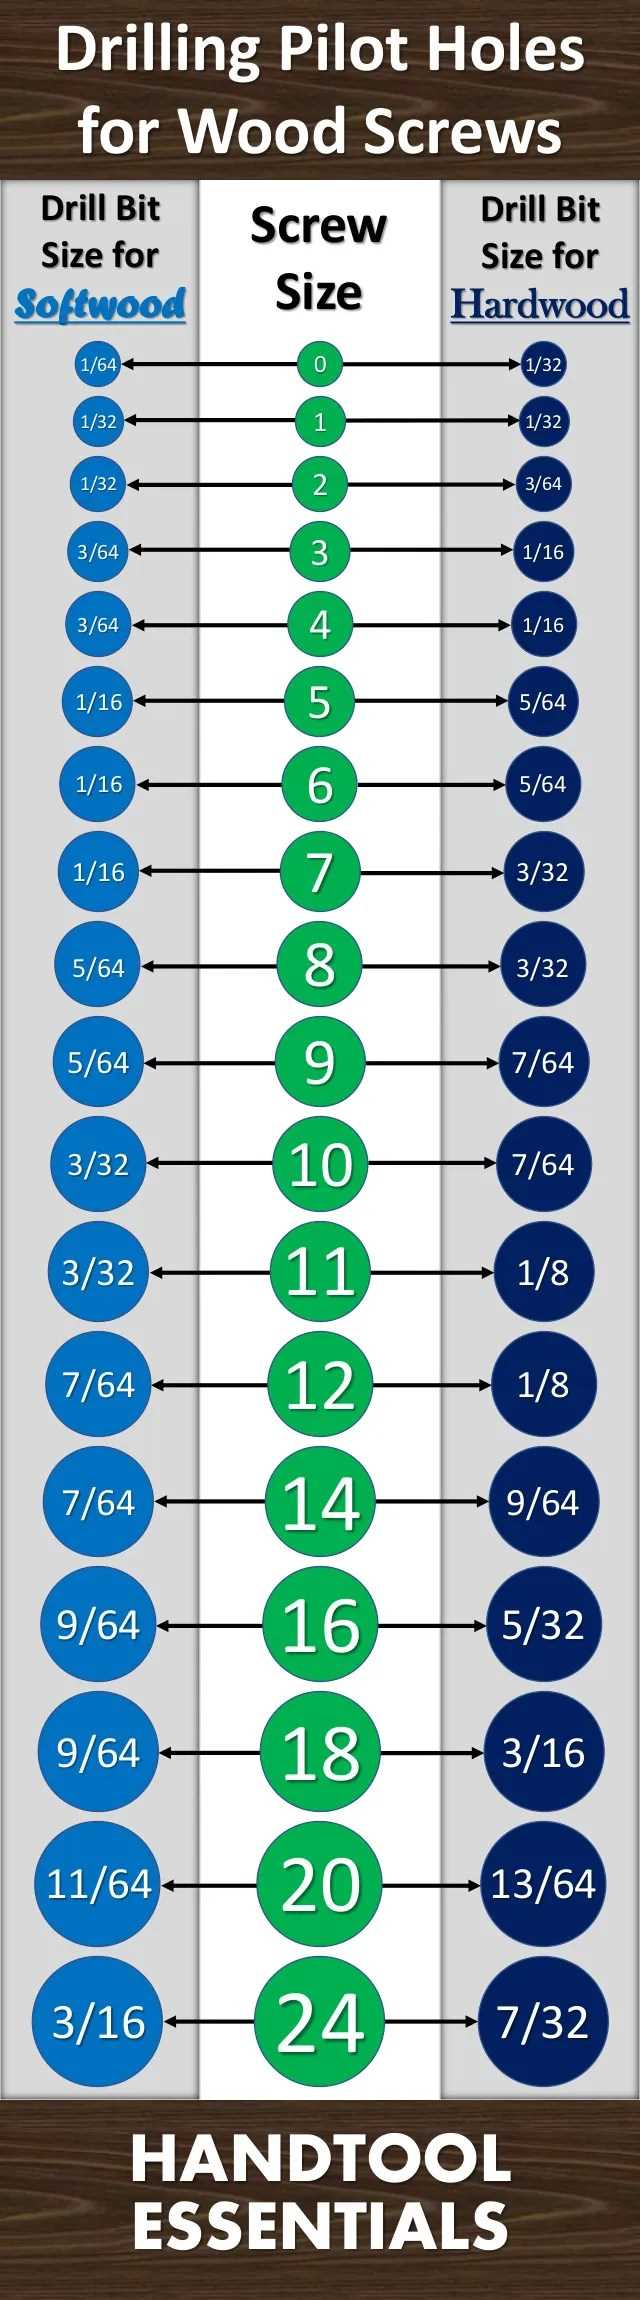
Before you start pre drilling for a 1/4 lag bolt, it’s important to select the right drill bit size. The recommended drill bit size for a 1/4 lag bolt is typically 3/16 inch. This size allows for a snug fit, ensuring that the lag bolt will securely hold the materials together.
2. Mark the Drilling Points
Once you have determined the correct drill bit size, mark the drilling points on the materials where you want to insert the lag bolts. Use a pencil or a marker to make clear and visible marks. This will help you accurately drill the holes in the right positions.
3. Secure the Materials
Before drilling, make sure to securely hold the materials in place. You can use clamps or a vice to keep the materials steady. This will prevent any movement or shifting during the drilling process, ensuring clean and accurate holes.
4. Start Pre Drilling
Attach the appropriate drill bit to your drill. Hold the drill perpendicular to the surface of the material and gently apply pressure to start drilling. Begin drilling at a slow speed and gradually increase the speed as the drill bit penetrates the material. Make sure to maintain a steady hand and apply consistent pressure to avoid any wobbling or wandering of the drill bit.
5. Check Depth and Clean the Holes
As you drill, periodically check the depth of the hole by removing the drill and inspecting the hole. This will help ensure that you reach the desired depth and size for the lag bolt. Once the holes are drilled to the correct depth, use a brush or compressed air to clean out any debris or wood chips from the holes.
6. Insert the Lag Bolts
After pre drilling the holes, you are now ready to insert the 1/4 lag bolts. Align the bolts with the drilled holes and apply firm pressure to insert the bolts into the holes. Use a wrench or socket to tighten the lag bolts until they are securely fastened.
7. Repeat the Process
Repeat the pre drilling technique for each lag bolt or drilling point, following the same steps outlined above. Take your time and ensure that each hole is drilled accurately and cleanly before inserting the lag bolts.
8. Test the Connection
After all the lag bolts are inserted and tightened, test the connection by applying pressure or weight to the materials. Make sure the connection is secure and there is no movement or loosening of the lag bolts. If any adjustments or further tightening is required, use the appropriate tools to ensure a strong and secure connection.
By following these proper pre drilling techniques, you can ensure that your 1/4 lag bolts are installed correctly and securely. This will provide a strong and reliable connection between the materials, giving you peace of mind and confidence in your construction or woodworking project.
The Step-by-Step Guide
1. Gather the necessary materials
Before you begin, make sure you have all the necessary materials and tools:
- Lag bolts
- Drill
- Drill bit
- Tape measure
- Pencil or marker
- Protective eyewear
2. Determine the right drill bit size
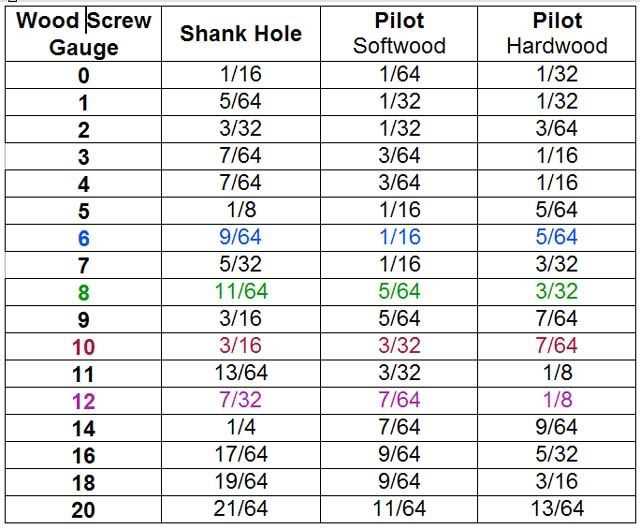
The size of the drill bit you will need depends on the diameter of the lag bolt. Use a tape measure to measure the diameter of the lag bolt. Once you have the measurement, consult a drill bit chart to determine the appropriate size. For a 1/4″ lag bolt, a 5/32″ or 11/64″ drill bit is typically recommended.
3. Prepare the drilling area
Before you start drilling, ensure that the area is clear of any obstacles or debris. This will help prevent any accidents and ensure a clean installation of the lag bolt.
4. Mark the drilling spot
Using a pencil or marker, mark the spot where you want to place the lag bolt. Make sure to measure and mark the spot accurately, as this will determine the stability of the installation.
5. Put on protective eyewear
Safety should always be a priority. Before you start drilling, put on a pair of protective eyewear to shield your eyes from any debris that may fly off while drilling.
6. Start drilling
Attach the appropriate drill bit to your drill. Hold the drill firmly and position the drill bit on the marked spot. Slowly start drilling, applying steady pressure. Make sure the drill bit is perpendicular to the surface you are drilling into to ensure a straight and secure installation.
7. Drill to the appropriate depth
Continue drilling until you reach the desired depth. The depth will depend on the length of the lag bolt and the material you are drilling into. Measure the length of the lag bolt and mark the appropriate depth on the drill bit with a piece of tape to ensure you do not drill too deep.
8. Insert the lag bolt
Once you have reached the desired depth, remove the drill bit from the hole. Insert the lag bolt into the hole and use either a socket wrench or an adjustable wrench to tighten it. Make sure the lag bolt is secure and does not wobble.
9. Repeat the process
If you need to install multiple lag bolts, repeat steps 4 to 8 for each hole. Make sure to measure and mark the spots accurately to ensure a secure installation.
10. Clean up and test
Once you have installed all the lag bolts, clean up the work area by removing any debris or dust. Test the stability of the installation by applying pressure or gently pulling on the lag bolts to make sure they are secure.
11. Enjoy your secure installation
You have successfully installed lag bolts using the appropriate pre-drilling size. Now you can enjoy the stability and security they provide for your project.
Common Mistakes to Avoid
1. Using the wrong pre-drill size
One of the most common mistakes when using lag bolts is not using the correct pre-drill size. It’s important to pre-drill a hole that is slightly smaller than the diameter of the lag bolt to ensure a secure and tight fit. Using the wrong pre-drill size can result in a loose connection and a weaker joint.
2. Over-tightening the bolts
Another common mistake is over-tightening the lag bolts. While it’s important to tighten them securely, applying excessive force can strip the threads of the bolt or cause the wood to split. It’s best to tighten the lag bolts until they are snug, but be careful not to overdo it.
3. Not using washers
Avoid the mistake of not using washers when using lag bolts. Washers help distribute the load and prevent the bolt from pulling through the wood. They also provide a larger surface area for the bolt head or nut to grip onto, resulting in a stronger connection.
4. Choosing the wrong length of bolts
Using lag bolts that are too short or too long for the intended application can lead to problems. Bolts that are too short may not provide enough thread engagement, while bolts that are too long can stick out unnecessarily or interfere with other components. It’s important to choose the right length of bolts based on the thickness of the materials being fastened.
5. Neglecting to use a pilot hole
Not using a pilot hole before driving in the lag bolt is another common mistake. A pilot hole helps guide the bolt and prevents the wood from splitting. The size of the pilot hole should be slightly smaller than the shaft of the bolt, allowing for easy insertion while still providing enough grip.
6. Failing to check for alignment
Before driving in the lag bolts, it’s important to check for alignment of the materials being fastened. Failing to do so may result in misaligned holes, which can lead to a weak and unstable joint. Take the time to ensure proper alignment before proceeding with the installation.
7. Ignoring the recommended torque specifications
Each lag bolt has a recommended torque specification provided by the manufacturer. Ignoring these specifications and either overtightening or undertightening the bolts can lead to problems. It’s important to use a torque wrench to tighten the bolts to the specified torque, ensuring a secure and safe installation.
8. Not using proper safety precautions
When working with lag bolts, it’s essential to follow proper safety precautions. This includes wearing safety glasses to protect your eyes from flying debris, using gloves to prevent injuries, and using ear protection when operating power tools. Failure to follow these precautions can result in serious accidents and injuries.
9. Skipping regular maintenance
To ensure the longevity and strength of your lag bolt connections, regular maintenance is essential. This includes periodically checking the tightness of the bolts, inspecting for any signs of corrosion or damage, and replacing any worn or damaged bolts. Skipping regular maintenance can lead to weakened and insecure connections over time.
10. Using lag bolts for the wrong applications
Lastly, using lag bolts for the wrong applications can lead to failures. Lag bolts are designed for heavy-duty applications in wood and are not suitable for all materials and situations. It’s important to choose the appropriate fastener for the specific application to ensure a safe and secure connection.
Prevent Damage and Ensure Safety
Choosing the Right Size Pre Drill
When using a 1/4 lag bolt, it is important to choose the correct size pre drill to prevent damage and ensure safety. The pre drill helps create a pilot hole in the wood, which allows the lag bolt to be inserted smoothly and securely.
Choosing the right size pre drill depends on various factors, such as the type of wood being used, the length of the lag bolt, and the intended load or stress on the connection.
A general rule of thumb is to use a pre drill that is slightly smaller in diameter than the lag bolt. For a 1/4 lag bolt, a 3/16 or 7/32 pre drill is commonly recommended. However, it is important to consult the manufacturer’s guidelines or engineering specifications for the specific project to determine the exact size pre drill to use.
Preventing Damage
Using the correct size pre drill helps prevent damage to the wood. If the pre drill is too small, it can cause the wood to split or crack when the lag bolt is inserted. On the other hand, if the pre drill is too large, the lag bolt may not have enough grip or stability, compromising the structural integrity of the connection.
In addition to using the right size pre drill, it is important to use the appropriate technique when drilling. Ensure that the drill is held steady and perpendicular to the wood surface to prevent any slippage or misalignment during drilling. It is also important to apply steady and even pressure when drilling the pre drill hole.
Ensuring Safety
Properly pre drilling the hole for a lag bolt helps ensure safety. The smooth insertion of the lag bolt into the pre drill hole reduces the risk of accidents or injuries during installation. It also helps in creating a secure and reliable connection, minimizing the chances of the lag bolt loosening or failing under load.
Always follow proper safety procedures and wear appropriate protective equipment, such as safety goggles and gloves, when working with power tools and drilling equipment.
Conclusion
When using a 1/4 lag bolt, choosing the right size pre drill is crucial to prevent damage and ensure safety. By using the correct pre drill size, you can prevent wood splitting or cracking, create a secure connection, and minimize the risk of accidents or failures. Follow the manufacturer’s guidelines and practice proper drilling techniques to achieve the best results.
Benefits of Pre Drill
Pre drilling refers to the practice of creating a hole before inserting a screw, bolt, or other fastener into a material. While it may seem like an extra step, pre drilling offers several benefits that make it worth the effort. Here are some of the key advantages:
1. Preventing Splitting
- Pre drilling helps prevent the material from splitting when the fastener is inserted. This is particularly important when working with delicate or brittle materials, such as wood or plastic.
- By creating a pilot hole with a slightly smaller diameter than the fastener, you can guide the screw or bolt in smoothly without putting excessive pressure on the surrounding material.
2. Easier Installation
- Pre drilling makes it easier to install the fastener by providing a clear path for it to follow.
- Without pre drilling, it may be difficult to align the fastener correctly, which can lead to stripped screw heads, damaged threads, or crooked installations.
- By creating a pilot hole, you ensure that the fastener goes in straight and true, reducing the risk of any installation mishaps.
3. Improved Fastener Grip
- Pre drilling allows the fastener to grip the material more securely.
- By creating a properly sized pilot hole, the fastener can engage more of the material, providing greater stability and preventing the fastener from loosening over time.
- When the fastener has a solid grip, it can withstand more force without becoming loose or failing, enhancing the overall strength and durability of the joint or connection.
4. Minimizes Risk of Damage
- Pre drilling helps minimize the risk of damage to the fastener, the material, or both.
- Without pre drilling, the force required to insert a fastener can cause the material to crack, splinter, or deform, ruining the appearance and structural integrity of the object being fastened.
- Additionally, a misaligned or crooked fastener can further damage the material or surrounding components.
- By pre drilling, you significantly reduce the chances of these issues occurring and ensure a clean, professional-looking result.
5. Faster and Safer Installation
- While pre drilling adds an extra step to the installation process, it ultimately saves time and effort.
- By providing a clear path, pre drilling allows for quicker and smoother insertion of the fastener, reducing the risk of slipping, stripping, or injury.
- It also minimizes the need for excessive force, making the installation process safer and less physically demanding.
- Ultimately, pre drilling helps streamline the installation process and ensures consistent, high-quality results.
| Benefits of Pre Drill |
|---|
| Prevents splitting of delicate materials |
| Easier and more accurate installation |
| Improves fastener grip and overall strength |
| Reduces the risk of damage to fasteners and materials |
| Offers faster and safer installation |
Enhancing the Performance
Choosing the Right Size Pre-Drill
When it comes to using 1/4 lag bolts, it’s essential to choose the right size pre-drill to enhance their performance. The pre-drill size will depend on several factors such as the type of wood, the thickness of the material, and the intended load-bearing capacity. It’s crucial to select a pre-drill size that allows the lag bolt to securely grip the wood without splitting or weakening it.
Consider the Wood Type
One factor to consider when choosing the right size pre-drill for 1/4 lag bolt is the type of wood being used. Different woods have different densities, which affects how easily they can be drilled into. Softer woods like pine or cedar may require a smaller pre-drill size, while harder woods like oak or maple may need a larger pre-drill size.
Measure the Material Thickness
Another important consideration is the thickness of the material you are working with. Thicker materials may require larger pre-drill sizes to accommodate the increased depth. It’s essential to choose a pre-drill size that allows the lag bolt to penetrate the material fully while still providing enough grip and stability.
Load-Bearing Capacity
The load-bearing capacity of the lag bolt also affects the choice of pre-drill size. If the lag bolt is intended to support heavy loads or provide structural stability, a larger pre-drill size may be necessary. This allows for a tighter fit and better weight distribution, reducing the risk of failure or damage due to excessive strain.
Using a Drill Press or Hand Drill
When pre-drilling the hole for a 1/4 lag bolt, it’s important to use a drill press or a hand drill with a depth stop. This ensures that the hole is drilled to the proper depth, preventing over-drilling or under-drilling. A depth stop also helps maintain consistency in the size and depth of the pre-drill hole, further enhancing the performance of the lag bolt.
Conclusion
Choosing the right pre-drill size for 1/4 lag bolts is crucial for enhancing their performance. Considering factors such as the wood type, material thickness, and load-bearing capacity will help determine the appropriate pre-drill size. Additionally, using a drill press or hand drill with a depth stop ensures accurate and consistent hole drilling. Taking these steps will help ensure that the lag bolts provide optimal grip and stability for your project.
FAQ:
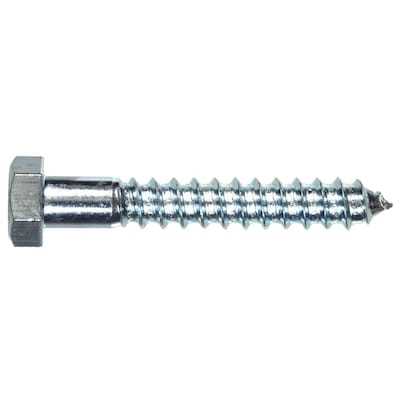
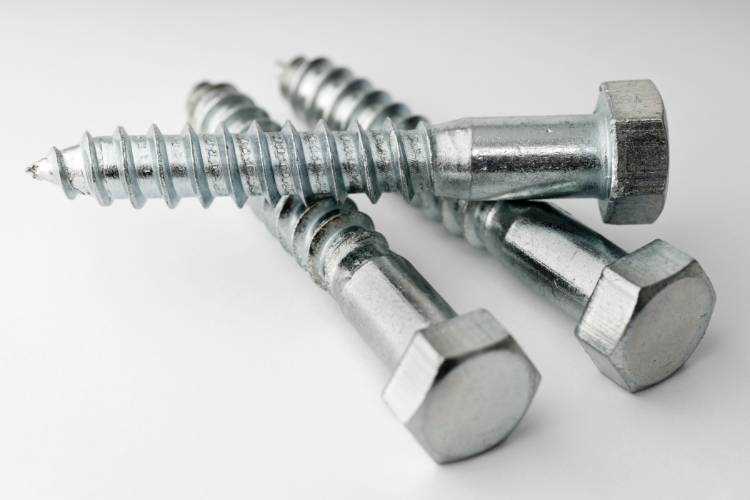
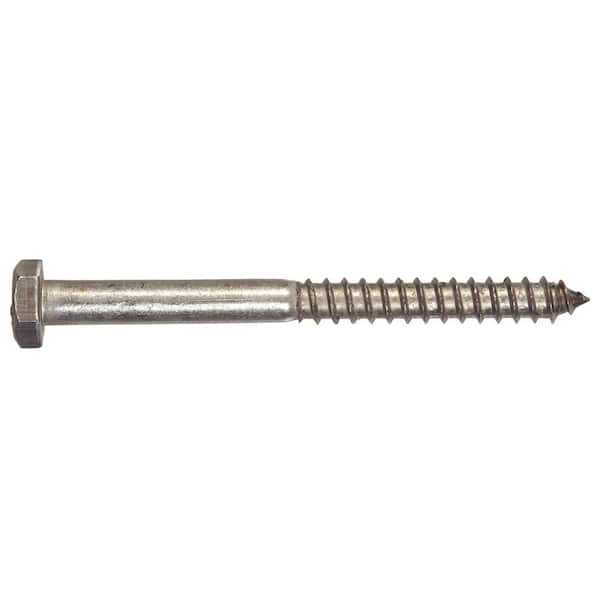
What is a lag bolt?
A lag bolt, also known as a lag screw, is a heavy-duty fastener designed for use in wood. It has a threaded shaft and a hexagonal head, allowing it to be tightened with a wrench or socket.
What size pre drill should I use for a 1/4 lag bolt?
For a 1/4 lag bolt, a pre-drill size of 3/16 inch is recommended. This allows for easy insertion of the lag bolt without splitting the wood.
Can I use a larger pre-drill size for a 1/4 lag bolt?
While it is possible to use a larger pre-drill size for a 1/4 lag bolt, it is not recommended. Using a larger size can weaken the grip of the lag bolt and may cause it to loosen over time.
What happens if I use a smaller pre-drill size for a 1/4 lag bolt?
If you use a smaller pre-drill size for a 1/4 lag bolt, there is a higher risk of splitting the wood when inserting the bolt. It may also be difficult to tighten the bolt properly, resulting in a weaker connection.
Do I need to pre-drill for a 1/4 lag bolt in softwood?
It is generally recommended to pre-drill for a 1/4 lag bolt in softwood to prevent splitting. The pre-drill size would depend on the specific type of softwood being used.
Video:

How to make bouncing bubbles

Meet Harrison Clayton, a distinguished author and home remodeling enthusiast whose expertise in the realm of renovation is second to none. With a passion for transforming houses into inviting homes, Harrison's writing at https://thehuts-eastbourne.co.uk/ brings a breath of fresh inspiration to the world of home improvement. Whether you're looking to revamp a small corner of your abode or embark on a complete home transformation, Harrison's articles provide the essential expertise and creative flair to turn your visions into reality. So, dive into the captivating world of home remodeling with Harrison Clayton and unlock the full potential of your living space with every word he writes.


