Using Sanding Bands: A Nail Drill Guide

When it comes to achieving salon-quality results at home, a nail drill can be a game changer. One of the key components of a nail drill is the sanding bands, which are cylindrical drill bits designed to smooth and shape the nails. Whether you’re a professional nail technician or a DIY enthusiast, understanding how to use sanding bands is essential for achieving the best results.
Step 1: Choose the right sanding band
There are different types of sanding bands available, each with its own grit level. The grit refers to the coarseness of the sanding band – the lower the grit number, the rougher the band. When choosing a sanding band, consider the condition of your nails and the desired result. For light shaping and smoothing, a fine grit sanding band is recommended. If you have thicker or stronger nails, a medium or coarse grit may be more suitable.
Step 2: Prepare your nails
Before using a sanding band, make sure your nails are clean and dry. Remove any nail polish or coatings and trim and shape your nails to your desired length and shape. It is also important to push back your cuticles to create a clean surface for the sanding band to work on.

Step 3: Attach the sanding band
Most nail drills come with a mandrel, which is the attachment that holds the sanding band in place. To attach the sanding band, simply slide it over the mandrel and push it all the way down until it is secure. Make sure the sanding band is centered and not loose or wobbly.
Step 4: Start sanding
Now that everything is set up, it’s time to start sanding. Hold the nail drill with a firm grip and position the sanding band at a 45-degree angle to the nail surface. Start at one side of the nail and gently work your way towards the other side. Be careful not to apply too much pressure or sand in one spot for too long, as this can cause heat and damage to the nail.
Remember to take breaks and check your progress frequently to avoid over-filing. Once you are satisfied with the shape and smoothness of your nails, gently remove any dust or debris and moisturize your hands and cuticles to keep them hydrated.

How to Choose the Right Sanding Bands
Choosing the right sanding bands for your nail drill can make a big difference in the quality of your nail work and the overall health of your nails. Here are some factors to consider when selecting sanding bands:
1. Grit Size
The grit size refers to the coarseness of the sanding band. Higher grit numbers indicate a finer grit, while lower grit numbers indicate a coarser grit. The right grit size will depend on the task you’re performing.
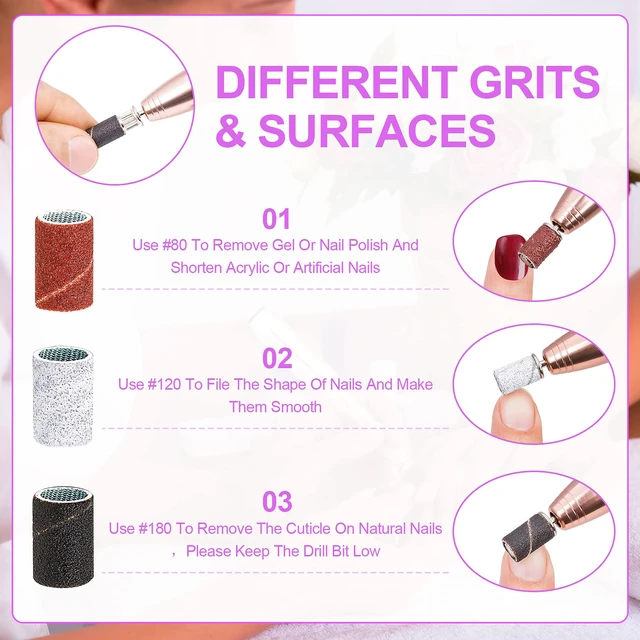
For shaping and smoothing the natural nail, a medium or fine grit band (around 180-240) is usually sufficient. If you’re working on artificial nails or removing gel polish, a coarser grit band (80-100) may be more effective.
2. Band Material
Sanding bands are typically made from abrasive materials such as sandpaper or diamond. Sandpaper bands are more commonly used and are suitable for most nail work. Diamond bands, on the other hand, are longer-lasting and more durable, making them a good choice for professionals or frequent users.
When choosing a sanding band material, consider the type of work you’ll be doing and your personal preference.

3. Band Shape and Size
Sanding bands come in various shapes and sizes. The most common shape is cylindrical, but you can also find conical, barrel, and tapered bands. The shape you choose will depend on the specific task you’re performing and your personal preference.
Additionally, consider the size of the band. Different sizes are available to fit different nail drill mandrels. Check the specifications of your nail drill to ensure compatibility.
4. Quality and Durability
The quality and durability of the sanding band are important factors to consider. Cheaper bands may wear out quickly or lose their shape, compromising the effectiveness of your nail work. Look for bands made from high-quality materials and construction to ensure longevity.
5. Safety Considerations
When using sanding bands, safety should be a top priority. Make sure to choose bands that are designed for use on nails and are gentle on the nail plate. Avoid using bands that are too coarse or aggressive, as they can cause damage to the natural nail.

Additionally, always follow the manufacturer’s instructions for proper usage and maintenance of the sanding bands.
By considering these factors, you can choose the right sanding bands for your nail drill that will help you achieve professional-quality results while keeping your nails healthy.
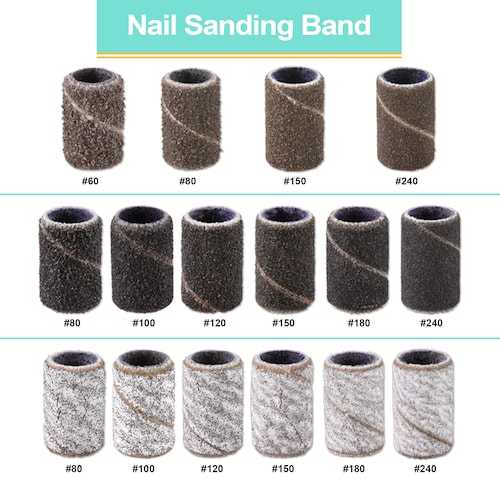
Understanding Grit Levels: Which to Use for What?
Introduction
When it comes to using sanding bands on a nail drill, understanding the different grit levels is essential. Grit refers to the coarseness or roughness of the sanding band and can vary from fine to coarse. Each grit level has its own purpose and is suitable for different nail care tasks. In this guide, we will discuss the different grit levels and which one to use for what.
Grit Levels
| Grit Level | Description | Recommended Use |
|---|---|---|
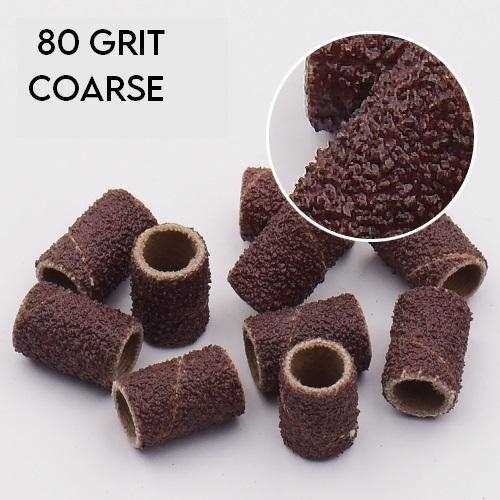
| 80 – 100 | Extremely coarse | Used for heavy-duty filing and shaping of artificial nails |
| 120 – 180 | Coarse | Great for removing stubborn gel or acrylic enhancements |
| 240 – 320 | Medium | Perfect for refining and shaping the natural nail |
| 400 – 600 | Fine | Used for buffing and polishing the nail surface |
| 800 – 1200 | Extra fine | Ideal for achieving a smooth and shiny finish on natural nails |
Choosing the Right Grit Level
Choosing the right grit level depends on the specific nail care task you are performing. Here are some general guidelines:
- For shaping and filing artificial nails, use coarse grit levels (80 – 100).
- To remove gel or acrylic enhancements, opt for a coarse to medium grit level (120 – 320).
- For shaping and refining the natural nail, use medium grit levels (240 – 320).
- When buffing and polishing the nail surface, choose fine grit levels (400 – 600).
- To achieve a smooth and shiny finish on natural nails, use extra fine grit levels (800 – 1200).
It’s important to note that the appropriate grit level may vary depending on the individual’s nail condition and personal preference. It’s always a good idea to start with a lower grit level and gradually increase if needed.

Conclusion
Understanding grit levels and knowing which one to use for different nail care tasks is crucial for achieving the desired results. Whether you are shaping artificial nails or buffing natural nails, selecting the right grit level will help you achieve the desired outcome efficiently and effectively.
Safety Precautions When Using a Nail Drill
1. Wear Protective Gear
When using a nail drill, it is important to protect yourself by wearing the proper protective gear. This includes goggles to protect your eyes from flying debris, a face mask to prevent inhalation of dust, and gloves to protect your hands from any mishaps.
2. Keep the Drill Clean
Before each use, make sure to clean the nail drill thoroughly. This will help prevent the spread of bacteria and other germs. Use a disinfectant specifically made for nail tools to ensure optimal cleanliness.
3. Use the Right Drill Bit
Make sure to choose the correct drill bit for the task at hand. Different drill bits are designed for different purposes, such as filing, shaping, or removing gel polish. Using the wrong drill bit can damage your nails or cause injury.
4. Start at a Low Speed
When using a nail drill, always start at a low speed and gradually increase the speed as needed. Starting at a high speed can cause unnecessary heat and friction, which can result in discomfort or damage to the nail.
5. Do Not Apply Too Much Pressure
While using the nail drill, it is important to apply gentle pressure. Applying too much pressure can cause excessive filing or even damage the natural nail. Let the drill do the work and avoid pushing down too hard.
6. Take Breaks
Using a nail drill for extended periods of time can cause fatigue and strain. It is important to take regular breaks to rest your hands, wrists, and arms. This will help prevent any potential injuries or discomfort.
7. Follow Instructions Carefully
Always read and follow the instructions provided with your nail drill. Each drill may have specific guidelines or safety precautions that you need to be aware of. Following these instructions will help ensure a safe and effective nail drilling experience.
8. Keep the Nail Drill in a Safe Place
After using the nail drill, always store it in a safe place, away from children and pets. Make sure to unplug it and keep it out of reach to prevent any accidents or injuries.
9. Seek Professional Help if Needed
If you are unsure about how to properly use a nail drill or if you encounter any issues or injuries, do not hesitate to seek professional help. A nail technician or a medical professional will be able to provide guidance or treatment if necessary.
By following these safety precautions, you can safely and effectively use a nail drill for various manicure and nail care tasks. Remember to always prioritize safety and take the necessary steps to protect yourself and your nails.
Step-by-Step Guide on How to Attach a Sanding Band
Using a sanding band with a nail drill can help you achieve smoother and more even nails. Here’s a step-by-step guide on how to attach a sanding band:
- Gather your materials. You will need a nail drill, a sanding band, and a collet bit.
- Make sure your nail drill is turned off and unplugged.
- Find the collet bit on your nail drill. This is the part that holds the sanding band.
- Insert the sanding band into the collet bit. Make sure it is centered and secure.
- Tighten the collet bit to secure the sanding band. Use the appropriate tool for your nail drill to tighten the collet bit.
- Check that the sanding band is securely attached by gently tugging on it. It should not come loose.
- Now your nail drill is ready to use with the sanding band attached!
Remember to always be gentle and cautious when using a nail drill and sanding band. Start with a low speed setting and gradually increase as needed. Be mindful of the pressure you apply and avoid over-sanding your nails.
Techniques for Filing and Shaping Nails with Sanding Bands
Sanding bands are a versatile tool when it comes to filing and shaping nails. They are commonly used with nail drills to remove excess length, shape the edges, and smooth the surface of the nails. Here are some techniques for using sanding bands effectively:
1. Removing Length
To remove length from the nails, start by selecting a sanding band with the appropriate grit. Lower grits, such as 80 or 100, are ideal for faster and more aggressive filing, while higher grits, like 180 or 240, are finer and more gentle. Insert the sanding band into the nail drill and secure it tightly. Hold the nail drill at a 45-degree angle and gently touch the sanding band to the tip of the nail. Slowly move the sanding band back and forth, working your way from one side to the other until the desired length is achieved.
2. Shaping the Edges
When it comes to shaping the edges of the nails, sanding bands can help create a clean and defined look. Start by selecting a sanding band with a higher grit, such as 180 or 240, to avoid removing too much nail material. Hold the nail drill perpendicular to the nail and gently touch the sanding band to the sidewall of the nail. Slowly move the sanding band in a back-and-forth motion along the edge, gradually shaping it to the desired curve. Repeat the process on all sides of the nail until the edges are smooth and even.
3. Smoothing the Surface
To achieve a smooth and polished surface, use a sanding band with a higher grit, such as 240 or 320. Hold the nail drill parallel to the nail and gently touch the sanding band to the surface of the nail. Move the sanding band in a circular motion, working from the cuticle towards the free edge. Be careful not to apply too much pressure, as it can cause heat and damage to the nail. Continue the process until the surface is smooth and free of any ridges or imperfections.
4. Finishing Touches
After filing and shaping the nails with a sanding band, it is important to finish with a buffing block or a fine-grit file to smooth out any rough edges and create a polished finish. This will give the nails a professional look and help prevent any snags or breakage.
In conclusion, sanding bands are a valuable tool for filing and shaping nails. By using the right techniques and taking proper care, you can achieve beautifully manicured nails with the help of sanding bands and a nail drill.
Removing Gel Polish with Sanding Bands: Dos and Don’ts
Do:
- Prepare your nails by gently filing the top surface of the gel polish to break the seal.
- Choose a medium or fine grit sanding band to avoid damaging your nails.
- Use light pressure when using the sanding band to remove the gel polish.
- Start at the cuticle area and work your way towards the nail tip.
- Regularly check the progress to avoid excessive filing or damage to the nail bed.
- Moisturize your hands and nails after removing the gel polish to rehydrate them.
Don’t:
- Use a coarse grit sanding band, as it can cause unnecessary damage to your nails.
- Rub the sanding band back and forth on the nail, as this can create heat and friction that may harm your nail.
- Over-file your nails, as this can weaken them and make them susceptible to breakage.
- Apply excessive pressure while using the sanding band, as this can lead to pain or injury.
- Forget to sanitize your tools before and after use to maintain hygiene.
By following these dos and don’ts, you can safely and effectively remove gel polish using sanding bands. Remember to practice caution and take breaks if needed to prevent any harm to your nails. Always prioritize the health and well-being of your nails during the removal process.
Maintenance and Cleaning Tips for Sanding Bands
1. Replace worn-out sanding bands regularly
It is important to replace worn-out sanding bands regularly to maintain their effectiveness. Over time, the abrasive surface of the sanding bands can wear down, making them less efficient in removing nail product or shaping the nails. Monitor the condition of your sanding bands and replace them as soon as you notice any signs of wear or reduced performance.
2. Clean the sanding bands after each use
After each use, it is essential to clean the sanding bands to remove any debris or nail product residue that may have accumulated. Use a brush or a cotton swab to gently brush away any particles stuck on the sanding bands. You can also dip the sanding bands in gentle nail cleaner or rubbing alcohol to help dissolve any stubborn residue.
3. Store the sanding bands properly
Proper storage is crucial to ensure the longevity of your sanding bands. After cleaning them, make sure to store them in a clean and dry container. This will help prevent any contamination or damage to the sanding bands. Additionally, avoid storing the sanding bands in direct sunlight or extreme temperatures, as this can affect their performance and durability.
4. Avoid excessive pressure and heat
Applying excessive pressure or heat while using the sanding bands can cause damage to both the bands and your nails. Be gentle and use a moderate amount of pressure when working on your nails. Additionally, be mindful of the heat generated by the nail drill. If the sanding bands become too hot, take a break to allow them to cool down before continuing with your nail prep or shaping.
5. Regularly inspect the sanding bands for damage
Regularly inspect your sanding bands for any signs of damage, such as tears or fraying. Using damaged sanding bands can lead to uneven or rough nail surfaces and increase the risk of injuries. If you notice any damage, replace the sanding band immediately to ensure smooth and safe nail procedures.
6. Keep extra sanding bands on hand
It is always a good idea to have spare sanding bands readily available. Accidents happen, and sanding bands can break or wear out unexpectedly. Having extras on hand will prevent any interruptions during your nail prep or shaping process. Make sure to stock up on various grit sizes to accommodate different nail treatments and preferences.
7. Dispose of used sanding bands properly
When it’s time to replace your sanding bands, make sure to dispose of them properly. Used sanding bands can contain debris, nail product residue, or microorganisms, so it is essential to discard them in a sanitary manner. Seal them in a plastic bag or wrap them in tissue before discarding them in a trash bin.
By following these maintenance and cleaning tips, you can ensure the longevity and effectiveness of your sanding bands, allowing you to achieve professional-quality nail prep and shaping results.
Troubleshooting Common Issues with Sanding Bands
1. Band Slipping or Falling Off
If you are experiencing issues with the sanding band slipping or falling off during use, there are a few potential reasons for this problem:
- The band may not be properly tightened on the nail drill. Make sure to securely tighten the band before use.
- The sanding band may be the wrong size for your nail drill. Check the specifications of your nail drill and ensure that you are using the correct size band.
- The sanding band may be worn out or damaged. Replace the sanding band if it appears to be worn or damaged.
2. Uneven or Ineffective Sanding
If you are experiencing uneven or ineffective sanding with the sanding band, consider the following troubleshooting steps:
- Check the speed setting of your nail drill. If the speed is too high, it may cause the sanding band to skip or slide across the nail surface. Reduce the speed to a more appropriate level.
- Ensure that you are using the correct grit size for your desired result. A higher grit number indicates a finer grit, while a lower number indicates a coarser grit. Adjust the grit size to achieve the desired level of sanding.
- Check the condition of the sanding band. If it appears to be worn or clogged with debris, it may not be effective in sanding. Replace the sanding band if necessary.
3. Heat or Discomfort during Use
If you are experiencing excessive heat or discomfort during the use of sanding bands, there are a few steps you can take to troubleshoot the issue:
- Check the speed setting of your nail drill. Higher speeds can generate more heat. Reduce the speed to a lower setting if necessary.
- Ensure that you are not applying excessive pressure on the nail surface with the sanding band. Pressing too hard can create friction and increase heat. Use a light touch during the sanding process.
- Consider using a different type of sanding band material. Some materials may generate more heat than others. Experiment with different materials to find one that is comfortable for you.
4. Difficulty Removing the Sanding Band
If you are having trouble removing the sanding band from your nail drill, try these troubleshooting steps:
- Ensure that the nail drill is turned off and unplugged before attempting to remove the sanding band.
- Gently loosen the band by turning it counterclockwise. It may be necessary to use a bit of force, but be careful not to apply too much pressure to avoid damaging the nail drill.
- If the band is stuck or stubborn to remove, try using a pair of pliers to grip and twist the band off. Again, be cautious not to cause any damage to the nail drill.
If you are still experiencing issues with your sanding bands after trying these troubleshooting steps, it may be helpful to consult the user manual or contact the manufacturer for further assistance.
FAQ:
What are sanding bands?
Sanding bands are cylindrical attachments that are used with a nail drill. They are typically made of sandpaper and help to remove excess nail product, shape the nails, and smooth out rough edges.
How do I attach a sanding band to a nail drill?
To attach a sanding band to a nail drill, you first need to slide the band over the mandrel (the metal part of the drill bit). Then, tighten the band by turning the screw on the mandrel until it is secure.
What are the different grits of sanding bands available?
There are various grits of sanding bands available, ranging from fine to coarse. Fine grits, such as 180 or 240, are used for gentle shaping and buffing. Medium grits, like 120, are suitable for removing product or shaping the surface. Coarse grits, such as 80, are mainly used for removing acrylic or gel.
Are sanding bands reusable?
No, sanding bands are not reusable. They wear down over time and become less effective. It is best to replace them when they start to lose their grit or become damaged.
Can sanding bands damage the nails?
If used incorrectly or too aggressively, sanding bands can potentially damage the nails. It is important to use them with caution and not apply too much pressure. It is also advisable to keep the drill at a low speed and avoid prolonged exposure to avoid overheating the nails.
How often should I replace sanding bands?
The frequency of replacing sanding bands depends on the usage and condition. As a general guideline, it is recommended to replace them every 3-4 uses or when they start to show signs of wear and tear.
Can sanding bands be used on natural nails?
Yes, sanding bands can be used on natural nails, but it is important to use them gently and with caution. It is recommended to use a fine grit band and avoid excessive filing to prevent damage or weakening of the natural nails.
Video:

Meet Harrison Clayton, a distinguished author and home remodeling enthusiast whose expertise in the realm of renovation is second to none. With a passion for transforming houses into inviting homes, Harrison's writing at https://thehuts-eastbourne.co.uk/ brings a breath of fresh inspiration to the world of home improvement. Whether you're looking to revamp a small corner of your abode or embark on a complete home transformation, Harrison's articles provide the essential expertise and creative flair to turn your visions into reality. So, dive into the captivating world of home remodeling with Harrison Clayton and unlock the full potential of your living space with every word he writes.


