Using a Mortise Drill Bit: A Step-by-Step Guide

When it comes to woodworking, having the right tools can make all the difference. One tool that every woodworker should have in their arsenal is a mortise drill bit. This specialized drill bit is designed specifically for creating clean, precise mortises in wood. Whether you’re a seasoned pro or just starting out, knowing how to properly use a mortise drill bit is essential for achieving professional, high-quality results.
Before getting started, it’s important to understand what a mortise is. A mortise is a rectangular slot or hole that is created in a piece of wood to fit another piece of wood called a tenon. This type of joint is commonly used in furniture-making, woodworking, and joinery. By using a mortise drill bit, you can easily create these mortises with precision and accuracy.
To start using a mortise drill bit, you’ll first need to select the appropriate size for your project. Mortise drill bits come in a range of sizes, so choose one that matches the width and depth of the mortise you want to create. Once you have the right size bit, secure it in your drill press or handheld drill according to the manufacturer’s instructions.
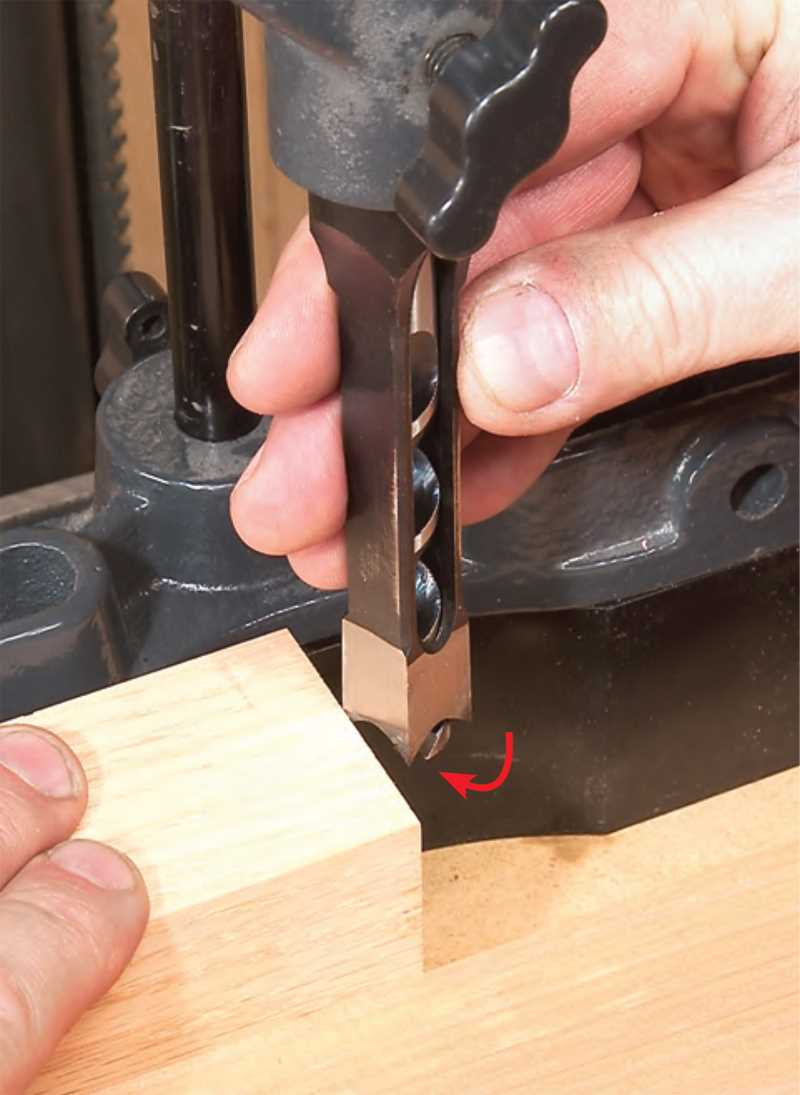
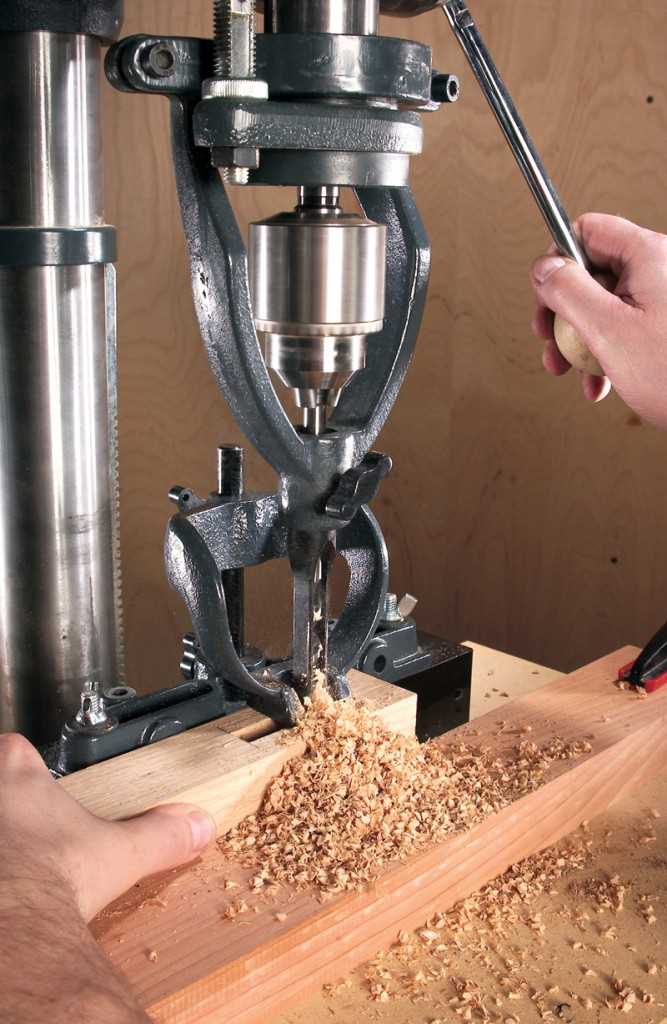
With your drill and mortise drill bit ready, position the drill bit over the area where you want to create the mortise. Apply gentle pressure and slowly begin drilling into the wood. Keep the drill perpendicular to the wood and maintain a steady, controlled pace as you drill. Be sure to pause periodically to clear away any wood chips or debris that may accumulate in the mortise.
Once you’ve drilled the initial hole, you can begin to create the mortise by moving the drill bit horizontally and vertically within the hole. This will help to create the rectangular shape of the mortise. Again, take your time and apply even pressure as you work. It’s important to note that mortises can vary in depth and width, so be sure to adjust your drilling technique accordingly.

Finally, use a chisel or a mortising chisel to clean up and refine the mortise. Gently remove any excess wood and smooth out the sides of the mortise until it is clean and precise. This will ensure a snug fit when joining the two pieces of wood together.
In conclusion, a mortise drill bit is an invaluable tool for any woodworker. By following these step-by-step instructions, you can confidently and effectively use a mortise drill bit to create professional-quality mortises in your woodworking projects. Whether you’re building furniture or working on a creative DIY project, a mortise drill bit will help you achieve the precision and accuracy you desire.
What is a Mortise Drill Bit?
A mortise drill bit is a specialized tool used in woodworking to create square or rectangular holes called mortises. These holes are typically used to insert a tenon, creating a strong and secure joint in furniture, cabinetry, and other wooden structures.
The mortise drill bit is designed with a square or rectangular shank, which fits into the chuck of a drill press or handheld drill. The cutting end of the bit consists of a sharp, chisel-like edge that removes material as it rotates.
Mortise drill bits come in various sizes to accommodate different types of joinery. They are commonly used in combination with a mortising machine but can also be used with a drill press or hand drill. The versatility and precision of these bits make them a valuable tool for professional woodworkers and DIY enthusiasts alike.
When using a mortise drill bit, it’s important to use the correct technique and take safety precautions. This includes wearing appropriate personal protective equipment, securing the workpiece, and using the drill on a stable surface. Following the manufacturer’s instructions and practicing proper drilling techniques will help ensure safe and accurate results.

Why use a Mortise Drill Bit?
A mortise drill bit is a specialized type of drill bit used for creating mortises, which are rectangular slots or holes used to join two pieces of wood together. These drill bits are specifically designed to remove material from the wood in a clean and efficient manner, making them ideal for woodworking projects that require strong and secure joints.
Benefits of using a Mortise Drill Bit:
1. Strong and Durable Joints: When creating mortise and tenon joints, the goal is to create a tight and secure connection between two pieces of wood. The mortise drill bit allows for precise and clean cuts, resulting in strong and durable joints that can withstand the test of time.
2. Versatility: Mortise drill bits come in various sizes, allowing you to create mortise joints of different dimensions depending on your project requirements. Whether you need a small slot for a delicate joint or a larger hole for a more substantial connection, there is a mortise drill bit available to suit your needs.
3. Time-saving: Using a mortise drill bit can significantly speed up the process of creating mortise joints compared to traditional methods such as chiseling. The bit removes material quickly and efficiently, reducing the amount of time and effort required to create precise and accurate mortises.
4. Professional Results: A mortise drill bit allows for clean and precise cuts, resulting in professional-looking joints that add a touch of craftsmanship to your woodworking projects. The smooth and accurate finish achieved with a mortise drill bit can elevate the overall quality and aesthetic appeal of your work.

Tips for using a Mortise Drill Bit:
- Always ensure that your workpiece is securely clamped down before drilling to prevent any movement or accidents.
- Choose the appropriate size of the mortise drill bit based on the dimensions of your joint and the type of wood you are working with.
- When drilling, apply steady and consistent pressure to achieve a clean and precise cut.
- Use a depth stop or tape on your drill bit to ensure that you drill to the correct depth without going too far.
- Clear away any wood chips or debris to keep the drill bit and your work area clean during the drilling process.
By using a mortise drill bit, you can achieve strong, versatile, and professional results in your woodworking projects. Whether you are a beginner or an experienced woodworker, incorporating a mortise drill bit into your toolkit will enhance the quality and durability of your joints.
Step 1: Prepare the Workpiece
Before using a mortise drill bit, it is essential to prepare the workpiece properly. Follow these steps to ensure a smooth and accurate drilling process:
1.1 Measure and Mark
Start by measuring and marking the desired location where you want to create the mortise. Use a measuring tape or ruler to ensure accurate measurements. Make sure to double-check your measurements before moving on to the next step.
1.2 Secure the Workpiece
Once you have marked the location, secure the workpiece firmly using clamps or a vice to prevent it from moving during the drilling process. Ensure that the workpiece is stable and won’t shift during drilling.

1.3 Select the Right Drill Bit Size
Choose the appropriate mortise drill bit size for the project. Consider the width and depth of the mortise needed. It is recommended to use a drill bit with a diameter slightly smaller than the width of the mortise, as this will allow for a snug fit.
1.4 Adjust the Drill Press Settings
If you are using a drill press, adjust the speed and depth settings based on the type of wood and the desired outcome. Consult the manufacturer’s instructions for guidance on setting up the drill press correctly.
1.5 Wear Safety Gear
Before starting the drilling process, ensure that you are wearing appropriate safety gear, including safety glasses and ear protection. This will protect you from any potential flying debris or loud noises during the operation.
1.6 Prepare a Stable Work Surface
It is crucial to have a stable work surface that can support the weight and force of the drill. Use a sturdy workbench or table that is level and secure. This will prevent any unintended movement or accidents during the drilling process.
By following these preparatory steps, you will be ready to use a mortise drill bit effectively and safely.

Measure and Mark
Before you start drilling the mortises, it’s important to accurately measure and mark the location of each mortise on the piece of wood. This will help ensure that the mortises are aligned properly and the overall structure is sturdy. Follow these steps to measure and mark the mortises:
- Take accurate measurements: Use a tape measure or ruler to measure the length, width, and depth of the mortise. Make sure to double-check your measurements to avoid any mistakes.
- Mark the location: Use a pencil or marking knife to mark the starting point and the boundaries of each mortise on the wood. Use a square or straight edge to ensure that the lines are straight and parallel.
- Divide the space: If you’re drilling multiple mortises in a single piece of wood, divide the available space evenly to ensure that the mortises are evenly spaced. Measure the distance between each mortise and mark the center point.
It’s important to take your time and be precise during the measuring and marking process. Any inaccuracies can affect the overall fit and finish of your project. Once you have measured and marked all the mortises, you’re ready to move on to the next step: preparing the drill and chisel.
Secure the Workpiece
Before using a mortise drill bit, it is important to properly secure the workpiece to ensure stability and safety during the drilling process. Here are some steps to follow:
- Choose a sturdy work surface or workbench that can adequately support the weight and size of the workpiece.
- Place the workpiece on the work surface and position it in a way that allows you easy access to the area where you need to drill the mortise hole.
- Consider using clamps or vice grips to securely hold the workpiece in place. This will prevent any movement or slipping during drilling and improve accuracy.
- Ensure that the workpiece is level and properly aligned. Use a measuring tape, square, or other tools to check for accuracy.
- If necessary, use blocks or supports to provide additional stability to the workpiece. This is especially important for longer or heavier pieces.
- Inspect the workpiece to make sure there are no knots, cracks, or other defects that could compromise its integrity during drilling. If you notice any issues, consider using a different piece of wood.
- Wear appropriate safety gear, such as goggles and gloves, to protect yourself during the drilling process.
By properly securing the workpiece before using a mortise drill bit, you can ensure a safer and more efficient drilling experience.
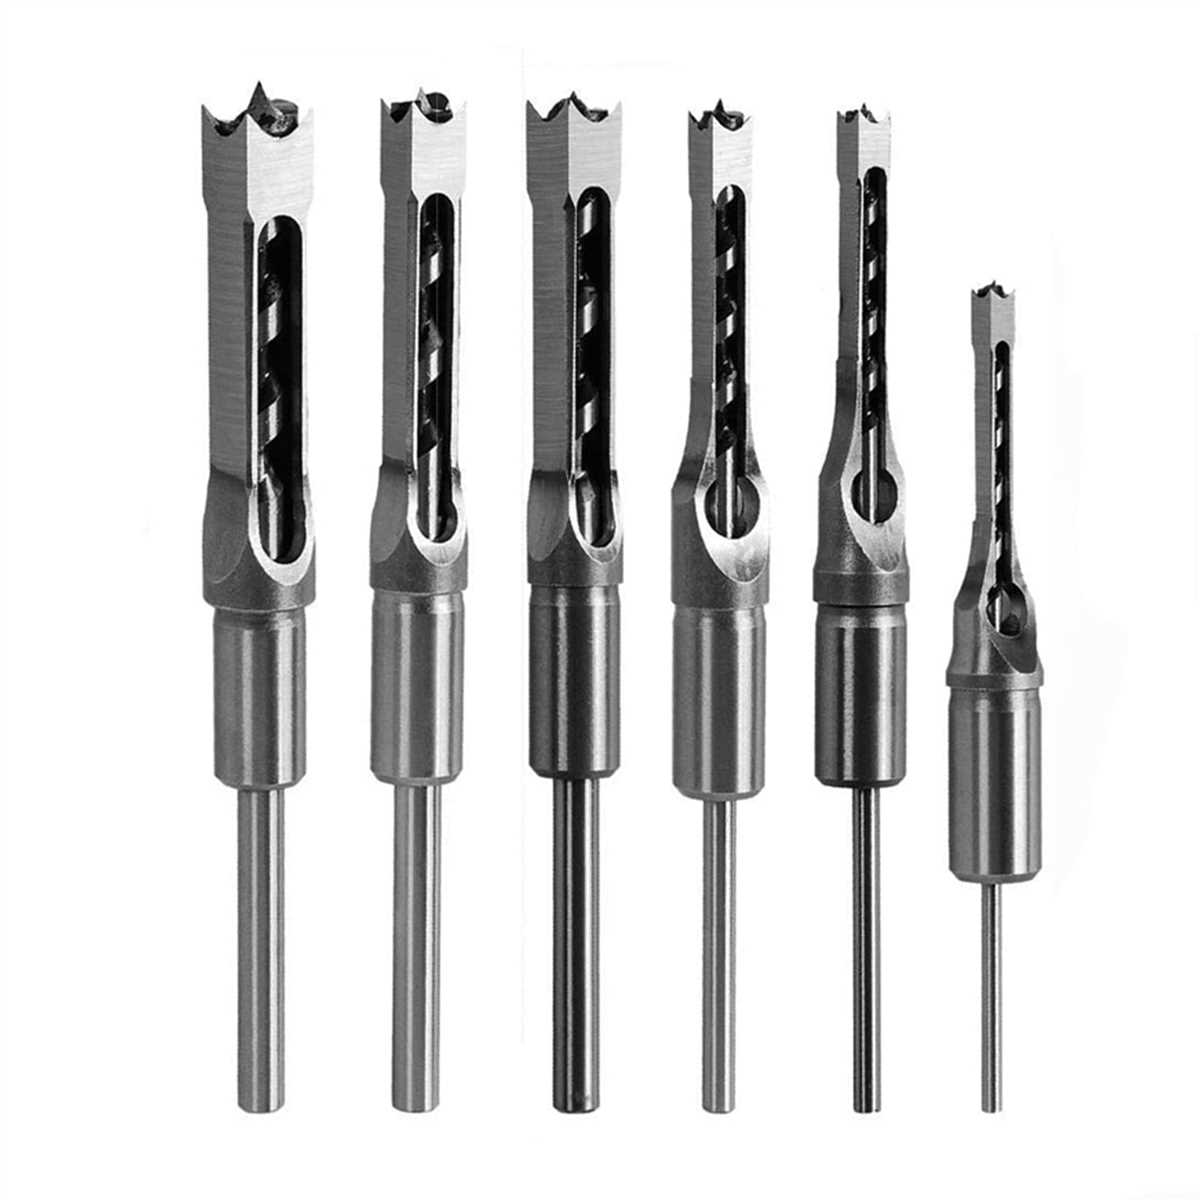
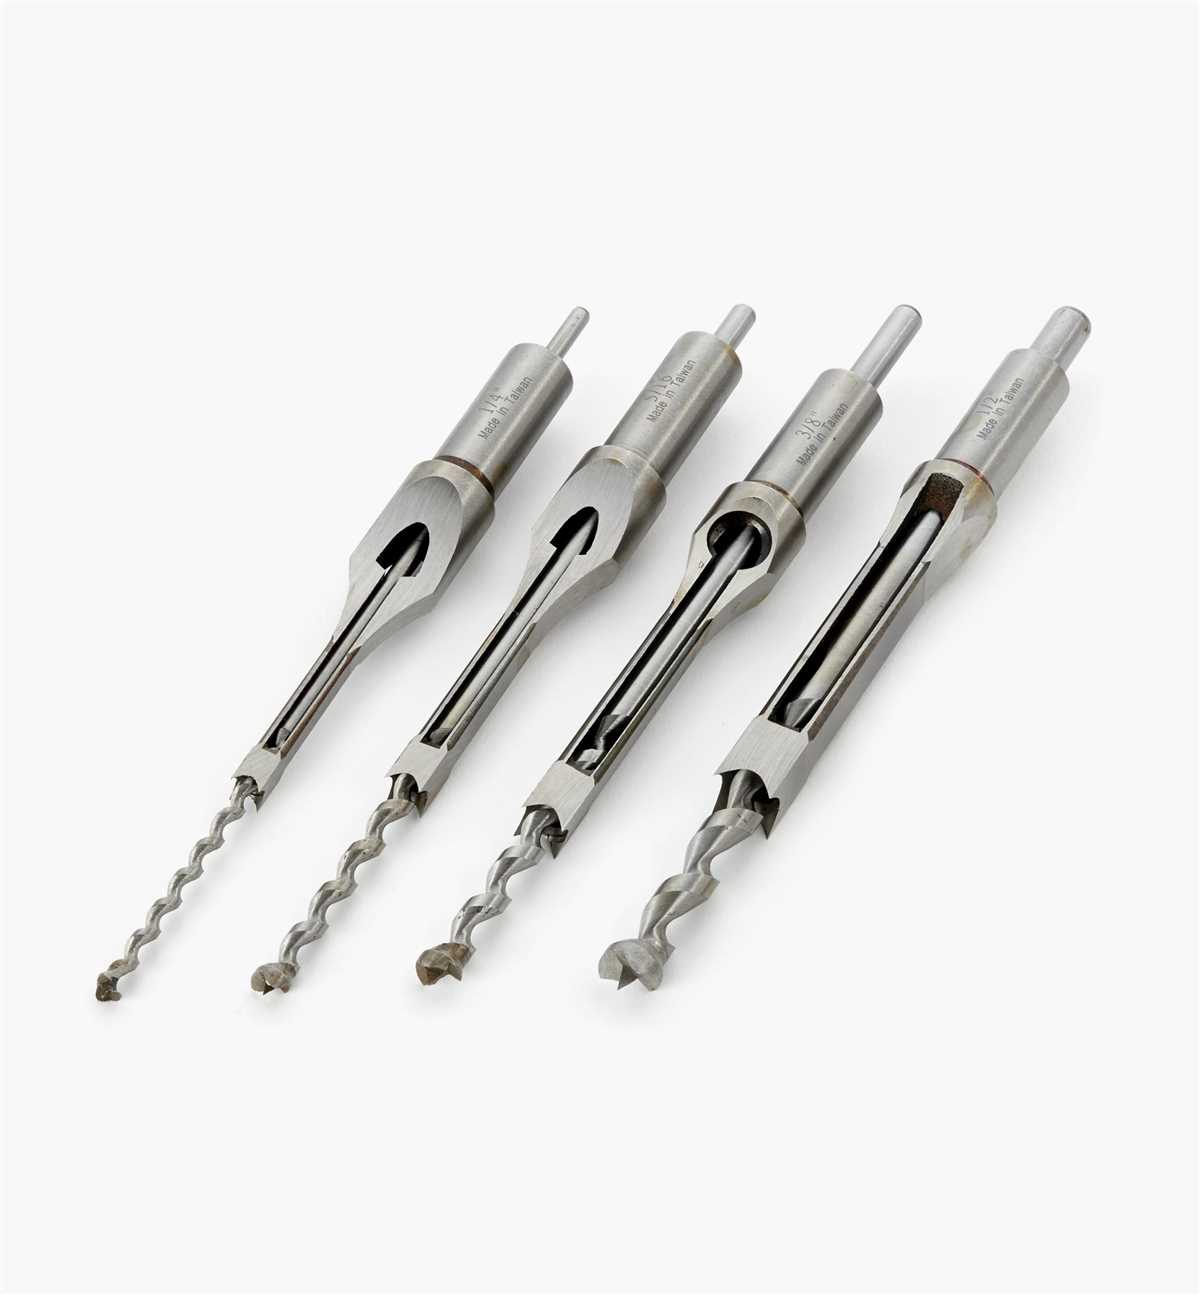
Step 2: Choose the Right Mortise Drill Bit
Choosing the right mortise drill bit is crucial for the success of your project. The size and design of the bit will determine the size and shape of your mortise, so it’s important to choose the one that best suits your needs.
Consider the Size
The size of the mortise drill bit should match the size of the tenon you’ll be using. If you’re working with a specific tenon size, make sure to choose a drill bit that matches it. Using a drill bit that is too small will result in a loose joint, while using a drill bit that is too large may weaken the structure.
Choose the Bit Style
There are different styles of mortise drill bits available, each with its own advantages and disadvantages. Here are some common bit styles:
- Spiral Flute Bits: These bits have a spiral-shaped flute that helps remove chips and debris from the hole as you drill. They are great for deep drilling and can provide cleaner, faster cuts.
- Square Chisel Bits: These bits have a square-shaped chisel on the end, which cuts the mortise walls as you drill. They are known for their clean and precise cuts, making them ideal for fine woodworking projects.
- Auger Bits: These bits have a screw-like design that helps pull the bit into the wood as you drill. They are commonly used for drilling deep mortises and are known for their fast and efficient drilling.
Consider the Material
The material you’ll be drilling into should also be taken into consideration when choosing a mortise drill bit. Different materials require different types of drill bits to ensure clean and accurate cuts. For example, if you’re drilling into hardwood, you may want to choose a drill bit specifically designed for hardwood to prevent dulling or breakage.
Budget and Brand
Your budget and preferred brand may also play a role in your decision-making process. There are various price ranges and brands available, so be sure to choose one that fits your budget and offers good quality.
By considering the size, style, material, budget, and brand, you’ll be able to choose the right mortise drill bit for your project. Once you have selected the appropriate bit, you can proceed to the next step of the mortising process.
Consider the Size and Depth
When using a mortise drill bit, it is important to consider the size and depth of the hole you need to create. The size of the drill bit you choose will depend on the size of the mortise you need to make. The depth of the hole will depend on the length of the tenon that will fit into the mortise. Here are some factors to consider:
- Mortise Size: Measure the width and depth of the mortise you need to create. The drill bit you choose should be slightly smaller than the width of the mortise, as this will allow for a snug fit.
- Tenon Length: Measure the length of the tenon that will fit into the mortise. Make sure the depth of the hole is at least equal to the length of the tenon to ensure a strong joint.
- Drill Bit Size: Choose a drill bit that matches the width and depth measurements you have taken. Mortise drill bits are available in various sizes, so you should be able to find one that suits your needs.
It is always a good idea to double-check your measurements before starting to ensure that you have the correct size drill bit. Using the wrong size can result in a loose joint that may eventually fail.
Select the Material
Before using a mortise drill bit, it is important to select the right material for your project. The choice of material will depend on the type of work you are planning to do, as different materials require different drill bits for optimal results.
Here are some common materials and the corresponding drill bits to use:
Wood:
-
Brad-Point Drill Bit: This type of drill bit has a sharp center point and two outer cutting spurs, making it ideal for drilling clean, precise holes in wood.
-
Forstner Drill Bit: Forstner bits are designed specifically for cutting flat-bottomed holes with smooth sides in wood. They are great for making mortises.
Metal:
-
HSS (High-Speed Steel) Drill Bit: HSS drill bits are suitable for drilling into metal materials such as aluminum, brass, and steel. They are known for their durability and can handle high-speed drilling without overheating.
-
Cobalt Drill Bit: Cobalt drill bits are made from a special cobalt alloy, which makes them extremely hard and heat-resistant. They are ideal for drilling into superalloys, stainless steel, and other hard metals.
Plastic:
-
High-Speed Steel (HSS) Drill Bit: HSS drill bits are also suitable for drilling into plastic materials. They offer good performance and can be used for general-purpose drilling tasks.
-
Brad-Point Drill Bit: Brad-point drill bits with a sharp center point can also be used for drilling clean holes in plastic.
It is important to select the appropriate drill bit for the material you are working with to ensure clean and accurate results. Using the wrong drill bit can lead to chipping, dulling, or even breaking of the bit, as well as damaging the material you are working on.
Step 3: Attach the Bit to the Drill
Now that you have prepared the drill and the workpiece, it’s time to attach the mortise drill bit to the drill. Follow these steps to ensure a secure and proper attachment:
- Choose the appropriate size mortise drill bit: Select a bit that matches the size of the mortise you want to create. Make sure the bit is compatible with your drill’s chuck size.
- Insert the bit into the drill’s chuck: Loosen the drill’s chuck by turning it counterclockwise. Insert the shank of the mortise drill bit into the chuck and tighten it securely by turning the chuck clockwise. Use a chuck key, if necessary, to tighten the chuck further.
- Ensure the bit is centered: Hold the drill with the bit perpendicular to the workpiece. Check that the bit is centered and aligned with the desired drilling location. Adjust the position of the bit, if needed, by loosening the chuck and repositioning the bit. Tighten the chuck again once the bit is properly centered.
It’s important to ensure that the mortise drill bit is securely attached to the drill to prevent any accidents or improper drilling. Take your time to double-check the bit’s alignment and tightness before proceeding to the next step.
Insert the Bit
- Before starting, ensure that the drill is turned off and unplugged from the power source to avoid any accidents.
- Choose a suitable mortise drill bit for your project. Mortise drill bits are available in various sizes and shapes, so select one that matches the requirements of your project.
- Insert the mortise drill bit into the chuck of the drill. To do this, hold the drill bit with one hand and turn the chuck key or the keyless chuck with your other hand in a counterclockwise direction to loosen the chuck.
- Once the chuck is loosened, insert the mortise drill bit into the chuck and ensure it is centered.
- Tighten the chuck by turning the chuck key or the keyless chuck in a clockwise direction until the drill bit is securely held in place.
- Double-check that the mortise drill bit is firmly inserted and tightened in the chuck to prevent any accidents or the bit coming loose during operation.
Now that the mortise drill bit is properly inserted, you are ready to proceed with the next step in the mortising process.
FAQ:
What is a mortise drill bit?
A mortise drill bit is a specific type of drill bit designed for creating square or rectangular holes, called mortises, in wood. It has a chisel-like shape with two cutting edges and is used in a drill press or a power drill.
What are mortises used for?
Mortises are used in woodworking to create joints between two pieces of wood. By creating a square or rectangular hole, a tenon, or a protruding piece of wood, can be inserted into the mortise, creating a strong and secure joint.
Can I use a mortise drill bit with a regular handheld drill?
While it is possible to use a mortise drill bit with a regular handheld drill, it is not recommended. The high torque required to properly cut a mortise is best achieved with a drill press or a power drill specifically designed for woodworking.
How do I set up a drill press for using a mortise drill bit?
To set up a drill press for using a mortise drill bit, begin by installing the bit securely into the drill chuck. Adjust the speed of the drill press according to the wood being used. Position the workpiece securely on the drill press table and align the mortise location. Finally, lower the drill bit into the wood and make the necessary cuts.
Are there different sizes of mortise drill bits available?
Yes, there are different sizes of mortise drill bits available, ranging from 1/4 inch to 1 inch or more. The size of the bit to use depends on the desired width and depth of the mortise. It is important to select the appropriate size for the woodworking project.
What safety precautions should I take when using a mortise drill bit?
When using a mortise drill bit, it is important to wear safety goggles to protect your eyes from flying debris. Keep your hands and fingers away from the rotating bit and always use a clamp or vise to secure the workpiece. Additionally, make sure to read and follow the manufacturer’s instructions for safe operation.
Can a mortise drill bit be used on other materials besides wood?
A mortise drill bit is specifically designed for woodworking and may not be suitable for other materials. It is recommended to use the appropriate drill bit designed for the specific material being worked on, such as metal or plastic.
Video:

How to lease a pub with no money

Meet Harrison Clayton, a distinguished author and home remodeling enthusiast whose expertise in the realm of renovation is second to none. With a passion for transforming houses into inviting homes, Harrison's writing at https://thehuts-eastbourne.co.uk/ brings a breath of fresh inspiration to the world of home improvement. Whether you're looking to revamp a small corner of your abode or embark on a complete home transformation, Harrison's articles provide the essential expertise and creative flair to turn your visions into reality. So, dive into the captivating world of home remodeling with Harrison Clayton and unlock the full potential of your living space with every word he writes.


