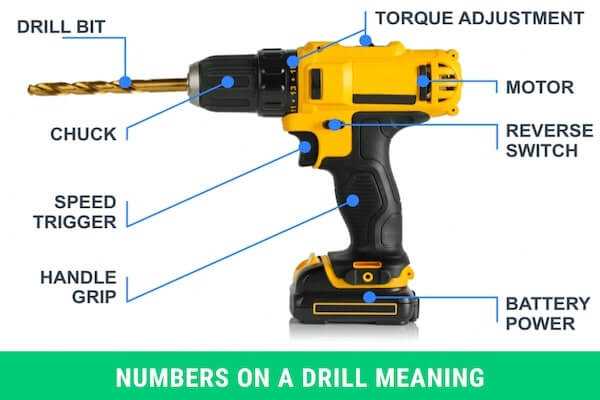
Understanding the Meaning of the Numbers 1 and 2 on a Drill

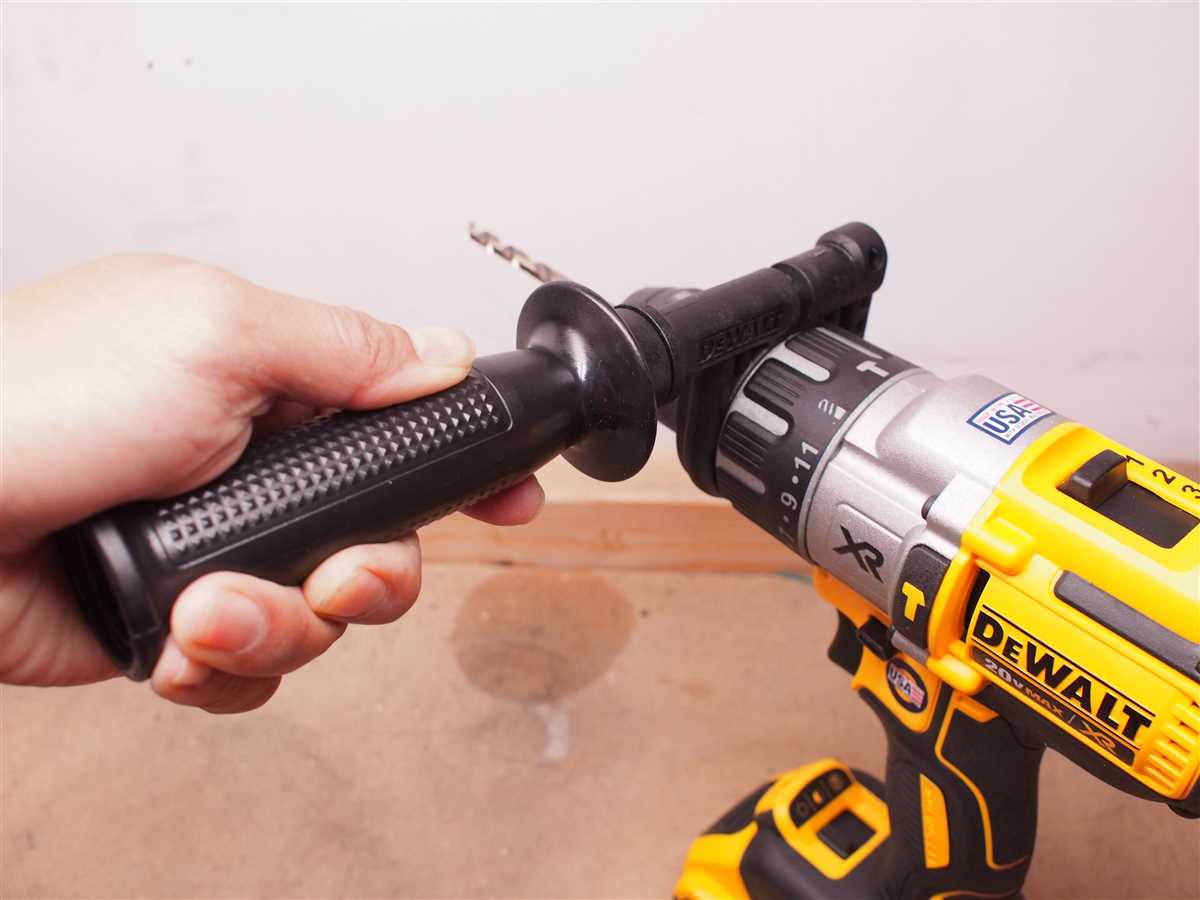
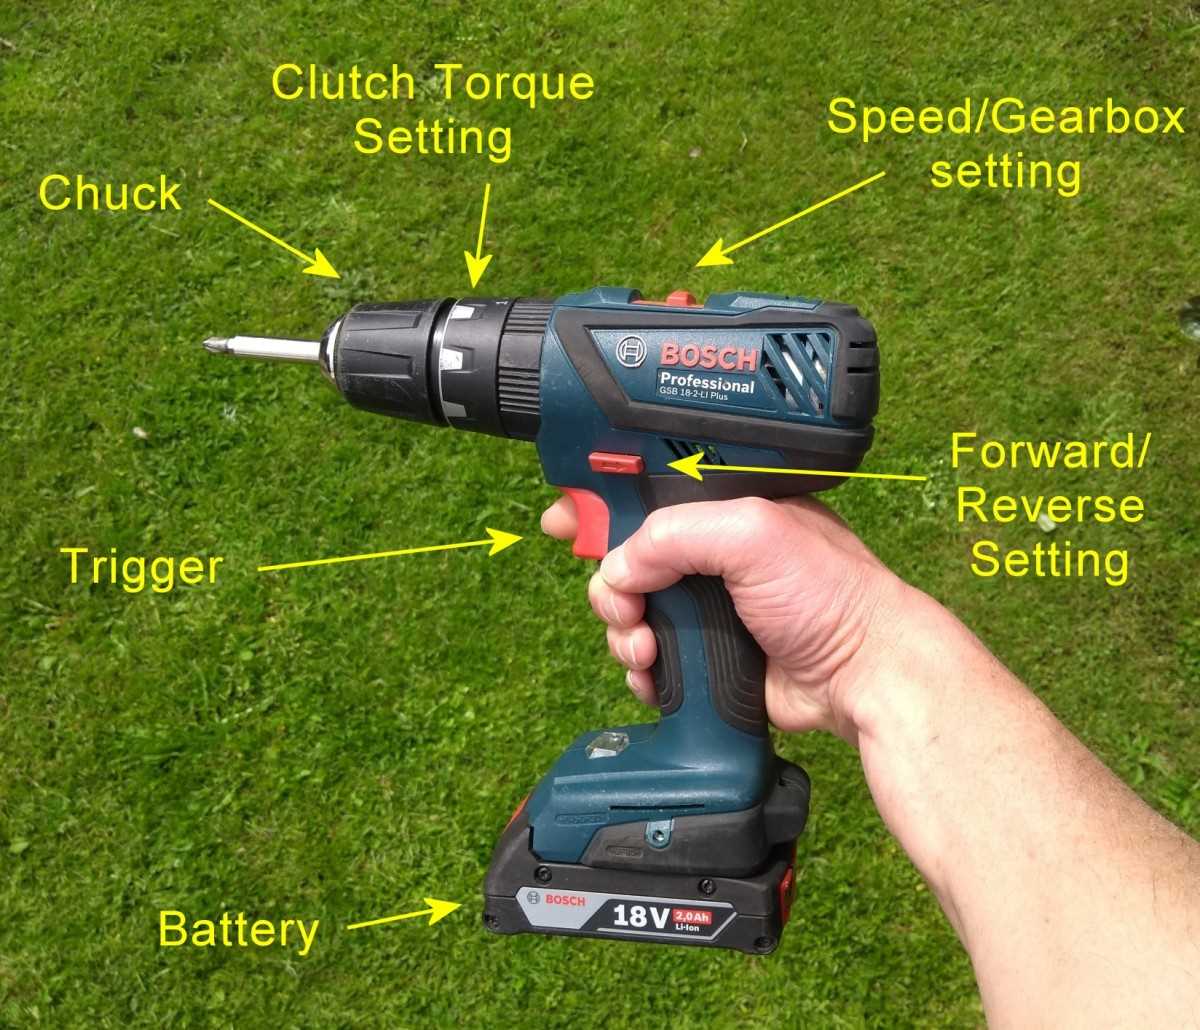
When using a drill for various DIY projects or professional construction work, it is essential to have a good understanding of the different settings and features available. One of the common features on a drill is the presence of numbers 1 and 2, usually located near the drill’s chuck. These numbers indicate the speed settings or gear ratios of the drill, and understanding their meaning can greatly enhance your drilling and driving performance.
The number 1 on a drill typically refers to the lower speed setting or gear ratio. This setting is suitable for tasks that require more torque and less speed, such as driving screws into dense materials like hardwood or drilling large diameter holes. The lower speed setting provides more control and prevents the drill bit from slipping, as it delivers more power to the bit.
On the other hand, the number 2 on a drill signifies the higher speed setting or gear ratio. This setting is ideal for tasks that require faster drilling or driving speeds, such as drilling small diameter holes or driving screws into softer materials like drywall. The higher speed setting allows for quicker work and is less likely to cause damage to the materials being drilled or driven into.
It is important to note that the specific speed range or gear ratio associated with the numbers 1 and 2 may vary depending on the drill model. Therefore, it is recommended to consult the drill’s user manual for precise information related to the speed settings and gear ratios of your specific drill.
TIP: Experimenting with different speed settings on a drill can help you determine the most suitable setting for a specific task. Start with the lower setting, and if the drill seems to struggle or the drilling/driving action is too slow, switch to the higher setting. Remember to always start drilling at a slow speed and gradually increase as needed, especially for delicate or precision work.
Functionality of Numbers on a Drill
Understanding the Purpose

The numbers 1 and 2 on a drill refer to the different speed settings the drill offers. These settings control the speed at which the drill bit rotates, allowing users to adjust the tool’s functionality to suit their specific needs.
Speed Setting 1
Speed setting 1 is typically the lower speed setting on a drill. It is designed for drilling tasks that require more precision or when using smaller drill bits. This setting offers a slower rotation speed, which helps prevent the bit from overheating as it drills into the material. Speed setting 1 is useful when drilling into delicate materials or when working with materials that are prone to cracking or splintering.
Speed Setting 2
Speed setting 2, on the other hand, is the higher speed setting on a drill. It is suited for tasks that require more power or when using larger drill bits. This setting offers a faster rotation speed, allowing the drill bit to cut through tougher materials more efficiently. The higher speed helps the bit to drive into the material more quickly, making it ideal for drilling holes in harder surfaces or when working on projects that require more force.
How to Use
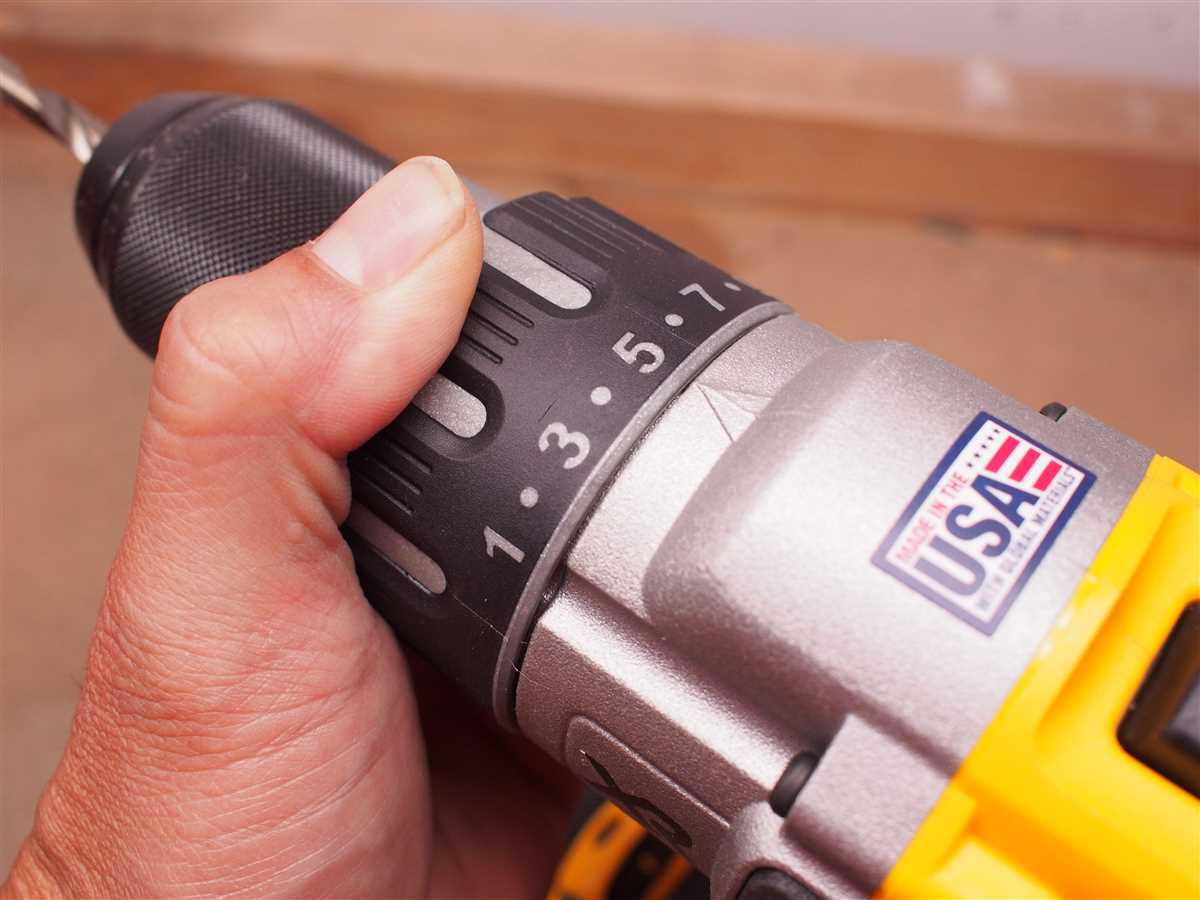
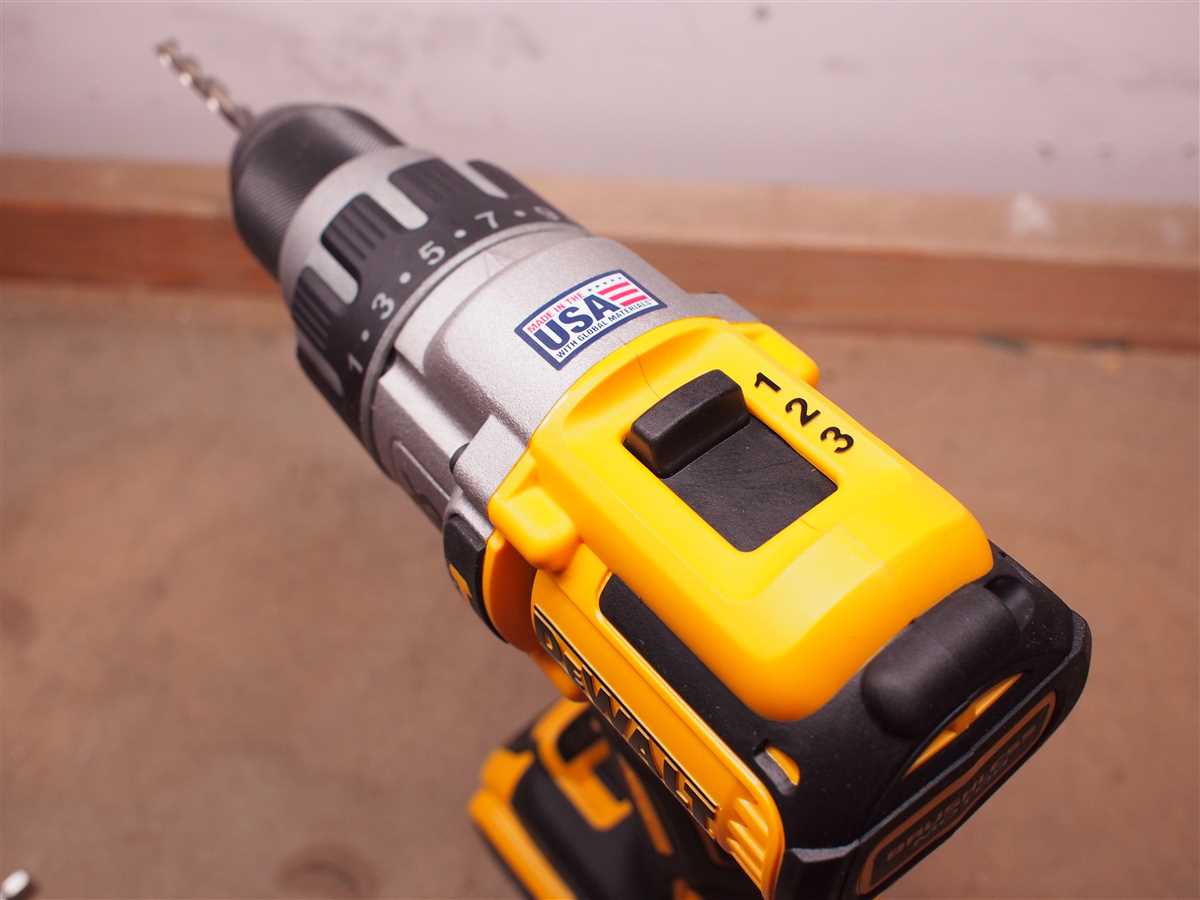
To switch between speed settings on a drill, look for a switch or button near the drill’s handle or body. The switch will generally display the numbers 1 and 2 or have markings indicating low and high-speed settings. To change the speed, slide or toggle the switch to the desired setting.

Considerations
When using a drill, it’s essential to select the appropriate speed setting based on the task at hand. Using the wrong speed setting can lead to inefficiency, damage to the drill bit or material, or even personal injury. Always refer to the drill’s user manual or consult with an expert if unsure about which speed setting to use.
Additionally, it’s crucial to use the right drill bit for the specific material being worked on. Different materials require different types of bits, and using the wrong one can affect the drilling performance and durability of both the drill bit and the material.
Conclusion
The numbers 1 and 2 on a drill provide users with the ability to adjust the speed at which the drill bit rotates. This feature offers greater control and versatility when drilling, ensuring optimal results based on the project’s requirements. Understanding the functionality of these speed settings is key to using a drill effectively and safely.
Different Settings for Number 1
1. Low Speed
Setting the drill to number 1 on the speed dial usually corresponds to a low speed setting. This setting is typically used for delicate tasks that require precision and control. The low speed setting is ideal for drilling into soft materials such as wood or plastic, as well as for driving screws into these materials.
When using the number 1 setting, the drill will rotate at a slower speed, allowing for better handling and accuracy. The lower speed helps prevent the material from splintering or cracking, as the drill bit moves through it more gently.

2. Clutch Setting
In some drills, the number 1 setting may be associated with the clutch function. The clutch is a feature that allows you to choose the amount of torque or power the drill applies to the task at hand. By selecting a lower clutch setting, the drill will stop automatically when it reaches a certain level of resistance.
This can be useful when driving screws to a specific depth or when working with delicate materials that could be easily damaged by applying too much force. The clutch setting on number 1 is typically the lowest torque setting, allowing for more control and preventing overdriving or stripping of screws.
3. Safety Precautions
When using the number 1 setting on your drill, it is important to take certain safety precautions to avoid injury or damage.
- Always wear appropriate safety goggles or glasses to protect your eyes from flying debris.
- If drilling into a hard material, such as metal or concrete, consider using a higher speed setting to ensure efficient drilling and prevent overheating of the drill.
- Ensure that the drill bit is securely inserted into the chuck and tightened properly before starting the drill.
- Be cautious when using drill attachments or accessories, as they may require a different speed setting or specific instructions for use.
4. Best Uses
The number 1 setting on a drill is best suited for the following tasks:
- Drilling small holes in wood, plastic, or other soft materials.
- Driving screws into delicate materials or when precise control is required.
- Working on projects that require low torque or power settings.
- Performing tasks that require a slower drilling speed for accuracy and control.
By understanding the different settings for number 1 on your drill, you can choose the appropriate speed and torque for various tasks, ensuring successful and safe operation.

Different Settings for Number 2
1. Speed Settings
The number 2 setting on a drill typically represents a faster speed than the number 1 setting. This higher speed can be used for tasks that require more power or when drilling into tougher materials, such as metal or concrete. Using the number 2 setting allows the drill to rotate faster and provide more torque, which can help with drilling through harder surfaces.
2. Drilling Depth
In some drills, the number 2 setting may be used to set the drilling depth. This is often the case when using a drill with manual depth control or a depth stopper feature. By setting the drill to the number 2 setting, you can ensure that the drill bit will only penetrate up to a certain depth, preventing it from going too deep and potentially damaging the material or underlying surfaces.
3. Screwdriving
For drills that have a screwdriving function, the number 2 setting is often used for driving screws. This setting provides a moderate amount of torque, allowing the drill to drive screws in quickly and efficiently. The number 2 setting is usually suitable for most standard screwdriving applications, such as assembling furniture or fastening items to walls.

4. Hammer Drilling
In some advanced drills, the number 2 setting may be used for hammer drilling. This is a specialized function that combines drilling and hammering actions to quickly and effectively drill into hard materials like concrete or masonry. The number 2 setting is typically the highest speed setting for hammer drilling and provides the necessary power for breaking through tough surfaces.
5. Different Brands and Models
It’s important to note that the specific functions and settings for the number 2 on a drill may vary depending on the brand and model. Different manufacturers may have their own unique interpretations of the number 2 setting, so it’s always best to refer to the drill’s manual for accurate information on how to use it properly.
Drill Speed and Torque
When using a drill, it is important to understand the relationship between speed and torque. The numbers 1 and 2 on a drill indicate different speed settings that can be used for different tasks.
Speed Settings
The number 1 setting on a drill usually represents a lower speed setting. This setting is ideal for tasks that require more control and precision, such as drilling into softer materials or driving screws. The lower speed helps prevent the drill bit from moving too quickly and allows for more accurate drilling or screwing.
The number 2 setting typically represents a higher speed setting. This setting is suitable for tasks that require more power and speed, such as drilling into harder materials like metal or masonry. The higher speed allows the drill bit to rotate faster, making it easier to penetrate tough surfaces.
Torque Settings
In addition to speed settings, many drills also have torque settings. Torque refers to the twisting force that the drill applies to the drill bit or screw. Different torque settings can be useful for different tasks.
When drilling into softer materials or driving screws, a lower torque setting is often sufficient. This helps prevent the drill from over-tightening screws or damaging the material being drilled. A higher torque setting is typically needed for drilling into harder materials, as it provides more power to overcome resistance and penetrate the surface.
Choosing the Right Setting
When using a drill, it is important to choose the right speed and torque settings for the task at hand. Consider the material you are working with, the size of the drill bit or screw, and the desired outcome.
For example, if you are drilling into wood with a smaller drill bit, setting 1 with a lower torque setting may be appropriate. However, if you are drilling into metal with a larger drill bit, setting 2 with a higher torque setting may be necessary.
Always refer to the drill’s manual for specific recommendations and guidelines regarding speed and torque settings for different materials and tasks. This will ensure you achieve the best results and prevent potential damage to the drill or workpiece.
Remember to use appropriate safety precautions when operating a drill, such as wearing protective eyewear and securing your workpiece.
Drilling Techniques Using Number 1
Introduction
When using a drill, it is important to understand the different numbers and settings available. The number 1 setting is commonly used for drilling holes in wood, plastics, and lighter materials. This article will explore various drilling techniques that can be performed using the number 1 setting on a drill.
1. Pilot Holes
One of the main uses for the number 1 setting on a drill is for creating pilot holes. Pilot holes are small, pre-drilled holes that act as a guide for inserting screws or nails. By using the number 1 setting, you can create precise pilot holes that prevent the wood from splitting when the fastener is inserted.
2. Countersinking
Countersinking is a technique used to create a recessed area for the head of a screw or bolt. This allows the fastener to sit flush with the surface of the material. By using the number 1 setting, you can drill a shallow hole to accommodate the screw head, ensuring a professional and finished look.
3. Creating Small Holes
Another benefit of using the number 1 setting is the ability to create small holes. This is useful for tasks such as installing cabinet hardware, hanging pictures, or assembling small projects. By selecting the number 1 setting, you can drill holes of a suitable size for these types of tasks.
4. Avoiding Over-Drilling
Using the number 1 setting helps to prevent over-drilling, especially in softer materials. Over-drilling can lead to excessive damage or weakening of the material. By using a lower setting, such as number 1, you can control the depth of the hole and reduce the risk of over-drilling.
Conclusion
The number 1 setting on a drill is versatile and suitable for a range of drilling techniques. From creating pilot holes to countersinking and creating small holes, this setting allows for precise drilling in wood, plastics, and lighter materials. By understanding the different uses of number 1, you can enhance your drilling skills and achieve professional results.
Drilling Techniques Using Number 2
Depth and Precision
When using the number 2 setting on a drill, you can achieve a specific depth and precise drilling. This is especially useful when you need to create holes of a consistent size and depth.
Creating Pilot Holes
Number 2 on a drill is often used to create pilot holes. Pilot holes are small guide holes that are drilled before driving screws or nails into a material. These pilot holes help prevent the material from splitting or cracking during the fastening process.
Countersinking Screws
Countersinking is the process of drilling a hole that allows the head of a screw to sit flush with or below the surface of the material. Number 2 on a drill can be used to create countersink holes for screws, ensuring a neat and professional finish.
Drilling Small to Medium-sized Holes
The number 2 setting on a drill is often used for drilling small to medium-sized holes. This can include holes for installing hardware, mounting brackets, or creating openings for electrical wires. The precise control offered by the number 2 setting makes it ideal for these types of applications.
Working with Delicate Materials
The number 2 setting can also be useful when working with delicate materials such as thin wood or soft plastics. The lower speed provided by the number 2 setting helps reduce the risk of damaging these materials during the drilling process.
Summary
- Number 2 on a drill allows for precise drilling and consistent depth.
- It is commonly used for creating pilot holes and countersinking screws.
- Number 2 is ideal for drilling small to medium-sized holes for various applications.
- It is well-suited for working with delicate materials, reducing the risk of damage.
FAQ:
What do the numbers 1 and 2 mean on a drill?
The numbers 1 and 2 on a drill refer to the different speed settings. Setting 1 is usually for low speed, while setting 2 is for high speed.
How do I change the speed on a drill?
To change the speed on a drill, you typically need to rotate the speed selector located on the top or side of the drill. Move it to the left for setting 1 (low speed) and to the right for setting 2 (high speed).
When should I use low speed (1) on a drill?
Low speed (setting 1) on a drill is suitable for tasks that require higher torque or slower rotation, such as driving screws or drilling into harder materials like metal or concrete.
What is the advantage of using high speed (2) on a drill?
High speed (setting 2) on a drill is ideal for tasks that require faster rotation or drilling into softer materials like wood or plastic. It can also be used for quick fastening with a drill bit designed for high speed.
Can I use low speed (1) for all drilling tasks?
While low speed (setting 1) can be used for many drilling tasks, it may not be the most efficient choice for softer materials. The slow rotation may cause the drill bit to become stuck or create excessive heat.
Are there drills with more than two speed settings?
Yes, there are drills with multiple speed settings. Some advanced drills have variable speed controls, allowing you to adjust the speed within a wider range to suit various drilling and fastening tasks.
Video:


Meet Harrison Clayton, a distinguished author and home remodeling enthusiast whose expertise in the realm of renovation is second to none. With a passion for transforming houses into inviting homes, Harrison's writing at https://thehuts-eastbourne.co.uk/ brings a breath of fresh inspiration to the world of home improvement. Whether you're looking to revamp a small corner of your abode or embark on a complete home transformation, Harrison's articles provide the essential expertise and creative flair to turn your visions into reality. So, dive into the captivating world of home remodeling with Harrison Clayton and unlock the full potential of your living space with every word he writes.