Understanding the Meaning of Numbers on a Drill: A Comprehensive Guide

When it comes to power tools, one of the most important features to understand is the meaning of the numbers that are often found on drills. These numbers can provide valuable information about the capabilities and performance of a drill, helping users to make informed decisions about which tool is best suited to their needs.
In this comprehensive guide, we will explore the significance of these numbers and how they relate to the functions of a drill. By understanding these numbers, you will be better equipped to choose the right drill for your specific tasks.
To begin, let’s take a closer look at the most common number you will find on drills: the voltage rating. This number represents the amount of electrical power that the drill can handle, and higher voltage typically means more power. However, it is important to note that higher voltage also often translates to a heavier and bulkier tool, so it is crucial to consider your specific needs and preferences before selecting a drill with a higher voltage.
Next, we will delve into the drill’s torque rating, which is another important number to consider. Torque refers to the rotational force that the drill can exert, and it is a key factor in determining the drill’s performance capabilities. As a general rule, the higher the torque rating, the more powerful the drill will be in driving screws or drilling through tough materials.
Lastly, we will explore the drill’s speed settings. These numbers typically indicate the maximum rotations per minute (RPM) that the drill can achieve. Different speed settings allow for greater flexibility and control, as they enable you to adjust the drill’s speed based on your specific task. For example, you might choose a lower speed setting for precise drilling and a higher speed setting for fast drilling or driving screws.

In conclusion, understanding the meaning of the numbers on a drill can greatly assist you in selecting the right tool for your needs. By considering the voltage rating, torque rating, and speed settings, you can ensure that your drill is powerful enough for the tasks you have at hand while also providing the necessary control and precision. With this comprehensive guide, you will be equipped to make informed decisions and tackle any project with confidence!
The Importance of Numbers
1. Precision and Accuracy
The numbers on a drill provide important information regarding its precision and accuracy. These numbers indicate the size, power, and capabilities of the drill, allowing users to make informed decisions about which drill is best suited for their specific needs.
For example, the number on a drill may indicate the drill bit size that the drill can accommodate. This is important as different projects may require different drill bit sizes for optimal results. Using a drill with the wrong bit size can lead to inaccurate holes or damage to the material being drilled.
2. Compatibility and Interchangeability
Numbers on a drill also play a crucial role in ensuring compatibility and interchangeability with other tools and accessories. For example, a drill with a certain chuck size can only accommodate drill bits or other attachments with matching shank sizes.
Having accurate and standardized numbers on drills allows users to easily find and purchase compatible accessories, making their drilling tasks more efficient and effective. It also ensures that different drill bits or attachments can be interchanged without any issues, providing flexibility and versatility in various drilling applications.
3. Safety and Performance
Numbers on a drill can also indicate the maximum speed or torque it can deliver. The maximum speed is usually measured in rotations per minute (RPM), and the maximum torque is measured in pound-feet (lb-ft) or Newton meters (Nm).

Understanding these numbers is crucial for maintaining safety during drilling operations. Exceeding the maximum speed can cause the drill to overheat or damage the material being drilled, while exceeding the maximum torque can strain the drill motor and increase the risk of accidents due to loss of control.
By adhering to the prescribed speed and torque limits, users can ensure proper performance, prolong the life of the drill, and ultimately reduce the risk of accidents or damage.
4. Maintenance and Repairs
Numbers on a drill can also be useful when it comes to maintenance and repairs. By referring to the drill’s model number or serial number, users can easily find replacement parts or seek technical support from the manufacturer.
Having access to these numbers simplifies the process of troubleshooting issues, ordering spare parts, or getting guidance on repairs. It ensures that the drill can be properly serviced and maintained, optimizing its longevity and performance.
| Benefits | Description |
|---|---|
| Precision and Accuracy | Allows users to choose the right drill for their needs and ensures accurate drilling results. |
| Compatibility and Interchangeability | Enables the use of compatible accessories and interchangeability of drill bits and attachments. |
| Safety and Performance | Promotes safe drilling practices and optimizes the drill’s performance. |
| Maintenance and Repairs | Facilitates easy maintenance, repairs, and access to spare parts or technical support. |

Understanding Drill Bit Sizes
Drill bit sizes are an important factor to consider when working with a drill. The size of the drill bit will determine the size of the hole it creates. It is important to select the right drill bit size for the task at hand in order to achieve the desired result.
Standard Drill Bit Sizes
In most cases, drill bit sizes are given in a standardized format. The size is usually indicated by a number or a letter. The larger the number or letter, the larger the size of the drill bit.
The most commonly used standard drill bit sizes range from 1/16 inch to 1/2 inch. These sizes are typically used for everyday drilling tasks. It is important to note that there are variations in drill bit size standards between different countries.
Fractional Inches
One common way to indicate drill bit sizes is through fractional inches. For example, a 1/8 inch drill bit has a diameter of 1/8 inch. Fractional inch sizes are often used in woodworking and general construction tasks.
Numbered Bits
Another way to indicate drill bit size is through numbered bits. These bits are typically used for drilling holes in metal. Numbered drill bits range from #1 to #80, with #1 being the largest size and #80 being the smallest.

Letter Sizes
Drill bits can also be labeled with letter sizes. Letter sizes range from A to Z, with A being the largest size and Z being the smallest. Letter-sized drill bits are commonly used in the aerospace industry.
Metric Sizes
In addition to fractional inches, numbered bits, and letter sizes, drill bit sizes can also be expressed in metric measurements. Metric drill bit sizes are common in European countries and follow a different numbering system.
Choosing the Right Drill Bit Size
When selecting a drill bit size, it is important to consider the specific requirements of the task. Factors such as material type, hole depth, and desired hole size should all be taken into account. Consulting a drill bit size chart or seeking advice from a professional can help ensure the correct size is chosen.
By understanding drill bit sizes and their uses, individuals can optimize their drilling projects and achieve accurate, clean, and precise holes.

What Do the Numbers Mean?
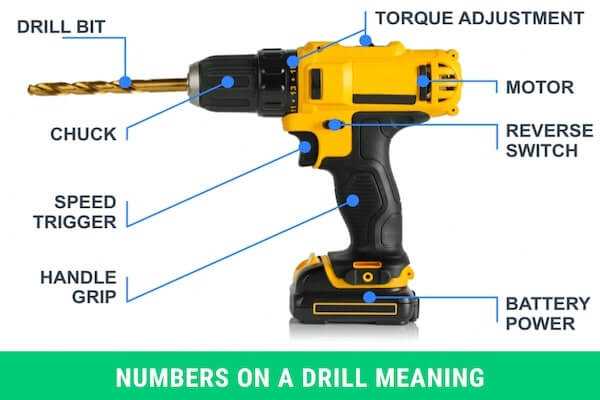
When it comes to drills, understanding the meaning of the numbers on the drill is crucial. These numbers help you determine the power and capabilities of the drill, allowing you to choose the right tool for your projects. Here are the key things to know about the numbers on a drill:
Volts (V)
The voltage rating indicates the power output of the drill. Higher voltage ratings typically mean more power and capability. For light-duty tasks such as hanging pictures or assembling furniture, a drill with a voltage rating of 12V to 18V is usually sufficient. However, for heavy-duty tasks like drilling through concrete or metal, a drill with a voltage rating of 18V to 24V or above may be required.
Ampere-hours (Ah)
Ampere-hours, often written as Ah, represents the battery capacity of the drill. It indicates how long the drill can operate before the battery needs to be recharged. Higher Ah ratings mean longer battery life. If you have a lot of work to do or need to use your drill for extended periods, a drill with a higher Ah rating is recommended.
RPM (Revolutions per Minute)
RPM refers to the number of revolutions the drill bit makes per minute. It indicates the speed at which the drill bit rotates. Higher RPM ratings will allow you to drill through materials more quickly. Different drill models have different RPM ranges, so it’s important to choose a drill with the appropriate RPM range for your specific needs.

Torque (Measured in inch-pounds or Newton-meters)
Torque is the twisting force applied by the drill. It indicates how effectively the drill can drive screws or drill holes in tough materials. Higher torque ratings mean more power. If you frequently work with hard materials or large screws, a drill with higher torque is recommended.
Chuck Size (in inches)
Chuck size refers to the diameter of the hole in the drill’s chuck where you insert the drill bit. Common chuck sizes for home use drills are 3/8 inch and 1/2 inch. A larger chuck size allows you to use larger drill bits and accessories, giving you more versatility in your projects. However, a larger chuck size also means a heavier and bulkier drill.
Weight (in pounds or kilograms)
The weight of the drill is an important consideration, especially if you will be using it for extended periods or need to work in tight spaces. Heavier drills may tire your arms more quickly, while lighter drills may not provide enough power for certain tasks. Find a balance between weight and power that suits your specific needs.
Additional Features
In addition to the numeric specifications, drills may come with various additional features such as variable speed controls, LED lights, ergonomic handles, and more. Consider these features based on your specific needs and preferences.
Understanding the meaning of the numbers on a drill will help you make an informed decision when choosing the right tool for your projects. Consider your intended use, the materials you will be working with, and your own preferences to find the drill that meets your needs.
Decoding RPM Ratings
When it comes to drills, understanding the RPM (Revolutions Per Minute) rating is crucial for finding the right tool for your needs. The RPM rating indicates how fast the drill bit or accessory can rotate. Different materials require different RPM settings to achieve optimum performance and avoid damage.
1. Understanding RPM
RPM stands for Revolutions Per Minute, which refers to the number of complete rotations the drill bit or accessory can make in one minute. This measurement is important because it determines the speed at which the tool can cut, drill, or grind a material.
2. High RPM vs. Low RPM
A drill with a high RPM rating will rotate the bit or accessory faster, resulting in quicker cutting or drilling. High RPMs are generally suitable for working with softer materials like wood or plastic. On the other hand, low RPM ratings are better for tougher materials like metal or concrete. Going too fast with a high RPM on a hard material can cause overheating or even break the drill bit.
3. Matching RPM to Material
To achieve the best results and prevent damage, it’s important to match the RPM rating of your drill with the material you are working on. To determine the appropriate RPM setting for a specific material, it’s recommended to consult the manufacturer’s guidelines or use a general reference chart.
4. Variable Speed Drills
Some drills come with a variable speed feature, allowing you to adjust the RPM according to your needs. This is especially useful when working with a variety of materials. Variable speed drills give you more control and flexibility while minimizing the risk of damage.
5. Safety considerations
When using a drill, it’s crucial to wear appropriate protective gear, including safety glasses, gloves, and ear protection. Always follow the manufacturer’s instructions and take proper safety precautions when operating the drill.
Conclusion
Understanding RPM ratings is essential for choosing the right drill and achieving optimal results in different applications. By matching the RPM to the material and using appropriate safety measures, you can ensure efficient and safe operation.
Identifying Optimal Speeds
When using a drill, it is important to understand the optimal operating speeds for different tasks. The speed at which a drill operates can greatly impact the efficiency and effectiveness of the drilling process. Here are some guidelines for identifying optimal speeds:
1. Consult the Manufacturer’s Guidelines
One of the first steps in identifying optimal speeds for your drill is to consult the manufacturer’s guidelines. The manufacturer will typically provide a recommended speed range for different types of drilling tasks and materials. It is important to follow these guidelines to ensure the best results and to avoid damaging the drill or the workpiece.
2. Consider the Material
The material you are drilling into will also play a role in determining the optimal speed. Different materials have different hardness levels and require different drilling speeds. For example, drilling into wood may require a slower speed than drilling into metal. It is important to consider the material before setting the speed.
3. Start with a Slower Speed
If you are unsure of the optimal speed for a particular task, it is best to start with a slower speed and gradually increase it until you find the optimal speed. Starting with a slower speed will help prevent the drill bit from overheating or drilling too quickly, which can result in poor drilling performance or damage to the workpiece.
4. Test and Adjust
Once you have identified a starting speed, test it on a small area or scrap piece of material. Observe the drilling performance and adjust the speed as needed. If the speed is too slow, the drilling process may be overly time-consuming. If the speed is too fast, the drill may struggle to effectively penetrate the material or may cause damage.
5. Consider the Drill Bit Size
The size of the drill bit being used can also impact the optimal speed. Generally, larger drill bits require slower speeds, while smaller drill bits can handle faster speeds. This is because larger drill bits have more surface area in contact with the material, causing more friction and heat buildup. Adjust the speed accordingly to optimize drilling performance.
6. Prioritize Safety
Lastly, always prioritize safety when identifying optimal speeds. Operating the drill at excessive speeds can increase the risk of accidents, such as the drill bit breaking or the workpiece becoming dislodged. Follow safety guidelines and use protective equipment, such as safety glasses and gloves, when operating a drill.
By following these guidelines and using some trial and error, you can identify the optimal speeds for different drilling tasks. Remember to consult the manufacturer’s guidelines, consider the material, start with a slower speed, test and adjust, consider the drill bit size, and prioritize safety.
Unveiling Torque Settings
When working with drills, one important aspect to consider is the torque settings. Torque settings determine the amount of rotational force that the drill applies to a fastener or material. Understanding torque settings is crucial for achieving the desired results and preventing damage to the workpiece or the drill itself.
Here are some key points to unveil the mystery behind torque settings:
1. What are torque settings?
Torque settings on a drill are the adjustable settings that control the amount of torque or rotational force exerted by the drill. They allow users to adjust the power output, which is especially important when working with different materials and fasteners.
2. Why are torque settings important?
Torque settings are important for several reasons:
- Prevention of damage: Using the appropriate torque setting helps prevent over-tightening or stripping of fasteners, which can result in damage to the workpiece or the drill.
- Control and precision: Different materials and applications require different levels of torque. By adjusting the torque setting, users can achieve the desired level of control and precision.
- Consistency: Torque settings ensure consistent torque output, which is important for tasks that require uniform fastening, such as assembling furniture or machinery.
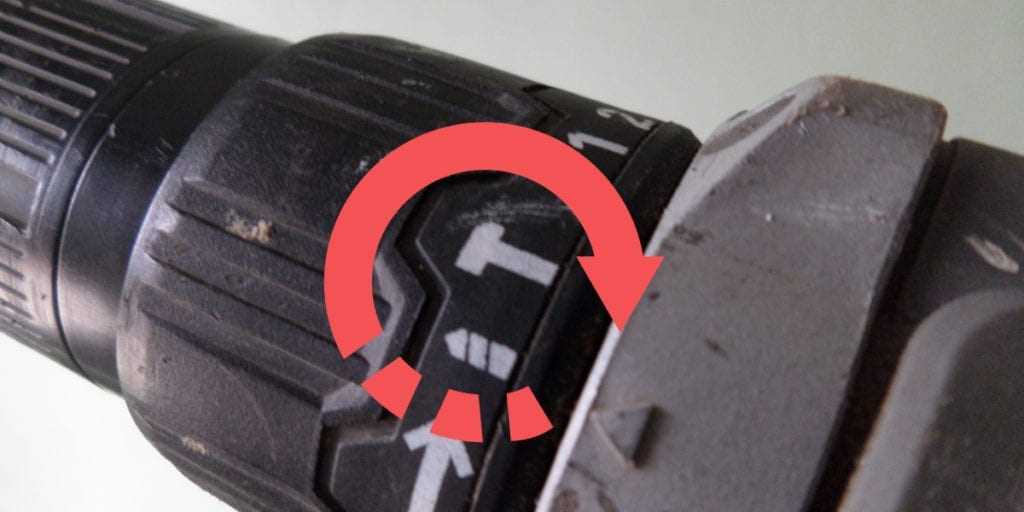
3. How are torque settings adjusted?
The method of adjusting torque settings varies depending on the model and brand of the drill. However, most drills have a torque adjustment ring or collar near the chuck. Rotating this collar allows users to select the desired torque setting.
4. Understanding torque setting numbers
Drills often feature numbered torque settings. These numbers represent the level of torque that the drill will apply. Higher numbers indicate higher torque output, while lower numbers indicate lower torque output. Some drills may also have additional symbols or markings to indicate specialized torque settings for specific applications.
5. When to adjust torque settings
Torque settings should be adjusted based on the specific task at hand. Here are a few examples:
- For delicate tasks or when working with fragile materials, such as wood or plastic, a lower torque setting should be used to prevent damage.
- For heavy-duty tasks or when working with dense materials, such as metal or concrete, a higher torque setting may be necessary to ensure proper fastening.
- When driving screws, adjusting the torque setting to match the screw’s size and material can prevent stripping or over-tightening.
6. Experiment and practice
Understanding torque settings may require some experimentation and practice. It’s important to familiarize yourself with your drill’s torque adjustment mechanism, try different torque settings in various scenarios, and observe the results to determine the best setting for each task.
By unveiling the mysteries behind torque settings and understanding their importance, you can maximize the efficiency and effectiveness of your drilling projects.
Making the Right Adjustments
When using a drill, it’s important to make the right adjustments to ensure that you get the desired results. Here are some key adjustments you may need to make:
Speed
One of the most important adjustments you can make is to the speed of the drill. Different materials and tasks require different speeds. For example, when drilling into wood, a slower speed may be more appropriate to prevent splintering. On the other hand, when drilling into metal, a higher speed may be needed to avoid overheating.
Torque
Another adjustment you may need to make is to the torque setting of the drill. Torque refers to the rotational force of the drill. Higher torque settings are generally used for tougher materials or tasks, while lower torque settings are used for more delicate jobs. Adjusting the torque properly can help prevent damage to the material or achieve the desired depth or result.
Drill Bit
Choosing the right drill bit is crucial for different tasks. Some drill bits are specifically designed for drilling into wood, while others are better suited for metal or masonry. Using the wrong drill bit can not only result in ineffective drilling but also damage the bit or the material. Make sure to select the appropriate drill bit for the job at hand.
Depth
Adjusting the depth of the drill hole is important to ensure that the desired result is achieved. Some drills come with a depth stop that allows you to set a specific depth. This is particularly useful when drilling holes of a consistent depth, such as for dowels or screws. If your drill doesn’t have a depth stop, you can use tape or a marker on the drill bit as a guide.
Clutch
Many drills come with a clutch that allows you to adjust the amount of torque applied. This is particularly useful when driving screws or fasteners, as it helps prevent stripping or over-tightening. Adjust the clutch setting according to the material and the amount of force required. Experiment with different settings until you find the right balance.
By making the right adjustments to your drill, you can ensure that you achieve the desired results and prevent damage to the material or the drill itself. Take the time to familiarize yourself with the various adjustments and experiment with different settings to find what works best for each task.
Mastering Clutch Positions
Introduction
Understanding and effectively utilizing the various clutch positions on a drill is a vital skill for any DIY enthusiast or professional. The clutch of a drill allows you to adjust the amount of torque or rotational force applied by the drill bit, giving you control over the depth and pressure of your drilling. In this section, we will explore the different clutch positions and how to use them for different drilling tasks.
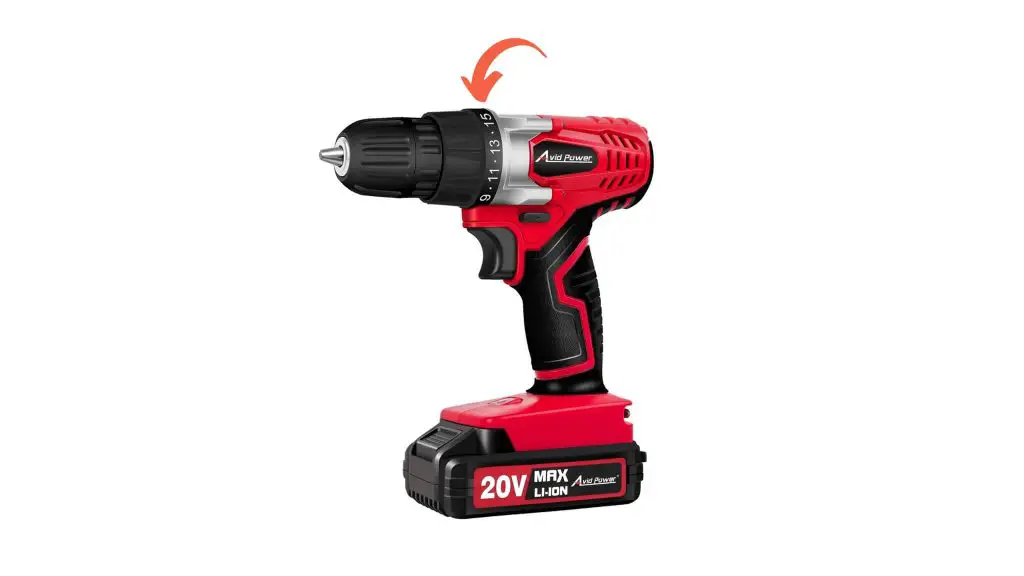
The Basics: Clutch Numbers
Most modern drills have a numbered or labeled clutch, typically located near the chuck or handle of the drill. These numbers or labels indicate the different clutch positions available on the drill. The higher the number, the greater the torque delivered by the drill bit. Lower numbers are ideal for delicate tasks, such as driving screws into soft materials or assembling furniture, while higher numbers are suited for heavy-duty tasks like drilling into concrete or hardwood.
Using the Clutch for Different Drilling Tasks
To achieve the best results, it’s important to choose the appropriate clutch position for the task at hand. Here are some common drilling scenarios and the recommended clutch positions:
- Driving Screws: When driving screws, select a lower clutch position to prevent over-tightening or damaging the screw or material. A clutch setting between 1 and 5 is typically suitable for this task. Start with a lower setting and gradually increase if necessary.
- Drilling into Soft Materials: For drilling into soft materials like drywall or plywood, a medium clutch position between 6 and 10 is often sufficient. This prevents the drill from damaging or pushing through the material excessively.
- Drilling into Hard Materials: When drilling into harder materials like hardwood or metal, higher clutch positions are necessary. Begin with a clutch setting of 11 to 15, and adjust accordingly based on the material’s density and the desired drilling depth.
Advantages of Using the Clutch
Mastering clutch positions on your drill offers several advantages:
- Prevents Stripped Screws: By using the appropriate clutch setting when driving screws, you can prevent the screws from becoming stripped or damaged due to excessive force.
- Protects Materials: Adjusting the clutch position allows for controlled drilling, reducing the risk of damaging delicate materials when driving screws or drilling holes.
- Increases Efficiency: The ability to adjust the clutch position ensures that you are using the optimal amount of torque for each task, leading to more efficient drilling and improved battery life.
Troubleshooting
If you are experiencing issues while using the clutch positions on your drill, consider the following troubleshooting steps:
- Incorrect Clutch Setting: Ensure that you are using the appropriate clutch position for the task at hand. Adjust if necessary.
- Overloading the Drill: If the drill stalls or stops while in use, it may be due to overloading. Reduce the load or use a lower clutch setting.
- Worn Clutch: If the clutch is not engaging or slipping, it may be worn and in need of replacement. Consult the drill’s manual or contact the manufacturer for further assistance.
Conclusion
Mastering clutch positions on your drill is essential for achieving optimal results and protecting your tools and materials. By understanding how different clutch positions affect torque and pressure, you can improve the efficiency and effectiveness of your drilling tasks. Experiment with different clutch settings for various tasks, and don’t hesitate to consult the drill’s manual or reach out to the manufacturer for specific recommendations and troubleshooting guidance.
How to Choose the Right Setting
1. Consider the Material
Different materials require different settings on a drill. Before choosing a setting, consider the material you will be drilling into. Some common materials include:
- Wood
- Metal
- Plastic
- Concrete
Each material may require a different combination of speed and torque settings. It is important to consult the drill’s manual or do some research to determine the appropriate setting for the material you will be working with.
2. Determine the Desired Hole Size
Another important factor to consider when choosing the right setting is the desired hole size. Some drills have adjustable settings that allow you to choose the size of the hole you want to drill.
If you are looking to make a small hole, you will need a lower speed setting. Conversely, if you need a larger hole, a higher speed setting may be required. Adjust the drill’s setting according to the desired hole size.
3. Assess the Job Complexity
The complexity of the job is also a determining factor in choosing the right setting. If you are working on a simple project that requires drilling a few holes, a basic setting may suffice.
However, if you are tackling a more complex task that involves drilling through multiple layers or harder materials, you may need to adjust the drill’s setting accordingly. Higher torque settings may be necessary to complete the job efficiently and effectively.
4. Experiment and Test
Choosing the right setting is not always a straightforward process. It often requires some experimentation and testing. If you are unsure about the appropriate setting for a particular material or task, it is best to start with a lower setting and gradually increase it as needed.
Test the drill on a small, inconspicuous area of the material to ensure that the setting is suitable. If the drill is not producing the desired results, adjust the setting accordingly and test again.
5. Safety First
Remember to prioritize safety when choosing the right setting on a drill. Ensure that you are wearing appropriate protective gear, such as safety goggles and gloves.
If you are unsure about the appropriate setting for a particular job, it is always a good idea to seek advice from a professional or consult the drill’s manual. Avoid using settings that may cause damage to the material or pose a safety risk.
Interpreting Battery Voltage
Battery voltage is an important factor to consider when using a drill. It affects the power and performance of the drill, as well as how long the battery will last before needing to be recharged. Understanding how to interpret battery voltage can help you make informed decisions about which drill to use for a particular task.
What is Battery Voltage?
Battery voltage refers to the amount of electrical potential energy stored in the battery. It is typically measured in volts (V). The higher the voltage, the more powerful the drill will be.
How to Interpret Battery Voltage
When looking at the battery voltage, it is important to consider the specific requirements of your task. Different tasks may require different levels of power.
Here are some general guidelines for interpreting battery voltage:
- A battery voltage of 12V is typically suitable for light to medium-duty tasks, such as drilling small holes or driving screws into soft materials.
- A battery voltage of 18V is considered a good all-around option for most tasks. It provides enough power for medium-duty tasks, such as drilling into wood or metal.
- A battery voltage of 20V or higher is recommended for heavy-duty tasks, such as drilling into concrete or other hard materials.
It is important to note that higher battery voltage often comes with a trade-off of increased weight and size. So, if you require more power, you may need to consider using a larger and heavier drill.
Other Factors to Consider
While battery voltage is an important factor, there are other factors to consider when choosing a drill. These include the type of battery (such as lithium-ion or nickel-cadmium), the ampere-hour (Ah) rating (which determines how long the battery will last), and the overall design and features of the drill.
Remember to read the manufacturer’s specifications and guidelines for the drill you are considering to ensure that it meets your specific needs and requirements.
| Battery Voltage | Suitable Tasks |
|---|---|
| 12V | Light to medium-duty tasks |
| 18V | Medium-duty tasks |
| 20V or higher | Heavy-duty tasks |
FAQ:
How do I understand the meaning of numbers on a drill?
The numbers on a drill typically represent the drill’s speed settings. Higher numbers indicate higher speeds, while lower numbers indicate slower speeds.
What is the significance of the speed settings on a drill?
The speed settings on a drill allow you to control the rate at which the drill rotates. Higher speeds are often used for drilling through softer materials, while lower speeds are better for drilling through harder materials.
Can you provide a breakdown of the different speed settings on a drill?
On most drills, there are multiple speed settings ranging from 1 to 10 or more. Generally, the lower speed settings (1-3) are best for drilling through metal and harder materials, while the higher speed settings (7-10) are more suitable for drilling through wood and softer materials.
What should I consider when choosing a speed setting on a drill?
When selecting a speed setting on a drill, you should consider the type of material you are drilling through and the size of the drill bit you are using. Smaller drill bits typically require higher speeds, while larger drill bits may require slower speeds to avoid overheating and damaging the bit or material.
What are some common mistakes people make when using a drill?
Some common mistakes people make when using a drill include using an incorrect speed setting for the material or drill bit being used, applying too much pressure while drilling, and not wearing appropriate safety gear such as safety glasses or gloves.
Video:


Meet Harrison Clayton, a distinguished author and home remodeling enthusiast whose expertise in the realm of renovation is second to none. With a passion for transforming houses into inviting homes, Harrison's writing at https://thehuts-eastbourne.co.uk/ brings a breath of fresh inspiration to the world of home improvement. Whether you're looking to revamp a small corner of your abode or embark on a complete home transformation, Harrison's articles provide the essential expertise and creative flair to turn your visions into reality. So, dive into the captivating world of home remodeling with Harrison Clayton and unlock the full potential of your living space with every word he writes.


