Tips for Keeping Your Drill Straight

Using a drill may seem like a straightforward task, but keeping it straight can sometimes be a challenge. Whether you’re working on a DIY project or a professional job, it’s important to ensure that your drill stays on the right track. Here are some tips to help you keep your drill straight and avoid any mishaps.
1. Use a drill press: If you have access to a drill press, it can be a great tool to help you keep your drill straight. A drill press allows you to position the drill bit exactly where you want it and provides stability and precision.
2. Mark your drilling points: Before you start drilling, make sure to mark your drilling points with a pencil or marker. This will give you a clear indication of where to place the drill bit and help you keep it straight.
3. Start with a small pilot hole: If you’re drilling through a thick material or working with a large drill bit, it can be helpful to start with a small pilot hole. This will give you a starting point and make it easier to keep the drill straight as you increase the size of the hole.
4. Use a level: A level can be a handy tool to help you keep your drill straight. Place the level on top of the drill or on the surface you’re drilling into to ensure that everything is aligned properly.

5. Hold the drill firmly: When drilling, make sure to hold the drill firmly and apply even pressure. Avoid tilting or wobbling the drill as this can cause the bit to wander off course.
By following these tips, you can keep your drill straight and ensure accurate and clean holes in your projects. Remember to always prioritize safety and take your time to get the job done right. Happy drilling!
Choosing the Right Drill
When it comes to choosing a drill, there are several factors to consider. Here are some tips to help you make the right choice:
Type of Drill
- Hammer Drill: Ideal for drilling into concrete or masonry surfaces. It combines a rotating motion with a hammering action, providing more power.
- Driver Drill: Suitable for drilling into wood, plastic, and metal. It offers variable speed and torque settings, making it versatile for various tasks.
- Drill Press: Used for accurate and repetitive drilling, especially for woodworking. It is mounted on a stand or workbench and features a drill bit that moves vertically.
Power Source
- Corded Drill: Requires a power outlet for operation. Offers consistent power and is suitable for heavy-duty tasks.
- Cordless Drill: Runs on rechargeable batteries, providing portability and convenience. Perfect for light to medium-duty tasks.
Chuck Size
Consider the chuck size of a drill, which refers to the diameter of the opening where the drill bit is inserted. Common chuck sizes include 1/4 inch, 3/8 inch, and 1/2 inch. A larger chuck size allows for the use of larger drill bits and provides more power.

Speed and Torque
Choose a drill with variable speed settings to accommodate different materials and tasks. Higher speeds are suitable for drilling into soft materials, while lower speeds are better for hard materials. Torque is the twisting force applied by the drill. Consider a drill with adjustable torque settings to prevent overdriving screws or damaging materials.
Ergonomics
Pay attention to the design and ergonomics of the drill. Look for a comfortable grip and well-balanced weight distribution. This will help reduce fatigue and improve control during prolonged use.
Accessories
Consider the availability of accessories and attachments for the drill, such as drill bits, screwdriver bits, and additional batteries. Having a wide range of accessories will allow you to tackle different projects with ease.
Budget
Lastly, consider your budget when choosing a drill. Determine how much you are willing to spend and compare the features and quality of different models within your price range.

Remember to carefully assess your needs and prioritize the features that are most important to you. By considering these factors, you can confidently choose the right drill for your projects.
Using the Correct Drill Bit
One of the most important factors in keeping your drill straight is using the correct drill bit. The drill bit you choose will depend on the material you are drilling into.
1. Wood:
- For drilling into wood, you can use a twist drill bit or a brad point bit.
- A twist drill bit is a general-purpose bit that can be used for various materials, including wood.
- A brad point bit has a sharp point that helps to center the bit and prevent it from wandering.
2. Metal:
- When drilling into metal, you will need to use a metal drill bit.
- HSS (high-speed steel) drill bits are commonly used for drilling into metal.
- For drilling through hardened steel or other hard metals, you may need to use a cobalt drill bit.
3. Masonry:

- Drilling into masonry requires a masonry drill bit.
- Masonry drill bits have a carbide tip that is designed to penetrate hard materials such as concrete or brick.
- Make sure to choose a masonry drill bit that is the correct size for the anchor or screw you will be using.
4. Plastic:
- For drilling into plastic, you can use a twist drill bit or a spade drill bit.
- Twist drill bits are suitable for thinner plastic, while spade drill bits are more appropriate for thicker plastic.
- Make sure to use a slow drilling speed to avoid melting the plastic.
5. Glass and Tile:
- When drilling into glass or tile, you will need to use a specialized drill bit.
- Diamond drill bits or carbide spear-point drill bits are commonly used for drilling through glass or tile.
- It is important to use a low drilling speed and apply light pressure to avoid cracking or shattering the material.
Using the correct drill bit for the material you are drilling into will help to ensure that your drill stays straight and produces clean, accurate holes.
Marking Your Drilling Spot
Before you start drilling, it’s important to mark your drilling spot to ensure accuracy and precision. Here are some tips to help you mark your spot correctly:
1. Measure and Mark
Use a measuring tape or ruler to determine the exact location where you want to drill. Once you have measured the spot, use a pencil or marker to make a small dot or a cross. This will serve as your drilling indicator.

2. Use a Level
For horizontal drilling, it’s important to ensure that your mark is level. Place a level vertically against the wall or surface and adjust the mark as needed until the bubble in the level is centered. This will ensure that your drill hole is straight.
3. Masking Tape
If you are concerned about damaging the surface while drilling, you can use masking tape to create a protective barrier. Simply place a strip of masking tape over your mark, and then mark the spot on the tape itself. This will allow you to drill through the tape without damaging the surface, and you can easily remove the tape afterwards.
4. Create a Pilot Hole
If you are drilling into hard materials such as concrete or tile, it’s a good idea to start with a pilot hole. This is a small hole that you can drill first, which will serve as a guide for the larger drill bit. Use the same marking technique to create a small dot for the pilot hole.
5. Double-Check Before Drilling
Before you start drilling, it’s always a good idea to double-check your mark to ensure it’s in the right spot. Take a step back and visually confirm that your mark aligns with your desired drilling location.
By following these marking techniques, you can ensure that your drilling spot is accurate and straight, resulting in better drilling outcomes.
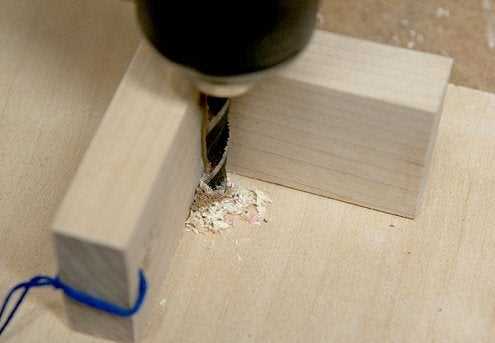
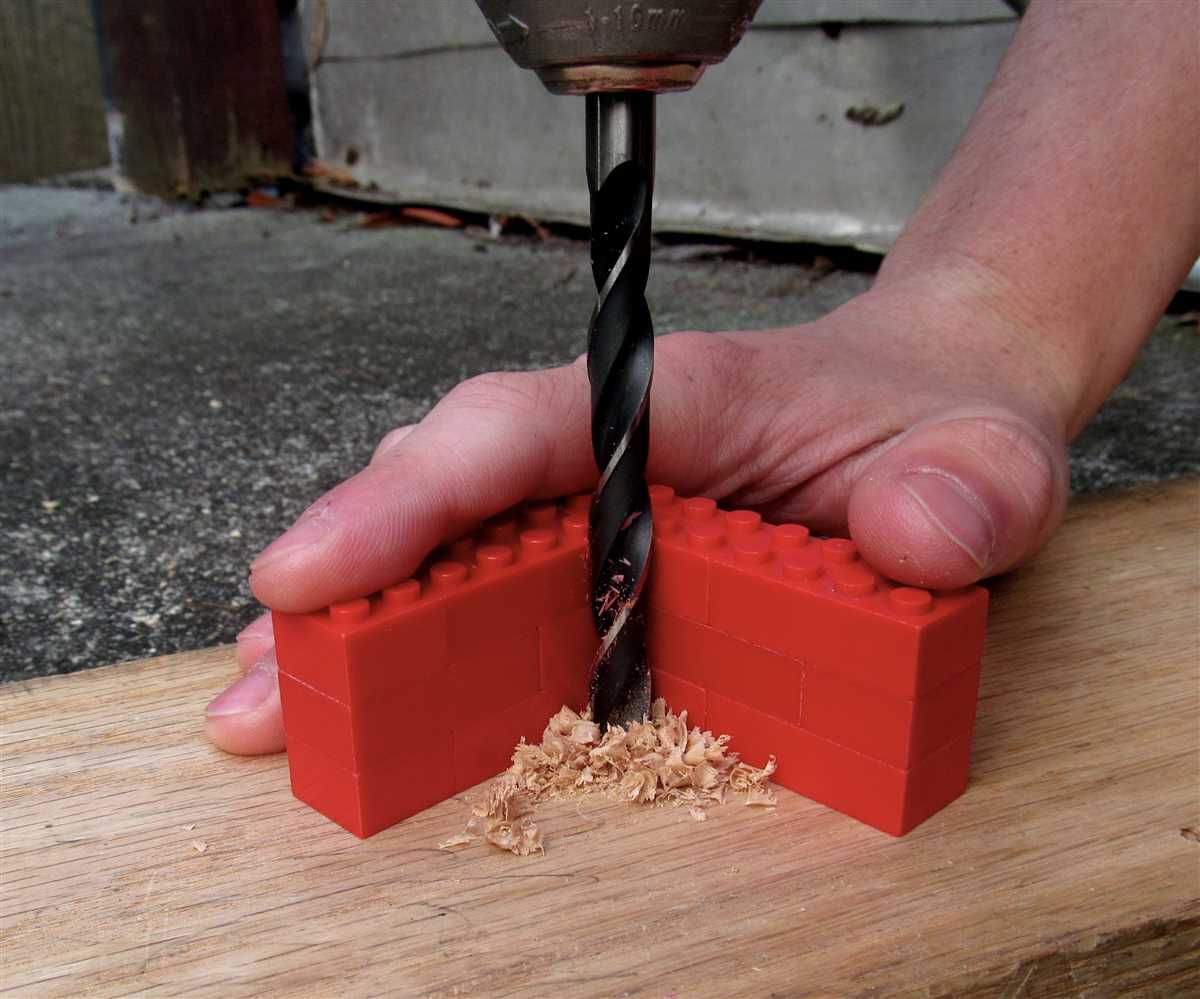
Securing the Workpiece
One of the most important factors in keeping your drill straight is to securely fasten your workpiece. If your workpiece moves or shifts while you are drilling, it can cause the drill bit to veer off track, resulting in a crooked hole.
Here are some tips for securing your workpiece:
- Clamping: Using clamps to hold your workpiece in place is a reliable way to prevent any movement. Make sure to use clamps that are appropriate for the material and are securely tightened. This will provide stability and keep your workpiece from shifting during drilling.
- Workbench vice: If you have a workbench vice, it can be a useful tool for securing your workpiece. Place the piece in the vice and tighten it securely, ensuring that it is held firmly in place. This method is particularly effective for smaller workpieces.
- Workbench dogs: Workbench dogs are small pegs that fit into holes on the surface of your workbench. By using these dogs in combination with a bench stop, you can create a secure surface to hold your workpiece in place. This method is particularly useful when drilling larger pieces that may not fit in a vice.
- Double-sided tape: For smaller and lighter workpieces, you can use double-sided tape to secure them to your work surface. Apply the tape to the bottom of the piece and press it firmly onto the workbench. This will create a strong bond and prevent any movement during drilling.
- Workpiece stabilization: If you are working with a large or irregularly shaped workpiece that cannot be clamped, consider using additional stabilization methods. This can include using wedges, blocks, or even sandbags to prevent any movement while drilling.
By taking the time to secure your workpiece properly, you can greatly increase the accuracy and precision of your drilling. Remember to always prioritize safety and use appropriate methods for the size and shape of your workpiece.
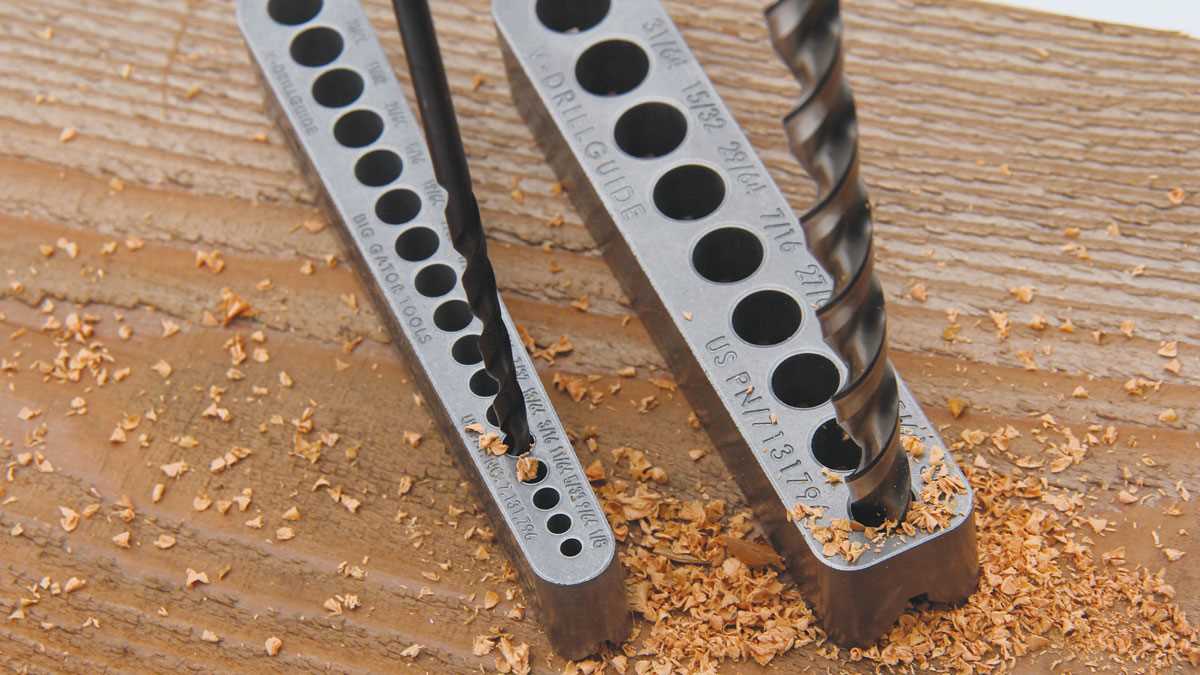
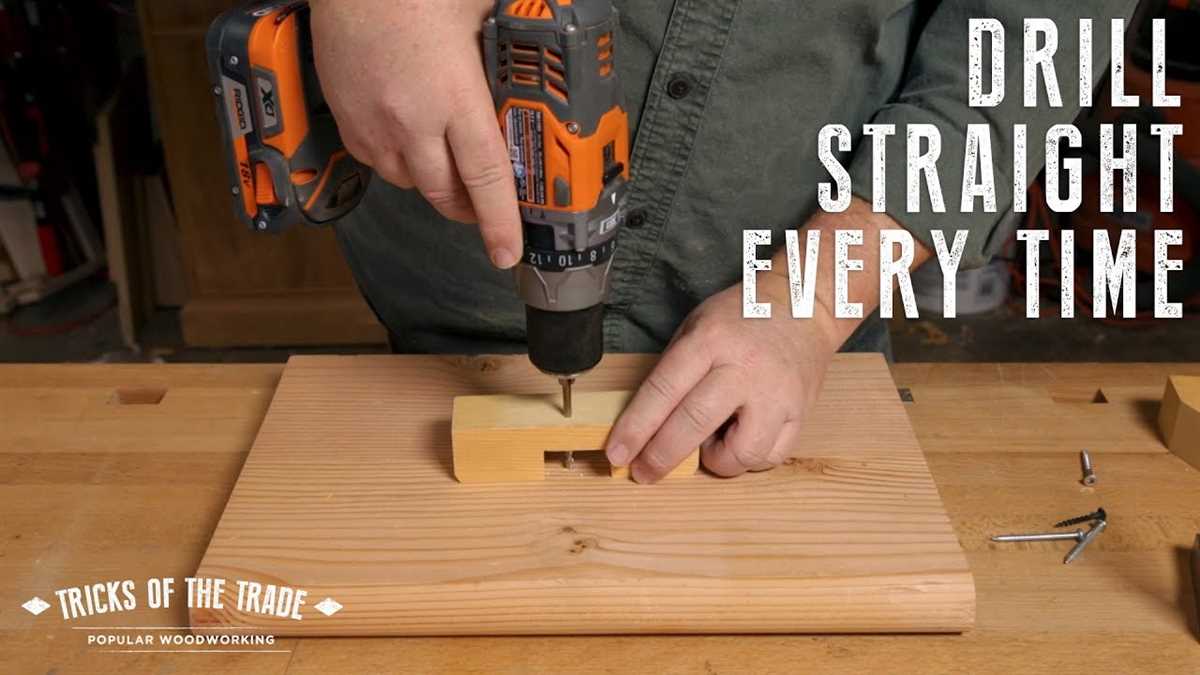
Using a Drill Guide
If you want to ensure that your drill stays perfectly straight while drilling, using a drill guide can be very helpful. A drill guide is a tool that helps you align your drill and keep it on target. Here are some tips for using a drill guide:
- Choose the right drill guide: There are different types of drill guides available, such as handheld drill guides and benchtop drill guides. Choose the one that suits your needs and the type of drilling you’ll be doing.
- Secure the drill guide: Before you start drilling, make sure to secure the drill guide to the surface you’ll be drilling into. This will ensure stability and accuracy during the drilling process.
- Adjust the drilling depth: Most drill guides have a mechanism that allows you to adjust the drilling depth. Set it to the desired depth and lock it in place to ensure consistent drilling.
- Align the drill: Place the drill into the guide and align it with the desired drilling point. Pay attention to the guide’s alignment markings or guidelines if they are provided.
- Hold the drill guide firmly: While drilling, make sure to hold the drill guide firmly in place to prevent any movement or wobbling. This will help maintain the drill’s straightness.
- Use the drill guide as a reference: After drilling the initial hole, you can continue using the drill guide as a reference point for consecutive holes. This will ensure consistency in the hole placement.
Using a drill guide can greatly improve the accuracy and precision of your drilling. It is especially useful when working on projects that require straight and aligned holes. So, make sure to invest in a good-quality drill guide and practice using it for better drilling results.
Applying Steady Pressure
When using a drill, it is important to apply steady pressure to keep the drill bit straight and prevent it from wandering or slipping. Follow these tips to ensure you apply steady pressure while drilling:
- Hold the drill properly: Place your dominant hand on the drill handle and grip it firmly. Your other hand should support the back of the drill, providing stability. This two-handed grip will help you maintain control and apply steady pressure.
- Stand stable: Position yourself in a stable stance with your feet shoulder-width apart. This will provide a solid base and help you maintain balance while exerting pressure on the drill.
- Start with slow speed: When starting to drill, begin at a slow speed setting. This allows you to gain control over the drill and accurately position the bit on the desired spot.
- Apply gradual pressure: Slowly apply pressure to the drill as you start drilling. Avoid using excessive force, as it can cause the drill to wander or the bit to break. Gradually increase the pressure as needed to maintain a steady drilling motion.
- Keep the drill perpendicular: Ensure that the drill remains perpendicular to the surface you are drilling into. Tilting the drill can lead to angled holes or the bit snagging in the material.
- Take breaks if needed: If you need to exert a significant amount of force or if the material you are drilling is particularly hard, take breaks to prevent fatigue. This will help you maintain control over the drill and apply steady pressure consistently.
Remember, practicing proper drilling technique and applying steady pressure will not only help you keep your drill straight but also improve the quality of your drilling projects.
Going Slow and Steady
One important tip for keeping your drill straight is to go slow and steady. Rushing through the drilling process can lead to mistakes and uneven holes. By taking your time and being patient, you can ensure that your drill stays straight and produces accurate holes.
1. Choose the right speed
Before you start drilling, make sure to adjust the speed of your drill. Different materials may require different speeds, so it’s important to choose the appropriate setting. Generally, slower speeds are better for drilling through hard materials like metal, while faster speeds are suitable for softer materials like wood.
2. Apply consistent pressure
When drilling, it’s important to apply consistent pressure to maintain control and keep the drill straight. Too much pressure can cause the drill bit to wander, while too little pressure may result in a slow and inefficient drilling process. Find the right amount of pressure and maintain it throughout the drilling process.
3. Use a guide
If you’re having trouble keeping your drill straight, consider using a guide. A guide can help keep the drill in the desired position and prevent it from wandering off course. You can purchase drilling guides or make your own using a piece of scrap wood with pre-drilled holes.
4. Mark your drilling spot
Before you start drilling, it’s helpful to mark the exact spot where you want to drill. This will provide a clear reference point and help you stay on track. You can use a pencil or a marker to make a small dot or an “X” on the surface of the material.
5. Practice on scrap material
If you’re new to drilling or working with a different type of material, it’s a good idea to practice on a scrap piece first. This will allow you to familiarize yourself with the drill and its behavior on the specific material. You can adjust your technique as necessary before drilling on the actual workpiece.
6. Use a level
For precision drilling, a level can be a useful tool. Place the level on top of the drill or on the surface of the material to ensure that you’re drilling at the desired angle. The bubble in the level should be centered, indicating that the drill is straight.
By following these tips and going slow and steady, you can improve your drilling accuracy and keep your drill straight for professional-looking results.
Checking Your Work
Once you have completed drilling your holes, it is important to check your work to ensure that everything is straight and aligned properly. Here are a few tips for checking your work:
1. Visual Inspection
The first step in checking your work is to visually inspect the drilled holes. Stand back and take a look at the alignment of the holes. They should be in a straight line and evenly spaced. If you notice any deviations, you may need to make adjustments.
2. Measuring
Using a ruler or tape measure, you can measure the distance between each hole to determine if they are evenly spaced. This will help you identify any inconsistencies and make corrections if necessary.
3. Test Fit
If you are drilling holes for a specific purpose, such as installing screws or dowels, it is important to do a test fit to ensure that everything lines up correctly. Insert the screws or dowels into the drilled holes and make sure they fit snugly without any gaps or misalignment.
4. Level Check
If you are drilling holes in a vertical or horizontal line, you can use a level to check for straightness. Place the level against the drilled holes and see if the bubble is centered. If it is off-center, you will need to make adjustments to align the holes properly.
5. Double-Check Measurements
Before proceeding with any further steps, it is always a good idea to double-check your measurements. Ensure that you have drilled the holes at the correct depth, diameter, and spacing.
By following these tips and checking your work carefully, you can ensure that your drilled holes are straight and aligned properly. This will result in better quality work and a more professional finish.
FAQ:
How can I keep my drill straight?
There are several tips you can follow to keep your drill straight. Firstly, make sure to hold the drill with both hands, using one hand to grip the handle and the other hand to guide the drill. Additionally, it’s important to start slowly and build up speed gradually to maintain control. Lastly, using a drill guide or creating a pilot hole can help ensure that your drill goes straight.
What should I do if my drill keeps veering off course?
If your drill keeps veering off course, there are a few things you can try. First, double-check that you are holding the drill correctly and using both hands to maintain control. Next, slow down and make sure to start drilling at a low speed before gradually increasing it. If the problem persists, you can try using a drill guide or creating a pilot hole to guide your drill in the right direction.
Can using a drill guide really help keep my drill straight?
Yes, using a drill guide can greatly help in keeping your drill straight. A drill guide is a tool that you can attach to your drill, which acts as a guide for your drill bit. It helps ensure that the drill goes exactly where you want it to, without veering off course. Drill guides come in various shapes and sizes, so you can choose one that suits your needs and the type of drilling you’ll be doing.
Should I apply pressure when drilling?
Yes, applying pressure when drilling is important, but it should be done in a controlled manner. Pressing down too hard can cause the drill to veer off course or get stuck. Instead, apply a steady and even pressure, allowing the drill bit to do the work. Adjust the speed and pressure based on the material you’re drilling into – for harder materials, you may need to apply more pressure, while for softer materials, less pressure is required.
What should I do if my drill gets stuck while drilling?
If your drill gets stuck while drilling, the first thing you should do is stop applying pressure and turn off the drill. Trying to force the drill to go deeper or pulling it out forcefully can cause damage. Instead, gently reverse the drill in the opposite direction to back it out of the material. If the drill bit is still stuck, you may need to use pliers or a clamp to carefully remove it. It’s important to approach this process with caution to avoid injury.
Video:


Meet Harrison Clayton, a distinguished author and home remodeling enthusiast whose expertise in the realm of renovation is second to none. With a passion for transforming houses into inviting homes, Harrison's writing at https://thehuts-eastbourne.co.uk/ brings a breath of fresh inspiration to the world of home improvement. Whether you're looking to revamp a small corner of your abode or embark on a complete home transformation, Harrison's articles provide the essential expertise and creative flair to turn your visions into reality. So, dive into the captivating world of home remodeling with Harrison Clayton and unlock the full potential of your living space with every word he writes.


