Tips for Drilling Into a Metal Door

Drilling into a metal door can be a daunting task, especially if you have never done it before. However, with the right tools and techniques, you can successfully drill into a metal door without damaging the door or the drill bits. This article will provide you with some tips and tricks to help you drill into a metal door like a pro.
Choose the right drill bit: When drilling into a metal door, it is important to choose the right drill bit that is designed for metal drilling. High-speed steel (HSS) or cobalt drill bits are recommended for drilling into metal doors. These bits are made of hardened steel and can withstand the heat generated during drilling.
Prepare the door: Before drilling into the metal door, you should mark the spot where you want to drill. Use a pencil or a marker to make the mark. This will help you to position the drill bit accurately. You should also secure the door in place to prevent any movement while drilling. You can use clamps or ask someone to hold the door steady for you.
Start with a pilot hole: It is always a good idea to start with a small pilot hole before drilling the actual hole. A pilot hole will help to guide the drill bit and prevent it from slipping. You can use a small drill bit, such as 1/8 inch, to create a pilot hole. Once the pilot hole is created, you can switch to a larger drill bit to drill the actual hole.

Note: Make sure to wear safety goggles and gloves when drilling into a metal door to protect yourself from any flying debris or metal shards.
Use a lubricant: When drilling into a metal door, it is important to use a lubricant to reduce the heat generated during drilling and prolong the life of the drill bit. You can use cutting oil or a water-based lubricant for this purpose. Apply a small amount of lubricant to the drill bit before starting to drill. This will help to keep the drill bit cool and prevent it from getting dull.
Drill slowly and steadily: When drilling into a metal door, it is important to drill slowly and steadily. Applying too much pressure or drilling too fast can cause the drill bit to overheat or break. Take your time and let the drill bit do the work. Apply a consistent amount of pressure and maintain a steady drilling speed until the hole is fully drilled.
By following these tips, you can successfully drill into a metal door without any hassle. Remember to choose the right drill bit, prepare the door properly, start with a pilot hole, use a lubricant, and drill slowly and steadily. With practice, you will become more confident in drilling into metal doors and achieve professional results.
Safely Drilling into a Metal Door
1. Gather the Necessary Tools
Before you begin drilling into a metal door, make sure you have all the necessary tools and equipment. This includes a power drill, drill bits suitable for metal, safety glasses, a measuring tape, and a pencil or marker for marking the drilling spots.

2. Choose the Right Drill Bit
When drilling into a metal door, it is important to use drill bits specifically designed for metal. These drill bits are made of high-speed steel or cobalt, and they have a pointed tip for easier drilling through metal surfaces. Make sure the drill bit size matches the size of the screws or anchors you will be using.
3. Mark the Drilling Spots
Before you start drilling, measure and mark the drilling spots on the metal door. Use a measuring tape to ensure accurate placement of the screws or anchors. Mark the spots with a pencil or marker, taking care to make them clearly visible.
4. Secure the Door
To prevent the metal door from moving during the drilling process, secure it in place. You can use clamps or ask a helper to hold the door steady while you drill. This will ensure that the holes are drilled precisely and avoid any unwanted vibrations.
5. Start with a Pilot Hole
A pilot hole is a small hole that serves as a guide for the larger drill bit. It helps prevent the drill from slipping and ensures accuracy when drilling into metal. Start by using a small drill bit to create the pilot hole, and gradually increase the size until you reach the desired hole size.
6. Apply Steady Pressure
When drilling into a metal door, it is important to apply steady pressure to the drill. Metal requires more force compared to drilling into other materials. Avoid using excessive force, as it can cause the drill bit to break or damage the door. Instead, apply consistent and controlled pressure throughout the drilling process.

7. Use Lubrication
For smoother drilling and to prolong the life of your drill bits, consider using lubrication. Applying a small amount of cutting oil or lubricant to the drill bit will help reduce friction and heat buildup. This can make the drilling process easier and prevent damage to the drill bit or metal door.
8. Clean Up the Metal Shavings
After drilling into the metal door, make sure to clean up any metal shavings or debris. Use a vacuum or a brush to remove the shavings from the drilling area. This will prevent them from scratching the door or causing any other damage.
9. Secure the Hardware
Once you have drilled the holes, it’s time to secure the hardware to the metal door. Insert the screws or anchors into the holes and use a screwdriver or a drill to tighten them. Make sure the hardware is snugly secured but avoid over-tightening, as it can damage the door or strip the threads.
10. Double-Check your Work
After securing the hardware, double-check your work to ensure that everything is properly installed. Test the stability of the hardware and verify that the screws or anchors are securely fastened to the metal door. This will help ensure the longevity and durability of the installation.
Remember: Always exercise caution when drilling into a metal door. Follow the manufacturer’s instructions for your specific drill and equipment. If you are unsure or uncomfortable with the process, it is recommended to consult a professional.

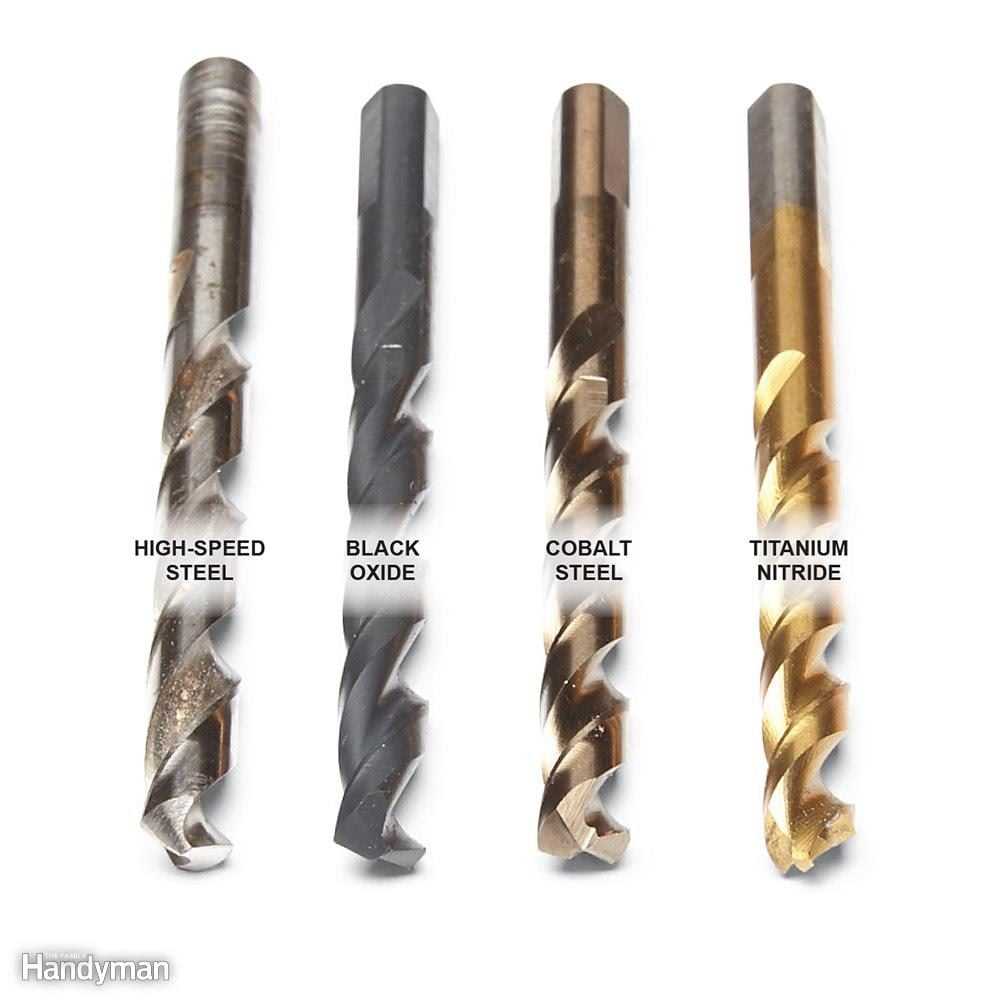
Choosing the Right Drill Bit
When drilling into a metal door, it is important to choose the right drill bit for the job. Using the wrong drill bit can lead to inefficiency, damage to the door, or even injury. Here are a few factors to consider when selecting a drill bit:
1. Material
The first thing to consider is the material of the drill bit. Metal doors are typically made of steel, so you will need a drill bit that is designed for drilling into metal. High-speed steel (HSS) or cobalt drill bits are often the best choice for drilling into metal doors.
2. Size
The size of the drill bit is also important. You will need a drill bit that matches the size of the screw or anchor you plan to use. If the hole is too small, the screw or anchor may not fit properly. If the hole is too large, the screw or anchor may be loose and not provide a secure hold. Measure the diameter of the screw or anchor and choose a drill bit that is slightly smaller.
3. Point Style
The point style of the drill bit can also affect the drilling performance. For drilling into metal doors, a split point or self-centering drill bit is recommended. These types of drill bits have a sharp point that helps to prevent wandering and allows for more precise drilling.
4. Coating
Some drill bits are coated with a material such as titanium or black oxide to improve their performance. Coated drill bits are generally more durable and can provide better heat resistance. Consider using a coated drill bit for drilling into metal doors, especially if you will be drilling multiple holes or working with a harder type of metal.

5. Speed and Feed Rate
Lastly, it is important to use the right speed and feed rate when drilling into a metal door. This will help to prevent overheating or damaging the drill bit. Consult the drill bit manufacturer’s guidelines to determine the recommended speed and feed rate for drilling into metal. Remember to use a lubricant, such as cutting oil or silicone spray, to reduce friction and prolong the life of the drill bit.
By considering these factors and choosing the right drill bit, you can ensure a successful drilling experience when working with a metal door.
Preparing the Surface
1. Clean the Surface
Before you start drilling into a metal door, it is important to clean the surface to ensure proper adhesion of any drilling templates or markers.
Use a mild detergent mixed with water to clean the surface. Wipe it down with a clean cloth to remove any dirt, dust, or grease. Allow the surface to dry completely before moving on to the next step.
2. Mark the Drilling Locations
Next, mark the drilling locations on the metal door. Use a measuring tape or ruler to determine the exact position where you want to drill.
Use a permanent marker or a center punch tool to mark the exact spots where the holes will be drilled. This will ensure accuracy when drilling and help prevent any mistakes.
3. Secure the Door
Before you start drilling, it is important to secure the door to prevent any unwanted movement or damage.
Place the door on a stable surface or secure it using clamps or brackets. This will provide stability and prevent the door from moving or vibrating while drilling.
4. Use a Lubricant
Using a lubricant can help reduce friction and heat generated during the drilling process. This will prevent damage to the drill bit and help prolong its lifespan.
Apply a small amount of lubricant on the tip of the drill bit before drilling into the metal door. This will ensure smooth and efficient drilling.
5. Use the Correct Drill Bit
Choosing the right drill bit is crucial when drilling into a metal door. Using the wrong drill bit can result in damaged drill bits and ineffective drilling.
Use a drill bit specifically designed for metal drilling. High-speed steel (HSS) drill bits or cobalt drill bits are commonly used for drilling into metal surfaces.
6. Start with a Pilot Hole
When drilling into a metal door, it is recommended to start with a pilot hole. A pilot hole acts as a guide for the drill bit and helps prevent the door from slipping or the drill bit wandering off course.
Use a smaller drill bit to create a pilot hole at each marked drilling location. Start drilling slowly and steadily until the pilot hole is complete. This will make it easier to drill the final hole.
7. Drill the Final Holes
Once the pilot holes are complete, you can proceed to drill the final holes with the appropriate-sized drill bit.
Take your time and apply even pressure when drilling the final holes. Avoid applying excessive pressure, as it can cause the drill bit to break or damage the surface of the metal door.
8. Clean Up and Inspect the Holes
After drilling the holes, clean up any debris or metal shavings using a brush or vacuum cleaner. Inspect the holes to ensure they are clean, straight, and free from any burrs or rough edges.
If necessary, use a file or sandpaper to smooth out any rough edges around the holes.
9. Apply a Protective Coating
To prevent rust or corrosion, consider applying a protective coating to the drilled holes.
You can use a rust-inhibiting spray paint or a clear epoxy coating to provide a protective barrier on the metal surface. Allow the coating to dry completely before using or installing any hardware into the drilled holes.
10. Proceed with Caution
Always exercise caution when drilling into a metal door. Wear safety goggles to protect your eyes from debris. Additionally, use ear protection if the noise from drilling is too loud.
Take breaks if needed and stay focused on the task at hand to ensure your safety and the best drilling results.
Marking Your Drilling Points
Before you start drilling into your metal door, it’s important to accurately mark the points where you want to drill. Here are some tips to ensure your drilling points are well-marked:
- Measure and mark: Use a measuring tape to determine the precise location where you want to drill. Use a pencil or a marker to make small marks on the door to indicate the drilling points.
- Use a level: To ensure that your drilling points are perfectly aligned, use a level to make sure the marks are straight and level. This will help prevent any crooked holes and ensure that your door hardware is properly installed.
- Protect the surface: To prevent any damage to the door surface, place a scrap piece of wood behind the area where you will be drilling. This will help prevent splintering or denting of the metal door.
- Consider using a template: If you need to drill multiple holes, it may be helpful to create a template using a piece of paper or cardboard. This will allow you to easily transfer the drilling points onto the door without the need for measuring each time.
- Double-check your measurements: Before you start drilling, double-check your measurements to ensure they are accurate. It’s better to spend a little extra time checking than to drill holes in the wrong location.
By taking the time to accurately mark your drilling points, you can ensure that your door hardware is properly installed and functions as intended. Following these tips will help make your drilling process more efficient and reduce the risk of making mistakes.
Applying Lubrication
When drilling into a metal door, it is essential to apply lubrication to ensure smooth and efficient drilling. Lubrication helps to reduce friction and heat buildup, preventing damage to both the drill bit and the metal door.
Types of Lubrication
- Oil: Using oil, such as cutting oil or motor oil, can provide excellent lubrication for metal drilling. The oil helps to cool the drill bit and reduce friction, allowing for smoother drilling.
- WD-40: WD-40 is a popular multi-purpose lubricant that can be used for drilling into metal doors. It not only lubricates the drill bit but also helps to loosen rust or corrosion that may be present on the door’s surface.
How to Apply Lubrication
Before starting the drilling process, follow these steps to apply lubrication:
- Clean the surface: Wipe away any dirt, dust, or debris from the drilling area using a clean cloth or brush. This will ensure that the lubrication adheres properly to the metal surface.
- Apply the lubricant: Use a small amount of the chosen lubricant and apply it to the drilling area. For oil lubricants, pour a few drops onto the surface or use a brush to spread it evenly. For WD-40, spray it directly onto the drilling area.
- Spread the lubricant: Use a clean cloth or your fingers to spread the lubricant evenly across the drilling area. Make sure to cover the entire surface that will be drilled into.
By applying lubrication before drilling into a metal door, you can help prolong the life of your drill bit and make the drilling process easier and more efficient.
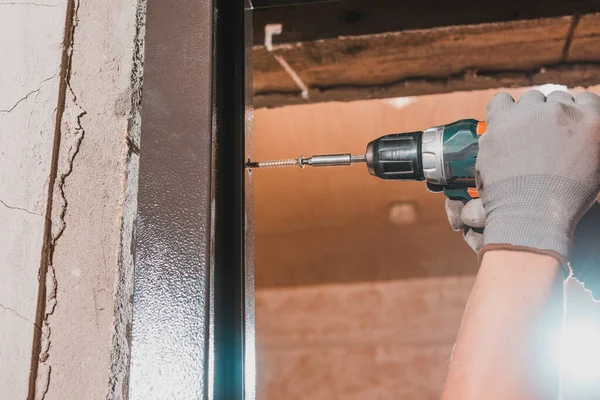
Drilling Techniques
1. Start with the right drill bits
When drilling into a metal door, it’s important to use the right drill bits. For most metal doors, a high-speed steel (HSS) drill bit or a cobalt drill bit will work well. These types of drill bits are specifically designed to cut through metal and will help you achieve clean and precise holes.
2. Use a center punch
Before you start drilling, it’s a good idea to use a center punch to mark the spot where you want to drill. This will help prevent the drill bit from wandering and ensure that your hole is properly aligned. Simply place the center punch against the metal door and strike it with a hammer to create a small indentation.
3. Apply steady pressure
When drilling into a metal door, it’s important to apply steady pressure. This will help prevent the drill bit from “grabbing” the metal and causing it to spin or become misaligned. Start drilling at a slow speed and gradually increase the speed as you go. Remember to keep the drill bit perpendicular to the surface of the door to ensure straight holes.
4. Use lubrication
Using a lubricant such as cutting oil or WD-40 can help make the drilling process smoother and prevent overheating of the drill bit. Apply a few drops of lubricant to the area where you’ll be drilling and continue to apply it as needed during the drilling process. This will help extend the life of your drill bit and make it easier to drill through the metal door.
5. Take breaks
Drilling into a metal door can be a tiring and time-consuming process, especially if you’re drilling multiple holes. It’s important to take breaks to rest and allow the drill bit to cool down. This will prevent overheating and ensure that your drill bit continues to perform effectively. Additionally, taking breaks will help prevent fatigue and ensure that you maintain control over the drilling process.
Cleaning Up Metal Shavings
When drilling into a metal door, it is common to have metal shavings or chips left behind. These shavings can be sharp and difficult to clean up if not dealt with properly. Here are some tips for effectively cleaning up metal shavings:
1. Use a Magnet
One of the easiest and most efficient ways to clean up metal shavings is by using a magnet. Simply run a magnet over the area where the shavings are, and the magnet will attract the metal. This method is particularly useful if you have a lot of small metal shavings to clean up.
2. Vacuum the Area
Using a vacuum cleaner with a hose attachment can also be effective in cleaning up metal shavings. The suction power of the vacuum will help to pick up the shavings from the surface. Make sure to use a vacuum that has a filter capable of handling fine debris, or consider using a shop vac specifically designed for heavier duty cleaning.
3. Use a Damp Cloth
In cases where the metal shavings are scattered over a larger area, using a damp cloth can be a useful method. Dampen the cloth with water and gently wipe the surface to collect the shavings. Be careful not to rub too vigorously, as this can cause the shavings to scratch the metal door.
4. Sweep the Shavings
If the metal shavings are concentrated in a specific area, sweeping them up with a broom can be effective. Use a broom with stiff bristles to gather the shavings into a pile, then use a dustpan to scoop them up and dispose of them properly.
5. Dispose of Shavings Properly
It is important to dispose of the metal shavings properly to avoid any injuries or damage. Store the collected shavings in a metal container or a strong plastic bag to prevent any punctures or leaks. Be sure to dispose of the container or bag in accordance with your local waste management regulations.
By following these tips, you can effectively clean up metal shavings left behind while drilling into a metal door. Remember to take precautions and prioritize safety when handling sharp metal debris.
Finishing and Protecting the Drilled Holes
Once you have successfully drilled into your metal door, it is important to properly finish and protect the drilled holes to ensure their longevity and prevent any potential damage to the door or the surrounding area. Here are some tips to help you with this process:
1. Remove any metal shavings or debris
After drilling, use a brush or a vacuum cleaner to remove any metal shavings or debris from the drilled holes. This will help prevent rusting and ensure a clean finish.
2. Sand the edges of the holes
Using fine-grit sandpaper or a metal file, gently sand the edges of the drilled holes to smooth out any rough or jagged edges. This will provide a clean and professional look.
3. Apply a rust-resistant coating
Applying a rust-resistant coating to the drilled holes will help prevent oxidation and rusting. There are various rust-resistant coatings available in the market, such as metal primers or anti-corrosion sprays. Apply the coating according to the manufacturer’s instructions.
4. Fill the holes with a filler compound
If you want to completely fill the drilled holes, you can use a filler compound specifically designed for metal surfaces. Apply the filler compound to the holes, and use a putty knife or a scraper to smooth it out. Allow the filler compound to dry according to the manufacturer’s instructions before proceeding to the next step.
5. Paint or touch up the drilled holes
If the drilled holes are visible and you want to achieve a seamless finish, you can paint or touch up the holes to match the color of the door. Use a high-quality metal paint or touch-up paint that is suitable for your door’s material. Apply the paint or touch-up paint carefully and evenly, and allow it to dry completely before using the door.
6. Install screw anchors or plugs
If you have drilled the holes for the purpose of installing screws or other hardware, consider using screw anchors or plugs to reinforce the connection. Screw anchors or plugs can provide extra support and prevent the screws from loosening over time. Follow the instructions provided with the screw anchors or plugs to properly install them.
By following these tips, you can ensure that the drilled holes in your metal door are properly finished and protected, enhancing the durability and appearance of your door.
FAQ:
What are some tips for drilling into a metal door without damaging it?
Drilling into a metal door can be a tricky task, but there are a few tips to ensure you don’t damage it. First, use a sharp drill bit that is designed for metal. It’s important to drill at a slow speed to avoid overheating the metal. Using a lubricant like oil or wax can help reduce friction and prevent the drill bit from getting stuck. Finally, make sure to have a firm grip on the drill and apply steady pressure to avoid slipping and scratching the door.
What type of drill bit should I use when drilling into a metal door?
When drilling into a metal door, it’s best to use a drill bit specifically designed for metal. High-speed steel (HSS) drill bits or cobalt drill bits are great options as they are both durable and have a sharp cutting edge. These types of drill bits will be able to penetrate through the metal with ease and provide clean, precise holes.
How can I prevent overheating the metal when drilling into a metal door?
Overheating the metal can lead to damage or even cause the drill bit to become dull. To prevent this, it’s important to drill at a slow speed. Applying constant and steady pressure will also help reduce the risk of overheating. If you notice the metal becoming too hot, you can use a lubricant such as oil or wax to cool it down and reduce friction.
Should I use a lubricant when drilling into a metal door?
Using a lubricant when drilling into a metal door can be beneficial. It helps to reduce friction and heat, making the drilling process smoother. Oil or wax can be applied to the drill bit or directly onto the metal surface. This will not only make drilling easier but also prolong the life of the drill bit. It’s important to note that excessive lubricant should be avoided as it can make the metal slippery and affect the accuracy of the drilling.
What precautions should I take when drilling into a metal door?
When drilling into a metal door, there are a few precautions to keep in mind. First, always wear safety goggles to protect your eyes from any metal shavings or debris. It’s also a good idea to wear gloves to protect your hands. Use a clamp or vise to firmly secure the metal door in place to prevent movement while drilling. Lastly, ensure that the drill is set to the correct speed and that you have a firm grip on it to avoid any accidents.
Video:


Meet Harrison Clayton, a distinguished author and home remodeling enthusiast whose expertise in the realm of renovation is second to none. With a passion for transforming houses into inviting homes, Harrison's writing at https://thehuts-eastbourne.co.uk/ brings a breath of fresh inspiration to the world of home improvement. Whether you're looking to revamp a small corner of your abode or embark on a complete home transformation, Harrison's articles provide the essential expertise and creative flair to turn your visions into reality. So, dive into the captivating world of home remodeling with Harrison Clayton and unlock the full potential of your living space with every word he writes.


