Tips for Drilling Acrylic Sheet Without Cracking

Acrylic sheets are a versatile material commonly used in DIY projects, home renovations, and commercial applications. While drilling through acrylic can be a straightforward process, it is essential to take certain precautions to prevent cracking and damaging the material. In this article, we will discuss some useful tips and best practices for drilling acrylic sheets without cracking them.
1. Choose the Right Drill Bit: When drilling acrylic, it is crucial to select the right drill bit. The best type of drill bit for acrylic is a sharp twist bit made explicitly for plastic materials. These drill bits have a sharper point and flatter cutting edges, allowing for smoother and cleaner cuts without applying excessive pressure on the material.
2. Use Low Speeds: One of the primary reasons for cracking acrylic sheets is drilling at high speeds. To avoid this, set your drill to a low speed setting. Slow drilling helps to prevent overheating, which can cause the acrylic to melt and crack. Take your time and let the drill bit do the work.
3. Apply Firm and Even Pressure: When drilling through acrylic, it is crucial to apply steady and even pressure. Be mindful not to press too hard, as this can cause excessive stress and potential cracking. Maintain a consistent speed and gentle, even pressure throughout the drilling process.
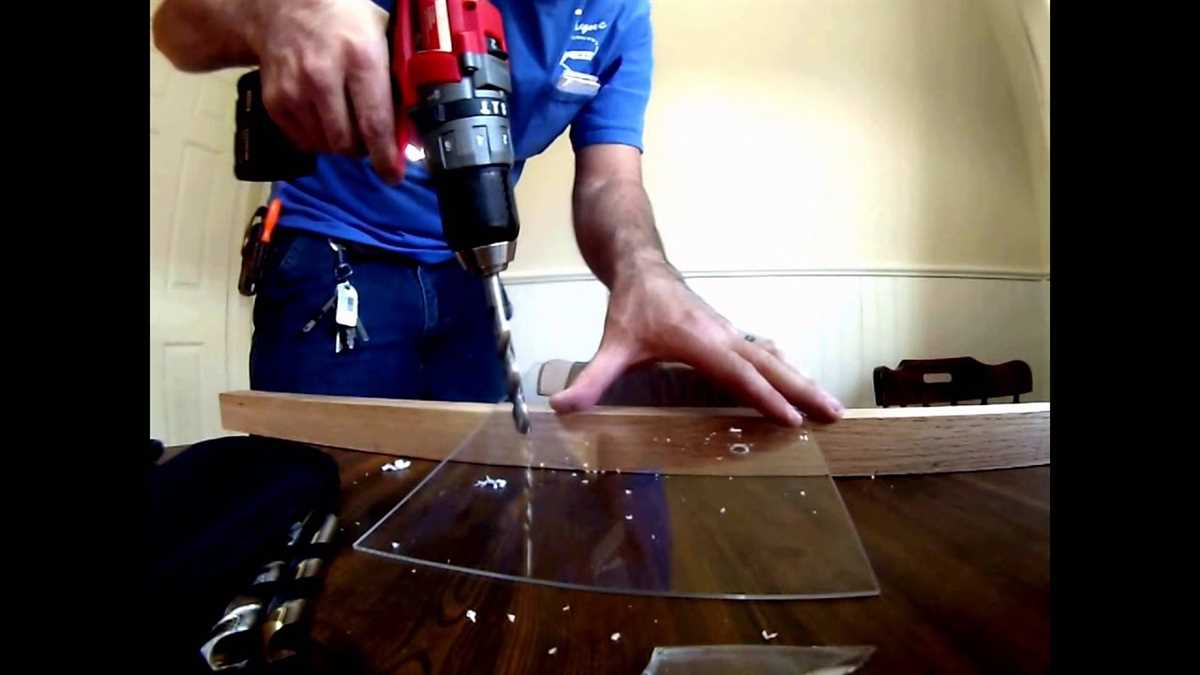
4. Use a Backing Material: To prevent cracking and ensure clean holes, it is advisable to use a backing material. Place a scrap piece of wood or a soft material like a sponge under the acrylic sheet, directly underneath the drilling area. This will provide support and prevent the acrylic from cracking due to excessive pressure or vibrations.

By following these tips and employing proper drilling techniques, you can successfully drill through acrylic sheets without cracking them. Remember to choose the right drill bit, use low speeds, apply firm and even pressure, and use a backing material. With practice and patience, you can achieve clean and precise holes in acrylic sheets for your various projects and applications.
Choosing the Right Drill Bit
When it comes to drilling acrylic sheet, using the right drill bit is essential to avoid cracking or damaging the material. Here are some tips on choosing the right drill bit for acrylic:
- HSS (High-Speed Steel) Drill Bits: HSS drill bits are a common choice for drilling acrylic. They are designed to cut through soft materials like plastic without causing excessive heat buildup. Make sure to use a sharp HSS drill bit for clean and precise holes.
- Brad Point Drill Bits: Brad point drill bits have a pointed tip that helps to prevent wandering or slipping on the surface of the acrylic sheet. They are great for creating clean and accurate holes. However, they may not be suitable for thicker or larger holes.
- Step Drill Bits: Step drill bits are cone-shaped and have multiple cutting edges. They are ideal for enlarging existing holes or creating holes of different sizes in acrylic. By gradually stepping up the hole size, you can reduce the chances of cracking or chipping the material.
- Countersink Drill Bits: Countersink drill bits come in handy when you need to create a recessed hole for a screw head. They allow the screw to sit flush with the surface of the acrylic sheet, providing a neat and professional finish.
- Diamond-Tipped Drill Bits: Diamond-tipped drill bits are extremely durable and can be used to drill through hard materials like acrylic. They are often used in industrial applications and are more expensive compared to other types of drill bits.
It’s important to note that regardless of the drill bit you choose, using proper drilling techniques is crucial when working with acrylic. Always wear safety goggles and apply gentle and consistent pressure to avoid overheating or causing excessive stress on the material. It’s also a good idea to start with a smaller bit and gradually increase the hole size to minimize the risk of cracking.
Preparing the Acrylic Sheet
Before drilling into an acrylic sheet, it is important to properly prepare the sheet to minimize the risk of cracking or chipping. Follow these steps to prepare the acrylic sheet:
1. Measure and mark the drilling locations
Using a measuring tape, determine the exact locations where you want to drill holes in the acrylic sheet. Mark these locations using a marker or a pencil. Make sure the markings are clear and easy to see.

2. Secure the acrylic sheet
Place the acrylic sheet on a stable and flat surface, such as a workbench or table. Use clamps or weights to secure the sheet in place, ensuring that it does not move during drilling. This will help prevent the sheet from cracking or shattering.
3. Use a center punch
To prevent the drill bit from sliding or wandering off the marked location, use a center punch to create a small indentation at each drilling point. This will give the drill bit a starting point and improve accuracy.
4. Set up a drilling template
If drilling multiple holes with precise spacing, consider creating a drilling template. This can be a piece of scrap wood or plastic with holes pre-drilled at the desired locations. Place the template on top of the acrylic sheet and align the holes with the markings. This will ensure consistent hole placement.
5. Choose the correct drill bit
For drilling acrylic sheet, it is recommended to use a drill bit specifically designed for plastics or a drill bit that has been ground to a sharper point. Avoid using regular twist drill bits, as they can cause the acrylic to crack or chip.
6. Apply masking tape
Applying a strip of masking tape over the area to be drilled can help prevent the acrylic sheet from cracking or chipping. The tape provides extra support and minimizes the stress placed on the sheet during drilling. Make sure the tape is firmly in place and covers the entire drilling area.

7. Use a low drilling speed
When drilling acrylic sheet, it is important to use a slow speed setting on the drill. High speeds can generate heat and friction, increasing the risk of cracking or melting the acrylic. Start at a low speed and gradually increase if necessary.
8. Apply consistent downward pressure
While drilling, apply gentle and consistent downward pressure on the drill. Avoid pushing too hard, as this can cause the acrylic sheet to crack or warp. Let the drill bit do the work and maintain a steady hand.
9. Use a backing material
Placing a piece of scrap wood or plastic behind the acrylic sheet as you drill can provide additional support and prevent excessive chipping. The backing material should be lined up with the drilling point to catch any break-off pieces.
By following these steps to prepare the acrylic sheet before drilling, you can significantly reduce the risk of cracking or chipping. Take your time, use the correct tools, and apply the proper techniques to ensure successful drilling without damage to the acrylic sheet.
Securing the Acrylic Sheet
Before drilling into your acrylic sheet, it is important to secure it properly. This will help prevent cracking or shattering during the drilling process.

Here are some tips for securing your acrylic sheet:
- Clamp the acrylic sheet: Use clamps to secure the acrylic sheet firmly in place. Place the clamps around the edges of the sheet, making sure to apply even pressure.
- Protective backing: It is a good idea to place a piece of scrap wood or a rubber mat underneath the acrylic sheet to provide support and prevent any damage to the surface.
- Use a drilling jig: If you are drilling multiple holes or need precise positioning, consider using a drilling jig. This will help ensure accurate and consistent hole placement.
- Apply masking tape: Cover the area where you plan to drill with masking tape. This will help reduce the risk of the drill bit slipping or causing any scratches on the acrylic surface.
By taking these steps to secure your acrylic sheet, you will minimize the risk of cracking or damage and achieve clean and precise drill holes.
Using the Correct Speed and Pressure
When drilling acrylic sheets, it is important to use the correct speed and pressure to avoid cracking or shattering the material. Here are some tips to help you achieve the desired results:
1. Use a low drill speed
Acrylic is a relatively soft material, so it is best to use a low drill speed. Higher speeds can generate too much heat and cause the acrylic to crack. Set your drill to a slow speed setting, preferably below 1000 RPM.
2. Apply light and consistent pressure

Applying too much pressure can put stress on the acrylic and lead to cracks. Instead, use light and consistent pressure while drilling. Let the drill bit do the work, and avoid forcing it through the material.
3. Use a sharp drill bit
A dull drill bit can cause the acrylic to chip or crack. Make sure to use a sharp drill bit specifically designed for drilling acrylic or plastic materials. Replace the drill bit if it becomes dull during the drilling process.
4. Use a backing material
Placing a backing material behind the acrylic sheet can help prevent cracking. You can use a piece of scrap wood or plywood as a backing material. This provides support and prevents the acrylic from flexing too much during the drilling process.
5. Use a drilling guide
Using a drilling guide or template can help ensure accurate and precise drilling. This can be especially beneficial when drilling multiple holes or making intricate cuts in the acrylic sheet. It helps to prevent the drill bit from wandering and reduces the risk of cracking.
By following these tips and using the correct speed and pressure, you can effectively drill acrylic sheets without cracking or shattering the material. Remember to always wear safety glasses and take proper precautions when working with power tools.
Using Lubrication
When drilling acrylic sheets, using lubrication can greatly reduce the risk of cracking. Lubrication prevents the drill bit from friction, heat, and pressure buildup, which can cause the acrylic to crack or melt.
Types of Lubrication
- Water: Water is a common and easily accessible lubricant for drilling acrylic sheets. Simply dip the drill bit in water or use a spray bottle to apply water to the drilling area. This helps to cool down the drill bit and flush away acrylic debris.
- WD-40: WD-40 is a widely-used lubricant that can also be used for drilling acrylic. Apply a small amount of WD-40 to the drilling area before starting the drilling process. This helps to reduce friction and heat buildup.
- Cutting Fluids: Cutting fluids, such as mineral oil or specialized acrylic cutting fluids, are designed to provide optimal lubrication during drilling. These fluids can be applied directly to the drill bit or used as a coolant in a drilling system.
How to Apply Lubrication
- Water: If using water as a lubricant, simply dip the drill bit into a container filled with water or use a spray bottle to apply water to the drilling area. Make sure to keep the drilling area wet throughout the drilling process.
- WD-40: For using WD-40, apply a small amount to the drilling area before starting the drilling process. Spread the lubricant evenly over the surface to ensure proper lubrication.
- Cutting Fluids: When using cutting fluids, follow the manufacturer’s instructions for application. Some cutting fluids may need to be mixed with water before use. Apply the cutting fluid to the drill bit or use it as a coolant if using a drilling system.
Note: It is important to avoid using too much lubrication as excessive lubrication can lead to the acrylic sheet becoming too slippery, causing the drill bit to wander or slip. Use a moderate amount of lubrication to ensure smooth drilling.
By using lubrication when drilling acrylic sheets, you can significantly reduce the risk of cracking and achieve clean, precise holes without damaging the material.
Drilling Techniques: Start Slowly
When drilling acrylic sheets, it is important to start slowly to avoid cracking the material. The following drilling techniques will help you achieve clean and precise holes without compromising the integrity of the acrylic sheet:
- Use a sharp drill bit: Begin by ensuring that you have a sharp drill bit specifically designed for use with acrylic sheets. Dull or general-purpose bits can cause the material to crack due to the excessive force required for drilling.
- Mark the drilling area: Before drilling, use a marker or masking tape to mark the exact location where you want to drill the hole. This will help you stay on track and prevent the drill bit from wandering.
- Create a pilot hole: Start by creating a small pilot hole with a smaller drill bit. This will help to guide the larger drill bit and prevent the acrylic from cracking due to excessive pressure.
- Apply even pressure: When drilling, apply steady and even pressure to the drill. Avoid pushing too hard or applying uneven pressure, as this can cause the acrylic to crack.
- Use a low speed setting: Set your drill to a low speed setting before drilling the acrylic sheet. High speeds can generate excessive heat, which can lead to melting or fracturing of the material.
- Use a backer board: Place a piece of scrap wood or acrylic sheet underneath the area you are drilling. This will provide support and help prevent splintering or chipping of the acrylic.
- Keep the drill bit cool: To prevent overheating of the drill bit, periodically withdraw the bit from the hole and cool it down with water or a lubricant specifically designed for drilling acrylic.
- Go slow and steady: Take your time when drilling acrylic sheets. Rushing the process can lead to mistakes and increase the risk of cracking or damaging the material.
By following these drilling techniques and taking the necessary precautions, you can achieve clean, precise, and crack-free holes in acrylic sheets.
Finishing the Hole
After drilling the hole in the acrylic sheet, it may have rough edges or burrs. It’s important to finish the hole to smooth and polish the edges for a professional-looking finish.
Here are some tips to finish the hole in acrylic sheet:
- Sandpaper: Start by using fine-grit sandpaper to smooth the edges of the hole. Gently sand the edges in a circular motion until they are smooth and even.
- File: If there are any larger burrs or rough spots, use a file to carefully remove them. Work slowly and be cautious not to apply too much pressure, as this may cause the acrylic to crack.
- Flame Polishing: For a polished finish, you can use a small handheld propane torch to flame polish the edges of the hole. Hold the flame a few inches away from the acrylic and move it in a circular motion to heat the surface. Be careful not to overheat the acrylic, as it can melt or warp.
- Polishing Compound: After flame polishing, you can use a polishing compound specifically designed for acrylic to further smooth and enhance the finish. Apply a small amount of the compound to a soft cloth and gently rub it onto the edges of the hole in a circular motion.
Remember to always wear protective eyewear when working with acrylic sheets to avoid any potential eye injuries. Additionally, be sure to work in a well-ventilated area when using a propane torch.
Preventing Cracks: Store and Handle with Care
Preventing cracks in acrylic sheets starts with proper storage and careful handling. By following these tips, you can minimize the risk of damage and ensure the longevity of your acrylic sheets.
1. Store in a Cool and Dry Place
Acrylic sheets should be stored in a cool and dry place to prevent warping or cracking. Avoid storing them in areas with high humidity or extreme temperatures. A stable environment will help maintain the integrity of the material.
2. Avoid Direct Sunlight
Direct sunlight can cause acrylic sheets to heat up and expand, increasing the risk of cracking. Store the sheets in a shaded area or use covers to protect them from direct sunlight.
3. Use Protective Wrapping
Keep acrylic sheets protected by using a soft cloth or plastic film to wrap them when storing or transporting. This will prevent scratches and other forms of damage that can weaken the material and make it more prone to cracks.
4. Handle with Clean Hands
Oil, dirt, or other substances on your hands can transfer onto the acrylic sheet, weakening its structure. Always handle acrylic sheets with clean hands or wear gloves to prevent contamination.
5. Use Proper Lifting Techniques
When lifting or moving a large acrylic sheet, avoid applying excessive pressure or force to one area. Distribute the weight evenly and use lifting tools or equipment when necessary to prevent stress and potential cracks.
6. Avoid Sharp Objects
Avoid placing sharp objects or tools on top of acrylic sheets or dragging them across the surface. This can lead to scratches or gouges that weaken the material and increase the risk of cracking.
7. Clean with Gentle Products
When cleaning acrylic sheets, use mild soap or acrylic-specific cleaners. Avoid harsh chemicals or abrasive cleaners that can damage the surface and make it more prone to cracks.
8. Consider Using a Drill Press
If you need to drill holes in acrylic sheets, consider using a drill press instead of a handheld drill. A drill press provides more control and stability, reducing the risk of applying excessive pressure and causing cracks.
By following these guidelines, you can handle and store acrylic sheets with care, minimizing the risk of cracks and ensuring their long-term durability.
FAQ:
What is the best way to drill acrylic sheets?
The best way to drill acrylic sheets is by using a drill bit specially designed for plastics, such as a brad point drill bit or a twist drill bit with a low rake angle.
What can I do to prevent cracking when drilling acrylic?
To prevent cracking when drilling acrylic, you can use a center punch to create a small indentation before drilling, or you can use a drill press with a slow speed and apply light, constant pressure while drilling.
What should I do if my acrylic sheet still cracks when drilling?
If your acrylic sheet still cracks when drilling, you can try using a larger drill bit, as a smaller bit can cause more pressure and increase the chances of cracking. Alternatively, you can try using a lubricant, such as water or cutting oil, to reduce friction and heat during drilling.
Can I use a regular drill bit to drill acrylic?
While it is possible to use a regular drill bit to drill acrylic, it is not recommended as it can increase the chances of cracking. It is best to use a drill bit specially designed for plastics to ensure clean and accurate holes.
What safety precautions should I take when drilling acrylic?
When drilling acrylic, it is important to wear safety goggles to protect your eyes from flying debris. Additionally, it is recommended to clamp down the acrylic sheet securely to prevent it from moving while drilling.
What are some other tips for drilling acrylic without cracking?
Some other tips for drilling acrylic without cracking include using a backer board to support the acrylic sheet while drilling, starting with a smaller drill bit and gradually increasing the size, and using a slower drill speed to reduce heat build-up.
Can I use a hammer drill to drill acrylic?
Using a hammer drill to drill acrylic is not recommended as the hammer action can cause the acrylic to crack. It is best to use a regular drill with a low speed setting for drilling acrylic.
Video:

How to get w rizz

Meet Harrison Clayton, a distinguished author and home remodeling enthusiast whose expertise in the realm of renovation is second to none. With a passion for transforming houses into inviting homes, Harrison's writing at https://thehuts-eastbourne.co.uk/ brings a breath of fresh inspiration to the world of home improvement. Whether you're looking to revamp a small corner of your abode or embark on a complete home transformation, Harrison's articles provide the essential expertise and creative flair to turn your visions into reality. So, dive into the captivating world of home remodeling with Harrison Clayton and unlock the full potential of your living space with every word he writes.


