Steps to Remove a Chuck from an Old Drill Press

If you have an old drill press and need to remove the chuck, it can seem like a daunting task. However, with the right steps and tools, it can be a relatively simple process. Whether you need to replace a worn-out chuck or clean it for maintenance, follow these steps to safely and effectively remove the chuck from your old drill press.
Before you begin, gather the necessary tools: a wrench, penetrating oil, a mallet, and a block of wood. These tools will help you loosen the chuck and remove it without damaging the drill press.
Step 1: Start by unplugging the drill press from the power source to ensure your safety. Always remember to prioritize safety when working with power tools.
TIP: It is also recommended to wear safety goggles and gloves to protect your eyes and hands while handling the drill press.
Using a Wrench to Remove a Chuck
If you are trying to remove the chuck from an old drill press, using a wrench can be an effective method. Here are the steps to remove a chuck using a wrench:
- Ensure the drill press is turned off and unplugged for safety.
- Locate the chuck key or chuck removal tool that came with the drill press. This tool will have a handle and a key or socket that fits into the chuck.
- Insert the chuck key or chuck removal tool into the chuck. Make sure it is fully engaged and secure.
- Place a wrench around the chuck body, close to the drill press spindle.
- Tighten the chuck key or chuck removal tool securely into the chuck. This will loosen the chuck from the spindle.
- Hold the wrench firmly and rotate it counterclockwise to remove the chuck from the drill press spindle.
- Continue rotating the wrench until the chuck is fully unscrewed and can be removed by hand.
Note: If the chuck is stuck and difficult to loosen, you can use a penetrating oil or a heat gun to loosen it. Be sure to follow the instructions carefully and take any necessary safety precautions.

Removing a chuck from an old drill press can be a challenging task, but by using a wrench and following these steps, you should be able to successfully remove the chuck. Remember to always exercise caution and wear appropriate safety gear when working with power tools.
Step-by-Step Guide
Step 1: Prepare the Workspace
Before starting, make sure you have a clean and well-lit workspace. Clear any debris or clutter from the area, and ensure you have all the necessary tools and materials nearby.
Step 2: Disconnect the Power
Safety is paramount when working with power tools. Before proceeding, unplug the drill press from the power source or switch off the circuit breaker to ensure there is no electrical current running through the machine.

Step 3: Open the Chuck
- Locate the chuck key. This is a small metal tool specifically designed to open and close the chuck.
- Insert the chuck key into one of the holes on the side of the chuck.
- Using the chuck key, rotate the chuck counterclockwise to loosen it. If the chuck is stuck, you may need to tap the key gently with a hammer to break it loose.
- Continue rotating the chuck until it is fully open and the drill bit can be removed.
Step 4: Remove the Chuck
With the chuck open, you can now remove it from the drill press.
- Locate the retaining screw at the center of the chuck. This is a small screw that holds the chuck in place.
- Using a screwdriver, turn the screw counterclockwise to loosen and remove it.
- Once the screw is removed, the chuck should be free to slide off the drill press spindle. If it is stuck, you can tap it gently with a rubber mallet to help loosen it.
Step 5: Clean and Replace
Now that the chuck is removed, take this opportunity to clean it and the drill press spindle.
- Wipe off any dirt or debris from the chuck using a clean cloth or brush.
- Inspect the spindle for any damage or wear. If necessary, clean and oil it before installing the new chuck.
- If you are replacing the chuck, simply slide the new chuck onto the spindle and tighten the retaining screw.
- If you plan to reinstall the same chuck, clean it thoroughly before sliding it back onto the spindle and tightening the retaining screw.
Step 6: Test and Secure
Before using the drill press again, plug it back in or switch on the circuit breaker to restore power.
- Turn on the drill press and check that the chuck is securely in place.
- Test the chuck by opening and closing it a few times with the chuck key to ensure smooth operation.
- Once you are satisfied with the installation, you can resume using your drill press.
Preparing the Drill Press
Before removing the chuck from the old drill press, there are a few steps you need to take to prepare the machine:

- Disconnect Power: Make sure the drill press is unplugged from the power source before starting any work. This will prevent any accidental starts or electrical shocks.
- Clear Workspace: Clear the area around the drill press of any clutter or debris. This will provide you with a clean and safe working environment.
- Gather Tools: Gather all the necessary tools and equipment needed for the chuck removal process. This may include an adjustable wrench, a hammer, a block of wood, and any other tools recommended by the drill press manufacturer.
- Secure Workpiece: If there is a workpiece clamped in the drill press, remove it or secure it to prevent any movement during the chuck removal process. This will help maintain stability and prevent accidents.
- Inspect Chuck: Before removing the chuck, inspect it for any visible damage or wear. If the chuck is damaged or worn out, it may need to be replaced instead of simply removed.
By following these steps to prepare the drill press, you will ensure a safe and successful chuck removal process.
Cleaning the Surface
Before removing the chuck from your old drill press, it’s important to clean the surface around it. This will help to prevent any dirt or debris from falling into the drill press and potentially causing damage.
Steps:
- Prepare the workspace: Clear the area around the drill press of any clutter or debris. This will make it easier to access and clean the chuck.
- Gather cleaning supplies: Get a soft-bristled brush or a toothbrush, a mild cleaning solution, and a clean cloth. It’s best to avoid using abrasive cleaners that may damage the surface of the drill press.
- Dampen the cloth: Moisten the cloth with the cleaning solution, ensuring it is not dripping wet.
- Gently wipe the surface: Use the damp cloth to wipe the surface around the chuck, paying attention to any dust or debris that may have accumulated. Be careful not to apply excessive pressure or get any liquid into the drill press.
- Clean hard-to-reach areas: If there are any tight spaces or corners that are difficult to clean with a cloth, use the soft-bristled brush or toothbrush to gently scrub them.
- Dry the surface: Once you’ve finished cleaning, use a dry cloth to gently pat the surface dry. Make sure there is no moisture left behind that could cause rust or damage.
By following these steps and cleaning the surface around the chuck, you’ll create a clean and safe environment for removing the chuck from your old drill press.
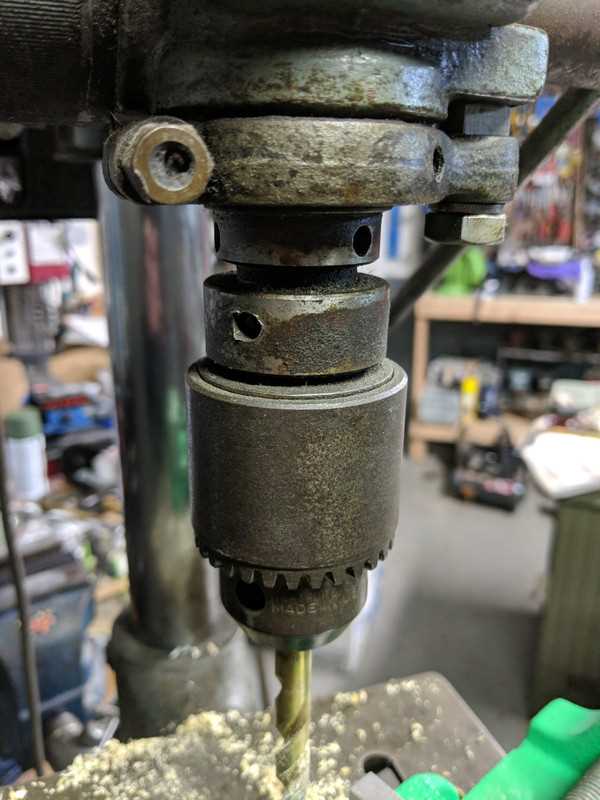
Locating the Chuck Screw
Before removing the chuck from your old drill press, you will need to locate the chuck screw. The chuck screw is essential in holding the chuck onto the drill press spindle. Here are the steps to locate the chuck screw:

- Make sure the drill press is turned off and unplugged for safety reasons.
- Look for a small hole on the side of the chuck near the base of the drill press.
- Inspect the chuck for any markings or indicators that may point to the location of the chuck screw.
- If there are no visible markings, refer to the drill press manual or the manufacturer’s website for specific information on the location of the chuck screw.
- Once you have located the chuck screw, prepare the necessary tools for removal, such as a slotted or Phillips head screwdriver.
By following these steps, you will be able to easily locate the chuck screw on your old drill press and proceed with the removal process.
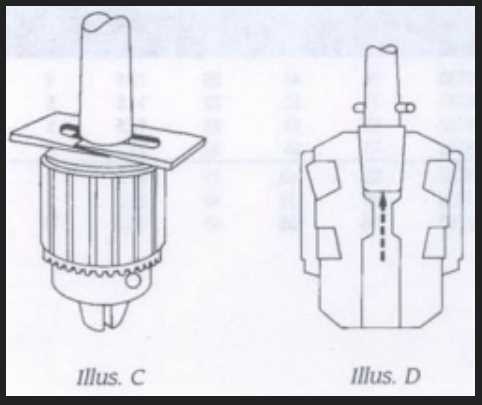
Identifying the Chuck Screw
Before you can remove the chuck from your old drill press, you need to locate and identify the chuck screw. The chuck screw is a small screw that holds the chuck onto the spindle of the drill press. Here are some steps to help you find and identify the chuck screw:
- Turn off the drill press and unplug it from the power source to ensure your safety.
- Inspect the front of the chuck. Look for a small hole or recessed area.
- Use a flashlight if necessary to get a better view of the chuck.
- Check the chuck key. The chuck key is a tool used to tighten and loosen the chuck. It may have a small hole on the side that aligns with the chuck screw.
- If you have a chuck key with a hole, insert the short end of the chuck key into the hole in the chuck.
- Rotate the chuck key counterclockwise to see if the chuck screw moves. If it does, you have located the chuck screw.
- If your chuck key does not have a hole, look for a screw at the side or the back of the chuck.
- If you still can’t find the chuck screw, consult the drill press manual or the manufacturer’s website for specific instructions.
Once you have located the chuck screw, you can continue with the steps to remove the chuck from your old drill press.
Loosening the Chuck Screw
Before attempting to remove the chuck from an old drill press, it is important to loosen the chuck screw in order to release the jaws and free the drill bit.

Follow these steps to loosen the chuck screw:
- Locate the chuck screw, which is usually found at the base of the chuck.
- Use a suitable wrench or Allen key to turn the chuck screw counterclockwise.
- Apply steady pressure while turning the chuck screw to loosen it.
- If the chuck screw is stuck or difficult to loosen, try using a penetrating lubricant such as WD-40 and let it sit for a few minutes before attempting again.
- Once the chuck screw is loosened, you can proceed with removing the chuck from the drill press.
Important Note: Always make sure to disconnect the drill press from any power source before performing any maintenance or repair tasks.
By following these steps, you will be able to safely and effectively loosen the chuck screw and proceed with removing the chuck from an old drill press.
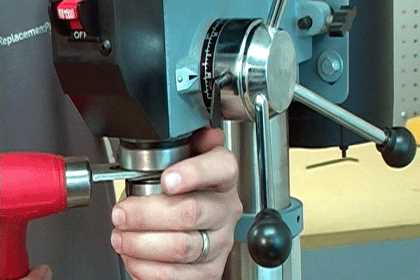
Using the Correct Wrench Size
When removing a chuck from an old drill press, it’s important to use the correct wrench size to ensure a secure and effective removal process. Using the wrong wrench size can cause damage to the chuck or the drill press itself.
The correct wrench size is typically specified by the manufacturer of the drill press, and can be found in the owner’s manual or by contacting the manufacturer directly. It’s important to have the correct wrench size on hand before attempting to remove the chuck.
Using the correct wrench size will help prevent slippage or stripping of the chuck, which can be both frustrating and potentially dangerous. It’s recommended to use a wrench that fits snugly around the chuck, allowing for a secure grip when applying force to loosen and remove it.
In some cases, an adjustable wrench may be necessary if the correct size wrench is not readily available. However, it is generally best to use a wrench specifically designed for the chuck size to ensure the best possible fit and avoid any potential issues.
Before attempting to remove the chuck, it’s also important to make sure the drill press is securely shut off and unplugged. This will help ensure safety during the removal process.
Overall, using the correct wrench size when removing a chuck from an old drill press is essential for a smooth and successful removal process. It’s always recommended to follow the manufacturer’s guidelines and take extra precaution to avoid any damage or injury.
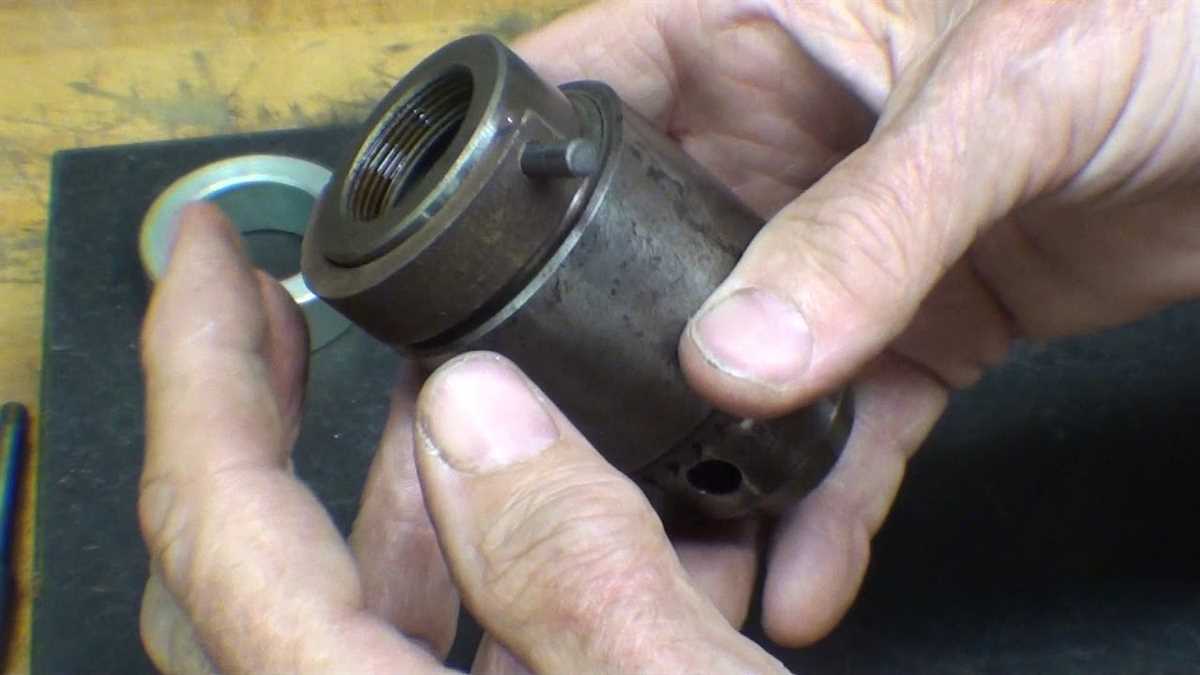
Removing the Chuck Screw
Before removing the chuck from an old drill press, you need to remove the chuck screw. The chuck screw is used to secure the chuck onto the spindle. Here are the steps to remove the chuck screw:
- Make sure the drill press is unplugged from the power source.
- Put on protective gloves to avoid any injuries.
- Locate the chuck screw on the side of the chuck near the spindle.
- Use a wrench or a chuck key to remove the chuck screw. Insert the wrench or chuck key into the chuck screw and turn it counterclockwise to loosen it.
- Continue loosening the chuck screw until it is completely removed from the chuck.
- Set aside the chuck screw in a safe place to avoid misplacing it.
Once the chuck screw is removed, you can proceed to remove the chuck from the drill press. The chuck screw plays an important role in keeping the chuck securely attached to the spindle, so make sure to keep it in a safe place to prevent loss or damage.
Using a Counterclockwise Motion
To remove the chuck from an old drill press, you will need to use a counterclockwise motion. This is because drill presses typically have a right-hand thread on the chuck, meaning that it tightens in a clockwise direction and loosens in a counterclockwise direction.
Steps:
- Ensure that the drill press is turned off and unplugged for safety.
- Securely grip the chuck key, which is a specialized tool used to loosen and tighten the chuck.
- Insert the chuck key into one of the holes on the side of the chuck.
- Rotate the chuck key counterclockwise to loosen the chuck.
- Continue rotating the chuck key counterclockwise until the chuck is fully loosened.
- Once the chuck is sufficiently loosened, you can remove it from the drill press.
- If the chuck appears to be stuck, you can try tapping it gently with a rubber mallet to dislodge it.
It’s important to note that some chuck designs may require additional steps or tools to remove. If you encounter any difficulties or are unsure about the process, it’s recommended to consult the drill press’s user manual or seek assistance from a professional.
FAQ:
How do I remove the chuck from an old drill press?
To remove the chuck from an old drill press, you will need to follow a few simple steps. First, you should unplug the drill press from the power source to ensure your safety. Then, locate the chuck key and insert it into the hole on the side of the chuck. Turn the chuck key counterclockwise to loosen the chuck. Once the chuck is loose, you can remove it by hand or with the help of a wrench if necessary.
What tools do I need to remove the chuck from an old drill press?
To remove the chuck from an old drill press, you will need a few tools. You will need a chuck key, which usually comes with the drill press. You may also need a wrench if the chuck is particularly tight and difficult to remove. Additionally, it is always a good idea to have a pair of safety gloves to protect your hands during the process.
Can I remove the chuck from an old drill press without a chuck key?
While it is possible to remove the chuck from an old drill press without a chuck key, it is not recommended. The chuck key is specifically designed to fit into the hole on the side of the chuck and provide the necessary leverage to loosen it. Without a chuck key, you may damage the chuck or the drill press while attempting to remove it.
Is it necessary to unplug the drill press before removing the chuck?
Yes, it is absolutely necessary to unplug the drill press before attempting to remove the chuck. Removing the chuck involves turning it counterclockwise, which can cause the drill press to start if it is still plugged in. This can be extremely dangerous and may result in injury. Always prioritize safety and unplug the drill press before working on it.
Do I need to use a wrench to remove the chuck from an old drill press?
You may need to use a wrench to remove the chuck from an old drill press if it is particularly tight and difficult to loosen by hand. A wrench can provide additional leverage and make the removal process easier. However, if the chuck is not excessively tight, you should be able to remove it by hand without the need for a wrench.
Are there any safety precautions I should take when removing the chuck from an old drill press?
Yes, there are several safety precautions you should take when removing the chuck from an old drill press. First and foremost, always unplug the drill press from the power source before working on it to prevent accidental starting. Additionally, wear safety gloves to protect your hands from any potential injuries. Take your time and be cautious throughout the process to ensure your safety.
Is there a specific direction in which I should turn the chuck key to loosen the chuck?
Yes, there is a specific direction in which you should turn the chuck key to loosen the chuck. To loosen the chuck, you should turn the chuck key counterclockwise. Insert the chuck key into the hole on the side of the chuck and carefully turn it in the counterclockwise direction. This will loosen the chuck and allow you to remove it from the drill press.
Video:


Meet Harrison Clayton, a distinguished author and home remodeling enthusiast whose expertise in the realm of renovation is second to none. With a passion for transforming houses into inviting homes, Harrison's writing at https://thehuts-eastbourne.co.uk/ brings a breath of fresh inspiration to the world of home improvement. Whether you're looking to revamp a small corner of your abode or embark on a complete home transformation, Harrison's articles provide the essential expertise and creative flair to turn your visions into reality. So, dive into the captivating world of home remodeling with Harrison Clayton and unlock the full potential of your living space with every word he writes.


