Step-by-Step Guide: Writing a Marching Band Drill

Marching band drills are a crucial part of any performance. They involve intricate formations, synchronized movements, and creative visuals that bring the music to life. Writing a marching band drill requires careful planning and attention to detail. It is a complex process that involves designing formations, determining movement patterns, and ensuring that the visual elements align with the music.
Creating a marching band drill begins with understanding the music. The choreographer must listen to the music repeatedly, identifying the different sections, dynamics, and tempos. This allows them to determine the overall structure of the drill and how the visual elements will complement the music. They may choose to highlight certain musical moments with specific formations or movements.
Once the music is understood, the next step is to create a visual concept. This involves brainstorming ideas for formations, movements, and transitions that are both visually appealing and achievable for the band members. The choreographer must consider the skill level of the band, the size of the performance area, and any limitations or restrictions imposed by the venue or competition rules.
After the concept is developed, the drill writer begins the process of mapping out the formations and movements on a grid or field chart. This involves assigning specific positions to individual band members, determining their paths of travel, and ensuring that the formations flow fluidly from one to the next. The drill writer must have a good understanding of how each movement will be executed on the field and work closely with the band director to ensure that the drill is feasible and effective.
In conclusion, writing a marching band drill is a creative and technical process that requires careful planning, attention to detail, and collaboration between the choreographer and band director. It is a challenge that requires the choreographer to translate the music into visual art and create a dynamic and engaging performance for the band members and audience.

Understanding the Basics of Marching Band Drill
When it comes to creating a visually stunning and synchronized performance, marching band drill is an essential component. Understanding the basics of marching band drill is crucial for both directors and performers alike. Here are some key concepts to grasp:
Formations
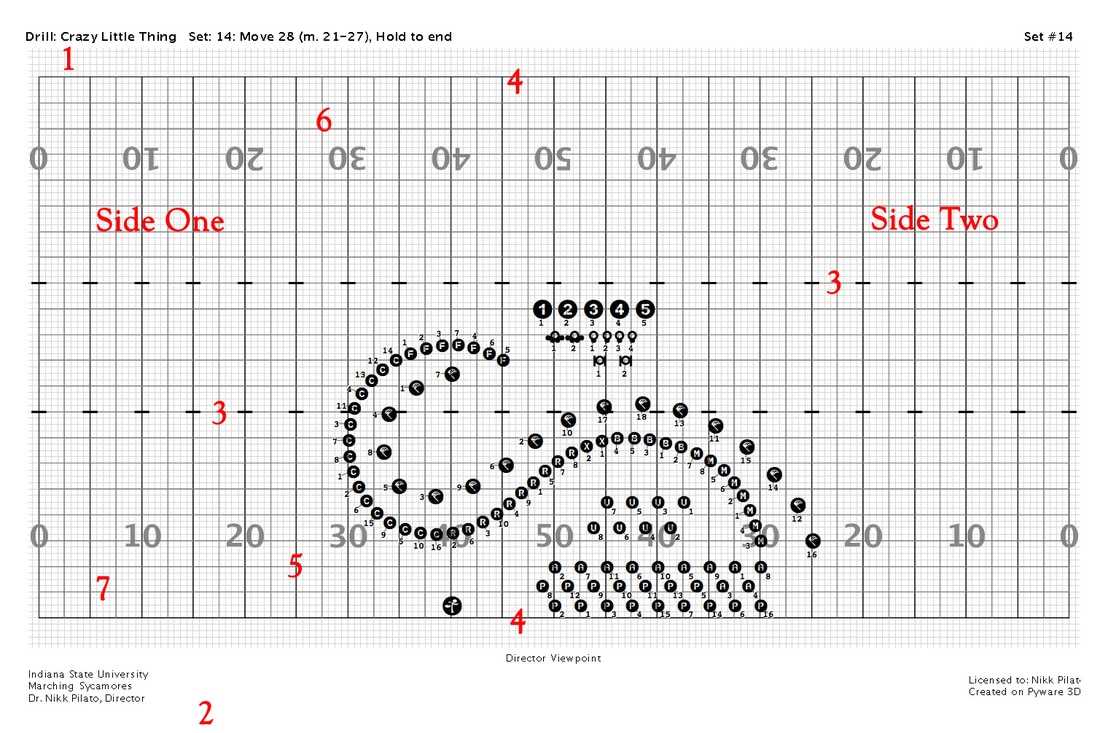
In marching band, formations refer to the different shapes and patterns that the band members form on the field. These formations can include straight lines, arcs, circles, diagonals, and more. Understanding how to arrange musicians in various formations is fundamental to creating an engaging and visually appealing performance.
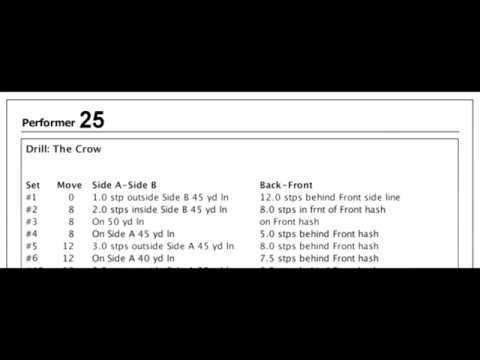
Coordinates
Coordinates are used to precisely place band members within formations. They are typically represented by yard lines on the football field and are used to ensure that each member is positioned correctly. Understanding how to read and interpret coordinates is essential for executing formations accurately.
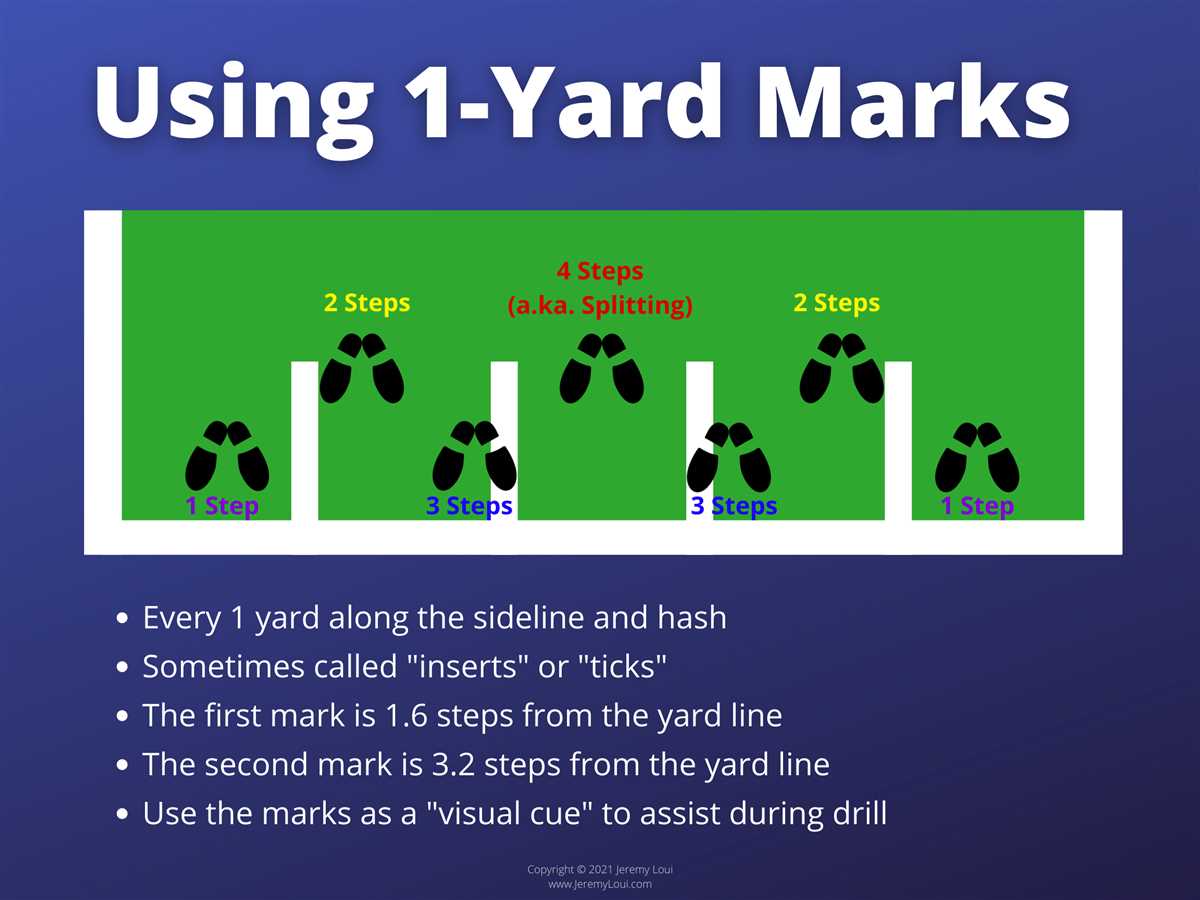
Step Sizes
Step sizes refer to the distance band members travel with each step. This can vary depending on the tempo of the music and the desired visual effect. It is crucial for performers to maintain consistent step sizes throughout a drill to maintain synchronization and ensure smooth transitions between formations.
Transitions
Transitions are the movements between formations in a marching band drill. These movements can include slides, crosses, pivots, and pivot turns. Understanding how to execute smooth and seamless transitions is crucial for maintaining the visual flow of a performance.

Counting and Timing
Counting and timing is essential for synchronizing musical and visual elements in a marching band drill. Each musical note or beat corresponds to a specific step or movement. Band members must count and time their movements accurately to ensure that the visual elements align with the music.
Visual Design
The visual design of a marching band drill involves the arrangement of formations, transitions, and movements to create an engaging and cohesive performance. This includes considerations such as spacing, alignment, symmetry, and visual effects. Understanding how to design visually compelling drills is crucial for capturing the audience’s attention and creating a memorable performance.
Practice and Rehearsal
Finally, practicing and rehearsing the marching band drill is crucial for achieving precision and synchronization. Band members must spend time learning their movements, memorizing formations, and rehearsing transitions to ensure a polished and visually stunning performance.
By understanding the basics of marching band drill, directors and performers can work together to create visually stunning performances that captivate audiences and showcase the talents of the marching band.
Gathering the Necessary Tools and Resources

In order to write a marching band drill, you will need several tools and resources to help you effectively plan and execute your design. Below are some essential items you should gather before you begin:
1. Marching Band Score
A marching band score is the musical arrangement that the band will perform. Obtain a complete and accurate copy of the score, which typically includes the individual parts for each instrument in the band.
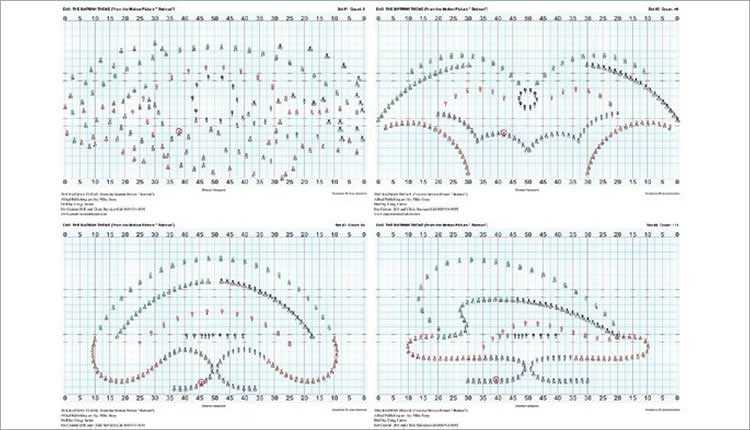
2. Field Diagram
A field diagram is a scaled representation of the marching band’s performance area. This diagram will help you visualize the formations and movements of the band on the field. You can find field diagrams from various sources, such as marching band curriculum books or online resources.
3. Notation Software
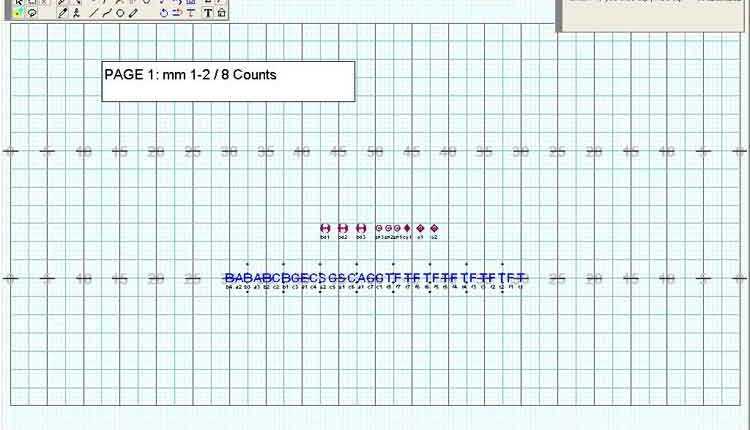
Using notation software can greatly simplify the process of writing and editing your drill. Look for a software program that allows you to create and manipulate visual representations of each individual marching band member on the field.
4. Grid Paper
For those who prefer a more hands-on approach, grid paper can be used to plan out the formations and movements of the band. Each square on the paper can represent a specific distance on the field, allowing you to accurately plot out the drill design.

5. Whiteboard or Chalkboard
A whiteboard or chalkboard can be helpful for sketching out ideas, working through problems, and making quick changes to the drill design. These tools allow for easy erasing and modification, making them ideal for brainstorming and collaboration.
6. Stopwatch or Timer
Keeping track of time is crucial when planning a marching band drill. A stopwatch or timer will help you determine the duration of each segment, ensuring that the performance fits within the designated time limit.
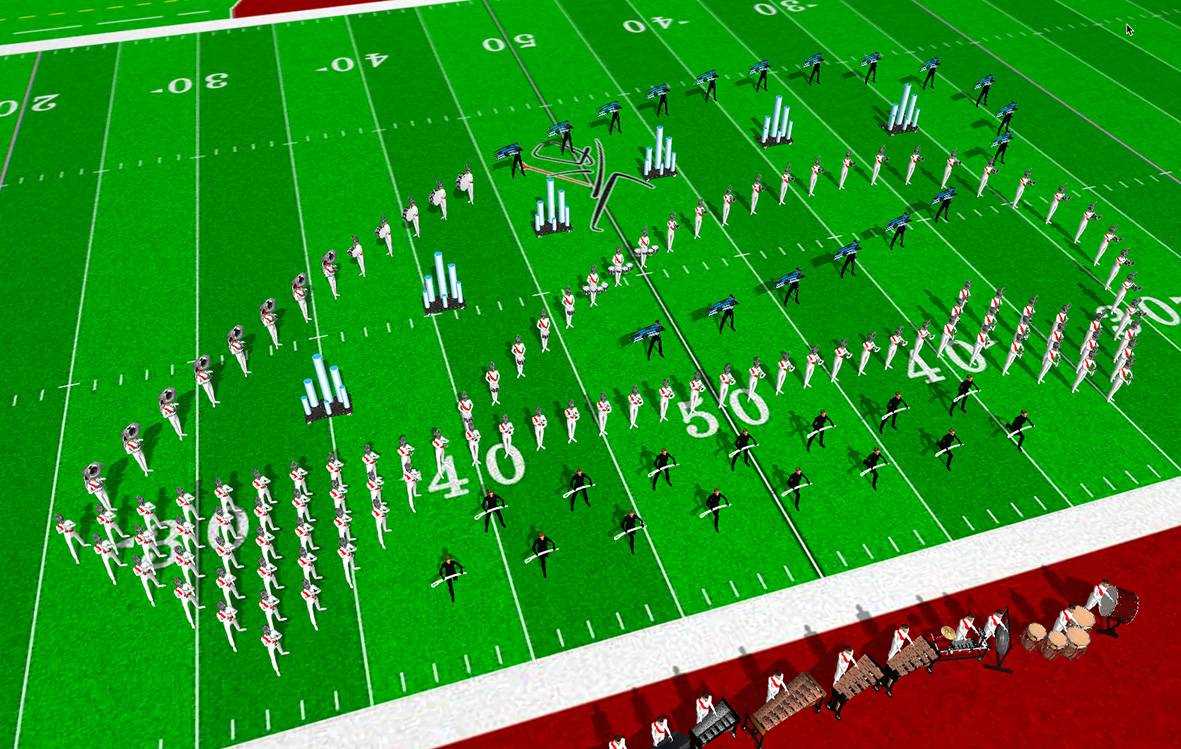
7. Access to a Football Field
In order to properly envision and test your drill design, it is best to have access to a football field or similar performance area. This will allow you to physically walk through and evaluate the formations and movements of the marching band.
8. Musical Arranger or Composer
If you don’t have experience in arranging or composing music, it may be beneficial to collaborate with a professional musical arranger or composer. They can help you adapt the music to the specific needs of the marching band and ensure that it is technically feasible for the performers.
9. Collaboration and Feedback
Lastly, make sure to gather a team of individuals who can provide valuable feedback and offer different perspectives on your drill design. It can be helpful to have someone with experience in marching band drill design or an instructor who can provide guidance and suggestions.

By gathering these necessary tools and resources, you will be well-equipped to begin the process of writing a marching band drill. Remember to stay organized, open to feedback, and adaptable as you bring your vision to life on the field.
Analyzing the Musical Score
Before you can begin writing a marching band drill, it is important to thoroughly analyze the musical score that you will be working with. Understanding the structure and timing of the music will help you create effective formations and movements for the performers.
Step 1: Listen to the Music
Start by listening to the musical score multiple times, paying close attention to the overall feel, tempo, and dynamics. Take note of any significant changes in the music, such as key changes or tempo shifts.
Step 2: Identify Musical Phrases

Break the music down into phrases, which are shorter sections of the score that generally have their own distinct melody or rhythm. Marking the phrases will help you structure your drill and create transitions between different parts of the show.
Step 3: Determine the Time Signature
Identify the time signature of the music, which will help you understand the underlying rhythm. The time signature is usually indicated at the beginning of the score and consists of two numbers, such as 4/4 or 6/8.
Step 4: Note the Key Changes
If there are any key changes in the music, make sure to mark them. Key changes can provide an opportunity to create visually impactful moments in the drill and highlight musical transitions.

Step 5: Analyze the Dynamics
Pay attention to the dynamic markings in the score, such as crescendos, decrescendos, and accents. These markings will help you create visually exciting moments that align with the musical dynamics.
Step 6: Consider the Performer’s Abilities
Take into account the skill level and capabilities of the marching band performers. If the music includes technically challenging sections, you may need to plan simpler formations or movements to ensure the performers can execute them accurately.
Step 7: Develop the Overall Vision
Based on your analysis of the musical score, begin to develop a cohesive vision for the overall drill. Consider the theme or concept you want to convey and how the music can be interpreted through visual movements and formations.
By thoroughly analyzing the musical score, you can create a well-structured and visually captivating marching band drill that complements the music and engages both the performers and the audience.
Creating a Conceptual Design
1. Determine the Theme
Before you can start creating a marching band drill, you need to have a theme or concept in mind. This could be based on a song, a historical event, a movie, or any other idea that inspires you. The theme will guide the overall design of the drill and help create a cohesive performance.
2. Research and Gather Inspiration
Once you have chosen a theme, it’s time to research and gather inspiration. Look for images, videos, and other materials that relate to your theme. This will help you visualize different elements and movements that can be incorporated into the drill.
3. Create a Storyline
One way to bring your theme to life is by creating a storyline for the drill. Think about the beginning, middle, and end of the performance and how you can tell a story through the movements and formations. This will add depth and meaning to the drill, making it more engaging for the audience.
4. Plan the Formations
Using the inspiration and storyline, start planning the formations for your drill. Consider how the performers will move across the field and how the different sections of the band will interact with each other. This will require careful coordination and organization to ensure that the drill flows smoothly.
5. Determine the Movement and Choreography
Next, think about the specific movements and choreography that will be performed by the band members. This could include various marching techniques, dance-like movements, or even props and visual effects. Make sure to consider the skill level of your performers and choose movements that they can execute with precision.
6. Establish Timing and Transitions
Timing is crucial in a marching band drill, so it’s important to establish the timing for each movement and transition. Consider the tempo of the music and how it will influence the speed and pace of the drill. Practice the drill with a metronome to ensure that the timing is consistent throughout.
7. Collaborate with the Band Director
Throughout the process of creating the conceptual design, it is essential to collaborate with the band director. They can provide valuable input and guidance based on their experience and knowledge of the band’s capabilities. Together, you can refine the design and make necessary adjustments to optimize the performance.
8. Document and Share the Design
Once the conceptual design is finalized, make sure to document and share the details with the band members. This could include written notes, visual diagrams, and recordings of the performance. Clear communication is crucial to ensure that everyone understands their role and can practice and memorize the drill effectively.
Translating the Design onto Paper
Once you have a clear understanding of the drill design and musical arrangement, it’s time to translate that onto paper. This step is crucial in ensuring that the performers understand their movements and how they fit into the overall visual design of the show.
To begin, gather your supplies, including a large piece of graph paper, a ruler, and colored pencils or pens. This will make it easier to create an accurate representation of the drill.
Step 1: Determine the Scale
Before you start drawing, you need to determine the scale at which you will be working. This will depend on the size of your performing area and the number of performers in your band. A common scale is 1 inch equals 4 yards.
Step 2: Create the Grid
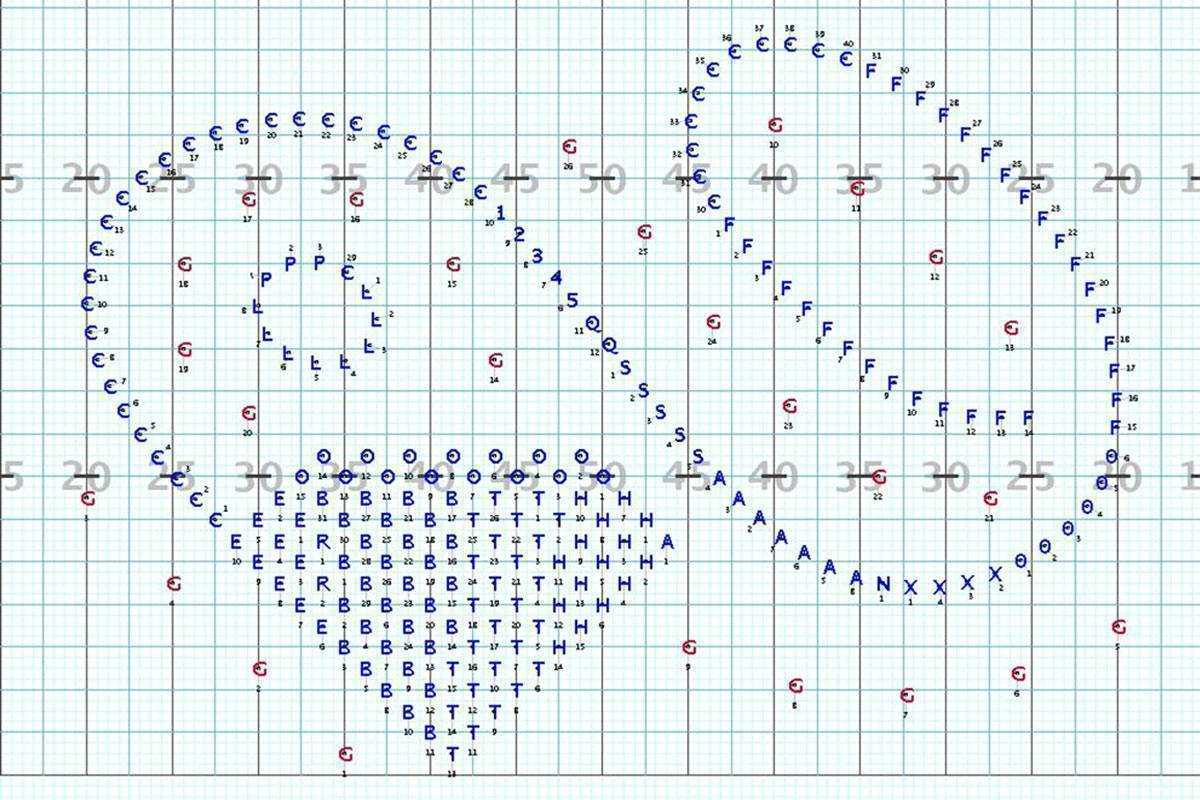
Using your ruler, draw a grid on the graph paper based on the scale you determined. Each square on the grid represents a specific distance on the field. This will help you accurately place the performers and props on your drill.
Step 3: Plot the Coordinates
Referencing the design and musical arrangement, plot the starting positions of each performer on the grid. Use different colored pencils or pens to differentiate between sections of the band.
Step 4: Connect the Dots
Using your ruler, draw lines to connect the initial positions of each performer. These lines represent the pathways that the performers will take as they move throughout the drill.
Step 5: Mark Visual Elements
Mark any visual elements, such as formations or shapes, that are a part of the drill design. Use different symbols or shading to distinguish between different visual elements.
Step 6: Add Notes
Make any necessary notes or annotations on the drill to provide further clarification to the performers. This could include details about timing, counts, or specific movements.
Step 7: Review and Refine
Once you have completed the initial draft of the drill, review it with a critical eye. Make any necessary adjustments or refinements to ensure that the drill is clear and accurate.
By following these steps, you can effectively translate the design of your marching band drill onto paper. This will provide a visual representation of the performance and serve as a valuable tool for both the performers and the instructors.
Implementing the Drill on the Field
Step 1: Set up the Field
Before implementing the drill on the field, it is important to set up the field properly. This involves marking the field with yard lines, hash marks, and other appropriate markings to reference during the drill.
Step 2: Organize the Band
Organize the band members into their respective sections and assign each member to their spot on the field. Ensure that each section has a designated leader or section captain who can help direct the members during the drill.
Step 3: Review Positions and Movements
Take the time to review the positions and movements with the band members. This can be done through visual demonstrations and verbal explanations. It is important that each member understands their individual responsibilities as well as the overall drill formations.
Step 4: Practice Transitions and Formations
Practice the transitions between formations and ensure that band members are able to move quickly and smoothly from one position to another. Start with slower tempos and gradually increase the tempo as the band becomes more comfortable with the drill.
Step 5: Add Musical Elements
Integrate the music into the drill by rehearsing the band’s performance while executing the movements and formations. This will help the band members synchronize their playing with their marching, creating a cohesive and visually appealing performance.
Step 6: Refine and Polish
Once the basic elements of the drill are in place, spend time refining and polishing the performance. Pay attention to details such as posture, alignment, and timing. Make any necessary adjustments to ensure a high-quality performance.
Step 7: Add Visual Effects
If desired, add visual effects such as flag twirling or dance routines to enhance the visual appeal of the performance. Practice these elements separately and then integrate them into the overall drill.
Step 8: Run Full Rehearsals
Once the drill has been implemented, run full rehearsals to practice the entire performance from start to finish. This will help the band members develop stamina and ensure that they can successfully execute the drill performance as a cohesive unit.
Step 9: Perform and Evaluate
Finally, perform the drill in front of an audience and evaluate the performance. Take note of any areas that need improvement and make adjustments for future performances. Celebrate the hard work and enjoy the success of a well-executed marching band drill!
Rehearsing and Refining the Drill
Once you have completed the initial design and written the marching band drill, the next step is to begin rehearsing and refining the drill. This process involves ensuring that the movements and formations are executed correctly and that the overall performance is visually appealing.
1. Start with individual sections
Begin by rehearsing the drill with individual sections of the marching band. This allows each section to focus on their specific movements and formations without distractions. Work on ensuring that each member of the section is in sync and that their movements are precise. This can be accomplished through repetition and practice.
2. Gradually add more sections
Once each section can perform their movements accurately, begin adding more sections to the rehearsal. This will increase the complexity of the drill and require the band members to coordinate with each other. Start with smaller groups and gradually add more sections until the entire band is rehearsing together.
3. Focus on transitions and flow
During the rehearsal process, pay special attention to the transitions between formations and movements. The drill should flow seamlessly from one formation to the next, with each movement leading naturally into the next. Adjust the timing and spacing as needed to create a smooth and visually appealing performance.
4. Take advantage of practice tools
There are various tools available that can help you refine the drill and improve the band’s performance. Consider using a metronome to ensure that the marching is in time, or video recording the rehearsals to identify areas that need improvement. These tools can provide valuable feedback and allow for more precise adjustments.
5. Seek feedback and make adjustments
Throughout the rehearsal process, it’s important to seek feedback from band members, staff, and other observers. They may notice things that you have overlooked and can offer suggestions for improvement. Be open to making adjustments and changes to the drill based on this feedback, as it can ultimately lead to a stronger and more polished performance.
6. Practice, practice, practice
Rehearsing and refining the drill is a continuous process that requires time and dedication. Encourage band members to practice their individual movements outside of rehearsals and schedule regular full-band rehearsals to ensure that everyone is consistently improving. The more practice and repetition, the more polished and precise the performance will become.
By following these steps and dedicating the necessary time and effort, you can ensure that the marching band’s drill is rehearsed and refined to its fullest potential. This will ultimately result in an impressive and visually stunning performance.
FAQ:
How do you start writing a marching band drill?
To start writing a marching band drill, you need to have a clear vision of the music and the overall concept or theme for the show. It’s important to listen to the music multiple times and analyze its structure, dynamics, and emotional content. Once you have a solid understanding of the music, you can begin mapping out the general form of the drill and breaking it down into individual sets or “pictures” that will be performed on the field.
What tools are commonly used to write a marching band drill?
There are several tools commonly used to write a marching band drill. Many drill designers use computer software specifically designed for this purpose, such as Pyware or Ensemble Composer. These programs allow designers to create a visual representation of the drill and manipulate the formations and movements of the band members on the field. Additionally, traditional methods like pencil and paper can also be used to sketch out the drill.
How do you create interesting visual formations in a marching band drill?
Creating interesting visual formations in a marching band drill involves a combination of creativity, an understanding of spatial relationships, and a sense of symmetry and balance. It’s important to consider the size and shape of the band and the available space on the field. By utilizing different formations, such as arcs, diagonals, circles, and lines, and incorporating various body movements and directional changes, you can create visually appealing and dynamic formations.
What is the role of the drum major in the drill writing process?
The drum major plays a crucial role in the drill writing process. They are the leader of the band and serve as a visual reference point for the rest of the members. The drill designer often works closely with the drum major to ensure that the formations and movements are easily readable and followable. The drum major’s leadership and understanding of the drill are essential for the band’s overall visual performance.
Are there any specific guidelines or rules to follow when writing a marching band drill?
Yes, there are specific guidelines and rules to follow when writing a marching band drill. These can vary depending on the competition or event the band is participating in, as well as the specific style or genre of the music being performed. Some general guidelines include maintaining a consistent spacing between band members, avoiding sudden and drastic changes in direction or velocity, and ensuring that all members have clear and concise visual cues.
What are some common challenges faced by drill writers?
Drill writers often face various challenges during the writing process. One common challenge is finding the right balance between musicality and visual impact. It can be difficult to create formations and movements that enhance the music without sacrificing clarity or causing technical difficulties for the musicians. Another challenge is working with limited space on the field, particularly in smaller marching band competitions. Additionally, coordinating the movements and formations of a large group of band members requires careful planning and communication.
Video:


Meet Harrison Clayton, a distinguished author and home remodeling enthusiast whose expertise in the realm of renovation is second to none. With a passion for transforming houses into inviting homes, Harrison's writing at https://thehuts-eastbourne.co.uk/ brings a breath of fresh inspiration to the world of home improvement. Whether you're looking to revamp a small corner of your abode or embark on a complete home transformation, Harrison's articles provide the essential expertise and creative flair to turn your visions into reality. So, dive into the captivating world of home remodeling with Harrison Clayton and unlock the full potential of your living space with every word he writes.


