Step-by-step guide on removing gel nail polish with a drill

Gel nail polish is known for its long-lasting and durable formula, but sometimes, it can be a challenge to remove. While there are several methods for removing gel polish, one effective and efficient way is by using a drill. In this step-by-step guide, we will walk you through the process of removing gel nail polish with a drill, ensuring a smooth and easy removal without causing damage to your natural nails.
Step 1: Gather the necessary tools
Before you begin, make sure you have all the necessary tools and equipment. You will need a gel nail drill, a cuticle pusher, a buffer, acetone or gel polish remover, cotton balls or pads, and aluminum foil. Having these materials on hand will make the process much easier and quicker.
Step 2: Prep your nails
Start by preparing your nails for the gel polish removal. Gently push back your cuticles using a cuticle pusher, being careful not to exert too much pressure. This will help create a clean and neat canvas for the gel nail polish removal process.

Step 3: File the gel polish
Using a gel nail drill with a fine-grit attachment, carefully file the top layer of the gel nail polish. Be gentle and patient, as rushing this step can cause damage to the natural nail. The goal is to remove the shine and create a rough surface for the acetone or gel polish remover to penetrate.
Step 4: Soak the cotton balls
Take the cotton balls or pads and saturate them with acetone or gel polish remover. Make sure they are wet but not dripping. Place the soaked cotton balls on each nail, ensuring complete coverage of the gel nail polish.
Step 5: Wrap the nails

Wrap each nail with a small piece of aluminum foil, securing it tightly. This will help keep the acetone or gel polish remover in contact with the nail, allowing the gel polish to soften and loosen. Leave the foil wraps on for about 10-15 minutes.
Step 6: Remove the foil wraps
After the designated time has passed, gently remove the foil wraps one by one. You will notice that the gel nail polish has started to peel off. Use a cuticle pusher or a gentle buffing motion with a buffer to remove any remaining gel polish residue.
Step 7: Moisturize and restore
Finally, apply a cuticle oil or a moisturizing lotion to your nails and cuticles to replenish the moisture that may have been stripped during the gel polish removal process. This will help restore and nourish your nails, leaving them healthy and strong.

By following this step-by-step guide, you can confidently and effectively remove gel nail polish with a drill. Remember to always prioritize the health and safety of your nails, and if you are unsure or uncomfortable using a drill, consult a professional nail technician.
Preparation for Gel Nail Polish Removal
Before you begin the process of removing gel nail polish with a drill, it is important to properly prepare your nails and work area. Taking the time to prepare will help ensure a successful removal process and prevent any damage to your natural nails.
1. Gather your tools:
- Gel polish remover solution
- Nail drill
- Drill bits – specifically designed for gel polish removal
- Lint-free wipes or cotton pads
- Aluminum foil
- Manicure stick or cuticle pusher
- Moisturizing cuticle oil or cream
2. Set up your work area:
Choose a well-lit and well-ventilated area to work in. Ensure that you have enough space for all your tools and products, as well as a comfortable place to sit. Place a protective towel or mat on your work surface to catch any drips or spills.
3. Protect your skin:
Gel polish remover can be drying to the skin, so it is important to take steps to protect it. Apply a thin layer of petroleum jelly or cuticle oil around your nails to create a barrier between the remover solution and your skin.
4. Buff the shiny topcoat:
Using a nail buffer or a gentle file, buff the shiny topcoat of your gel polish. This step will help to break the seal and allow the remover solution to penetrate the layers of gel polish more effectively.

5. Cut and prepare aluminum foil wraps:
- Cut small squares of aluminum foil, large enough to wrap around each finger.
- Soak the cotton pads or lint-free wipes in the gel polish remover solution.
- Place a saturated cotton pad or wipe on top of your buffed nail.
- Wrap the foil around your finger, securing the cotton pad in place.
- Repeat this process for each finger.
6. Wait for the gel polish to loosen:
Allow the foil wraps to sit on your nails for approximately 10-15 minutes. This will give the remover solution enough time to break down the gel polish, making it easier to remove.
7. Remove the foil wraps:
- Starting with one finger, gently remove the foil wrap.
- If any gel polish remains, use a manicure stick or cuticle pusher to gently scrape it off.
8. Moisturize your nails:
After removing the gel polish, rinse your nails with water to remove any residue. Apply a moisturizing cuticle oil or cream to nourish and hydrate your nails and cuticles.
Now that you have prepared your nails and work area, you are ready to proceed with removing your gel nail polish using a drill. Following these steps will help ensure a successful and safe removal process.
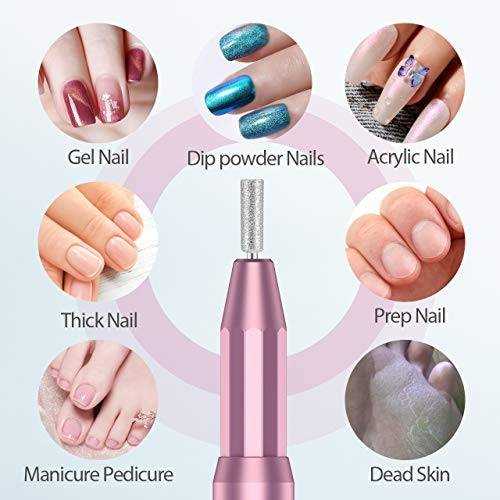
Setting Up the Drilling Station
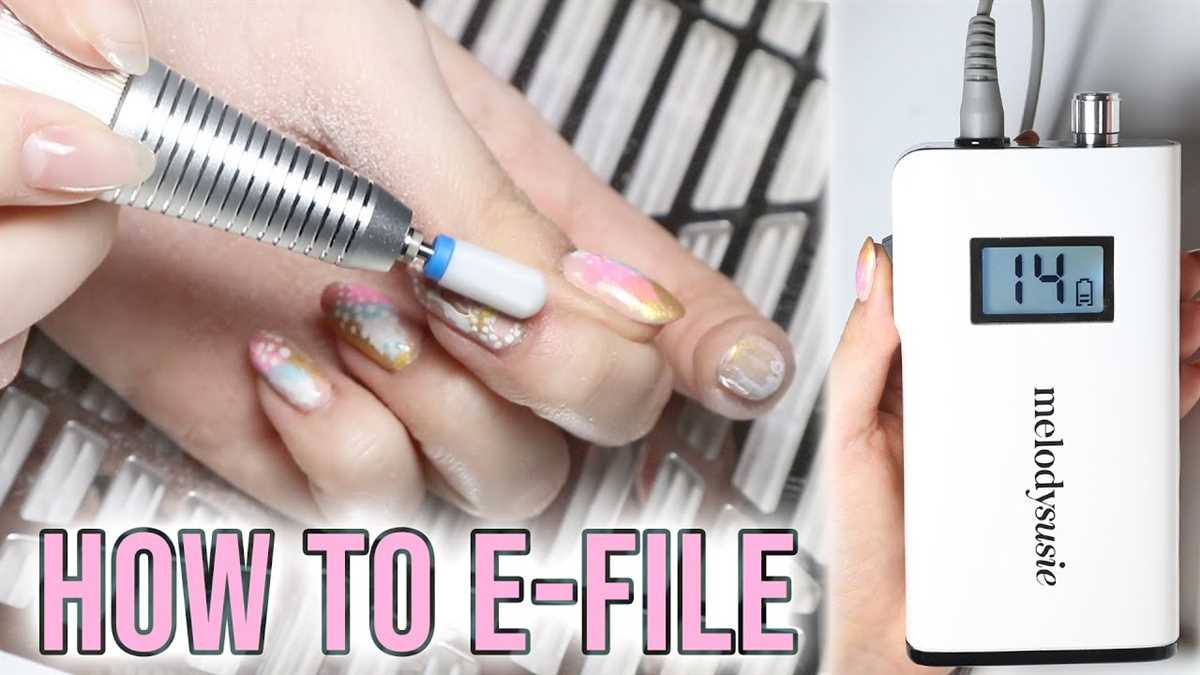
Before starting the process of removing gel nail polish with a drill, it’s important to properly set up your drilling station. This will ensure you have all the tools and equipment you need within reach and that you have a clean and organized workspace.

Gather Your Tools and Equipment
- A manicure drill: Make sure you have a high-quality electric drill specifically designed for nail care. It should have different speed and rotation settings.
- Safety glasses: Protect your eyes from any debris or accidental contact with the drill.
- Nail drill bits: Choose the appropriate bits for gel nail polish removal, such as carbide or diamond bits. Different bits will have different levels of abrasiveness, so choose a bit that matches your needs.
- Sanitizing solution: Keep a bottle of sanitizing solution nearby to clean your drill bits and other tools between uses.
- Cotton pads or balls: You’ll need these to apply acetone or gel polish remover to the nails.
- Acetone or gel polish remover: These products are essential for breaking down and removing the gel nail polish.
- Prep and finish products: Have your preferred primer, base coat, and top coat ready for use.
- Hand towels: You’ll need towels or cloths to clean up any spills or excess product.
Organize Your Workspace
Clear a clean and well-lit area for your drilling station. Ideally, you should work at a table or desk with enough space to comfortably fit all your tools and equipment.
Set up a nearby surface to hold your acetone or gel polish remover and sanitize your drill bits. Having everything within reach will make the process more efficient.
Take a moment to organize your tools and equipment in a way that makes sense to you. This could be arranging them by size or function, or simply placing them in a logical order from left to right.
Ensure Proper Ventilation

Using a drill to remove gel nail polish can create dust and fumes that may be harmful if inhaled in large quantities. Make sure your workspace is well-ventilated by opening a window or using a fan.

If you’re working in a small space without proper ventilation, consider using a dust collector or wearing a dust mask to reduce any potential health risks.
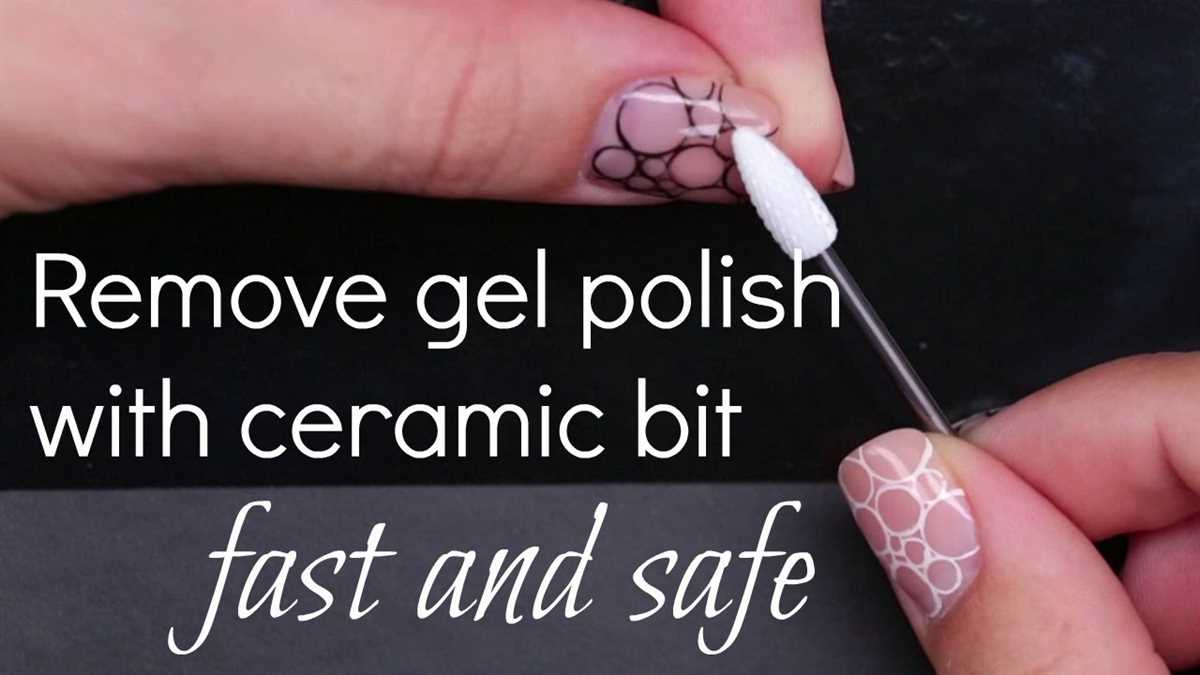
Removing the Top Coat
The top coat of gel nail polish is the final layer that protects the color and adds shine to the nails. Before you can remove the gel polish completely, you’ll need to remove this top coat. Here’s how you can do it:
- Start by preparing your nails. Use a nail file to gently remove any excess length or shape the nails as desired. Be careful not to file too much, as this can damage the natural nails.
- Next, soak a cotton ball or pad in acetone nail polish remover. Acetone is a powerful solution that helps break down the gel polish.
- Place the soaked cotton ball on the nail, making sure it covers the entire nail surface. You can also wrap each finger with a small square of aluminum foil to hold the cotton ball in place.
- Leave the cotton ball on the nails for about 10-15 minutes to allow the acetone to penetrate the top coat and weaken it.
- After the recommended time, gently apply pressure to the cotton ball and slide it off the nail. Most of the top coat should come off easily. If there’s any residue left, use a wooden cuticle pusher or an orangewood stick to gently scrape it off.
- Repeat the process on all the nails until the top coat is completely removed.
Removing the top coat is an important step in the gel polish removal process as it allows the acetone to reach the color coat underneath. Be sure to take your time and be gentle to avoid damaging your natural nails.
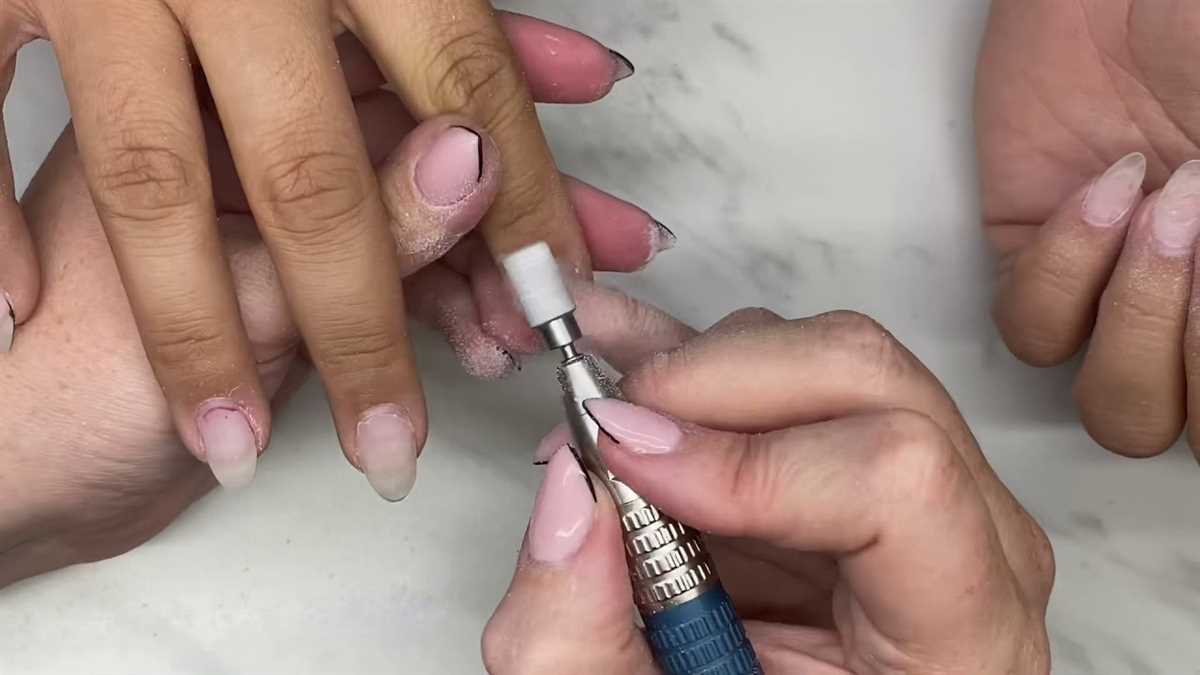
Sanding the Color Layer
After applying acetone to remove the bulk of the gel nail polish, sanding the color layer is the next step in the process of removing gel nail polish with a drill. This step helps to remove any remaining color and smooth out the surface of the nails.

Materials Needed:
- Medium-grit or fine-grit sanding band
- Nail drill
- Safety glasses
Step-by-Step Guide:
- Put on safety glasses to protect your eyes from any debris that may be generated during the sanding process.
- Choose a medium-grit or fine-grit sanding band for your nail drill, depending on the condition of your nails and the amount of color remaining.
- Insert the sanding band into the nail drill and tighten it securely.
- Hold the nail drill in your dominant hand and position it at a 45-degree angle to the surface of the nail.
- Turn on the nail drill and gently run the sanding band along the surface of the nail, in the direction of the growth of the nails.
- Apply light pressure and move the nail drill slowly to avoid damaging the natural nail.
- Continue sanding until all the color has been removed and the surface of the nail is smooth.
- Repeat the process on each nail.
Note: Be careful not to apply too much pressure or spend too much time in one area, as this can cause heat build-up and potential damage to the nail.
Once the color layer has been sanded off, you can proceed to the next step in the gel nail polish removal process.
Buffing and Smoothing the Surface
After the gel nail polish has been removed, it is important to buff and smooth the surface of the nails to ensure a clean and even finish.
Here is a step-by-step guide on buffing and smoothing the surface:
- Start by cleaning the nails with a gentle nail cleanser to remove any residue from the gel polish removal process.
- Next, use a fine-grit buffer or nail file to gently buff the surface of the nails. This will help to smooth out any rough or uneven areas.
- Be careful not to buff too aggressively, as this can thin out the nails and cause damage.
- Once the nails are smoothed, use a soft nail brush or lint-free cloth to remove any dust or debris.
- Apply a high-quality cuticle oil or moisturizer to the nails and cuticles to hydrate and nourish them.
Buffing and smoothing the surface of the nails not only gives them a polished look but also helps to create a smooth base for the application of new nail polish or treatments.
Remember to always take proper care of your nails and give them time to rest between nail polish applications to prevent any damage or weakening.
Cleaning the Nails
Before removing the gel nail polish with a drill, it’s important to properly clean the nails to ensure the best possible results. This will help remove any dirt or oil that may interfere with the removal process.
Steps to clean the nails:
- First, start by washing your hands with soap and water to remove any surface dirt or oil.
- Use a gentle nail brush or a soft toothbrush to gently scrub the nails and the surrounding skin. This will help to remove any remaining debris.
- Next, soak a cotton ball or pad in rubbing alcohol or nail polish remover.
- Wipe each nail thoroughly with the soaked cotton ball or pad. The alcohol or nail polish remover helps to remove any oils or residue left on the nail surface, allowing the gel nail polish removal process to be more effective.
- Finally, rinse your hands with clean water and dry them thoroughly with a clean towel.
Once the nails are properly cleaned, you are ready to proceed with the gel nail polish removal using a drill.
Applying Cuticle Oil and Moisturizer
After removing gel nail polish, it’s important to care for your nails and cuticles to keep them healthy and moisturized. Applying cuticle oil and moisturizer can help nourish your nails and prevent them from becoming dry and brittle.
Step 1: Choose a high-quality cuticle oil
There are many different cuticle oils available on the market, so it’s important to choose one that is high-quality and suitable for your needs. Look for oils that contain nourishing ingredients like jojoba oil, vitamin E, and almond oil.
Step 2: Apply cuticle oil
- Start by washing your hands and drying them thoroughly.
- Take a small amount of cuticle oil on an applicator or your fingertips.
- Gently massage the oil into your cuticles and nails.
- Continue massaging until the oil is fully absorbed.
- Repeat this process daily or as needed to keep your cuticles hydrated.
Step 3: Use a moisturizer
In addition to cuticle oil, using a moisturizer can help keep your nails and hands hydrated. Look for a moisturizer that is specifically designed for nails and cuticles, or choose a rich hand cream that contains nourishing ingredients.
Step 4: Apply moisturizer
- Take a small amount of moisturizer on your fingertips.
- Massage the moisturizer into your hands, focusing on your nails and cuticles.
- Continue massaging until the moisturizer is fully absorbed.
- Repeat this process daily or as needed to keep your hands and cuticles moisturized.
By regularly applying cuticle oil and moisturizer, you can help keep your nails and cuticles healthy and prevent them from becoming dry and damaged. Make sure to follow these steps consistently to maintain the health and appearance of your nails.
Finishing Steps and Aftercare
1. Clean the nail.
After removing the gel nail polish with a drill, it is important to thoroughly clean the nail to remove any remaining residue or debris. Use a nail brush or a soft cloth to gently scrub the nail surface. Pay special attention to the cuticles and sidewalls to ensure they are clean and free from any polish or dust.
2. Moisturize the nails.
Using a moisturizer or cuticle oil, apply a small amount to each nail to hydrate and nourish the nail bed. Massage the moisturizer or oil into the nails and surrounding skin to promote healthy nail growth and prevent dryness and brittleness.
3. Protect the nails.
To protect the newly cleaned nails, it is important to apply a clear base coat before applying any nail polish or treatments. The base coat acts as a barrier between the nail and any potential damage or staining from the polish. This step also helps to extend the longevity of your next manicure.
4. Avoid excessive use of drills.
While using a drill to remove gel nail polish can be effective, it is important to use it sparingly and not rely on it as a regular method of removal. Excessive use of drills can weaken the nail bed and cause thinning or damage. It is recommended to consult a professional nail technician for regular gel polish removal.
5. Maintain proper nail care.
After removing gel nail polish, it is essential to maintain proper nail care to ensure the health and strength of your nails. This includes regular trimming, filing, and buffing to prevent breakage and promote natural nail growth. Additionally, avoid prolonged exposure to water and harsh chemicals, and protect your nails with gloves when performing household chores or other activities that can be damaging to the nails.
6. Schedule regular manicures and salon visits.
To keep your nails in optimal condition, consider scheduling regular manicures and salon visits. Professional nail technicians can provide treatments and recommendations tailored to your specific nail type and needs. Apart from regular maintenance, they can also offer advice on proper nail care, product selection, and any concerns or issues you may have.
By following these finishing steps and aftercare tips, you can maintain healthy and beautiful nails after removing gel nail polish with a drill.
FAQ:
What is gel nail polish?
Gel nail polish is a type of nail polish that is cured under a UV or LED lamp. It is known for its durability and long-lasting shine.
Can I remove gel nail polish with a drill?
Yes, you can remove gel nail polish with a drill. However, it is important to use the drill properly and follow the necessary steps to avoid damaging your nails.
What tools do I need to remove gel nail polish with a drill?
To remove gel nail polish with a drill, you will need a nail drill with a fine-grit sanding band or a carbide bit, a cuticle pusher, a buffer block, cotton balls or pads, aluminum foil, and acetone.
Video:


Meet Harrison Clayton, a distinguished author and home remodeling enthusiast whose expertise in the realm of renovation is second to none. With a passion for transforming houses into inviting homes, Harrison's writing at https://thehuts-eastbourne.co.uk/ brings a breath of fresh inspiration to the world of home improvement. Whether you're looking to revamp a small corner of your abode or embark on a complete home transformation, Harrison's articles provide the essential expertise and creative flair to turn your visions into reality. So, dive into the captivating world of home remodeling with Harrison Clayton and unlock the full potential of your living space with every word he writes.


