Step-by-Step Guide on Drilling Out a Pop Rivet

Pop rivets are commonly used in construction and manufacturing applications to join two or more materials together. However, there may come a time when you need to remove a pop rivet for repairs or modifications. Drilling out a pop rivet is a straightforward process that requires the right tools and a bit of patience.
Before you begin, it’s important to note that drilling out a pop rivet should be done with caution to avoid damaging the surrounding materials. Make sure you have a clear workspace and all the necessary tools at hand.
To drill out a pop rivet, you’ll need a drill with a bit size that matches the rivet’s diameter. Start by placing the drill bit on the center of the rivet’s head and applying gentle pressure. Begin drilling slowly to prevent the bit from wandering off-center. Once the drill bit has made a small dent in the rivet’s head, increase the speed and continue drilling until the head is completely removed.
After removing the rivet’s head, you’ll need to create a hole in the center of the remaining shaft. This can be done by continuing to drill with the same bit size or using a slightly larger bit if necessary. Keep drilling until the remaining shaft is completely removed, taking care not to damage the surrounding materials.
Understanding Pop Rivets
A pop rivet, also known as a blind rivet, is a type of fastener commonly used to join two pieces of material together. It consists of a rivet body, a mandrel, and a head. The rivet body is inserted into a pre-drilled hole, and the mandrel is then pulled through the body, causing it to expand and clamp the materials together. The head of the rivet remains on one side of the material, while the mandrel breaks off and is discarded.

Advantages of Pop Rivets
Pop rivets offer several advantages over other types of fasteners:
- Easy installation: Pop rivets can be installed with basic hand tools and do not require specialized equipment.
- Versatility: Pop rivets are suitable for a wide range of materials, including metal, plastic, and fiberglass.
- Fast assembly: Pop rivets provide quick and efficient assembly, making them ideal for high-volume production.
- Strong joint: Once installed, pop rivets create a strong and permanent joint that resists vibration and loosening.
Types of Pop Rivets
There are several types of pop rivets available, each designed for specific applications:
- Open-end rivets: These rivets have a hollow body and are suitable for joining materials with varying thicknesses.
- Closed-end rivets: These rivets have a closed head, making them waterproof and ideal for applications where a sealed joint is required.
- Multigrip rivets: These rivets have a unique design that allows them to work effectively with materials of varying thicknesses.
- Peel rivets: These rivets are designed to create a large, flared hole in the material, providing a strong grip.
Usage of Pop Rivets
Pop rivets are commonly used in various industries and applications, including:
- Automotive: Pop rivets are often used in the automotive industry for assembling body panels, interior trim, and other components.
- Aerospace: Pop rivets are used in aircraft assembly for joining lightweight panels and structures.
- Construction: Pop rivets are used in construction for fastening metal roofing, gutters, and siding.
- Home improvement: Pop rivets are used by DIY enthusiasts for repairing and building various projects.
Conclusion
Understanding pop rivets is essential for anyone working with fasteners. They are easy to install, versatile, and provide a strong joint. With various types available, they can be used in a wide range of applications across different industries.
Tools and Materials Needed
- Drill: You will need a power drill with a drill bit that matches the size of the pop rivet you are removing.
- Drill bit set: It is recommended to have a set of drill bits to ensure you have the right size for the pop rivet you are working with.
- Rivet removal tool: This tool is specifically designed to help remove pop rivets and can make the process easier and more efficient.
- Safety goggles: It is important to protect your eyes from any debris that may be produced while drilling the pop rivet.
- Gloves: Gloves can provide extra protection for your hands while handling the drill and working on the project.
- Marker or pencil: You may need to mark the spot where the pop rivet needs to be drilled out.
- Clamps or vise grips: These can be used to secure the material you are working on and keep it steady while drilling.
- Drill press (optional): If you have access to a drill press, it can provide more stability and precision while drilling out the pop rivet.
- Replacement rivets: Depending on the project, you may need new pop rivets to replace the old ones.
Step 1: Preparation
Before you begin drilling out a pop rivet, it’s important to make sure you have the necessary tools and safety equipment. Here’s what you’ll need:
- Drill: You’ll need a drill with a drill bit that matches the size of the pop rivet being removed.
- Protective Eyewear: Safety glasses or goggles will help protect your eyes from any flying debris.
- Gloves: It’s always a good idea to wear gloves to protect your hands from any sharp edges.
- Replacement Rivet: If you’re removing the pop rivet to replace it, make sure you have a new one on hand.
- Optional: Clamp or Vise: If you’re working on a larger project or need extra stability, you may want to use a clamp or vise to secure the piece you’re drilling.
Once you have all the necessary tools and safety equipment, you can move on to the next step.
Step 2: Selecting the Right Drill Bit
Choosing the correct drill bit for drilling out a pop rivet is crucial in ensuring a smooth and effective process. It is important to select a drill bit that is properly sized for the rivet you are trying to remove. Using the wrong size drill bit can result in an ineffective removal process and may damage the surrounding materials.
Here are a few steps to help you select the right drill bit:
- Identify the rivet size: Measure the diameter of the rivet using a caliper or ruler. Most rivets are either 3/32-inch, 1/8-inch, 5/32-inch, or 3/16-inch in diameter. Make sure to measure the shank, not the head, of the rivet.
- Choose a drill bit: Match the rivet size with the appropriate drill bit. For example, if you have a 3/16-inch rivet, you should select a 3/16-inch drill bit. It is always a good idea to have a set of drill bits of various sizes on hand to ensure you have the right one for any situation.
- Consider the material: Take into account the material of the rivet and the surrounding materials. If you are drilling through a softer material like plastic or wood, a regular high-speed steel (HSS) drill bit will work well. However, if you are drilling through a harder material like metal, a cobalt or titanium-coated drill bit may be more appropriate.
Tip: If you are unsure about the size or type of drill bit to use, it is always a good idea to consult the manufacturer’s instructions or seek professional advice.
Once you have selected the right drill bit, you are ready to move on to the next step in the drilling out process.
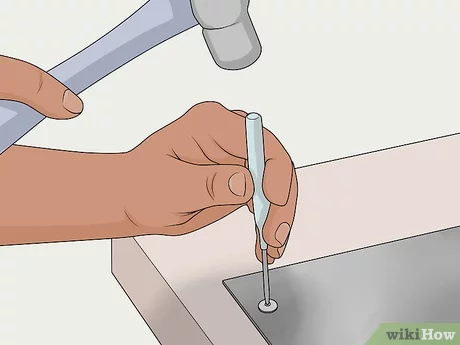
Step 3: Drilling the Pilot Hole
Before drilling out the entire pop rivet, it is important to create a pilot hole. This will help guide the drill bit and prevent it from slipping or wandering off course.
To drill the pilot hole, follow these steps:
- Choose the right size drill bit: Select a drill bit that is slightly smaller than the diameter of the pop rivet shaft. This will ensure a tight fit and prevent the drilled hole from being too large.
- Secure the workpiece: Place the workpiece on a stable surface or secure it in a vise to prevent movement during drilling.
- Mark the drilling point: Use a pencil or marker to make a small mark on the center of the rivet head. This will serve as a guide for drilling.
- Insert the drill bit: Insert the selected drill bit into the chuck of the drill. Make sure it is secure and tightened.
- Align the drill bit: Position the tip of the drill bit directly on the marked drilling point.
- Start drilling: Apply firm and steady pressure on the drill, and slowly start drilling into the rivet head. Keep the drill perpendicular to the workpiece to ensure a straight pilot hole.
- Monitor the progress: Pay close attention to the depth of the hole and the pressure applied. Stop drilling once the pilot hole reaches the desired depth, usually about halfway through the rivet head.
Remember to wear safety goggles and protective equipment while drilling. This will help prevent any potential injuries from flying debris.
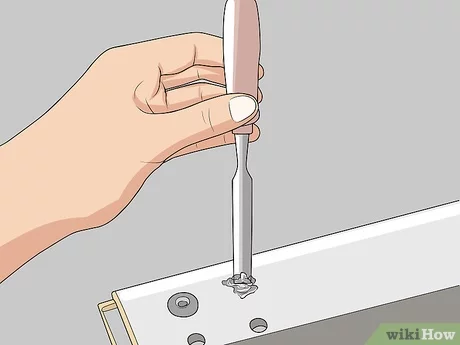
Step 4: Removing the Rivet
Once you have successfully drilled out the rivet, the next step is to remove it from the material. Follow these instructions to safely and effectively remove the rivet:
1. Disengage the rivet head:
Using a flathead screwdriver or a small chisel, gently pry up the rivet head from the opposite side of the material. Be careful not to damage the surrounding area as you work to disengage the rivet head.
2. Pull out the rivet body:
With the rivet head disengaged, you should be able to easily pull out the rivet body from the drilled hole. Use pliers or your fingers to grip the rivet body and apply gentle pulling force until it is completely removed.
3. Dispose of the rivet:
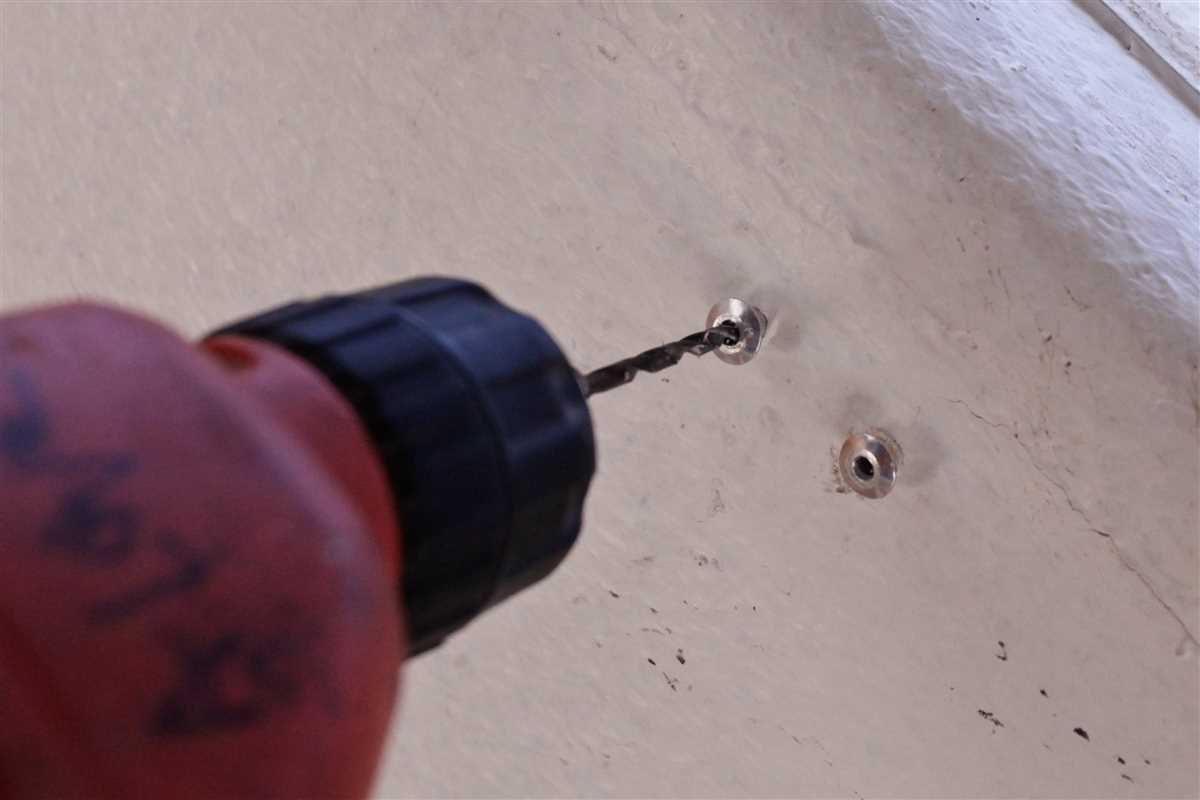
Properly dispose of the rivet once it has been removed. Check local regulations or recycling guidelines to determine the best method of disposal. In some cases, you may be able to recycle the rivet, while in others, it may need to be thrown away.
Now that you have successfully removed the rivet, you are ready to proceed with any necessary repairs or replacements for the material. Remember to take safety precautions throughout the process, such as wearing protective goggles and gloves.
Step 5: Finishing Touches
Once you have successfully drilled out the pop rivet, there are a few finishing touches you can make to ensure a clean and professional result.
Clean the Surface
After removing the pop rivet, it is important to clean the surface where the rivet was previously attached. Use a clean cloth or brush to remove any debris or leftover residue from the drilling process.
Fill in the Hole
If the hole left by the pop rivet is noticeable or needs to be filled, you can use a filler or bonding agent to patch it up. Apply the filler according to the manufacturer’s instructions and allow it to dry completely before proceeding.
Paint or Finish
If the surface where the pop rivet was drilled out needs to be painted or finished, now is the time to do it. Use appropriate paint or finish for the material you are working on and follow the manufacturer’s instructions for application.
Inspect and Test
Once you have completed the finishing touches, take a step back and inspect the area where the pop rivet was previously located. Ensure that the hole is properly filled or disguised and that the surface is clean and smooth.
If necessary, test the area for any remaining weakness or instability. Apply pressure or force to ensure that the repair or replacement of the pop rivet has been successful and that the newly drilled hole can withstand the intended use.
Following these finishing touches will help ensure a professional and durable result after drilling out a pop rivet.
FAQ:
What is a pop rivet?
A pop rivet is a type of fastener commonly used in construction and manufacturing. It consists of a cylindrical shaft with a mandrel in the center. When the mandrel is pulled, it causes the shaft to expand and create a secure connection.
Why would I need to drill out a pop rivet?
There are several reasons why you might need to drill out a pop rivet. It could be damaged or worn out and needs to be replaced, or you may need to remove a rivet to disassemble a structure. Drilling out the rivet allows for easy removal.
What tools do I need to drill out a pop rivet?
To drill out a pop rivet, you will need a power drill with a drill bit that is slightly larger in diameter than the rivet. You may also need a center punch to create a starting point for the drill bit.
Can I use a manual hand drill to remove a pop rivet?
Yes, you can use a manual hand drill to remove a pop rivet. However, it may be more time-consuming and require more effort compared to using a power drill. Make sure to apply steady pressure and maintain the correct angle while drilling.
Video:

Best Saw To Cut Metal Handheld

Meet Harrison Clayton, a distinguished author and home remodeling enthusiast whose expertise in the realm of renovation is second to none. With a passion for transforming houses into inviting homes, Harrison's writing at https://thehuts-eastbourne.co.uk/ brings a breath of fresh inspiration to the world of home improvement. Whether you're looking to revamp a small corner of your abode or embark on a complete home transformation, Harrison's articles provide the essential expertise and creative flair to turn your visions into reality. So, dive into the captivating world of home remodeling with Harrison Clayton and unlock the full potential of your living space with every word he writes.


