Step-by-Step Guide: How to Drill into a Ceramic Pot

If you love indoor gardening, you probably have a collection of beautiful ceramic pots. While these pots add a touch of style to your plants, drilling holes in them is essential for proper drainage. Proper drainage prevents water from pooling at the bottom of the pot, helping to keep your plant’s roots healthy. If you’re unsure how to drill into a ceramic pot without cracking or damaging it, don’t worry! This step-by-step guide will show you exactly how to do it.
Materials You Will Need:
- A ceramic pot
- A diamond-tipped drill bit
- Eye protection
- A marker
- Water
- Duct tape or masking tape
- A drill
Step 1: Mark the Spot
Start by determining where you want the drainage hole to be. Use a marker to make a small dot or draw a small circle on the bottom of the pot.
Step 2: Prep the Pot
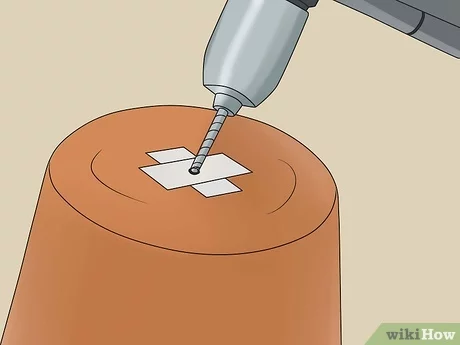
To prevent cracking, fill the pot with water or place it in a basin of water so that the area you’ll be drilling is submerged. This will help to dissipate the heat and keep the pot cool during drilling. You can also use duct tape or masking tape to create a barrier around the area you’ll be drilling to provide additional support.
Step 3: Start Drilling

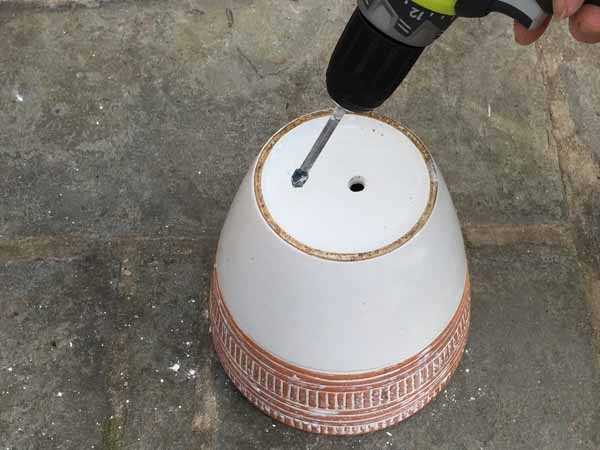
Put on eye protection and secure the pot on a stable surface. Place the diamond-tipped drill bit on the marked spot and start drilling slowly. Use a continuous, gentle pressure while drilling. Keep the drill bit perpendicular to the pot’s surface to avoid slippage.
Step 4: Cool and Clean
Periodically dip the drill bit in water to keep it cool and prevent overheating. This will also help to wash away debris. Continue drilling until you’ve created a hole of your desired size.
Step 5: Finishing Touches
Once drilling is complete, remove any remaining debris from the hole and wipe the pot dry. You’re now ready to enjoy proper drainage in your ceramic pot and give your plants the healthy environment they need to thrive!
Choose the Right Drill Bit
When it comes to drilling into a ceramic pot, it’s important to choose the right drill bit. Using the wrong drill bit can lead to damage or breakage of the pot, so it’s important to select a bit that is suitable for ceramic materials.
There are a few different types of drill bits that can be used for drilling into ceramic:
- Diamond-tipped drill bit: These drill bits are specifically designed for drilling into hard materials like ceramic. They have a diamond coating that helps to cut through the ceramic without causing damage.
- Tungsten carbide drill bit: These drill bits are made from a very hard material called tungsten carbide. They are also suitable for drilling into ceramic, although they may not be as effective as diamond-tipped drill bits.
- Masonry drill bit: If you don’t have a diamond-tipped or tungsten carbide drill bit, a masonry drill bit can also be used for drilling into ceramic. These drill bits are designed for drilling into materials like concrete and brick, but they can also work well on ceramic.
When choosing a drill bit, it’s important to consider the size of the hole you need to drill. Make sure to select a drill bit that is the right size for your project.

It’s also a good idea to have multiple drill bits on hand, especially if you’re working on a larger project. This way, if one drill bit becomes dull or damaged, you can easily switch to another one without interrupting your work.
Once you have chosen the right drill bit, you’re ready to move on to the next step in drilling into a ceramic pot.
Prepare the Pot and Mark the Drilling Spot
Before you begin drilling into your ceramic pot, it’s important to properly prepare the pot and mark the spot where you want to drill. Follow these steps:
- Clean the pot: Start by cleaning the ceramic pot to remove any dirt or debris. Use a damp cloth or sponge to wipe both the interior and exterior surfaces of the pot.
- Choose the right drill bit: Select a drill bit that is suitable for drilling into ceramic. A diamond-tipped or carbide-tipped drill bit is recommended for this task. Make sure the drill bit is the appropriate size for the hole you want to create.
- Mark the drilling spot: Use a pencil or marker to mark the exact spot where you want to drill the hole. Take into consideration the size and placement of the plant or drainage hole you need.
By properly preparing the pot and marking the drilling spot, you’ll increase your chances of successfully drilling into the ceramic without damaging it.
Secure the Pot
Once you have chosen the drill bit and marked the spot where you want to drill, it is important to secure the pot to prevent any movement or slipping during the drilling process. This will help ensure that the hole is drilled accurately and without any damage to the pot.

To secure the pot, you can use several methods:
- Place the pot on a stable surface: Find a flat and stable surface like a workbench or a table. Make sure the surface is clean and dry to prevent any slipping or sliding of the pot during drilling.
- Use a non-slip mat: If the surface you are working on is not stable enough, you can place a non-slip mat or a rubber mat under the pot. This will provide extra grip and prevent the pot from moving or shifting.
- Secure the pot with clamps: If your pot has handles or a rim, you can use clamps to hold it in place. Simply attach the clamps to the handles or rim and tighten them to secure the pot. Make sure the clamps are securely fastened and do not obstruct the area where you will be drilling.
- Hold the pot with your hand: If your pot is small and does not have handles or a rim, you can hold it with your hand. Make sure to grip the pot firmly to prevent any movement while drilling. It is recommended to wear protective gloves to avoid any injuries.
Choose the method that suits your pot and drilling setup best. The goal is to keep the pot in a stable position so that you can drill the hole accurately and safely.
Start Drilling
Now that you’ve gathered all the necessary equipment and prepared your ceramic pot, it’s time to start drilling. Follow these steps to ensure a successful drilling process:
- Secure the pot: Place the ceramic pot on a stable surface, such as a sturdy table or workbench. Make sure it is positioned securely so that it doesn’t move or wobble during the drilling process. You can use clamps or rubber pads to hold the pot in place if needed.
- Select the right drill bit: Choose a carbide-tipped or diamond-tipped drill bit specifically designed for drilling into ceramic or porcelain. The diameter of the drill bit should match the size of the hole you want to create.
- Mark your drilling spot: Use a pencil or marker to mark the exact spot where you want to drill the hole on the ceramic pot. Double-check the positioning to ensure accuracy.
- Apply water: Fill a bowl or tray with water and place it close to the drilling area. This will help keep the drill bit and ceramic pot from overheating during the drilling process. Dip the drill bit into the water to wet it before starting.
- Start drilling: Position the drill bit on the marked spot and apply gentle pressure. Start drilling at a slow speed to prevent the drill bit from slipping or cracking the ceramic pot. Keep the drill bit perpendicular to the surface and maintain a steady hand.
- Use a lubricant: If the drilling process becomes too difficult or the drill bit starts to overheat, apply a lubricant or cutting oil to the drilling area. This will help reduce friction and make drilling easier.
- Monitor the progress: As you drill, periodically stop to check the depth and progress of the hole. You can do this by wiping away any excess water and debris and inspecting the hole. Adjust your drilling speed and pressure accordingly.
- Finish the hole: Once you’ve drilled through the ceramic pot, gently lift the drill bit out of the hole. Clean any remaining debris or water from the pot and inspect the hole for any rough edges. Use sandpaper or a file to smooth any sharp edges if necessary.
Congratulations! You have successfully drilled a hole into your ceramic pot. Now you can proceed with your gardening project or use the pot for your desired purpose.
Use Water as Lubricant
When drilling into a ceramic pot, it’s important to use water as a lubricant to help prevent cracking or shattering the pot. Water acts as a coolant and reduces the heat generated from drilling, which can cause the ceramic to break.

Here are the steps to properly use water as a lubricant when drilling into a ceramic pot:
- Gather your materials: Before you begin, make sure you have all the necessary materials. This includes a ceramic pot, a drill with a carbide or diamond-tipped drill bit suitable for ceramic, a container filled with water, and a sponge or cloth.
- Mark the drilling spot: Use a pencil or marker to mark the spot where you want to drill the hole on the ceramic pot. This will help you maintain accuracy and prevent any unwanted mistakes.
- Prepare the pot: Place the ceramic pot on a stable surface, such as a workbench or table. It’s important to have a steady base to avoid any accidents or injuries while drilling.
- Apply water: Dip the drill bit into the container of water to wet it. This will help to keep the drill bit cool throughout the drilling process. Additionally, wet the surface of the ceramic pot where you will be drilling the hole.
- Start drilling: Hold the drill firmly and position the drill bit on the marked spot. Apply gentle and steady pressure as you begin drilling. Make sure to maintain a slow and consistent speed to avoid creating excessive heat.
- Continue drilling: As you drill into the ceramic pot, periodically wet the area with water using a sponge or cloth. This will help to keep the surface lubricated and prevent the pot from cracking or breaking.
- Clean the hole: Once you have drilled through the ceramic pot, wipe away any excess water and ceramic dust from the hole. This will ensure a clean and finished look.
- Inspect the hole: After drilling, carefully examine the hole to ensure it is the desired size and shape. If necessary, you can use sandpaper or a file to smooth the edges.
By following these steps and using water as a lubricant, you can successfully drill into a ceramic pot without causing damage. Remember to always wear safety goggles and work in a well-ventilated area when drilling.
Go Slow and Steady
When drilling into a ceramic pot, it’s important to take your time and proceed slowly. Ceramic is a brittle material, and if you rush the process, it can crack or break. By going slow and steady, you can ensure a clean and successful drill.
Here are some key tips to keep in mind:

- Use a diamond-tipped drill bit: Diamond-tipped drill bits are designed specifically for drilling into hard materials like ceramic. They provide more precision and durability compared to regular drill bits.
- Mark the spot: Before you begin drilling, mark the spot on the ceramic pot where you want the hole to be. Use a pencil or a marker to create a visible and precise guide.
- Start with a small pilot hole: Instead of drilling the final size hole right away, begin with a small pilot hole. This helps prevent the ceramic from cracking and provides a starting point for the larger hole.
- Apply consistent pressure: As you drill, apply steady and even pressure. Avoid excessive force, as it can cause the drill to slip or the ceramic to crack. Let the drill do the work and allow it to gradually create the hole.
- Use a slower drill speed: Lowering the drill speed can help reduce the risk of overheating and damaging the ceramic. A slower speed allows for better control and prevents friction from generating too much heat.
- Use water as a lubricant: To cool down the drill bit and reduce friction, apply water or a lubricant to the drilling area. This helps to prevent the ceramic from overheating and cracking.
- Use a scrap piece of wood: Placing a scrap piece of wood underneath the ceramic pot can provide additional support and prevent it from cracking while drilling. The wood absorbs some of the pressure and helps distribute it evenly.
- Go step by step: If you need to drill multiple holes, repeat the process for each hole individually. Avoid rushing or trying to drill multiple holes at once, as this increases the risk of damaging the ceramic.
By following these tips and taking your time with each step, you’ll be able to successfully drill into a ceramic pot without any cracks or breakages. Remember, slow and steady wins the race!
Clean and Smooth the Drilled Hole
After drilling the hole in the ceramic pot, it is important to clean and smooth the edges of the hole to ensure a professional finish and to prevent any sharp edges that may cause injury.
Materials needed:
- Sandpaper or sanding block
- Damp cloth or sponge
Steps to clean and smooth the drilled hole:

- Gently sand the edges of the drilled hole using sandpaper or a sanding block. Start with coarse-grit sandpaper and gradually move to finer-grit sandpaper to achieve a smooth finish.
- Be careful not to apply too much pressure while sanding, as this may crack or chip the ceramic.
- Wipe away any dust or debris with a damp cloth or sponge. This will help to remove any remaining particles and create a clean surface.
- Inspect the hole to ensure it is smooth and free of any rough edges. If necessary, continue sanding until the desired result is achieved.
By cleaning and smoothing the drilled hole, you are ensuring a professional and polished look for your ceramic pot. This will not only enhance the overall aesthetic appeal but also provide a safe and secure environment for your plants.
Protect the Pot
Before you start drilling into a ceramic pot, it’s important to take some precautions to protect the pot from cracking or breaking.
Materials Needed:
- Masking tape
- Marker or pencil
- Tile or glass cutter
- Protective gloves
- Protective goggles
Steps:
- Start by cleaning the pot thoroughly and allowing it to completely dry. This will ensure that the pot is free from any dirt, dust, or debris that could interfere with the drilling process.
- Use masking tape to mark the exact spot where you want to drill. This will help prevent the drill bit from slipping and ensure that you drill in the desired location.
- Place a piece of tile or glass cutter underneath the area you will be drilling. This will provide extra support and help prevent the pot from cracking or chipping.
- Put on protective gloves to protect your hands from any potential injuries while drilling. Additionally, wear protective goggles to shield your eyes from flying debris.
- Choose the appropriate drill bit for ceramic or porcelain. Start with a smaller size drill bit and gradually increase the size if needed, to prevent excessive force and pressure on the pot. It’s always better to start with a smaller hole and enlarge it later, if necessary.
- Position the drill perpendicular to the marked spot on the pot. Apply consistent pressure as you start drilling, making sure not to force the drill bit. Let the drill do the work and be patient.
- Use a slow speed setting on your drill and periodically pause to allow the drill bit and pot to cool down. This will prevent overheating and potential damage to the pot.
- Continue drilling slowly until you have reached the desired depth. Once finished, gently remove the tape and wipe away any residual dust or debris.
By following these steps and taking the necessary precautions, you can successfully drill into a ceramic pot without causing any damage. Remember to always handle the drill and pot with care to ensure a safe and successful drilling experience.
FAQ:
What tools do I need to drill into a ceramic pot?
To drill into a ceramic pot, you will need a power drill with a carbide-tipped masonry bit, masking tape, a ruler or measuring tape, and a pencil.
Is it necessary to use a specific type of drill bit for drilling into a ceramic pot?
Yes, it is necessary to use a carbide-tipped masonry bit when drilling into a ceramic pot. Regular drill bits may not be strong enough to penetrate the hard ceramics.

What can I do to prevent the ceramic pot from cracking?
To prevent the ceramic pot from cracking, you should apply masking tape over the area you want to drill. This will help provide support to the ceramic surface and reduce the chances of cracking.
Can I use a regular drill for drilling into a ceramic pot?
Yes, you can use a regular power drill for drilling into a ceramic pot, as long as you have a carbide-tipped masonry bit. However, it is recommended to use a drill with a variable speed setting to have more control over the drilling process.
How deep should I drill into the ceramic pot?
The depth you should drill into the ceramic pot depends on your specific needs. Measure the depth you require and mark it on the drill bit using masking tape. This will ensure that you drill only as deep as necessary and avoid damaging the pot.
What should I do if the drill gets stuck while drilling into the ceramic pot?
If the drill gets stuck while drilling into the ceramic pot, it is important to stop drilling immediately to prevent any further damage. Try reversing the drill slowly to remove it from the pot. If that doesn’t work, you may need to carefully break the ceramic around the stuck drill bit to free it.
Video:


Harrison Clayton
Meet Harrison Clayton, a distinguished author and home remodeling enthusiast whose expertise in the realm of renovation is second to none. With a passion for transforming houses into inviting homes, Harrison's writing at https://thehuts-eastbourne.co.uk/ brings a breath of fresh inspiration to the world of home improvement. Whether you're looking to revamp a small corner of your abode or embark on a complete home transformation, Harrison's articles provide the essential expertise and creative flair to turn your visions into reality. So, dive into the captivating world of home remodeling with Harrison Clayton and unlock the full potential of your living space with every word he writes.