Step-by-Step Guide: How to Drill a Hole Through Glass

Glass drilling may seem like a daunting task, but with the right technique and tools, it can be easily accomplished. Whether you’re looking to create a custom glass ornament or need to drill a hole in a glass bottle for a DIY project, this step-by-step guide will walk you through the process.
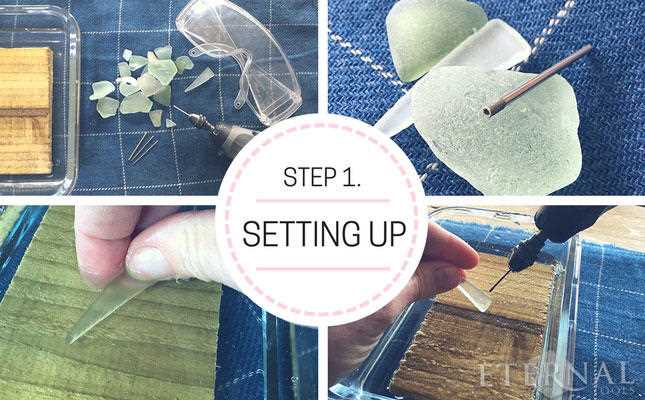
Before you begin, it’s important to gather the necessary materials. You’ll need safety goggles, gloves, a glass drill bit, a piece of scrap wood, a spray bottle filled with water, and a power drill with variable speed settings. Once you have everything you need, you’re ready to get started.
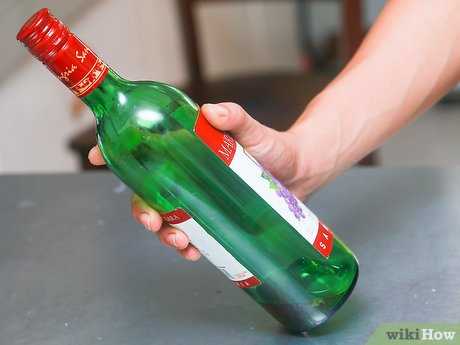
To begin, secure the glass in place on the scrap wood. This will help prevent the glass from cracking or shattering while you drill. Place the glass on the wood with the area you want to drill overhanging the edge of the wood, allowing enough space for the drill and your hand to move freely. Hold the glass firmly in place to prevent it from sliding during the drilling process.
Next, put on your safety goggles and gloves to protect yourself from any potential glass shards. Dip the glass drill bit in water and position it on the spot where you want to drill the hole. Start drilling at a low speed to create a shallow indent in the glass. This will help prevent the drill bit from slipping or wandering as you increase the speed.
As you continue drilling, keep the drill bit lubricated by periodically spraying it with water from the spray bottle. This will help cool down the drill bit and prevent the glass from overheating, which can lead to cracking or shattering. Gradually increase the drill speed as you go, applying gentle and even pressure. Take breaks if needed to prevent the glass and drill bit from getting too hot.

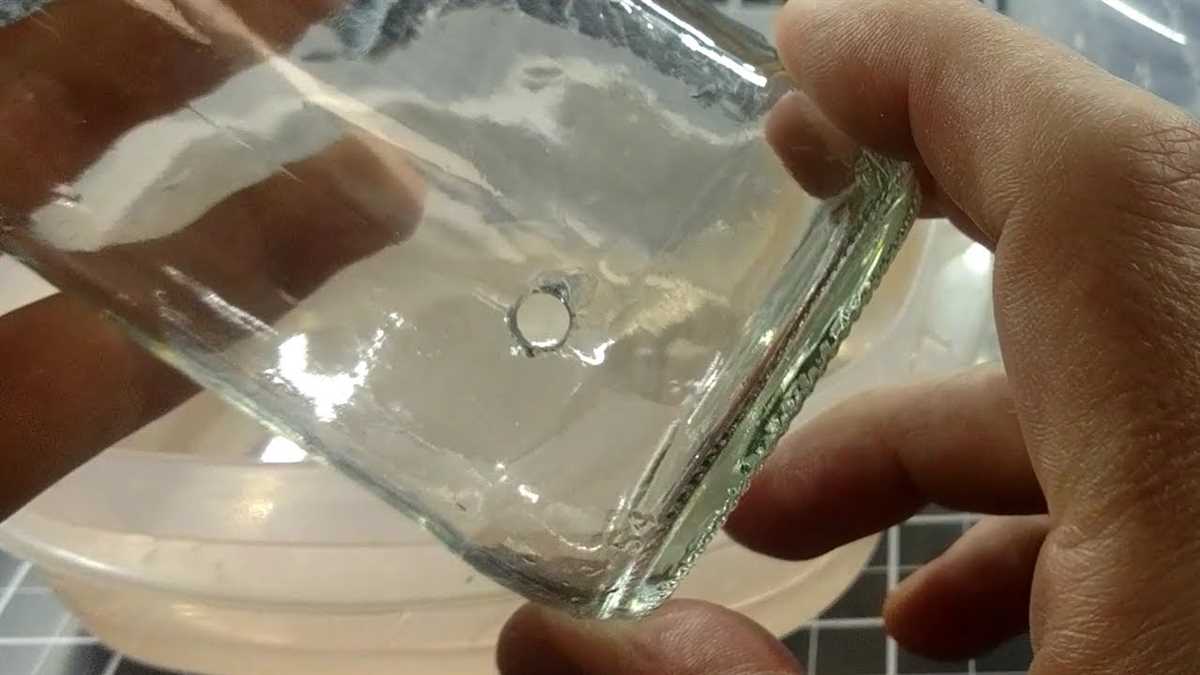
Once you’ve drilled through the glass, slow down the drill speed and remove the drill bit. Be careful not to rush this step, as pulling the drill out too quickly can cause the glass to crack. Gently lower the drill speed and extract the bit from the hole. Inspect the hole to ensure it’s the desired size and shape. If necessary, use sandpaper or a diamond file to smooth any rough edges.
And there you have it! With a little patience and the right tools, drilling a hole through glass can be a straightforward process. Now you can confidently tackle glass drilling projects and create beautiful and unique pieces for your home or as gifts.
Glass Drilling Tools

Drilling a hole in glass requires special tools to ensure a clean and precise result. Here are some essential tools you will need:
1. Diamond Drill Bit

A diamond drill bit is the main tool you will need for drilling through glass. These drill bits have a specialized diamond coating that allows them to cut through the hard surface of the glass. Diamond drill bits come in various sizes, so make sure to choose the right size for your project.
2. Drill

A power drill will be needed to operate the diamond drill bit. Make sure you have a drill with variable speed settings to control the drilling process. It is also important to have a steady hand while drilling to avoid any accidents or chipping of the glass.
3. Lubricant
Using a lubricant during the drilling process is crucial to reduce friction and heat buildup. Water or a specialized glass cutting oil can be used as a lubricant. Apply the lubricant to the glass surface while drilling to ensure a smooth drilling process.
4. Clamp or Tape

To secure the glass in place and prevent it from moving while drilling, you can use a clamp or tape. This will help maintain stability and accuracy during the drilling process.
5. Safety Gear
Always prioritize safety when drilling through glass. Wear safety glasses to protect your eyes from flying glass particles. It is also recommended to wear gloves to protect your hands from broken glass.
6. Marker
Before drilling, mark the spot on the glass where you want to drill the hole. This will help guide you during the drilling process and ensure accuracy.

Having these essential tools will make the process of drilling through glass much easier and safer. Make sure to use them properly and follow the recommended safety precautions for best results.
Preparing the Work Area
Before you begin drilling a hole through glass, it’s important to properly prepare your work area to ensure a safe and successful drilling process. Here are some steps to follow:
- Choose a well-lit and clean area: Find a location with good lighting, as it will help you see the glass and make accurate markings. Clean any debris or dirt from the area to avoid them from interfering with the drilling process.
- Use a sturdy work surface: Place a sturdy workbench, table, or countertop in the work area. Make sure it is stable and will provide enough support for the glass as you drill.
- Protect the work surface: Place a soft towel or a rubber mat on the work surface to prevent the glass from sliding or scratching the surface during drilling. The towel or mat will also help to absorb any vibrations during the drilling process.
- Secure the glass: Place the piece of glass on top of the towel or mat, ensuring it is stable and won’t move around while you drill. If necessary, use clamps or suction cups to hold the glass securely in place.
- Wear safety equipment: Always wear safety goggles and gloves to protect yourself from glass shards and debris. Glass can break unexpectedly while drilling, so it’s important to take proper precautions.
By taking the time to prepare your work area properly, you’ll create a safe and stable environment to successfully drill a hole through glass.
Measuring and Marking the Hole
Before you begin drilling the hole, it is important to measure and mark the exact spot where you want it. This will ensure that the hole is in the right position and helps to prevent any accidental damage to the glass.
Here is a step-by-step guide on how to measure and mark the hole:

- Start by identifying the location on the glass where you want the hole to be. Measure and mark it using a ruler or measuring tape.
- Use a permanent marker or a glass marker to make a visible mark on the spot. This will act as a guide during the drilling process.
- If you are drilling multiple holes, make sure to measure and mark each spot separately.
- Consider using masking tape to create a protective barrier around the marked spot. This can help prevent any chipping or cracking of the glass during drilling.
- Double-check the measurements and alignment of the marks before proceeding with drilling. It is important to ensure accuracy to avoid any mistakes or damage.
Once you have measured and marked the hole, you are ready to move on to the next step of the drilling process.
Setting up the Drill
Before you begin drilling a hole through glass, it’s important to properly set up the drill to ensure safety and prevent damage to the glass.
Materials Needed:
- Drill with a diamond-coated drill bit specifically designed for glass
- Glass surface to be drilled
- Protective eyewear
- Masking or painter’s tape
- Spray bottle filled with water
- Soft cloth or towel
Steps to Set up the Drill:
- Make sure the drill is unplugged and turned off before starting the setup process.
- Attach the diamond-coated drill bit to the drill chuck, ensuring it is securely tightened.
- Put on your protective eyewear to protect your eyes from any debris or glass shards.
- Clean the glass surface to be drilled with a soft cloth or towel to remove any dirt, dust, or fingerprints. This will help the drill bit make clean and precise cuts.
- Mark the spot on the glass where you want to drill the hole. Use a piece of masking or painter’s tape to create a target or guide for the drill bit. This will help prevent the drill bit from slipping or wandering during the drilling process.
- Spray water onto the marked spot, keeping it wet throughout the drilling process. The water acts as a lubricant, reducing friction and heat buildup, which can damage the glass.
- Place a piece of scrap wood or plywood underneath the glass surface to provide support and prevent cracking or shattering.
- Secure the glass surface to prevent it from moving or sliding while drilling. You can use clamps or non-slip mats to hold the glass in place.
Following these steps will help ensure that your drill is set up correctly and that you are ready to safely drill a hole through glass. Remember to always exercise caution and take your time when working with glass to avoid accidents or damage.
Applying Lubrication

Applying lubrication to the glass before drilling is essential to prevent cracking and breakage. Here are the steps to apply lubrication:
- Choose a suitable lubricant: It is important to select a lubricant that is compatible with glass, such as a glass cutting oil or a water-based lubricant.
- Clean the glass surface: Before applying the lubricant, ensure that the glass surface is clean and free from any dirt or debris. Use a glass cleaner or rubbing alcohol to clean the surface.
- Apply the lubricant: Using a small brush or applicator, apply a thin layer of lubricant to the area where you will be drilling the hole. Make sure to cover the entire area that will come in contact with the drill bit.
- Spread the lubricant: Gently spread the lubricant evenly over the surface of the glass using a soft cloth or your finger. This will help ensure that the lubricant is distributed evenly and provides maximum protection.
- Reapply if necessary: If you are drilling multiple holes or if the lubricant dries out, reapply a fresh layer of lubricant before drilling each hole. This will help maintain lubrication throughout the drilling process.
Note: Applying lubrication is an important step that should not be skipped, as it helps reduce friction and heat generated during drilling. This, in turn, minimizes the risk of cracking or shattering the glass.
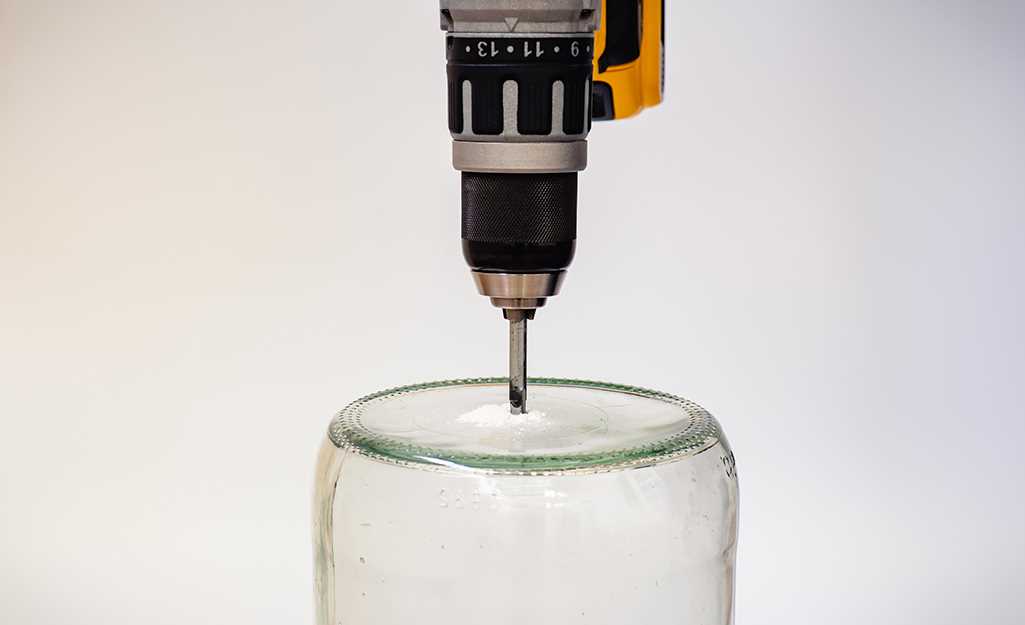
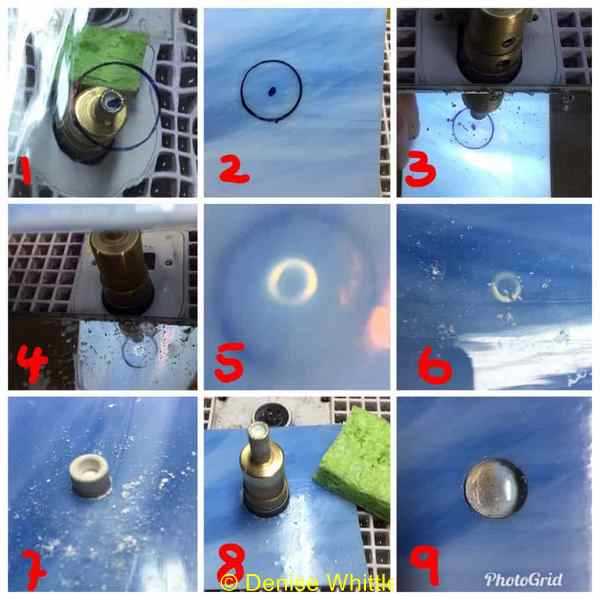
Drilling the Hole
Now that you have prepared the glass and gathered all the necessary tools and materials, it’s time to start drilling the hole. Follow these steps to ensure a clean and successful drilling process:
- Clamp the glass: Begin by securing the glass firmly in place using a clamp or suction cup. This will prevent the glass from moving or cracking during the drilling process.
- Mark the spot: Use a marker or tape to mark the exact spot where you want to drill the hole. Double-check the placement to ensure accuracy.
- Apply lubricant: Apply a small amount of lubricant or glass cutting oil to the surface of the glass where you will be drilling. This will help reduce friction and heat during the drilling process, preventing the glass from cracking or shattering.
- Start at a slow speed: Set your drill to a slow speed setting. It’s important to start drilling at a slow speed to prevent the glass from cracking due to sudden pressure or friction.
- Begin drilling: Place the drill bit on the marked spot and slowly drill into the glass. Apply gentle, even pressure while maintaining a slow speed. Make sure to keep the drill bit perpendicular to the surface of the glass to prevent it from slipping or cracking.
- Take breaks: Occasionally pause drilling to allow the glass and drill bit to cool down. This will prevent overheating and reduce the risk of cracks or breakage.
- Continue drilling: Gradually increase the speed of the drill as you continue drilling. Be patient and do not rush the process, as drilling too quickly can cause the glass to crack.
- Complete the hole: Continue drilling until the bit has penetrated the glass completely. Do not remove the drill bit while it’s still spinning to prevent damage to the glass.
- Clean the hole: Once the hole is drilled, clean any debris or glass shards from the hole using a small brush or compressed air. This will ensure a smooth and clean surface for any future use.
Remember to always wear safety goggles and gloves during the drilling process to protect yourself from any potential harm. It’s also important to remain patient and cautious throughout the process to achieve the best results.
Cleaning Up

Once you have drilled the hole through the glass, it’s important to clean up any debris or residue left behind.
Here are some steps to clean up after drilling a hole through glass:
- Remove the glass from the drilling area and place it on a clean, flat surface.
- Use a soft brush or cloth to gently remove any glass dust or shavings from the surface of the glass. Be careful not to scratch the glass.
- Wipe down the surface of the glass with a solution of warm water and mild dish soap. This will help remove any remaining residue or oils from the drilling process.
- Rinse the glass thoroughly with clean water to remove any soap residue.
- Dry the glass with a clean, lint-free cloth or allow it to air dry.
Note: If you have drilled a large hole or if the glass has shattered, it may be necessary to sweep or vacuum the area to remove any broken glass shards. Take extra care when handling broken glass to avoid injury.
By following these cleaning steps, you can ensure that your glass is clean and free from any debris or residue after drilling a hole.
Tips and Safety Precautions
- Wear safety goggles/glasses to protect your eyes from glass fragments.
- Use a well-lit work area to ensure good visibility while drilling.
- Work on a stable surface or use clamps to secure the glass in place.
- Use a low drilling speed to avoid cracking or shattering the glass.
- Start drilling at a slow and steady pace, applying even pressure.
- Keep the drill bit and glass surface wet with a constant stream of water to prevent overheating and reduce friction.
- Use a diamond-tipped drill bit specifically designed for drilling glass.
- Periodically stop drilling to clear away glass fragments and water to ensure a clean drilling surface.
- Avoid excessive force or side-to-side movement that could damage the glass.
- Do not use excessive pressure while drilling, let the drill bit do the work.
- If the glass starts cracking or shattering, immediately stop drilling and reposition the glass.
- After drilling the hole, carefully remove any remaining glass fragments and clean the area thoroughly.
FAQ:
What tools do I need to drill a hole through glass?
To drill a hole through glass, you will need a diamond-tipped drill bit, a glass lubricant (such as water or oil), a drill with a variable speed setting, and a piece of wood or a soft material to place under the glass for support.
How do I choose the right drill bit for drilling glass?
When choosing a drill bit for glass, it is important to use a diamond-tipped drill bit. Diamond-tipped drill bits are specifically designed to cut through glass without cracking or shattering it.
What is the best lubricant to use when drilling glass?
When drilling glass, water is the most commonly used lubricant. It helps to keep the drill bit cool and prolong its life. You can also use oil, such as sewing machine oil or cutting oil, as a lubricant.
Can I use a regular drill to drill a hole through glass?
Yes, you can use a regular drill to drill a hole through glass, but it is important to use a drill with a variable speed setting. Glass is a fragile material, and drilling at high speeds can cause it to crack or shatter. Using a drill with a variable speed setting allows you to adjust the speed to a slower setting, which is safer for drilling glass.
What safety precautions should I take when drilling glass?
When drilling glass, it is important to wear safety glasses or goggles to protect your eyes from flying glass particles. You should also wear gloves to protect your hands from any sharp edges. Additionally, make sure to work in a well-ventilated area to avoid inhaling any dust or fumes.
Video:


Meet Harrison Clayton, a distinguished author and home remodeling enthusiast whose expertise in the realm of renovation is second to none. With a passion for transforming houses into inviting homes, Harrison's writing at https://thehuts-eastbourne.co.uk/ brings a breath of fresh inspiration to the world of home improvement. Whether you're looking to revamp a small corner of your abode or embark on a complete home transformation, Harrison's articles provide the essential expertise and creative flair to turn your visions into reality. So, dive into the captivating world of home remodeling with Harrison Clayton and unlock the full potential of your living space with every word he writes.


