Step-by-step guide: How to drill a hole in glass or ceramic

Drilling a hole in glass or ceramic can be a daunting task for many DIY enthusiasts. However, with the right tools and technique, you can accomplish this task successfully. In this step-by-step guide, we will walk you through the process of drilling a hole in glass or ceramic, providing you with all the necessary tips and tricks along the way.
First and foremost, it is important to understand that drilling through glass or ceramic requires delicate handling and precision. These materials are fragile and can easily crack or shatter if not handled properly. To ensure safety and success, it is recommended to wear protective eyewear and gloves throughout the process.
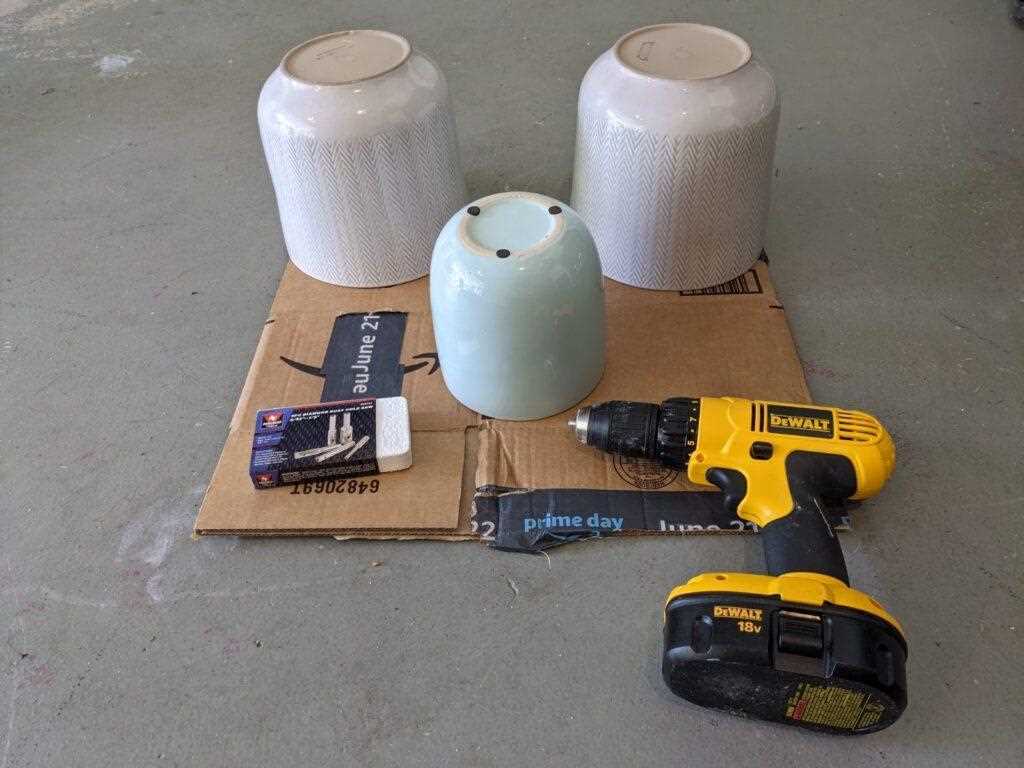
Before you begin, gather all the necessary tools and materials. You will need a drill with a diamond drill bit specifically designed for drilling through glass or ceramic. Additionally, you will need a spray bottle filled with water to cool down the drill bit while drilling, as well as a piece of masking tape or a permanent marker to mark the spot where you want to drill the hole.
Tip: Make sure to choose the right diamond drill bit size for the hole you want to drill. It should be slightly larger than the diameter of the object or fixture you plan to insert into the hole.
Step-by-step guide to drilling a hole in glass or ceramic
Materials Needed:
- Glass or ceramic surface
- Power drill
- Glass or tile drill bit
- Masking tape
- Water
- Safety goggles
- Gloves
Instructions:
- Prepare the surface: Clean the glass or ceramic surface thoroughly and make sure it is free from any dirt or debris that could interfere with the drilling process.
- Mark the spot: Use masking tape to mark the exact spot where you want to drill the hole. This will help prevent the drill bit from sliding around during the drilling process.
- Select the drill bit: Choose a glass or tile drill bit that is appropriate for the size of the hole you want to drill. These drill bits are specifically designed to handle the hardness of glass and ceramic surfaces.
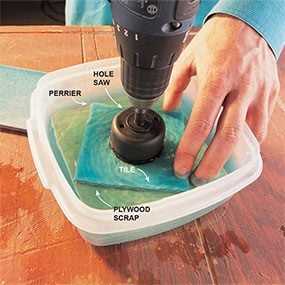
- Secure the surface: Place the glass or ceramic surface on a stable and secure work surface. You may want to place a soft cloth or piece of wood under the surface to prevent it from cracking or chipping during the drilling process.
- Wear safety gear: Put on safety goggles and gloves to protect your eyes and hands from any flying debris or glass shards.
- Add water: Pour a small amount of water onto the marked spot. This water will help lubricate the drill bit and keep the temperature down, preventing the glass or ceramic from cracking.
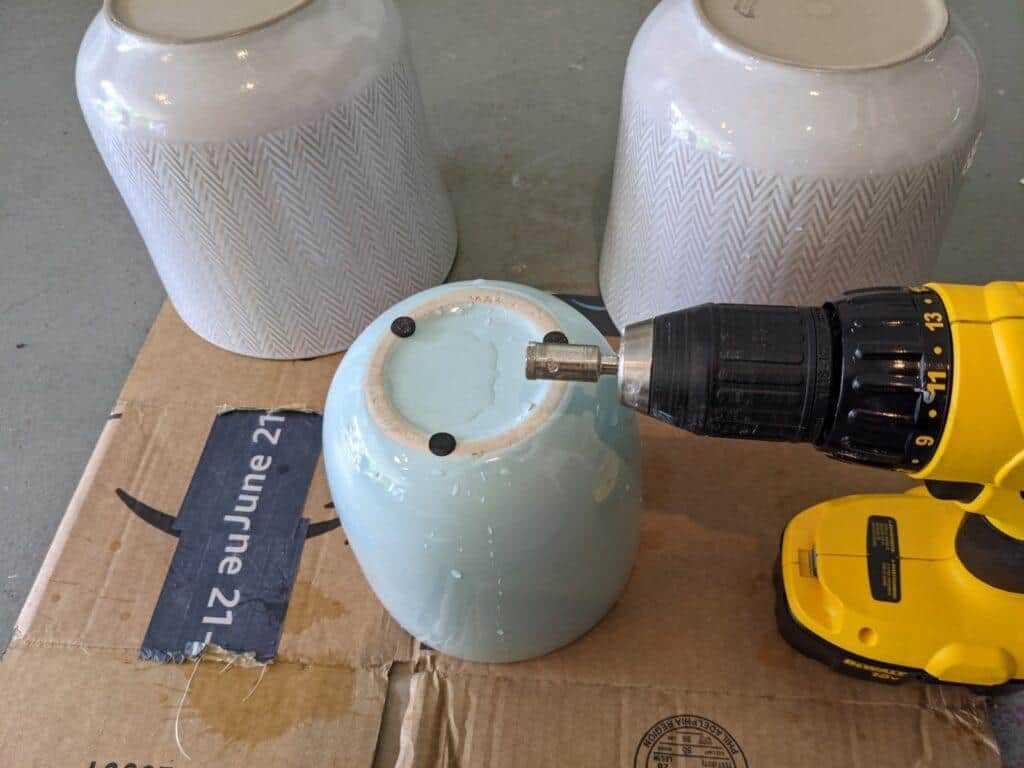
- Start drilling: Hold the power drill steady with both hands and position the drill bit against the marked spot. Start drilling at a slow speed, applying gentle pressure. As you drill, make sure to keep the drill bit and the surface wet with water to prevent overheating.
- Continue drilling: Gradually increase the drilling speed as you go deeper into the glass or ceramic surface. Be patient and take breaks if needed to let the drill bit cool down.
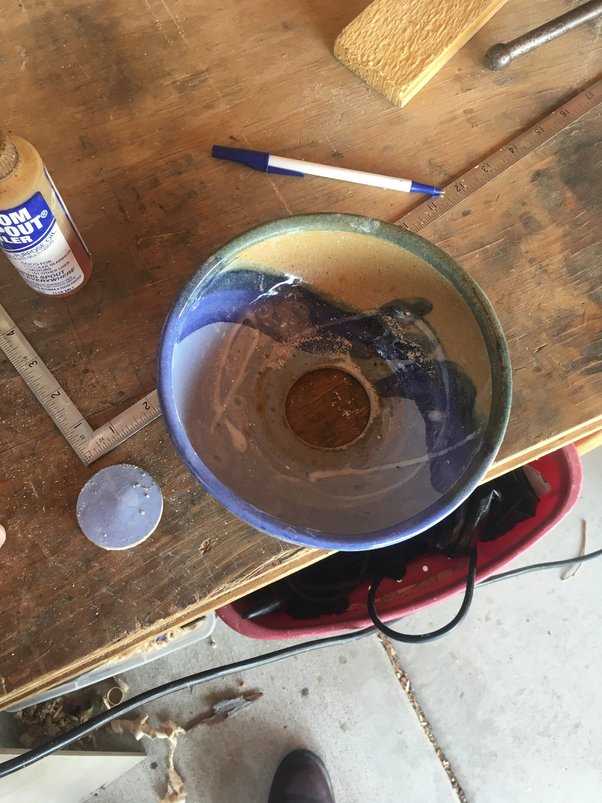
- Complete the hole: Once you have drilled all the way through the glass or ceramic surface, remove the drill bit slowly while keeping it wet with water. Wipe away any remaining water or debris from the surface.
- Remove the masking tape: Carefully peel off the masking tape from the surface, taking care not to scratch or damage the newly drilled hole.
Note: It is important to take your time and work slowly when drilling glass or ceramic as these materials are prone to cracking or chipping. If you feel any resistance or see any signs of cracking, stop drilling immediately.

| Size of Hole | Drill Bit Size |
|---|---|
| 3/16 inch | 1/4 inch drill bit |
| 1/4 inch | 5/16 inch drill bit |
| 3/8 inch | 1/2 inch drill bit |
| 1/2 inch | 5/8 inch drill bit |
Step 1: Gather necessary materials
Before you start drilling a hole in glass or ceramic, it’s important to gather all the necessary materials. Here’s what you’ll need:
- A power drill: Make sure you have a power drill with adjustable speed and a drill bit suitable for drilling through glass or ceramic.
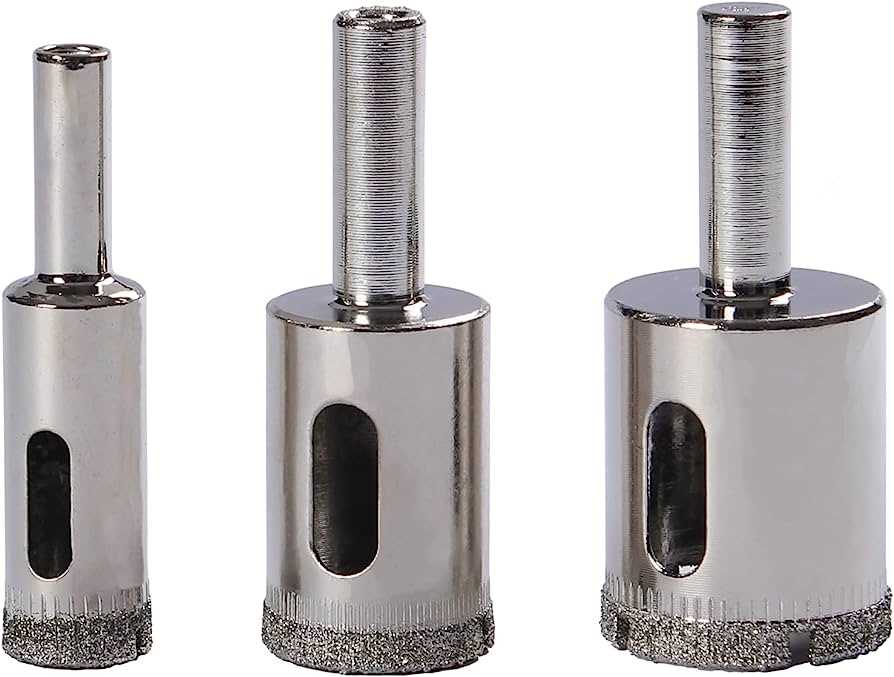
- A diamond drill bit: Since glass and ceramic are hard materials, it’s recommended to use a diamond-tipped drill bit. These drill bits are specifically designed for drilling through hard materials without causing cracks or damage.
- Masking tape: You’ll need masking tape to create a guide on the surface of the glass or ceramic. This will help to prevent the drill bit from slipping and ensure a clean and precise hole.
- Safety goggles: Protect your eyes by wearing safety goggles throughout the drilling process. This will prevent any debris or fragments from getting into your eyes.
- Water spray bottle: Glass and ceramic can get hot while drilling, so it’s important to keep the drill bit and the surface cool. A water spray bottle will help to cool down the area and prevent any cracking or damage.
- A sponge or cloth: You’ll need a sponge or cloth to wipe away any excess water and keep the surface clean.
Once you have gathered these materials, you’ll be ready to move on to the next step.
Step 2: Prepare the surface
Before you start drilling a hole in glass or ceramic, it is important to properly prepare the surface to ensure a successful outcome. Follow these steps to get your surface ready:
- Clean the surface: Use a glass cleaner or a mild soap and water solution to clean the area where you plan to drill the hole. Make sure to remove any dirt, dust, or residue that may interfere with the drilling process.
- Mark the drilling spot: Use a marker or a piece of tape to clearly mark the exact spot where you want to drill the hole. This will help guide your drilling and ensure precision.
- Apply masking tape: To prevent slipping and provide additional support, apply a strip of masking tape over the area where you will be drilling. This will help protect the surface from cracking or chipping.
By preparing the surface properly, you can minimize the risk of damage and achieve the desired results when drilling a hole in glass or ceramic.

Step 3: Mark the drilling spot
Before you start drilling, it’s important to mark the exact spot where you want to drill the hole. This will ensure accuracy and prevent any damage to the surrounding area.
Here’s how you can mark the drilling spot:
- Clean the surface of the glass or ceramic with a mild detergent and water to remove any dirt or debris.
- Using a permanent marker or a piece of tape, make a small dot or mark on the spot where you want to drill the hole.
- Make sure the mark is clearly visible and centered on the drilling spot.
- If you are drilling multiple holes, measure and mark each spot separately.
By marking the drilling spot, you will have a clear guide to follow when drilling the hole, ensuring that it is in the right place and at the right angle.
Step 4: Choose the right drill bit

Choosing the right drill bit is crucial when drilling a hole in glass or ceramic. Using the wrong drill bit can result in cracking, breaking, or shattering the material. Here are some important factors to consider when selecting the appropriate drill bit:
- Type of material: Glass and ceramic require specialized drill bits that are designed to cut through these hard and brittle materials without causing damage. These drill bits are often made of carbide or diamond, which are strong enough to handle the hardness of glass or ceramic.
- Size of the hole: Determine the size of the hole you want to drill. Drill bits are available in various sizes, so it’s important to choose one that matches your desired hole size. Be sure to measure and mark the spot where you want to drill the hole.
- Drill type: Consider the type of drill you will be using. If you have a regular handheld drill, you will need a drill bit that is suitable for that type of drill. However, if you have a specialty glass drill or a drill press, you may require a different type of drill bit.
- Quality: Invest in high-quality drill bits to ensure durability and precision. Cheap or low-quality drill bits may not be able to handle the stress of drilling through glass or ceramic and can lead to poor results.
| Type | Features |
|---|---|
| Diamond-coated drill bits | Coated with diamond particles for extra strength and durability. Ideal for drilling through glass and ceramics. |
| Carbide drill bits | Made of tungsten carbide, these bits are extremely hard and can cut through even the toughest glass and ceramic materials. |
| Spear-point drill bits | These bits have a pointed tip that helps to prevent the drill bit from slipping and provides precise drilling. |
| Tile and glass drill bits | Specifically designed for drilling through glass and ceramic tiles. These bits have a spear-like tip and a carbide or diamond coating for effective drilling. |
When choosing a drill bit, make sure to read the manufacturer’s instructions for compatibility and usage guidelines. Additionally, it’s always a good idea to have a few extra drill bits on hand in case one breaks or becomes dull during the drilling process.
Step 5: Apply lubricant
Applying a lubricant to the glass or ceramic surface will help to reduce friction and prevent overheating during the drilling process. This will also extend the life of your drill bit and prevent cracking or chipping of the material.
Here’s how to apply lubricant:

- Select a suitable lubricant: There are several options for lubricants that can be used when drilling glass or ceramic. Some common choices include water, glass cutting oil, or a lubricating gel specifically designed for drilling. Choose the lubricant that best suits your needs and preferences.
- Prepare the lubricant: If using water, fill a small container with enough water to cover the area where you will be drilling. If using a liquid lubricant, pour a small amount into a separate container. If using a gel lubricant, squeeze a small amount onto the surface of the material.
- Apply the lubricant: Dip the tip of your drill bit into the lubricant or use a brush to apply it directly to the area where you will be drilling. Make sure the entire area is well lubricated.
- Keep the area lubricated: While drilling, periodically apply more lubricant to the drill bit and the drilling area. This will help to keep the temperature down and prevent the bit from getting too hot.
Remember to always follow the instructions provided by the lubricant manufacturer and exercise caution when using any type of lubricant. Proper lubrication will ensure a smoother drilling process and a better outcome.
Step 6: Start drilling
Now that you have prepared the glass or ceramic surface and secured it in place, it’s time to start drilling. Follow these steps to safely and effectively drill a hole:
- Pick up your drill with the appropriate drill bit. Make sure the drill bit is designed for glass or ceramic materials. You can find these special drill bits at most hardware stores.
- Put on safety goggles and gloves to protect yourself from any flying debris.
- Set your drill to a slow speed. High speeds can cause the glass or ceramic to crack or shatter.
- Place the tip of the drill bit firmly on the marked spot on the glass or ceramic surface.
- Apply gentle pressure and start drilling. Let the drill do the work – do not force it.
- Use a continuous, smooth motion and keep the drill bit perpendicular to the surface. Tilting the drill bit can result in an uneven or angled hole.
- Periodically stop drilling to add more coolant or lubricant to prevent overheating and reduce friction.
- Continue drilling until you have reached the desired depth. Be patient and take your time to avoid damaging the material.
- Once you have drilled the hole, carefully remove the drill bit from the surface.
- Clean up any debris or dust around the hole with a damp cloth or vacuum.
Remember, drilling glass or ceramic requires patience and precision. Take breaks as needed and be cautious throughout the process to ensure a successful outcome.
Step 7: Maintain a steady pace
Drilling through glass or ceramic requires patience and a steady hand. It is important to maintain a consistent pace throughout the drilling process to prevent the material from cracking or shattering.

Here are some tips on how to maintain a steady pace while drilling:
- Start slowly: Begin drilling at a slow speed to establish a groove and prevent the drill bit from slipping. This will also allow you to have better control over the drilling process.
- Apply steady pressure: While drilling, apply steady and even pressure to the material. Avoid pushing too hard, as this can cause the drill bit to break or damage the glass or ceramic.
- Keep the drill bit cool: Glass and ceramic can generate a lot of heat while being drilled. To prevent overheating, periodically remove the drill bit and apply a few drops of water or a coolant to keep it cool.
- Use a lubricant: Applying a lubricant such as oil or a drilling fluid can help reduce friction and heat while drilling. This will also help extend the life of the drill bit.
- Take breaks if necessary: If you feel that the material is becoming too hot or the drill bit is dulling, take a short break before continuing. This will give the drill bit and the material time to cool down.
By maintaining a steady pace and following these tips, you can successfully drill a hole in glass or ceramic without damaging them.
Step 8: Clean and finish up
Once you have successfully drilled your hole in the glass or ceramic, it’s important to clean up the area and put the finishing touches on your project.
First, carefully remove any debris or dust that may have accumulated during the drilling process. You can use a small brush or compressed air to gently blow away any loose particles.
Next, wipe down the glass or ceramic with a soft cloth or sponge to remove any remaining dirt or residue. Be sure to use a non-abrasive cleaner to avoid scratching the surface.
If the drilled hole is going to be exposed, you may want to consider using a diamond file or sandpaper to smooth out the edges. This will help to prevent any sharp edges or chipping that could occur from the drilling process.
Finally, take a moment to step back and admire your work. Whether you’re installing a new faucet or creating a beautiful piece of art, drilling a hole in glass or ceramic can be a rewarding experience.
Congratulations! You have successfully completed the process of drilling a hole in glass or ceramic. With proper technique and care, you can now tackle a variety of DIY projects with confidence.
FAQ:
What tools do I need to drill a hole in glass or ceramic?
To drill a hole in glass or ceramic, you will need a drill with a diamond drill bit specifically designed for drilling into these materials. You will also need some masking tape, a squirt bottle filled with water, and safety goggles.
How do I choose the right size of diamond drill bit?
The size of the diamond drill bit you choose depends on the size of the hole you want to drill. Measure the diameter of the hole you need and choose a drill bit that matches that size.
What is the best technique for drilling into glass or ceramic?
The best technique for drilling into glass or ceramic involves applying a small amount of masking tape over the area you want to drill. This helps to prevent the drill bit from slipping and provides a guide for the drill. Use a slow speed and apply constant, gentle pressure while drilling. It is also important to keep the area wet with the squirt bottle to prevent overheating.
How do I prevent the glass or ceramic from cracking while drilling?
To prevent the glass or ceramic from cracking while drilling, it is important to use a low speed and apply constant, gentle pressure. Keep the area wet with water to prevent overheating, as the heat can cause the material to crack. Additionally, starting with a small pilot hole and gradually increasing the size of the hole can help to prevent cracking.
Can I use a regular drill bit to drill into glass or ceramic?
No, you cannot use a regular drill bit to drill into glass or ceramic. Regular drill bits are not designed to handle the hardness and fragility of these materials. Using a regular drill bit can lead to cracking or shattering of the material.
Are there any safety precautions I should take while drilling into glass or ceramic?
Yes, there are several safety precautions you should take while drilling into glass or ceramic. Wear safety goggles to protect your eyes from flying debris. Make sure to keep your fingers away from the drill bit while it is spinning. It is also a good idea to work on a stable surface and to secure the glass or ceramic in place with a clamp or vice.
Video:


Meet Harrison Clayton, a distinguished author and home remodeling enthusiast whose expertise in the realm of renovation is second to none. With a passion for transforming houses into inviting homes, Harrison's writing at https://thehuts-eastbourne.co.uk/ brings a breath of fresh inspiration to the world of home improvement. Whether you're looking to revamp a small corner of your abode or embark on a complete home transformation, Harrison's articles provide the essential expertise and creative flair to turn your visions into reality. So, dive into the captivating world of home remodeling with Harrison Clayton and unlock the full potential of your living space with every word he writes.


