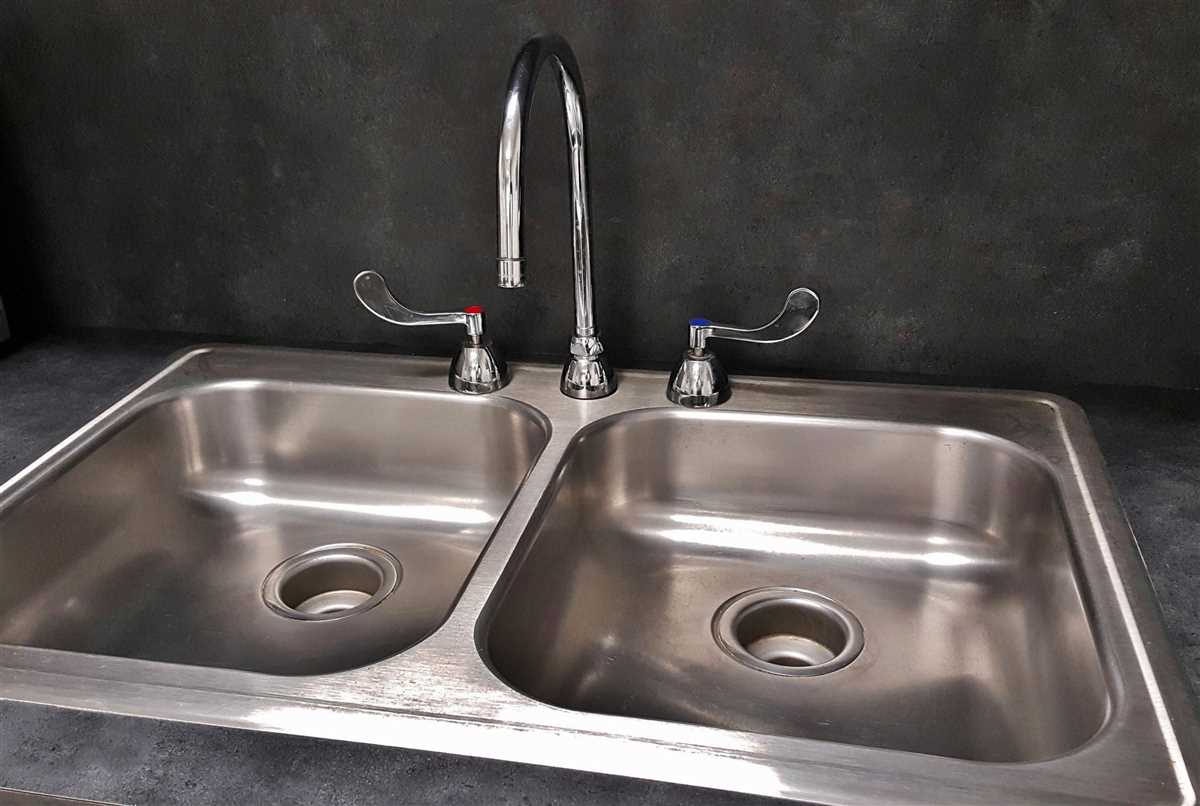
Step-by-step guide: How to drill a hole in a stainless steel sink

Drilling a hole in a stainless steel sink can seem like a daunting task, but with the right tools and techniques, it can be a straightforward process. Whether you need to install a new faucet or add additional accessories to your sink, drilling a hole is often necessary. In this step-by-step guide, we will walk you through the process of drilling a hole in a stainless steel sink, so you can achieve professional results.
Step 1: Gather your materials and tools
Before you begin, make sure you have all the necessary materials and tools for the job. This includes a stainless steel drill bit, a power drill, a center punch, masking tape, a lubricant (such as cutting oil), a marker, and safety equipment like safety glasses and gloves. Having everything ready will ensure a smooth and efficient drilling process.
Step 2: Mark the drilling spot
Using a marker, mark the exact spot where you want to drill the hole on the stainless steel sink. You can measure and mark the spot beforehand to ensure accuracy. Consider the size and placement of the hole based on your needs. Once you have marked the spot, place a small piece of masking tape over it to keep the drill bit from slipping.

Step 3: Use a center punch to create a starting point
Next, use a center punch to create a small indentation at the center of your marked spot. This indentation will serve as a starting point for the drill bit and help prevent it from wandering. Gently tap the center punch with a hammer to create the indentation, making sure to keep it centered on the marked spot.
Step 4: Apply lubricant and secure the sink
Before you begin drilling, apply a small amount of lubricant, such as cutting oil, to the surface of the sink. This will help reduce friction and prevent the drill bit from overheating. Additionally, secure the sink in place to prevent it from moving or vibrating during the drilling process. This can be done by placing a piece of scrap wood or a clamp beneath the sink.
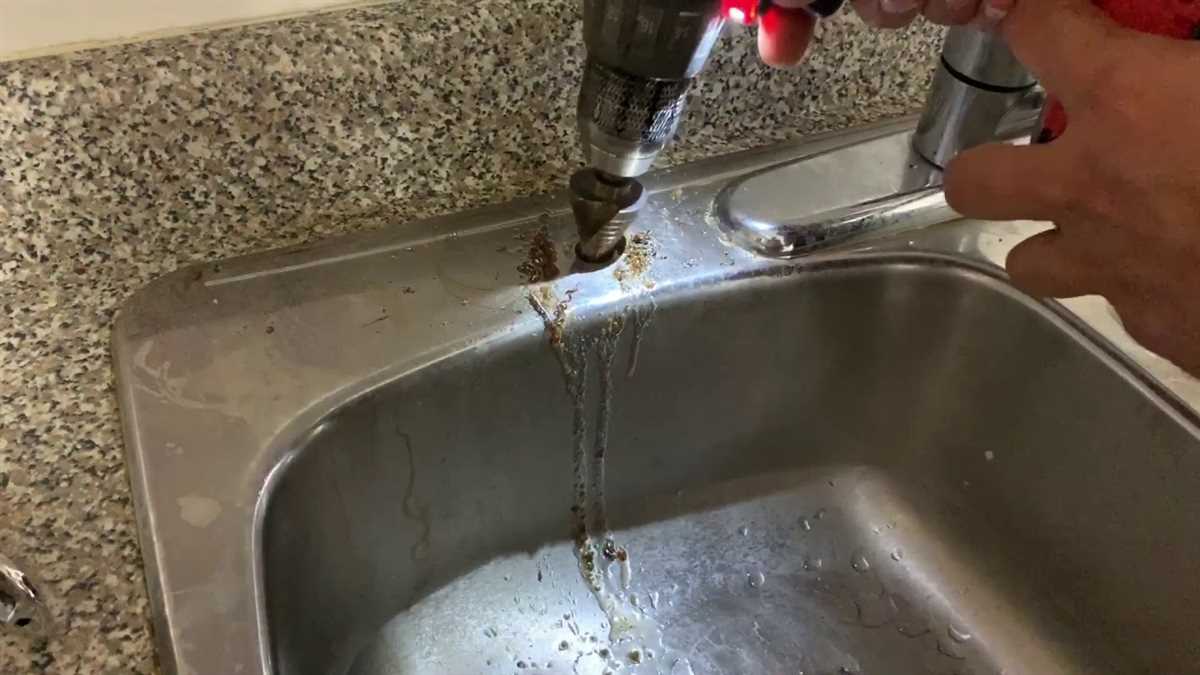
Step 5: Start drilling slowly and steadily

With your safety equipment on, start the power drill at a low speed and begin drilling on the indentation you created earlier. Ensure that the drill bit is perpendicular to the sink surface and apply steady pressure. It’s important to use a slow and consistent speed to avoid overheating the drill bit or damaging the sink. As you drill, periodically add more lubricant to keep the drilling process smooth.
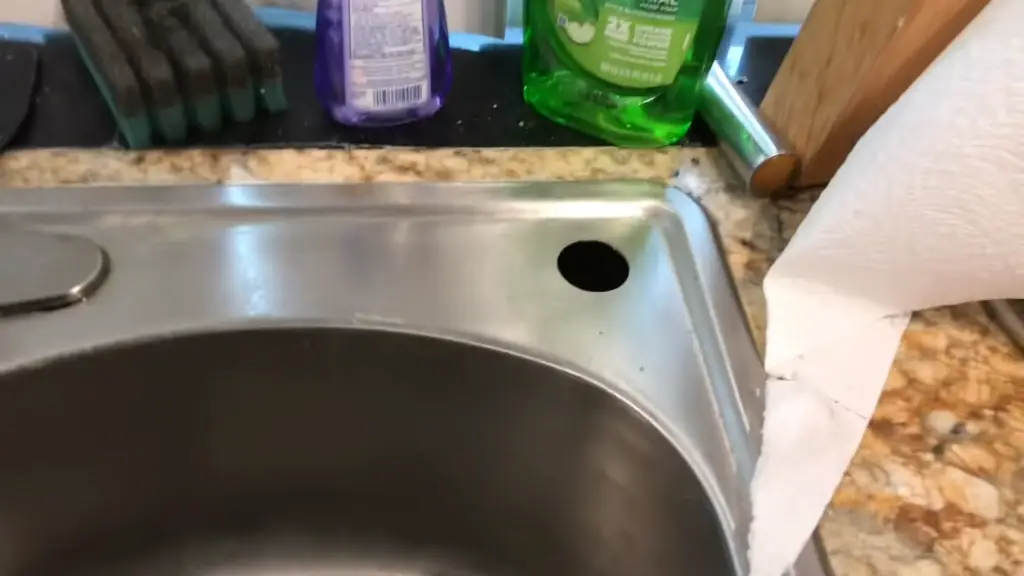
Step 6: Remove any burrs and clean up
Once the hole has been drilled, remove any burrs or sharp edges using a file or sandpaper. A smooth edge will ensure a secure fit for the accessory or fixture you plan to install. Finally, clean up any debris or residue left from the drilling process, and your stainless steel sink is ready for use.
Following these steps will allow you to successfully drill a hole in a stainless steel sink and achieve professional-looking results. Remember to take your time, prioritize safety, and use the right tools and techniques for the job. Happy drilling!
Preparing the Materials


Before you begin drilling a hole in a stainless steel sink, it’s important to gather all the necessary materials. Here are the items you’ll need:
- Stainless steel sink – Make sure your sink is made of stainless steel, as drilling into other materials can be more challenging.
- Drill – Use a drill equipped with a carbide-tipped drill bit specifically designed for drilling through stainless steel.
- Masking tape – Apply masking tape to the area where you’ll be drilling to prevent the drill bit from slipping.
- Center punch – Use a center punch to create a small indentation in the center of the marked hole location. This will help guide the drill bit and prevent it from wandering.
- Safety glasses – Protect your eyes by wearing safety glasses throughout the drilling process.
- Lubricant – Applying a lubricant, such as cutting oil or a multipurpose oil, to the drill bit will help reduce friction and heat buildup.
- Clean cloth – Keep a clean cloth nearby to wipe away any excess oil or debris during and after drilling.
Having all these materials ready before you start will ensure a smooth and efficient drilling process for your stainless steel sink.
Choosing the Right Drill Bit
- When drilling a hole in a stainless steel sink, it’s crucial to choose the right drill bit for the job. Using the wrong drill bit can result in damaged bits, slow drilling progress, or even injury.
- For drilling holes in stainless steel, it is recommended to use a high-speed steel (HSS) or cobalt drill bit. These types of drill bits are specifically designed for drilling through hard materials like stainless steel.
- HSS drill bits are more common and suitable for most stainless steel drilling applications. They are affordable and can handle most stainless steel thicknesses.
- If you’re drilling through a thicker stainless steel sink or encountering more resistance, consider using cobalt drill bits. Cobalt drill bits are made with a higher percentage of cobalt, making them harder and more durable.
Factors to consider when choosing a drill bit:
- Drill bit size: The size of the hole you need will determine the drill bit size. Measure the diameter of the hole required and choose a drill bit that matches or is slightly larger.
- Material: Ensure that the drill bit you choose is suitable for drilling through stainless steel. Look for HSS or cobalt drill bits, as mentioned earlier.
- Coating: Some drill bits come with coatings that reduce friction and heat buildup, prolonging the lifespan of the bit. Look for bits with a titanium or black oxide coating for improved performance.
- Shank type: Different drill bits have different shank types, such as round shanks or hex shanks. Ensure that the drill bit you choose has a shank that is compatible with your drill.
Recommended drill bit sizes for common tasks:
| Hole Size (Inches) | Drill Bit Size (Inches) |
|---|---|
| 1/8 | 5/32 |
| 1/4 | 17/64 |
| 3/8 | 25/64 |
| 1/2 | 5/8 |
Remember to always wear safety goggles and work gloves when drilling into stainless steel to protect yourself from any potential hazards.

Marking the Hole
Before you start drilling, it’s important to mark the exact location where you want the hole to be. This will help ensure that the hole is in the right place and prevent any mistakes.
Follow these steps to mark the hole:
- Measure and mark the center point of where you want the hole to be on the stainless steel sink. Use a measuring tape or a ruler to get an accurate measurement.
- Place a piece of masking tape over the center point. This will help protect the sink’s surface and prevent the drill bit from slipping.
- Use a marker or a center punch to mark the exact center of the hole on the masking tape. This will give you a clear and precise reference point.
- Double-check your measurements and markings to ensure they are accurate. Make any necessary adjustments if needed.
By marking the hole before drilling, you can avoid any unnecessary damage to the stainless steel sink and ensure that the hole is positioned correctly. Taking the time to mark the hole accurately will make the drilling process much easier and produce better results.
Securing the Sink
Before you begin drilling a hole in your stainless steel sink, it is important to secure the sink to prevent it from moving during the drilling process. This will help ensure accuracy and prevent damage to both the sink and the drill bit. Follow these steps to securely fasten the sink:

- Place a cloth or towel underneath the sink to protect the surface. This will also prevent the sink from slipping or sliding during the process.
- Use clamps or brackets to secure the sink in place. Position them in a way that they will hold the sink firmly and prevent any movement.
- Ensure that the clamps or brackets are tightly secured to the sink. This will prevent the sink from shifting or rotating while drilling.
- If your sink has mounting clips or brackets, make sure they are securely fastened to the countertop or cabinet. These additional supports will provide extra stability to the sink.
By securing the sink properly, you will have a stable surface to work on and reduce the risk of any accidents during the drilling process. It is crucial to take the time to perform this step correctly in order to achieve accurate and safe results.
Applying Lubricant
Applying a lubricant to the area you will be drilling is an important step to ensure a smooth and clean drilling process. The lubricant helps to reduce friction and heat, which can damage both the drill bit and the stainless steel sink.
Here are the steps to follow when applying lubricant:
- Choose a suitable lubricant: Selecting the right lubricant is crucial for the drilling process. It is recommended to use a cutting fluid, such as a sulfurized oil or a water-based coolant. These lubricants are specifically designed for metal drilling and provide excellent cooling and lubricating properties.
- Prepare the sink: Clean the area of the sink where you will be drilling with a mild soap or detergent. Rinse it thoroughly and dry it completely before applying the lubricant.
- Apply the lubricant: Take a small amount of lubricant and apply it to the drilling area. You can use a brush or a cloth to spread the lubricant evenly over the surface. Make sure to cover the entire area that will come into contact with the drill bit.
- Spread the lubricant: Use a clean cloth to spread the lubricant over the entire drilling area. This will ensure that the lubricant is evenly distributed and will provide sufficient lubrication during the drilling process.
- Let it sit: Allow the lubricant to sit on the drilling area for a few minutes. This will give it time to penetrate the surface of the stainless steel sink and provide maximum lubrication.
By applying a lubricant before drilling a hole in a stainless steel sink, you can minimize the risk of damage to both the sink and the drill bit. This step is essential for achieving a clean and precise hole without any cracks or burrs.
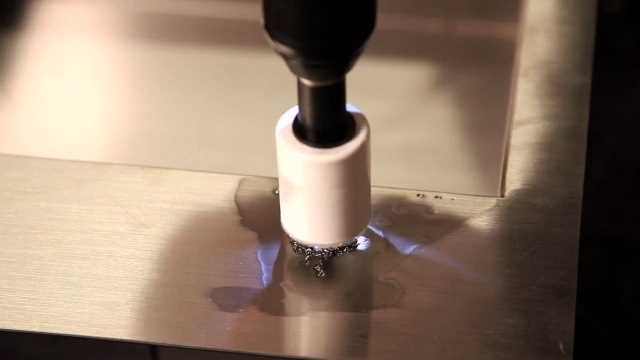
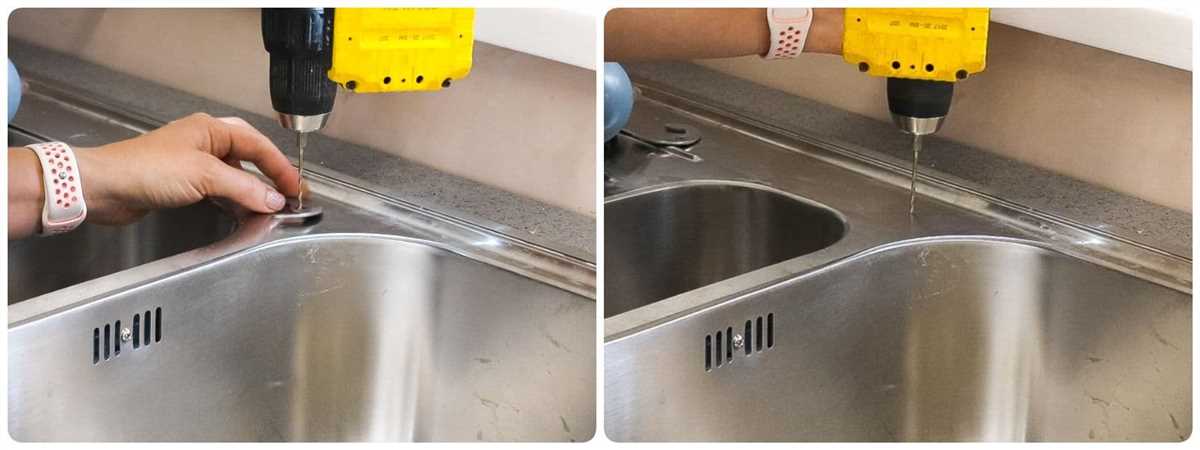
Drilling the Hole
Now that you have gathered all the necessary materials and taken the necessary precautions, it’s time to drill the hole in your stainless steel sink. Follow these steps:
-
Choose the location: Decide where you want the hole to be drilled on your sink. Make sure to measure and mark the exact spot using a marker or tape.
-
Secure the sink: Place a piece of scrap wood beneath the area where you will drill the hole. This will prevent the sink from flexing or denting during the drilling process.
-
Select the right drill bit: For drilling through stainless steel, a carbide or cobalt drill bit is recommended. These drill bits are specially designed to cut through hard materials like stainless steel.
-
Apply cutting oil: Before you start drilling, apply some cutting oil to the surface of the sink. This will help lubricate the drill bit and keep it cool during the drilling process.
-
Start drilling: Position the drill bit on the marked spot and start drilling at a low speed. Apply steady downward pressure and let the drill do the work. Avoid applying too much pressure, as it may cause the drill bit to break or damage the sink.
-
Keep the drill bit cool: While drilling, periodically apply more cutting oil to keep the drill bit cool and prevent it from overheating. This will also help prolong the life of the drill bit.
-
Adjust the speed: As you drill deeper into the stainless steel, you may need to increase the speed of the drill. However, be careful not to go too fast, as it can cause the drill bit to slip or create rough edges.
-
Finish the hole: Once you have drilled all the way through the stainless steel, retract the drill bit and clean away any metal shavings or debris. You can use a vacuum or a brush to remove the debris.
Following these steps will ensure that you drill a clean and precise hole in your stainless steel sink without damaging it. Remember to take your time and be patient throughout the drilling process.
Cleaning Up
Once you have successfully drilled the hole in your stainless steel sink, it is important to clean up any debris or mess that may have been created during the drilling process. Here are some steps to follow for cleaning up:
1. Remove any loose debris
First, use a brush or vacuum cleaner to remove any loose metal shavings or debris from the sink. This will prevent them from scratching or damaging the surface of the sink.
2. Wipe down the sink
Next, use a soft cloth or sponge dampened with warm water and mild soap to wipe down the sink. This will remove any remaining debris and clean the surface of the sink.
3. Dry the sink
Use a clean, dry cloth to thoroughly dry the sink. This will prevent water spots or residue from forming on the stainless steel surface.
4. Polish the sink (optional)
If desired, you can use a stainless steel cleaner or polish to give your sink a shiny, polished finish. Follow the instructions on the product label for best results.
5. Check for any damage
Finally, inspect the sink for any signs of damage or scratches. If you notice any issues, you may need to repair or address them accordingly.
By following these steps, you can ensure that your stainless steel sink is clean and free from debris after drilling a hole. This will help maintain the aesthetic appeal and functionality of your sink for years to come.
Finishing Touches
Once you have successfully drilled the hole in your stainless steel sink, there are a few finishing touches you can do to ensure a clean and professional look.
1. Smooth the edges
Using a metal file or sandpaper, carefully smooth the edges of the drilled hole. This will prevent any sharp or jagged edges that could potentially cause injury or damage to your plumbing fixtures.
2. Clean the area
Remove any debris or metal shavings that may have accumulated during the drilling process. Use a clean cloth or paper towel to wipe down the area around the hole, ensuring a clean and tidy finish.
3. Apply a sealant
To prevent any potential leaks or water damage, it is recommended to apply a waterproof sealant around the edges of the drilled hole. This will create a watertight seal and protect the sink from any moisture infiltration.
4. Install the desired fixture
Finally, install the desired fixture into the drilled hole. This could be a faucet, soap dispenser, or any other accessory you wish to add to your sink. Follow the manufacturer’s instructions for proper installation.
By following these finishing touches, you can ensure a clean and professional look for your stainless steel sink, while also preventing any potential damage or leaks in the future.
FAQ:
What tools do I need to drill a hole in a stainless steel sink?
To drill a hole in a stainless steel sink, you will need a battery-powered drill, a center punch, a drill bit, a lubricant such as cutting oil or soap, and safety gear such as safety glasses and gloves.
Can I use a regular drill bit to drill through stainless steel?
No, you cannot use a regular drill bit to drill through stainless steel. Stainless steel is a hard material that requires a specially designed drill bit made from cobalt, carbide, or high-speed steel.
Should I use cutting oil or soap as a lubricant?
You can use either cutting oil or soap as a lubricant when drilling a hole in a stainless steel sink. Both options will help reduce friction and heat, making it easier to drill through the metal.
What safety precautions should I take when drilling a hole in a stainless steel sink?
When drilling a hole in a stainless steel sink, it is important to wear safety glasses to protect your eyes from metal shavings. You should also wear gloves to protect your hands from sharp edges. Additionally, make sure to secure the sink and work area to prevent any accidents.
Do I need to use a center punch before drilling?
Yes, using a center punch is recommended before drilling a hole in a stainless steel sink. The center punch will create a small indentation that acts as a guide for the drill bit, helping to prevent it from slipping and keeping it centered.
What is the step-by-step process for drilling a hole in a stainless steel sink?
The step-by-step process for drilling a hole in a stainless steel sink includes: 1. Marking the spot where you want to drill the hole. 2. Applying cutting oil or soap to the marked spot. 3. Using a center punch to create an indentation at the marked spot. 4. Inserting the appropriate drill bit into the drill. 5. Holding the drill perpendicular to the sink surface and applying steady pressure while drilling. 6. Periodically pausing to add more lubricant and prevent overheating. 7. Stopping once the drill bit has penetrated through the sink. 8. Removing the drill bit and cleaning up any metal shavings.
Video:

Meet Harrison Clayton, a distinguished author and home remodeling enthusiast whose expertise in the realm of renovation is second to none. With a passion for transforming houses into inviting homes, Harrison's writing at https://thehuts-eastbourne.co.uk/ brings a breath of fresh inspiration to the world of home improvement. Whether you're looking to revamp a small corner of your abode or embark on a complete home transformation, Harrison's articles provide the essential expertise and creative flair to turn your visions into reality. So, dive into the captivating world of home remodeling with Harrison Clayton and unlock the full potential of your living space with every word he writes.


