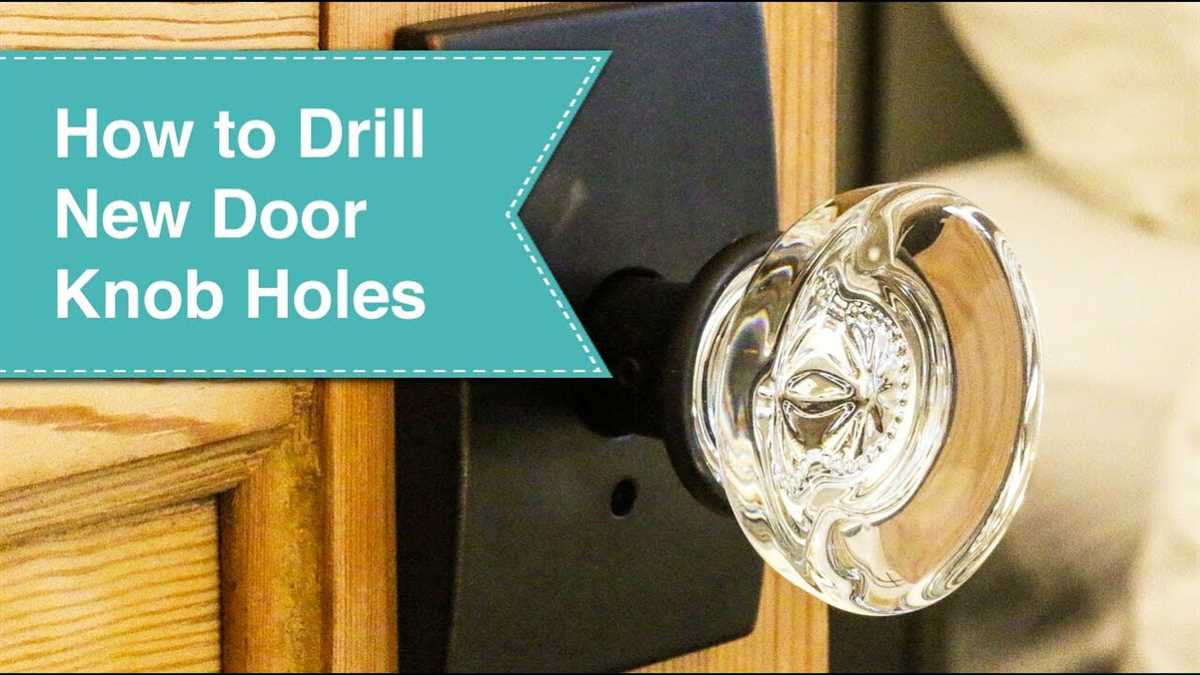
Step-by-Step Guide: How to Drill a Door Latch Hole with Precision

Drilling a door latch hole with precision is an essential skill for anyone who wants to install a door latch or upgrade their existing setup. While it may seem like a simple task, getting the hole size and position just right can make all the difference in the functionality and security of your door. In this step-by-step guide, we will walk you through the process of drilling a door latch hole with precision, ensuring a perfect fit every time.
Step 1: Measure and Mark
The first step in drilling a door latch hole is to measure and mark the correct position for the hole. Use a tape measure to determine the correct height for the latch and mark it on the door using a pencil or marker. Then, measure the distance from the door edge to the center of the latch hole and mark it as well. These measurements will ensure that the latch is aligned with the door frame and operates smoothly.
Step 2: Use a Hole Saw or Spade Bit
Once you have marked the position of the latch hole, it’s time to choose the right tool for the job. A hole saw or spade bit is recommended for drilling door latch holes as they provide clean and precise cuts. Select a hole saw or spade bit that matches the diameter of your latch, and attach it to your drill.

Step 3: Drill the Hole
With the right tool in hand, position the drill bit at the marked position on the door and start drilling. Apply light pressure and keep the drill straight to ensure a clean and straight hole. Take your time and drill slowly to avoid any splintering or chipping of the wood.
Pro Tip: To prevent splintering, you can use a piece of masking tape or adhesive tape on the surface of the door where you will be drilling.
Step 4: Test the Fit
After drilling the hole, test the fit of the latch. Place the latch in the hole and make sure it fits securely without any wiggle room. If needed, use a chisel or file to adjust the hole size or shape for a perfect fit. Test the latch’s operation by engaging and disengaging it to ensure smooth movement.
Step 5: Install the Latch

Once you are satisfied with the fit and operation of the latch, it’s time to install it. Attach the latch to the door frame according to the manufacturer’s instructions and make any necessary adjustments. Finally, test the latch’s functionality by closing and opening the door to ensure it securely locks and unlocks.
By following this step-by-step guide, you can confidently drill a door latch hole with precision and achieve a professional-looking installation. Remember to measure and mark accurately, use the right tools, drill slowly and test the fit before finalizing the installation. With these tips in mind, you’ll be able to complete this task successfully and enhance the security and functionality of your doors.
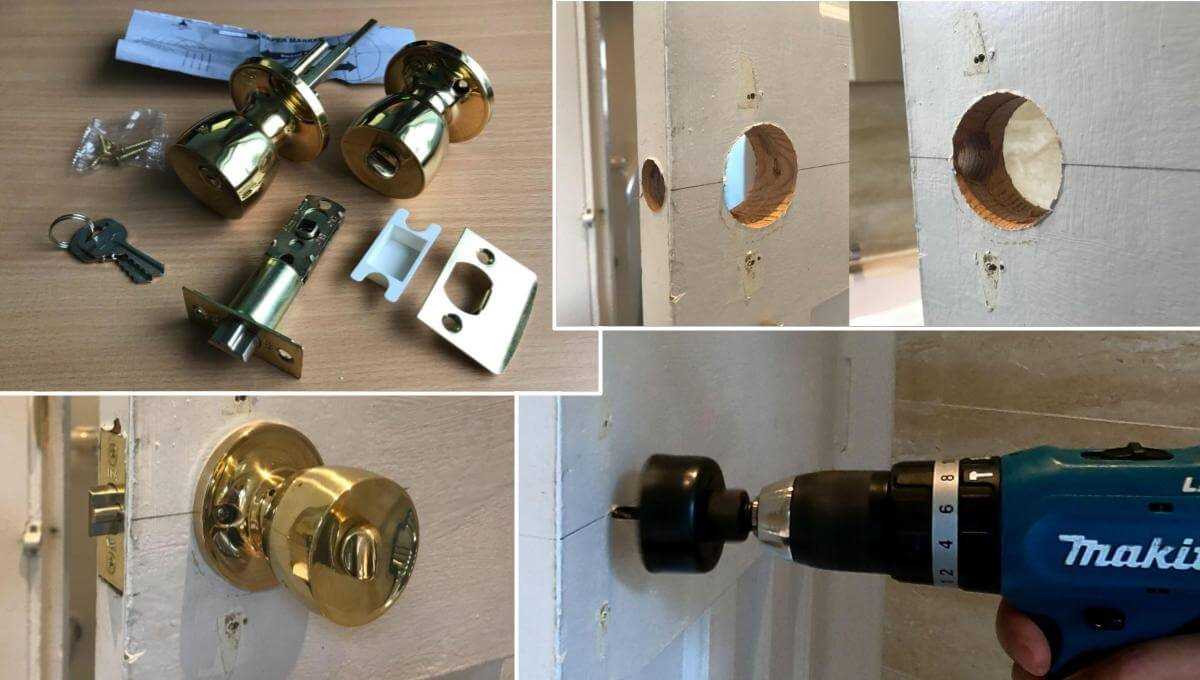
Tools and Materials Needed
Before you start drilling a door latch hole, make sure you have the following tools and materials:
- A drill with a drill bit suitable for drilling through the door material
- A door latch template or a door latch installation kit
- A tape measure or ruler
- A pencil or marker
- A screwdriver
- A chisel
- A hammer
- A door knob or handle
- Screws for attaching the door latch and knob to the door
It is important to choose the right size of drill bit, latch template, and screws for your specific door and latch type. Make sure to read the instructions provided with the latch and template to ensure you have the correct tools and materials.
Additionally, it is always a good idea to wear safety goggles and gloves when using power tools and handling sharp objects.

Step 1: Measure and Mark
Before you begin drilling the latch hole in your door, you need to measure and mark the exact location where the hole will be made. This step is crucial for ensuring that the latch will fit properly and function correctly.
Materials needed:
- Measuring tape or ruler
- Pencil or marker
Instructions:
- Start by measuring the dimensions of your latch mechanism. Take note of the width and height of the latch to determine the size of the hole you will need to drill.
- Next, identify the ideal location on the edge of the door where the latch hole should be positioned. This is typically determined by the pre-drilled holes on the door frame or the position of the existing latch hardware.
- Use your measuring tape or ruler to mark the center point of the latch hole on the edge of the door. Make sure the mark is accurate and clearly visible.
- Measure the required distance from the edge of the door to the center of the latch hole. This measurement will vary depending on the specific latch mechanism you are installing.
- Once you have measured and marked the location of the latch hole, double-check your measurements to ensure accuracy before proceeding to the next step.
By taking the time to measure and mark the correct location for the latch hole, you can ensure that your door will function properly and securely once the latch is installed.

Step 2: Prepare the Drill
Before you begin drilling the door latch hole, it’s important to make sure your drill is properly prepared. Follow these steps to ensure your drill is ready:
- Choose the right drill bit: Select a drill bit that is the correct size for your door latch. The size may vary depending on the brand and type of latch you are installing. Typically, a 2 1/8-inch drill bit is commonly used for most door latches.
- Secure the drill bit: Loosen the chuck on your drill by turning it counterclockwise. Insert the drill bit into the chuck and tighten it by turning the chuck clockwise. Make sure the drill bit is securely fastened and centred.
- Adjust the drill speed: Set your drill to the appropriate speed for the material you are drilling into. For most wooden doors, a medium speed should be sufficient. If you are drilling into a metal door, you may need to use a slower speed.
- Check for any obstructions: Examine the area around the door latch hole to ensure there are no obstructions that could interfere with the drilling process. Remove any hinges or other hardware that may be in the way.
By properly preparing your drill, you can ensure a more precise and efficient drilling experience. Take the time to double-check that everything is in order before moving on to the next step.
Step 3: Set the Depth
Before drilling the latch hole, it is crucial to set the depth of the drill bit. This will ensure that the hole is the perfect size for the latch.
Here are the steps to set the depth:

- Measure the length of the latch plate using a ruler or tape measure.
- Transfer this measurement to the drill bit by wrapping a piece of masking tape around it at the desired depth.
- Make sure the tape is secure and won’t slip during drilling.
- Double-check the depth by holding the drill bit next to the latch plate to ensure it lines up correctly.
By setting the depth correctly, you will avoid drilling too deep or too shallow, which can cause problems with the latch installation.
Note: If the door is made of a particularly hard material, such as metal or solid wood, it may be necessary to adjust the depth to account for the increased resistance.
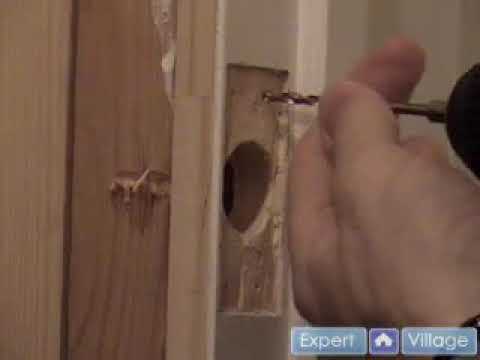
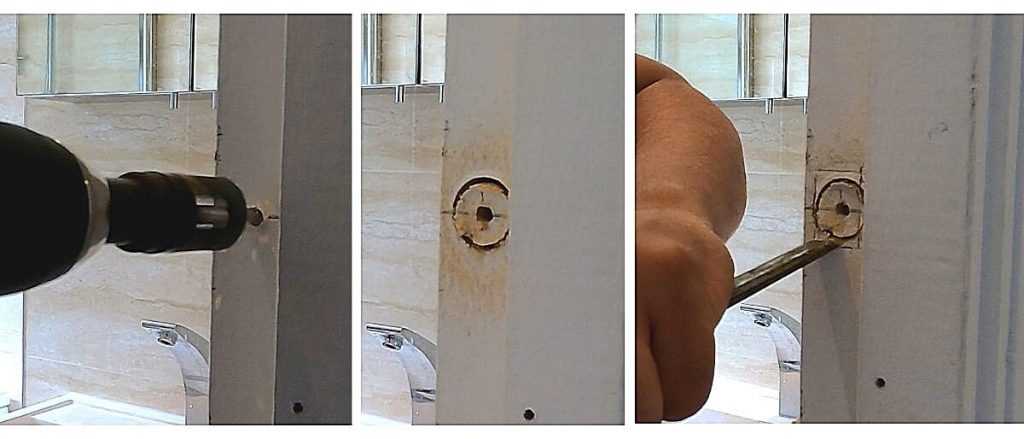
Step 4: Start Drilling
Now that you have prepared the door and marked the center point for the latch hole, it’s time to start drilling. Follow these steps to ensure a clean and precise hole:
- Gather the necessary tools: Before you begin drilling, make sure you have the following tools on hand: a power drill, a drill bit suitable for the latch size, a drill guide or template, painters tape, and a vacuum cleaner or dustpan to clean up any debris.
- Attach the drill bit: Insert the appropriate drill bit into your power drill. Make sure it is securely fastened.
- Secure the door: Place the door on a stable surface, such as a workbench or sawhorses, ensuring that it won’t move or slide while drilling.
- Position the drill guide: If you are using a drill guide or template, align it with the center point mark you made earlier. This will help guide the drill and prevent it from wandering off course.
- Tape the area: To prevent the wood from splintering or chipping, place a strip of painter’s tape over the area where you’ll be drilling. This will provide some extra support and protection for the wood surface.
- Start drilling: Hold the power drill firmly with both hands and position the drill bit on the center point of the door. Apply steady pressure and begin drilling slowly. Let the drill bit do the work and avoid forcing it through the wood.
- Remove the tape: Once the hole is drilled, remove the painter’s tape from the door. This will reveal a clean hole with minimal damage to the surrounding wood.
| Tips: | |
|---|---|
| Use a drill stop: | If you’re concerned about drilling too deeply, consider using a drill stop. This will prevent the drill bit from going too far and potentially damaging the other side of the door. |
| Keep the drill steady: | Ensure that the drill remains vertical and doesn’t tilt to the side while drilling. This will help maintain the precision of the hole and prevent any unwanted angles. |
| Clear debris regularly: | As you drill, periodically stop to clear away any wood chips or debris that may accumulate in the hole. This will prevent the debris from interfering with the drilling process and ensure a clean hole. |
By following these steps, you’ll be well on your way to successfully drilling a latch hole with precision in your door.
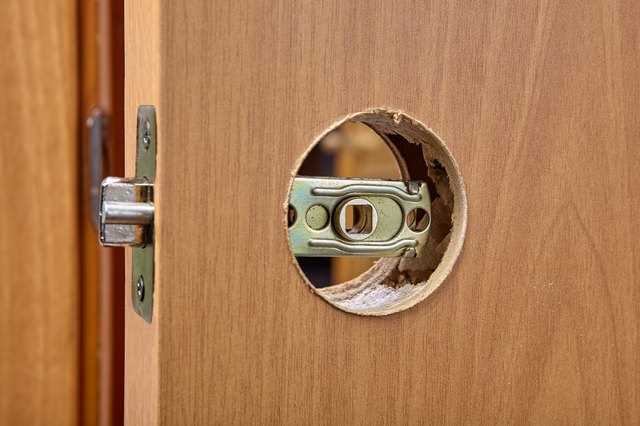
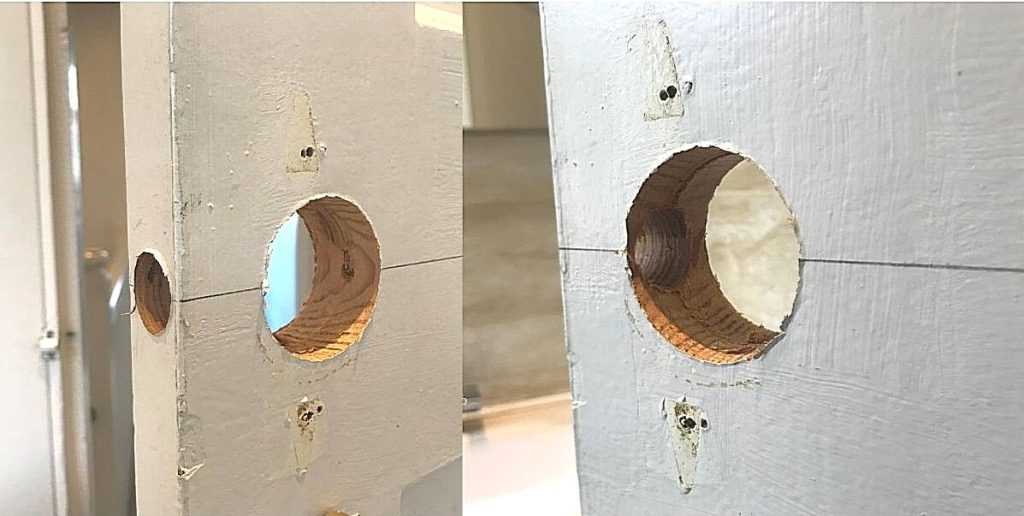
Step 5: Check the Fit
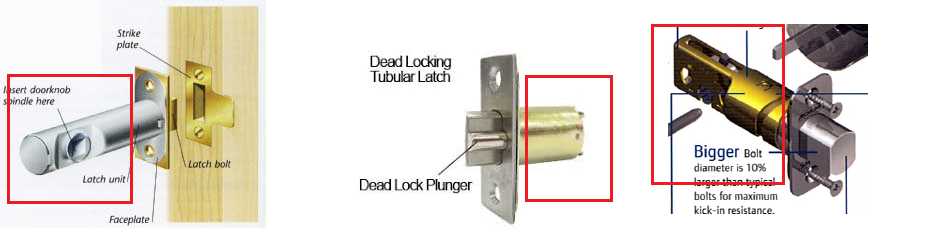
After drilling the latch hole, it’s important to check the fit before proceeding with the installation. This will ensure that the latch lines up correctly with the strike plate and the door closes smoothly.
Here’s how to check the fit:
- Insert the latch into the drilled hole. It should fit snugly without any gaps between the latch and the hole.
- Close the door and turn the handle or knob to engage the latch. The door should latch securely without any resistance or difficulty.
- Open and close the door a few times to test the smoothness of the latch operation. It should move freely without sticking or binding.
- Check the alignment of the latch with the strike plate on the door frame. The latch should align perfectly with the opening of the strike plate for a proper fit.
If you encounter any issues during the fit check, such as a loose latch or misalignment, you may need to adjust the hole or the strike plate to ensure a proper fit. This could involve enlarging the hole slightly or repositioning the strike plate for better alignment.
By checking the fit of the latch before proceeding, you can identify and address any potential problems early on, resulting in a well-functioning and secure door latch installation.
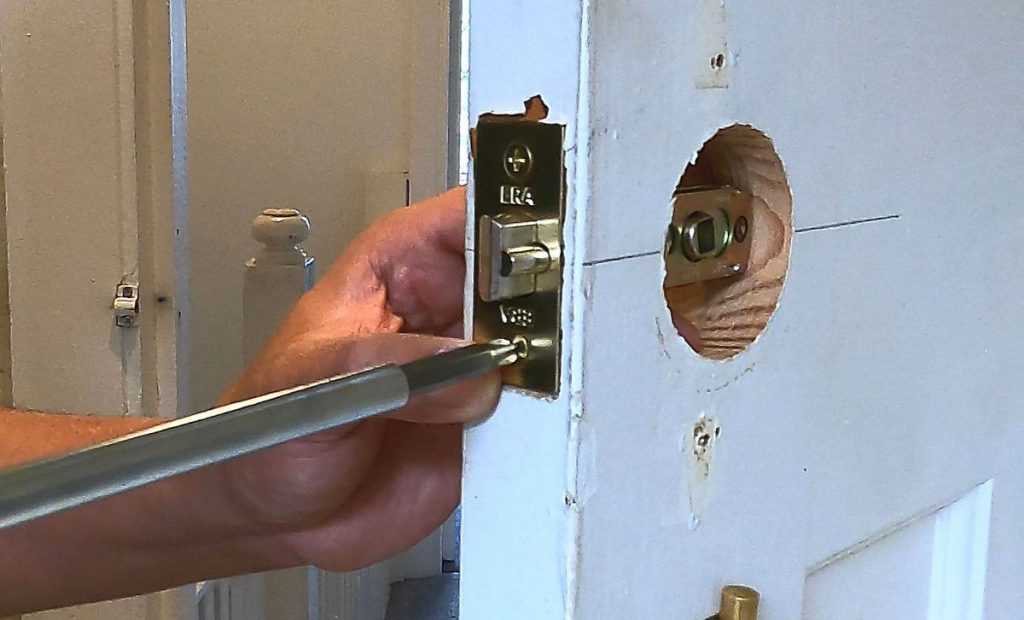
Step 6: Install the Latch

After successfully drilling the latch hole, it’s time to install the latch on your door. Follow these steps to ensure a proper installation:
- Place the latch plate on the edge of the door frame, aligning it with the hole you drilled.
- Ensure that the latch plate sits flush against the door frame without any gaps.
- Secure the latch plate in place by inserting the screws into the pre-drilled holes and tightening them using a screwdriver or drill.
Make sure that the latch plate is securely attached to the door frame to avoid any wiggling or movement.
Next, insert the latch mechanism into the latch hole on the door, aligning it with the latch plate on the door frame. The latch should fit snugly into the hole.
Once the latch is in place, test it by closing the door and checking if the latch properly engages with the strike plate on the door frame. If the latch doesn’t align correctly, make any necessary adjustments to ensure a proper fit.
Finally, test the latch several times to ensure it operates smoothly and securely. If there are any issues with the latch, make the necessary adjustments or consult a professional for assistance.
With the latch successfully installed, your door is now ready for use. Enjoy the added security and convenience that a properly installed latch provides!
Step 7: Test the Latch
Once you have drilled the latch hole, it’s important to test the latch to ensure it functions properly before proceeding any further.
Tools and Materials
- Drill
- Door latch
- Screwdriver
- Door
Instructions
- Take the door latch and insert it into the hole you just drilled.
- Secure the latch in place using the provided screws and a screwdriver.
- Close the door and attempt to turn the latch handle.
- Check if the latch engages smoothly and securely into the strike plate.
- If the latch doesn’t engage properly or there is difficulty turning the handle, you may need to adjust the placement of the strike plate or the depth of the latch hole.
- Make any necessary adjustments and retest the latch until it functions properly.
Testing the latch ensures that the hole was drilled correctly and that the latch is aligned properly with the strike plate. It’s important to have a well-functioning latch for proper security and convenience.
Step 8: Finish and Clean Up
Once you have successfully drilled the latch hole, it’s time to finish up the installation process and clean up any mess that may have been made. Follow these steps to complete the process:
- Remove the door latch template: Carefully remove the door latch template from the door. Take your time to avoid damaging the door or the newly drilled hole.
- Inspect the drilled hole: Take a moment to inspect the drilled hole to ensure that it is clean, smooth, and free from any debris or wood chips. Use a brush or a clean cloth to remove any excess sawdust or debris that may be present.
- Test the fit: Insert the door latch into the newly drilled hole and test the fit. The latch should slide smoothly into place without any resistance. If there is any difficulty or tightness, use a chisel or sandpaper to carefully adjust the hole until the latch fits properly.
- Secure the door latch: Once the fit is correct, secure the door latch in place using the screws provided with the latch kit. Ensure that the latch is securely fastened to the door, but be careful not to overtighten the screws, as this could damage the latch or the door.
- Test the latch: After securing the latch, test it to make sure it functions properly. Open and close the door several times to ensure that the latch engages and disengages smoothly without sticking or jamming.
- Clean up: Finally, clean up the work area by disposing of any debris or sawdust that was generated during the drilling process. Use a vacuum or a broom and dustpan to sweep up any mess on the floor or work surface.
By following these steps, you will be able to complete the door latch installation process with precision and ensure that the latch functions correctly. It’s always a good idea to double-check your work and make any necessary adjustments before considering the installation complete.
FAQ:
What tools do I need to drill a door latch hole?
You will need a drill, a hole saw, a tape measure, a marker, and a chisel.
Can I drill the hole without using a hole saw?
No, a hole saw is necessary to create a clean and precise hole for the latch.
What is the first step in drilling a door latch hole?
The first step is to measure and mark the center point of the latch on the edge of the door.
How do I ensure that the hole is drilled at the correct depth?
You can use a piece of tape on the drill bit to mark the desired depth, ensuring that you don’t drill too deep.
Should I drill all the way through the door?
No, you should only drill halfway through the door, and then finish the hole from the other side to avoid splintering the wood.
Do I need to chisel out the sides of the hole?
Yes, after drilling the hole, you will need to use a chisel to remove any remaining material and create a perfect rectangular shape for the latch.
Can I use this guide to drill a latch hole in a metal door?
No, this guide is specifically for drilling latch holes in wooden doors. For metal doors, you would need different tools and techniques.
Video:


Meet Harrison Clayton, a distinguished author and home remodeling enthusiast whose expertise in the realm of renovation is second to none. With a passion for transforming houses into inviting homes, Harrison's writing at https://thehuts-eastbourne.co.uk/ brings a breath of fresh inspiration to the world of home improvement. Whether you're looking to revamp a small corner of your abode or embark on a complete home transformation, Harrison's articles provide the essential expertise and creative flair to turn your visions into reality. So, dive into the captivating world of home remodeling with Harrison Clayton and unlock the full potential of your living space with every word he writes.


