Step-by-Step Guide: How to Drill a Coconut

Coconut is a versatile and delicious fruit that can be used in a variety of dishes, from desserts to savory meals. However, opening a coconut can be a daunting task if you don’t know the proper technique. In this step-by-step guide, we will walk you through the process of drilling a coconut so you can enjoy its refreshing water and tender flesh.
Step 1: Gather Your Tools
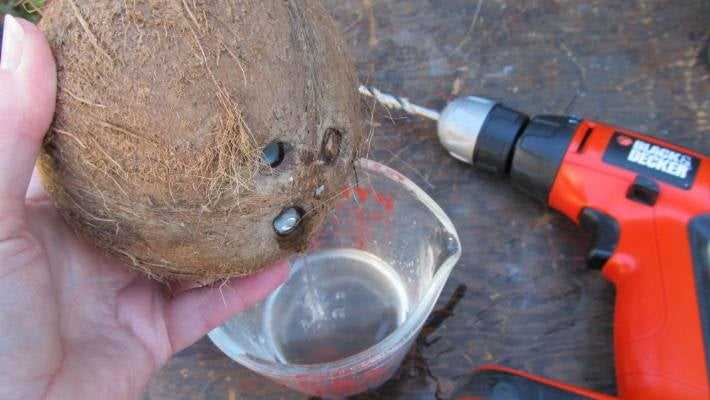
Before you begin, make sure you have the necessary tools. You will need a coconut, a drill with a 3/8-inch drill bit, a hammer, and a bowl to catch the coconut water.
Step 2: Drain the Coconut Water
To start, locate the three eyes on the top of the coconut. These are the soft spots where you will be drilling. Take the pointed end of the drill bit and gently tap it into one of the eyes. Once the drill bit is in, slowly rotate the coconut until you hear the water inside. Position a bowl under the coconut to catch the water as it drains out. Once all the water has drained, set the coconut aside for later use.

Step 3: Crack Open the Coconut
After draining the coconut water, it’s time to crack open the coconut to access the flesh. Hold the coconut firmly with one hand, and with the other, use a hammer to strike the coconut along its equator. Rotate the coconut and continue to strike along the equator until it cracks open. Be careful not to hit too hard, as you don’t want to smash the coconut into pieces.
Step 4: Remove the Flesh
Once the coconut is cracked, use a knife or spoon to carefully pry the flesh away from the shell. Start at the crack and work your way around the coconut, separating the flesh from the shell. The flesh should come away easily, but if it’s still attached in some areas, use a knife to loosen it. Once all the flesh is removed, you can use it in your favorite recipes or eat it as is.
With this step-by-step guide, you can confidently drill a coconut and enjoy its delicious contents. Whether you’re making a tropical cocktail or adding coconut to your favorite curry, fresh coconut adds a unique flavor and texture to any dish.

Tools and Materials

Before you start drilling a coconut, make sure you have the following tools and materials ready:
- A fresh coconut
- A power drill
- A drill bit with a sharp point
- A small bowl or container
- A hammer
- A screwdriver
- A towel or cloth
- Paper towels or kitchen towels
- A knife or coconut scraper (optional)
If you don’t have a power drill, you can also use a hammer and a screwdriver to puncture the coconut. However, using a power drill will make the process faster and easier.
Make sure to have a small bowl or container nearby to collect the coconut water as it comes out of the holes you drill.
It’s also a good idea to have a towel or cloth ready to help stabilize the coconut and protect your hands from slipping while drilling.

If you plan on using the coconut meat, you might also need a knife or coconut scraper to separate the meat from the shell after drilling.
Step 1: Preparing the Coconut
Before you can start drilling a coconut, you need to properly prepare it. This involves removing any outer husk or fiber that may be covering the hard shell. Follow these steps to prepare the coconut:
- Locate the “eyes” of the coconut. These are the three indented spots on one end of the coconut.
- Using a small, sharp knife, carefully pierce one of the eyes. Insert the knife into the soft spot and twist it slightly to create a small hole.
- Repeat this process with the other two eyes, so that all three are pierced.
- Turn the coconut upside down and pour out the coconut water that is inside. Catch the water in a separate container if you want to save it for later use.
- Once the coconut water is drained, you can move on to removing the outer husk. Use a sturdy knife or a coconut scraper to carefully peel away the fibers and husk until you are left with just the hard shell.
Now that you have prepared the coconut by removing the husk and draining the water, it is ready for drilling. Follow the next steps to learn how to drill a hole into the coconut shell.
Step 2: Marking the Drilling Spot

Before you start drilling into the coconut, it’s important to mark the spot where you will be drilling. This will ensure that the hole ends up exactly where you want it to be.
Here’s how you can mark the drilling spot:
- Place the coconut on a stable surface to prevent it from rolling or moving around while you are marking the spot.
- Grab a marker or a pen that can easily mark on the coconut’s surface.
- Gently hold the coconut with one hand to prevent it from rolling, and use the other hand to mark the spot where you want to drill the hole.
- Make sure to choose a spot that is convenient for you to insert a straw or pour out the coconut water.
- Consider the size of the straw or the utensil that you will be using to extract the water. It should fit comfortably into the hole.
- If you are planning to use a drill press or a similar drilling tool, you can also use a center punch to create a small indentation at the center of the drilling spot. This will help guide the drill bit and prevent it from slipping.
By carefully marking the drilling spot, you can ensure that the hole is in the right place and that you have easy access to the coconut water inside.
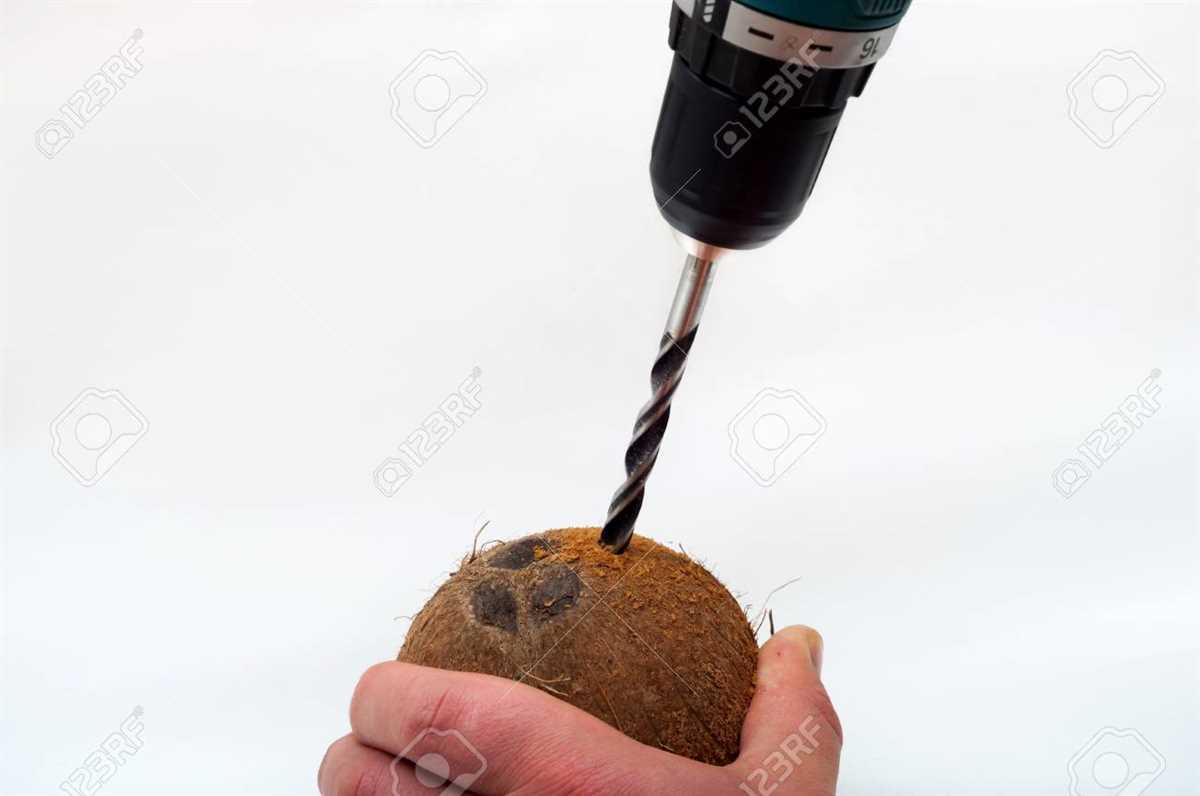
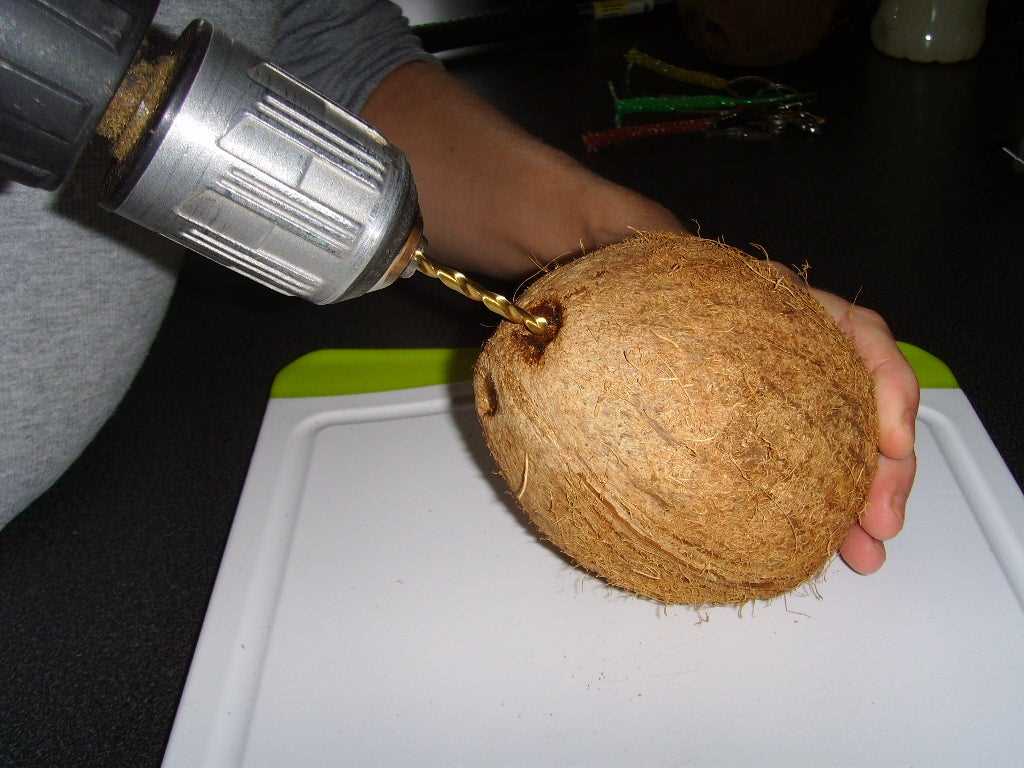
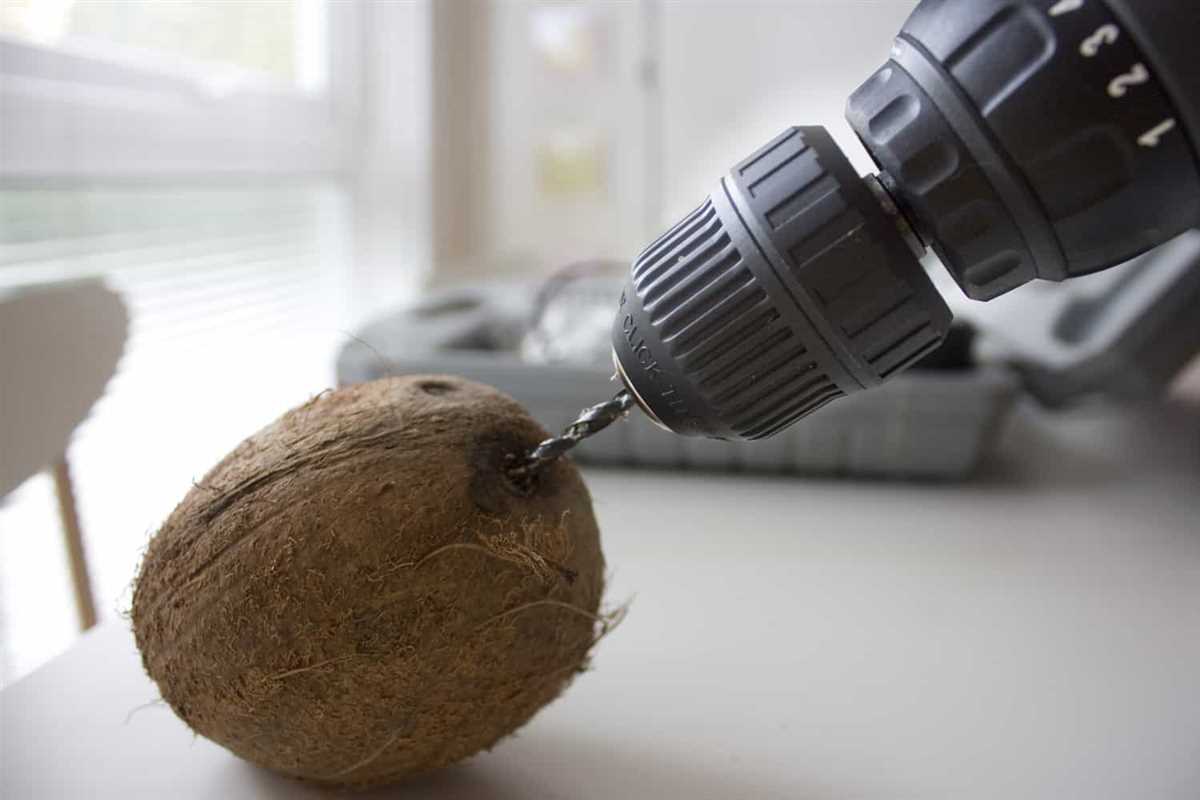
Step 3: Drilling the Coconut
Once you have prepared your tools and selected a safe and stable work surface, it’s time to drill into the coconut. Follow the steps below to complete this task:

- Position the coconut on the work surface with one of the eyes facing up. The eyes are the small, round, indentations on the surface of the coconut.
- Using a handheld drill with a small drill bit, carefully place the tip of the bit into one of the eyes of the coconut.
- Apply gentle pressure and begin drilling into the coconut. Make sure to keep the drill perpendicular to the coconut to ensure a straight hole.
- Continue drilling until the drill bit has penetrated the hard shell of the coconut.
- Once the drill bit is securely inside the coconut, you can start to rotate it back and forth to create a larger hole.
- Be sure to stop drilling periodically and remove any coconut debris that may accumulate in the hole.
- Continue drilling and rotating the bit until you have reached the desired size of the hole.
- Once the hole is drilled, carefully remove the drill bit from the coconut and set it aside.
Your coconut is now ready to be used for various recipes or crafts. Remember to exercise caution when handling the drill and the coconut to avoid any injuries.
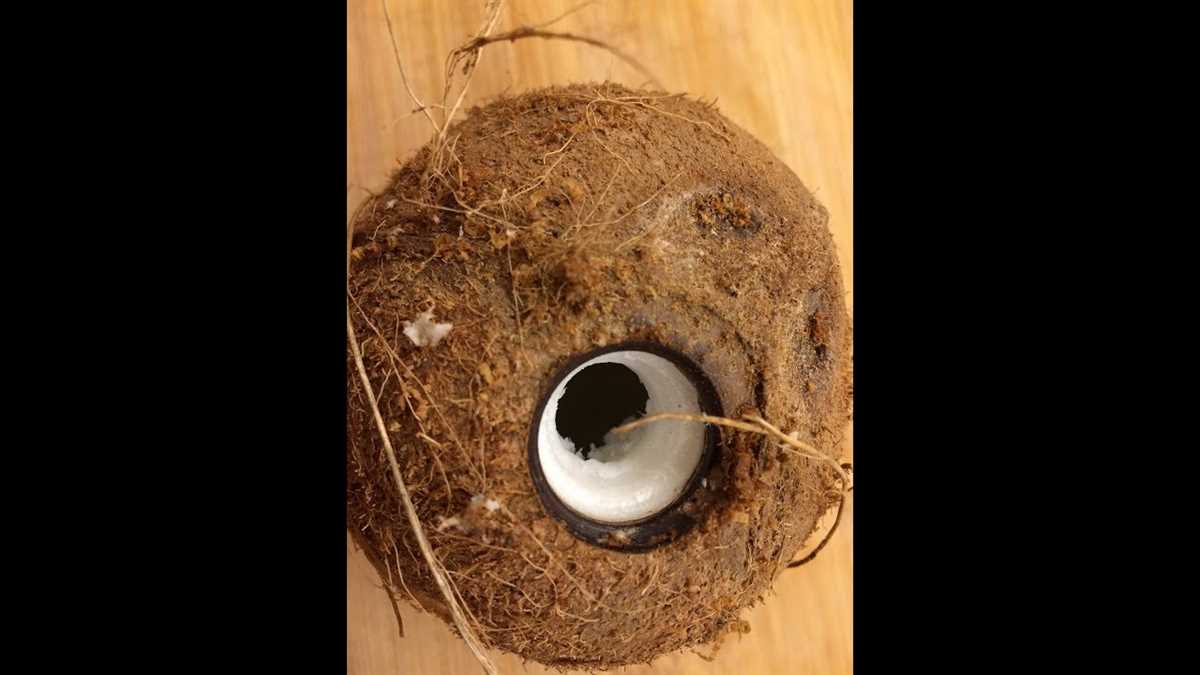
Step 4: Removing the Drilled Coconut Water
After successfully drilling a hole in the coconut, it’s time to remove the coconut water. Follow these steps:
- Hold the coconut upside down over a container to catch the water.
- Gently tap the back of the coconut with a spoon or a mallet.
- Continue tapping until all the coconut water has poured out.
- Once all the water has been removed, set the coconut aside.
Removing the coconut water is an important step before proceeding with other preparations or enjoying the coconut. The water inside the coconut can be used in various recipes or simply enjoyed as a refreshing drink.
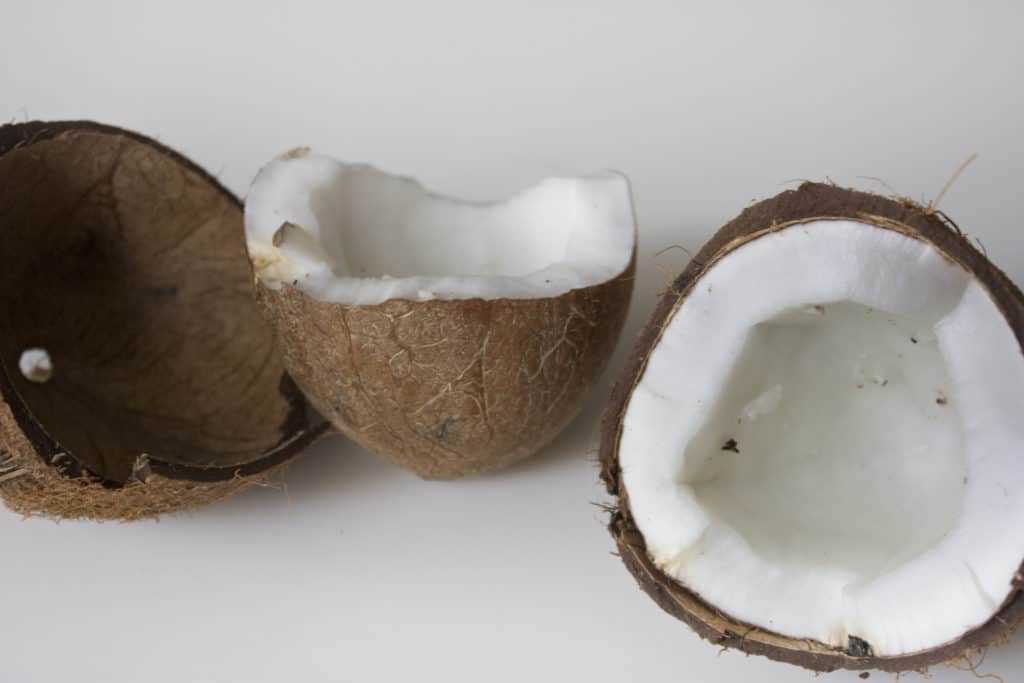
Step 5: Separating the Coconut Meat

Once you have successfully cracked the coconut open, it’s time to separate the meat from the shell. Here’s how you can do it:
- Using a butter knife or a similar blunt object, gently pry the coconut meat away from the shell. Start at one end and work your way around the edges.
- Continue prying until the meat is completely separated from the shell. Be careful not to apply too much pressure, as you don’t want to damage the meat.
- Once the coconut meat is free, use your hands to pull it away from any remaining bits of shell. You may need to use a bit of force, but be gentle to avoid squishing or breaking the meat.
- If there are any brown pieces of skin still attached to the meat, you can use a paring knife to carefully remove them. Take your time and be cautious to avoid cutting yourself.
Now that you have successfully separated the coconut meat from the shell, you can enjoy it in its natural form or use it in various recipes. Remember to store any unused coconut meat in an airtight container in the refrigerator to keep it fresh.
Step 6: Drying the Coconut Meat
After removing the coconut meat from the shell, it is important to dry it properly. Drying the coconut meat helps to extend its shelf life and make it easier to use in recipes.
Here are the steps to dry the coconut meat:
- Take the coconut meat and cut it into small pieces. The size of the pieces will depend on your preference and how you plan to use the dried coconut meat.
- Spread the coconut pieces evenly on a baking sheet or a clean, flat surface.
- Place the baking sheet or surface in a well-ventilated area, away from direct sunlight.
- Allow the coconut meat to air dry for at least 24 hours, or until it becomes hard and dry to the touch.
- You can also use a food dehydrator or oven to speed up the drying process. If using a food dehydrator, follow the manufacturer’s instructions. If using an oven, set it to the lowest temperature and leave the coconut meat inside for several hours, checking regularly until it is fully dried.
Tips for drying coconut meat:
- Make sure the coconut meat is evenly spread out to ensure even drying.
- If you are using an oven, keep the door slightly ajar to allow moisture to escape.
- Check the coconut meat regularly during the drying process to prevent it from becoming too dry or burnt.
- Store the dried coconut meat in an airtight container in a cool, dry place.
| Method | Drying Time |
|---|---|
| Air drying | 24 hours or more |
| Food dehydrator | 8-12 hours |
| Oven drying | 4-6 hours |
Step 7: Storing the Drilled Coconut
Once you have successfully drilled a hole in your coconut and extracted the water and meat, you may want to store the remaining coconut for later use. Proper storage will ensure that the coconut stays fresh and doesn’t spoil.
Materials Needed:
- Drilled coconut
- Ziplock bag or airtight container
- Refrigerator or freezer
Instructions:
- Make sure the drilled coconut is completely dry to avoid any moisture buildup that may cause spoilage.
- Place the coconut in a ziplock bag or an airtight container.
- Seal the bag or container tightly to prevent air and moisture from entering.
- If storing in the refrigerator, place the bag or container in the crisper drawer or the coldest part of the fridge.
- If storing in the freezer, make sure the coconut is wrapped tightly to prevent freezer burn.
- Label the bag or container with the date of storage to keep track of its freshness.
- The coconut can be stored in the refrigerator for up to 7 days and in the freezer for up to 6 months.
By properly storing your drilled coconut, you can enjoy its freshness and nutrition whenever you need it!
FAQ:
Why would I want to drill a coconut?
Drilling a coconut allows you to easily access the water and meat inside. The water can be used as a refreshing drink or in recipes, while the meat can be grated or used in various dishes.
What tools do I need to drill a coconut?
To drill a coconut, you will need a power drill with a small drill bit, a hammer, a small nail or awl, and a sturdy work surface. Additionally, you may need a towel or cloth to protect your hands while handling the coconut.
Can I use a regular drill bit to drill a coconut?
No, you should not use a regular drill bit to drill a coconut. It is best to use a small drill bit specifically designed for drilling through hard materials like coconuts. Using a regular drill bit can cause the coconut to crack or shatter.
How do I select a good coconut for drilling?
Look for a coconut that feels heavy for its size and has no visible cracks or mold. Shake the coconut to ensure there is water inside. Avoid coconuts with soft spots or ones that sound empty when shaken.
What is the best technique for drilling a coconut?
The best technique for drilling a coconut is to start by finding the softest eye of the coconut. Use a hammer and a small nail or awl to gently tap through the soft eye. Once you have created a small hole, switch to the drill and slowly drill through the hole, applying gentle pressure.
What should I do if the coconut starts cracking while drilling?
If the coconut starts cracking while drilling, immediately stop drilling and set it aside. It is likely that the drill bit has hit a hard spot or the coconut was not properly prepared. You can try drilling another hole in a different eye or opening the coconut using other methods.
How do I open the coconut after drilling?
After drilling a hole in the coconut, you can open it by inserting a spoon or knife into the hole and prying it open. Alternatively, you can place the coconut in a plastic bag and hit it with a hammer to crack it open. Be sure to collect the coconut water and remove the meat for use.
Video:


Meet Harrison Clayton, a distinguished author and home remodeling enthusiast whose expertise in the realm of renovation is second to none. With a passion for transforming houses into inviting homes, Harrison's writing at https://thehuts-eastbourne.co.uk/ brings a breath of fresh inspiration to the world of home improvement. Whether you're looking to revamp a small corner of your abode or embark on a complete home transformation, Harrison's articles provide the essential expertise and creative flair to turn your visions into reality. So, dive into the captivating world of home remodeling with Harrison Clayton and unlock the full potential of your living space with every word he writes.


