Step-by-Step Guide for Drilling Lag Bolts

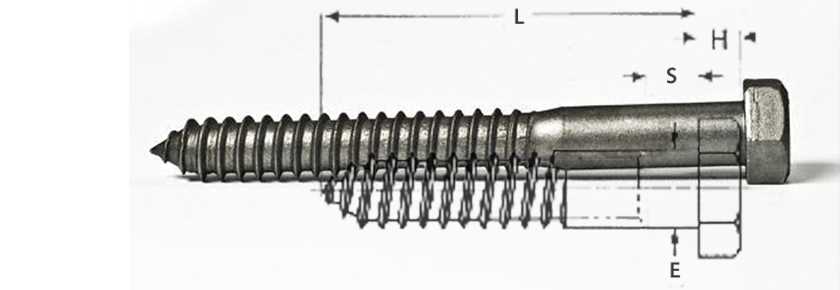
If you’re looking to securely attach heavy objects to wood, lag bolts are an excellent choice. Lag bolts, also known as lag screws, are large bolts that feature a hexagonal head and a pointed tip. They are designed to be used with a wrench or screwdriver, providing exceptional strength and stability. However, to install lag bolts properly, you’ll need to follow a step-by-step guide to ensure a safe and secure attachment.
Step 1: Measure and Mark
Start by measuring and marking the exact location where you want to install the lag bolt. Use a tape measure to ensure accuracy, and use a pencil or marker to make clear marks.
Step 2: Choose the Right Drill Bit
Next, choose the right drill bit. The size of the drill bit should be slightly smaller than the diameter of the lag bolt. This will allow for a tight fit and prevent the wood from splitting.
Step 3: Drill Pilot Holes
With the appropriate drill bit, drill pilot holes into the marked spots. Pilot holes are essential as they serve to guide the lag bolts into the wood, preventing them from veering off course.
Step 4: Lubricate the Lag Bolt

Apply a small amount of lubricant, such as soap or oil, to the threads of the lag bolt. This will make it easier to drive the bolt into the pilot hole without damaging the threads.
Step 5: Drive the Lag Bolt
Using a wrench or screwdriver, start driving the lag bolt into the pilot hole. Apply strong and steady pressure until the lag bolt is fully inserted and secure in the wood.
By following this step-by-step guide, you’ll be able to drill lag bolts effectively and safely. Remember to always prioritize safety by wearing protective gear, using the right tools, and taking necessary precautions. With lag bolts, you can confidently attach heavy objects to wood, knowing that they’ll remain securely in place.
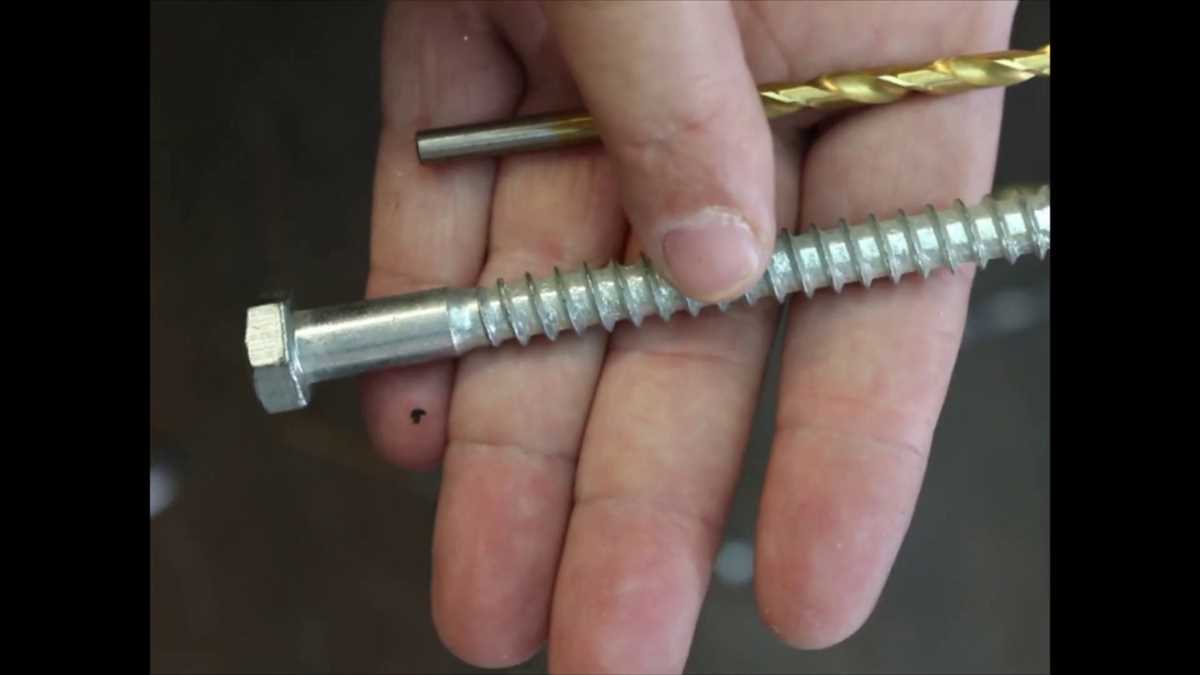
Choosing the Right Drill Bit Size
Choosing the right drill bit size is crucial when drilling lag bolts. The size of the drill bit will determine the size of the hole that needs to be drilled into the material in order for the lag bolt to fit properly.
Here are some steps to help you choose the right drill bit size:
- Check the Lag Bolt Size: Before selecting a drill bit, you need to know the size of the lag bolt you will be using. Lag bolts come in various sizes, so it’s important to match the drill bit size to the bolt size.
- Measure the Bolt Diameter: Use a caliper or measuring tape to measure the diameter of the lag bolt. This will give you the exact size you need to match when selecting a drill bit.
- Choose a Drill Bit Diameter: Once you know the bolt diameter, choose a drill bit that is slightly smaller in diameter. This will ensure a snug fit for the lag bolt. For example, if the bolt diameter is 1/2 inch, you may want to choose a 7/16 inch or 3/8 inch drill bit.
- Consider the Material: The material you are drilling into will also impact the choice of drill bit size. Softer materials may require a slightly smaller drill bit, while harder materials may require a slightly larger drill bit.
- Test Fit and Adjust: It’s always a good idea to test the fit of the lag bolt before drilling the entire hole. If the bolt is too loose or too tight, you may need to adjust the drill bit size accordingly.
Remember, choosing the right drill bit size is important to ensure a secure and properly fitting lag bolt installation. Taking the time to select the correct size will help prevent any issues or potential damage down the line.

Marking the Drill Hole
Before drilling the hole for the lag bolt, it is important to mark the precise location where the hole will be drilled. This will ensure that the lag bolt is properly aligned and will be secure once installed.
Here are the steps to marking the drill hole for a lag bolt:
- Gather the necessary tools: To mark the drill hole, you will need a tape measure, pencil, and a square or straightedge.
- Measure and mark the desired location: Use the tape measure to determine the exact location where the lag bolt will be installed. Mark this spot with a pencil.
- Ensure the marking is level and aligned: Use the square or straightedge to make sure the marking is level and aligned correctly. This will ensure that the lag bolt will be inserted straight into the material.
- Double-check the placement: Take a step back and double-check the placement of the marking. Make any necessary adjustments to ensure it is in the correct position.
Once the drill hole has been properly marked, you can proceed with drilling the hole for the lag bolt. Remember to always follow safety precautions and use the appropriate tools for the job.
Preparing the Drill
Before starting to drill lag bolts, there are a few important steps you need to take to prepare your drill. Following these steps will ensure that you have the right tools and equipment and that your drill is ready for the job.
- Gather the necessary tools: Make sure you have all the tools you will need for drilling lag bolts. This includes a power drill, drill bits suitable for lag bolts, a wrench or socket set to tighten the bolts, and safety glasses.
- Choose the correct drill bit size: Select a drill bit that matches the diameter of your lag bolts. Lag bolts typically require a larger-sized bit compared to regular screws due to their larger diameter.
- Secure the drill bit in the drill chuck: Open the chuck of your drill and insert the appropriate drill bit. Tighten the chuck securely to ensure the bit won’t slip or come loose during drilling.
- Check the drill’s battery or power source: If you are using a cordless drill, make sure the battery is fully charged or replace it with a charged one. If you are using a corded drill, ensure that it is plugged into a suitable power source.
- Ensure a stable working surface: It is important to have a stable work surface when drilling lag bolts. If you are working on a bench or table, make sure it is secured firmly. If you are drilling in a wall or other vertical surface, use clamps or other stabilizers to prevent the surface from moving.
- Wear safety glasses: Always protect your eyes when drilling. Wear safety glasses or goggles to prevent any potential debris or particles from entering your eyes.
- Prepare the drilling area: Clear the area where you will be drilling and remove any obstacles or clutter. This will ensure that you have enough working space and prevent any accidents or damage.
By following these steps, you will be well-prepared to begin drilling lag bolts. Taking the time to properly prepare your drill and workspace will help ensure the success and safety of your drilling project.

Securing the Material
Before drilling the lag bolts, it is important to properly secure the material you are working with. This will ensure stability and prevent any accidents while drilling. Here are the steps to secure the material:
1. Choose a Suitable Work Surface

Select a work surface that is sturdy and stable. Ideally, choose a strong wooden table or workbench that can support the weight of the material. Avoid working on surfaces that are weak or wobbly, as this can lead to accidents.
2. Clamp the Material
Use clamps to secure the material to the work surface. Position the material in the desired location and use clamps to firmly hold it in place. This will prevent any movement or shifting while drilling and ensure accurate placement of the lag bolts.

3. Mark the Drill Points
Measure and mark the drill points on the material where you want to insert the lag bolts. Use a tape measure and a pencil to ensure accurate measurements. Marking the drill points will also help guide your drilling process.
4. Support the Material
If the material is large or heavy, it may be necessary to provide additional support. Use shims or other supporting materials to stabilize the material and prevent it from sagging or bending during the drilling process. This will ensure that the lag bolts are inserted into a stable and secure surface.
By following these steps to secure the material, you can ensure stability and accuracy when drilling lag bolts. This will result in a stronger and more durable connection between the materials.
Drilling the Pilot Hole
Before drilling the pilot hole for your lag bolt, there are a few factors to consider:
- Size of the Bolt: The size of the pilot hole will depend on the diameter of the lag bolt you are using. Refer to the manufacturer’s instructions or consult a drill bit size chart to determine the correct size.
- Material: The material you are drilling into will also impact the size of the pilot hole. For softer materials, such as wood or plastic, a smaller pilot hole may be sufficient. However, for harder materials like metal or masonry, a larger pilot hole may be necessary.
- Depth: Consider the length of the lag bolt and determine how deep you need the pilot hole to be. It should be slightly shorter than the length of the bolt to ensure a secure fit.
To drill the pilot hole:

- Mark the Location: Use a pencil or marker to mark the exact location where you want to drill the hole.
- Secure the Workpiece: If necessary, clamp or secure the workpiece to prevent it from moving or shifting during drilling.
- Select the Drill Bit: Choose a drill bit that matches the size of the pilot hole you need to create.
- Attach the Bit: Insert the drill bit into the chuck of the drill and tighten it securely.
- Put on Safety Gear: Wear safety goggles and gloves to protect yourself from flying debris.
- Start Drilling: Position the drill bit on the marked location and apply steady pressure as you begin drilling. Use a moderate speed to prevent the bit from overheating.
- Control the Depth: Monitor the depth of the hole by periodically stopping and checking the depth with a measuring tool or the lag bolt itself.
- Clear the Debris: Remove the drill bit from the hole as needed to clear out any debris that may accumulate.
- Complete the Pilot Hole: Continue drilling until the pilot hole reaches the desired depth.
Once you have drilled the pilot hole, you are ready to proceed with the next steps of installing the lag bolt.
Removing Dust and Debris
Before drilling lag bolts, it is important to ensure that the drilling area is free from any dust or debris. This will help to prevent any potential damage to the drill, as well as ensure a cleaner and more accurate drilling process.
Tools and Materials Needed:
- Dust brush or broom
- Vacuum cleaner with brush attachment
- Cloth or rag
Step 1: Clear the Area
Remove any objects or obstacles from the drilling area to create a clear workspace.
Step 2: Sweep or Brush the Surface
Use a dust brush or broom to sweep away any loose debris or dust from the surface. Pay attention to corners and hard-to-reach areas.
Step 3: Vacuum the Surface
Use a vacuum cleaner with a brush attachment to clean the surface and remove any remaining smaller particles. Move the vacuum cleaner back and forth over the drilling area to ensure thorough cleaning.

Step 4: Wipe Off Any Residue
Use a clean cloth or rag to wipe off any remaining residue or dust on the surface. This will ensure a clean and smooth drilling process.
Step 5: Inspect the Surface
Take a final look at the surface to ensure that it is clean and free from any debris or dust. If necessary, repeat the cleaning process until the surface is completely clear.
Inserting the Lag Bolt
Once you have prepared the hole and gathered all the necessary tools and materials, you are ready to insert the lag bolt.
Step 1: Position the Bolt
Hold the lag bolt in one hand, making sure the threaded end is facing upwards. Position the bolt at the entrance of the pre-drilled hole. Ensure that the bolt is aligned straight with the hole.

Step 2: Apply Pressure
Using a socket wrench or an adjustable wrench, apply downward pressure on the lag bolt while turning it clockwise. This will start threading the bolt into the wood.
Step 3: Drive the Bolt
Continue turning the bolt clockwise until it is fully driven into the wood. Make sure to maintain a steady and even pressure throughout the process to prevent any slippage or damage.
Step 4: Tighten the Bolt
Once the lag bolt is fully inserted into the wood, use the socket wrench or adjustable wrench to tighten it further. Apply a firm but controlled force to ensure the bolt is securely fastened.
Step 5: Repeat for Additional Bolts
If you are installing multiple lag bolts, repeat the above steps for each bolt. Make sure to evenly distribute the bolts for maximum stability and strength.
Step 6: Test Stability
After all the lag bolts have been inserted and tightened, test the stability of the structure by applying gentle pressure or weight to it. If the bolts are properly installed, the structure should be secure and rigid.
Inserting lag bolts properly is crucial for ensuring the stability and safety of any structure. Following these step-by-step instructions will help you achieve a secure and long-lasting installation.
Tightening the Lag Bolt
After drilling the pilot hole and inserting the lag bolt, it’s important to properly tighten it to ensure a secure fastening. Here are the steps to follow:
- Use a socket wrench or an impact driver fitted with the appropriate sized socket to tighten the lag bolt.
- Securely hold the wrench or driver and position it so that it is perpendicular to the bolt.
- Apply steady pressure while turning the wrench or driver clockwise to tighten the bolt.
- Continue tightening until the bolt is fully secured and flush against the surface.
- Be careful not to overtighten the lag bolt, as this can strip the threads or cause the bolt to break.
- If necessary, use a torque wrench to ensure the bolt is tightened to the manufacturer’s recommended torque specification.
Remember, it’s crucial to properly tighten the lag bolt to ensure the stability and strength of the fastened joint. If the bolt is not tightened enough, it may come loose over time, posing a safety hazard. Conversely, overtightening the bolt can lead to structural damage or failure. Use caution and follow the manufacturer’s instructions or professional advice when tightening lag bolts.
FAQ:
What is a lag bolt and when is it commonly used?
A lag bolt is a large, heavy-duty screw with a threaded shaft and a hexagonal head. It is commonly used to fasten wood to wood or wood to a metal surface, providing strong and secure connections.
What tools do I need to drill lag bolts?
You will need a power drill with a suitable drill bit, a wrench or socket wrench to tighten the bolts, and safety glasses or goggles to protect your eyes.
What size drill bit should I use for lag bolts?
The size of the drill bit depends on the diameter of the lag bolt you are using. It is generally recommended to use a drill bit that is slightly smaller in diameter than the lag bolt to ensure a tight fit.
Can I drill lag bolts into concrete or masonry surfaces?
Lag bolts are not designed to be used in concrete or masonry surfaces. For such applications, it is recommended to use concrete screws or anchors specifically designed for the purpose.
Video:


Best Carcass Saw
Meet Harrison Clayton, a distinguished author and home remodeling enthusiast whose expertise in the realm of renovation is second to none. With a passion for transforming houses into inviting homes, Harrison's writing at https://thehuts-eastbourne.co.uk/ brings a breath of fresh inspiration to the world of home improvement. Whether you're looking to revamp a small corner of your abode or embark on a complete home transformation, Harrison's articles provide the essential expertise and creative flair to turn your visions into reality. So, dive into the captivating world of home remodeling with Harrison Clayton and unlock the full potential of your living space with every word he writes.


