Step-by-step Guide: Drilling New Holes for Drawer Pulls

Are you looking to update the look of your cabinets or drawers? One easy way to give them a fresh and modern look is by changing the drawer pulls. However, if the new pulls have a different hole spacing than the old ones, you’ll need to drill new holes. Don’t worry, it’s easier than you might think! In this step-by-step guide, we’ll walk you through the process of drilling new holes for drawer pulls.
Step 1: Measure and mark
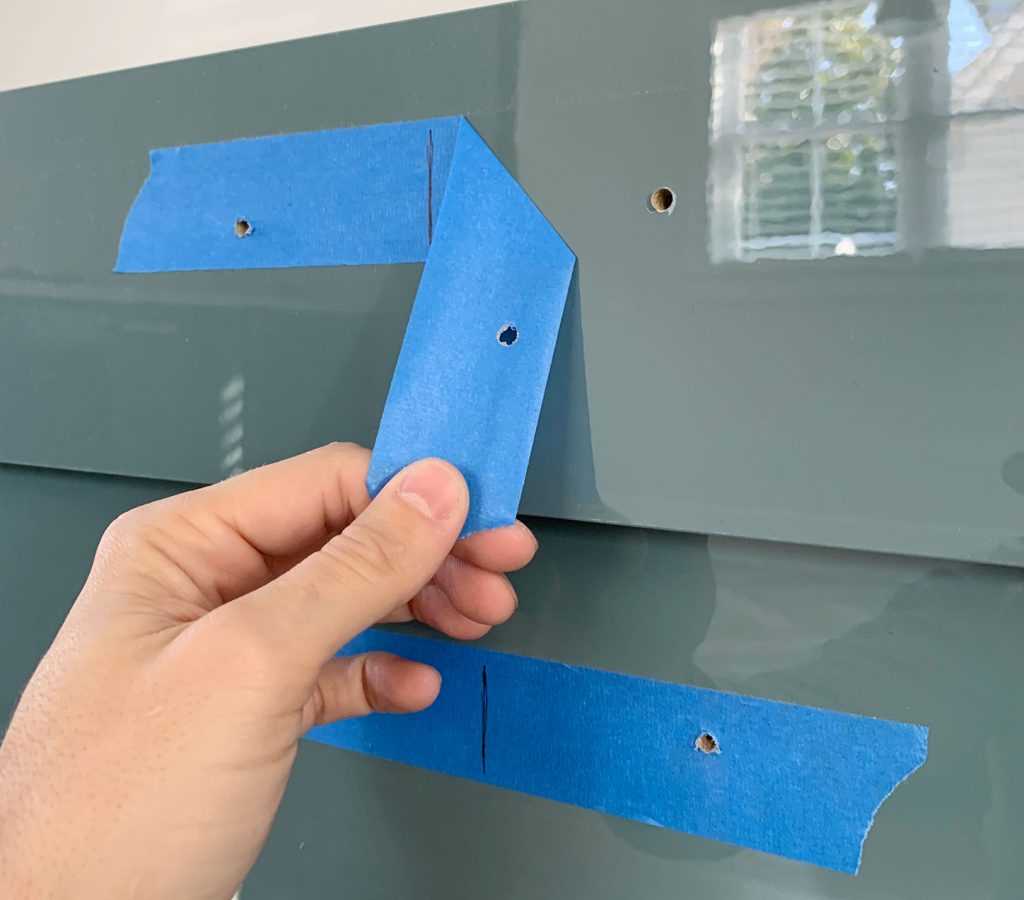
The first step is to measure and mark the locations for the new holes. Using a tape measure or ruler, measure the distance between the center of the existing holes. Transfer these measurements to the area where you want to install the new pulls. Use a pencil or a small piece of tape to mark the spots.
Step 2: Gather your tools
Before you start drilling, make sure you have all the necessary tools on hand. You’ll need a power drill with a drill bit that matches the size of the new holes, a screwdriver bit, masking tape, and a level. If you don’t own a power drill, you can usually rent one from a hardware store.

Step 3: Prepare the surface
Next, prepare the surface where you’ll be drilling. Apply a piece of masking tape over each mark to help prevent the wood from splintering. This will also help keep the drill bit from slipping. Use a level to make sure the marks are straight and level.
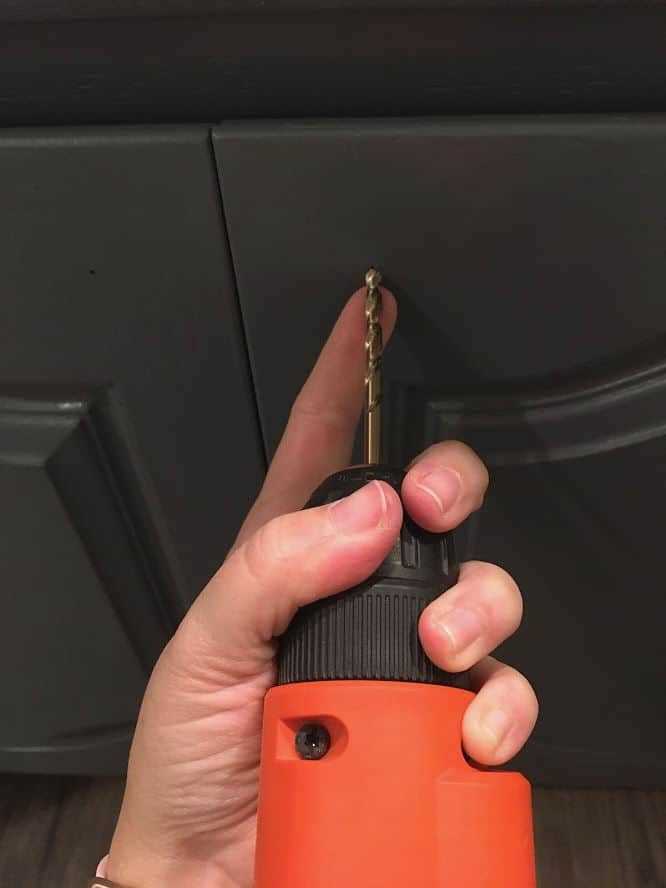
Step 4: Drill the holes
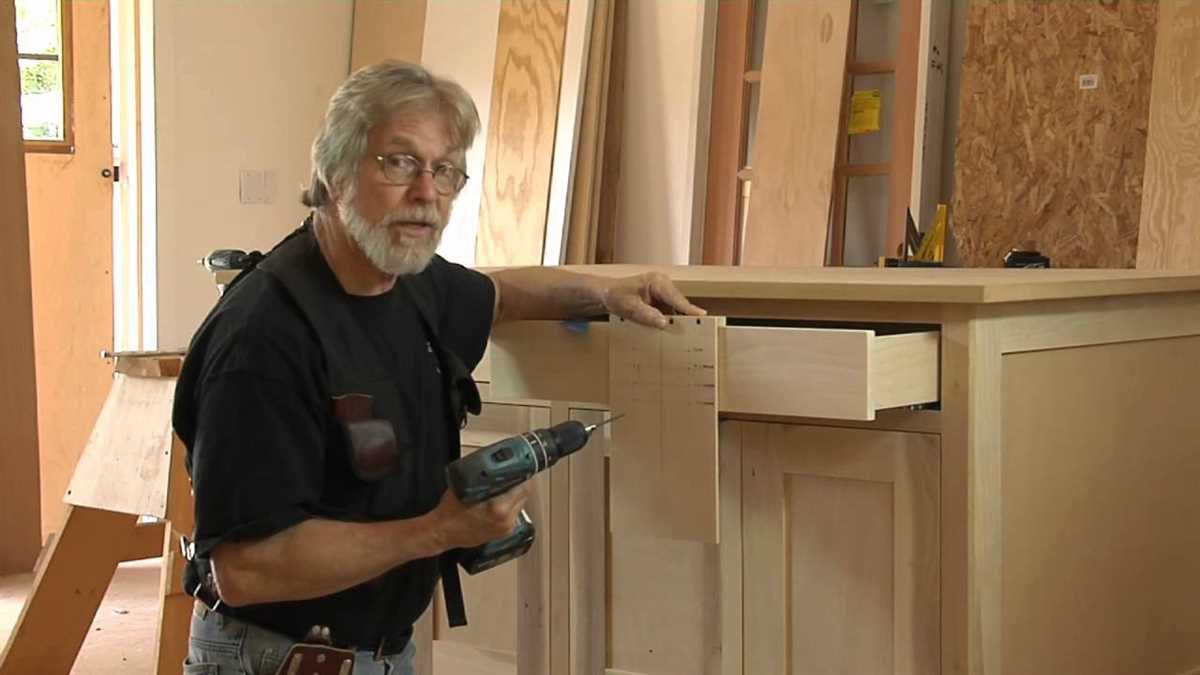
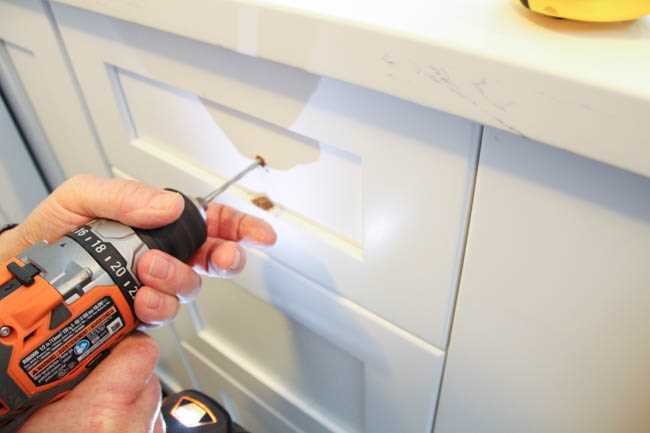
Now it’s time to start drilling. Attach the appropriate-sized drill bit to your power drill and hold it perpendicular to the surface. Start drilling at a slow speed, gradually increasing the speed as you go. Apply steady pressure, but be careful not to push too hard or the drill bit may break through the backside of the wood. Stop drilling when you reach the desired depth.
Step 5: Install the new pulls

Finally, it’s time to install the new drawer pulls. Insert the screw into the hole from the front side and tighten it with a screwdriver or a drill with a screwdriver bit. Repeat this process for each hole, making sure the pulls are securely attached.
Conclusion
By following this step-by-step guide, you can easily drill new holes for drawer pulls and give your cabinets or drawers a fresh new look. Remember to measure and mark carefully, gather the necessary tools, prepare the surface, and install the new pulls with care. With a little time and effort, you’ll have beautifully updated cabinets or drawers that will enhance the overall style of your space.
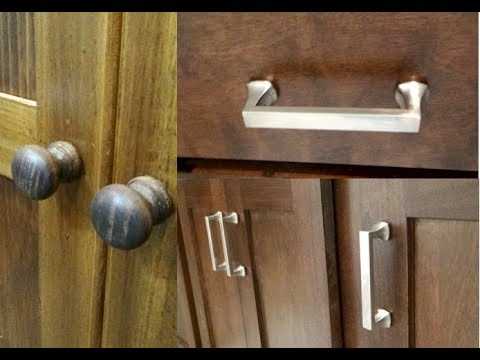
Importance of Properly Positioned Drawer Pulls
Properly positioning drawer pulls is an important aspect of any cabinetry project. Drawer pulls not only serve a functional purpose by allowing easy access to drawers, but they also contribute to the overall aesthetic of the piece. When drawer pulls are not properly positioned, it can create an imbalance and disrupt the visual harmony of the design.
Ergonomic Considerations

One of the main reasons why it is important to position drawer pulls correctly is for ergonomic purposes. Placing the pulls in an optimal location ensures that users can comfortably and efficiently open and close the drawers without straining their wrists or hands. Improper positioning can lead to discomfort and potential long-term health issues.
Aesthetic Appeal
Drawer pulls play a significant role in enhancing the aesthetic appeal of a piece of furniture. They can add a touch of elegance, modernity, or rustic charm to the overall design. Proper positioning ensures that the pulls are visually aligned with other elements of the cabinetry and contribute to a cohesive and pleasing appearance.
Functionality and Accessibility
Correctly positioned drawer pulls make it easier to access the contents of the drawers. When pulls are placed too high or too low, it can make it challenging to grab the handle and open the drawer smoothly. By positioning the pulls at an appropriate height and distance, users can effortlessly open and close the drawers, improving the overall functionality of the cabinetry.

Consistency and Symmetry
Properly positioned drawer pulls contribute to the overall visual balance and symmetry of the design. When the pulls are aligned with other elements, such as knobs or hinges, it creates a sense of harmony and unity. In contrast, incorrectly positioned pulls can create a jarring effect that detracts from the overall quality and appeal of the piece.
Drawers and Cabinet Doors
Consistency in positioning drawer pulls is essential when there are both drawers and cabinet doors in the same cabinetry. By positioning the pulls consistently, it creates a cohesive and unified look across the entire piece. This attention to detail enhances the overall visual appeal of the furniture.
Guidelines for Proper Positioning

Although there are no hard and fast rules for positioning drawer pulls, there are some general guidelines to keep in mind:
- Place the pulls at a height that is comfortable for the average user.
- Consider the size and weight of the drawer pulls in relation to the overall size of the drawers.
- Ensure that the pulls are visually aligned with other hardware elements, such as hinges or knobs.
- Take into account the style and design of the cabinetry when determining the placement of the pulls.
In conclusion
Properly positioned drawer pulls are not only essential for functionality and accessibility, but they also contribute to the overall aesthetic appeal of the cabinetry. By following ergonomic principles and considering design factors, you can achieve a visually pleasing and user-friendly piece of furniture.
Tools and Materials Needed for Drilling New Holes
Before you start drilling new holes for drawer pulls, you will need a few tools and materials to ensure a successful installation. Here is a list of things you will need:

- Drill: A power drill with a suitable drill bit is necessary for drilling the new holes. Make sure the drill is in good working condition.
- Measuring tape or ruler: A measuring tape or ruler will help you measure the distance between the existing holes and determine the placement of the new holes.
- Marking tool: A pencil or marker can be used to mark the location of the new holes on the drawer front.
- Masking tape: Using masking tape can help prevent the drill bit from slipping and creating scratches on the surface of the drawer front.
- Protective eyewear and gloves: It is important to protect your eyes and hands while using power tools. Wear protective eyewear and gloves to ensure safety.
- Dust mask: Drilling can create dust and debris. Wearing a dust mask will help protect you from inhaling the dust particles.
- Proper hardware: Depending on the type of drawer pulls you are installing, you may need screws, washers, and other hardware. Make sure you have the appropriate hardware for a secure installation.
- Level: A level can be useful to ensure that the holes are drilled evenly and the drawer pulls are properly aligned.
- Power source: Ensure that you have a power source nearby or a fully charged battery for your drill.
Having these tools and materials prepared before you start drilling new holes will make the installation process smoother and ensure that you have everything you need to complete the project.
Measuring and Marking the Correct Hole Placement
Before you begin drilling new holes for drawer pulls, you’ll need to measure and mark the correct hole placement. This step is crucial to ensure that your drawer pulls are aligned properly and look symmetrical.
Here are the steps to measure and mark the correct hole placement:
- Measure the width of your drawer: Use a tape measure to determine the width of your drawer. Make sure to measure the distance between the two edges where you want to install the drawer pulls.
- Divide the width by two: Take the measurement from the previous step and divide it by two. This will give you the center point of your drawer.
- Mark the center point: Use a pencil to mark the center point on the top edge of your drawer. This will serve as your reference point for drilling the holes.
- Measure the length of your drawer pull: Use a tape measure to determine the length of your drawer pull. This measurement will help you determine how far down from the center point you need to drill the holes.
- Mark the hole placement: From the center point, measure the length of your drawer pull and make a pencil mark. This will indicate where the bottom of the pull will be positioned.
- Repeat the process: If you have multiple drawers and want the pulls to be aligned, repeat the above steps for each drawer. Make sure to measure and mark the hole placement on each drawer individually.
By carefully measuring and marking the correct hole placement, you’ll ensure that your drawer pulls are installed neatly and professionally. Taking the time to do this step accurately will result in a finished product that is visually pleasing and functional.
Choosing the Right Drill Bit Size for the Drawer Pulls
When drilling new holes for drawer pulls, it’s important to choose the right drill bit size to ensure a proper fit. The size of the drill bit needed will depend on the diameter of the screws or bolts that come with the drawer pulls.

Measuring the Screw or Bolt Diameter
To determine the size of the drill bit needed, you’ll first need to measure the diameter of the screws or bolts that are included with the drawer pulls. This can be done using a caliper or a ruler. Simply measure the width of the screw or bolt at its widest point.
Choosing the Correct Size Drill Bit
Once you have measured the diameter of the screws or bolts, you can choose the correct size drill bit. It’s important to select a drill bit that matches the diameter of the screws or bolts as closely as possible.
Drill bit sizes are usually specified in fractions of an inch or in millimeters. If the screws or bolts have a diameter of 4mm, for example, you should choose a drill bit that is slightly larger than 4mm.
Testing the Fit
Before drilling the new holes, it’s a good idea to test the fit of the drill bit and the screws or bolts. This can be done by inserting the drill bit into the hole of the drawer pull and checking if it fits snugly. If the fit is too loose or too tight, you may need to adjust the drill bit size accordingly.
Remember, it’s always better to start with a smaller drill bit size and gradually increase the size if needed. This will help prevent the holes from being too large and causing the drawer pulls to be loose or wobbly.
Additional Considerations
In addition to the diameter of the screws or bolts, there are a few other factors to consider when choosing the right drill bit size. The type of material the drawer pulls are made of, as well as the type of surface you’ll be drilling into, can affect the size of the drill bit needed.
If the drawer pulls are made of a soft material, such as wood, a slightly smaller drill bit size may be appropriate. However, if the pulls are made of a harder material, such as metal or glass, a slightly larger drill bit size may be necessary to ensure a proper fit.
Additionally, if you’re drilling into a soft surface, such as plywood, a slightly smaller drill bit size may be needed. For harder surfaces, such as solid wood or metal, a slightly larger drill bit size may be necessary to ensure the holes are drilled cleanly.
Conclusion
Choosing the right drill bit size is essential when drilling new holes for drawer pulls. By measuring the diameter of the screws or bolts, selecting the correct size drill bit, testing the fit, and considering other factors such as material and surface type, you can ensure a proper fit and a clean drilling job.
Drilling the Holes with Precision and Care
1. Gather the necessary tools:
- A drill
- A drill bit appropriate for the size of your drawer pulls
- Masking tape
- A measuring tape or ruler
- A pencil or marker
- A level
- A clamp (optional)
2. Measure and mark the hole placement:
Using the measuring tape or ruler, measure the distance between the center of the existing hole to the center of the new hole. Make note of this measurement as it will be used to place the new hole correctly.
Place a small piece of masking tape on the spot where the new hole will be drilled. This will help prevent any wood splintering during the drilling process.
Using the measurement taken earlier, mark the center of the new hole on the masking tape using the pencil or marker. Use a level to ensure the mark is straight.
3. Prepare the drill and work area:
Attach the appropriate drill bit to your drill. Make sure it is securely tightened.
If you are drilling into a door or drawer front, consider using a clamp to secure the piece in place. This will prevent movement and ensure accurate drilling.
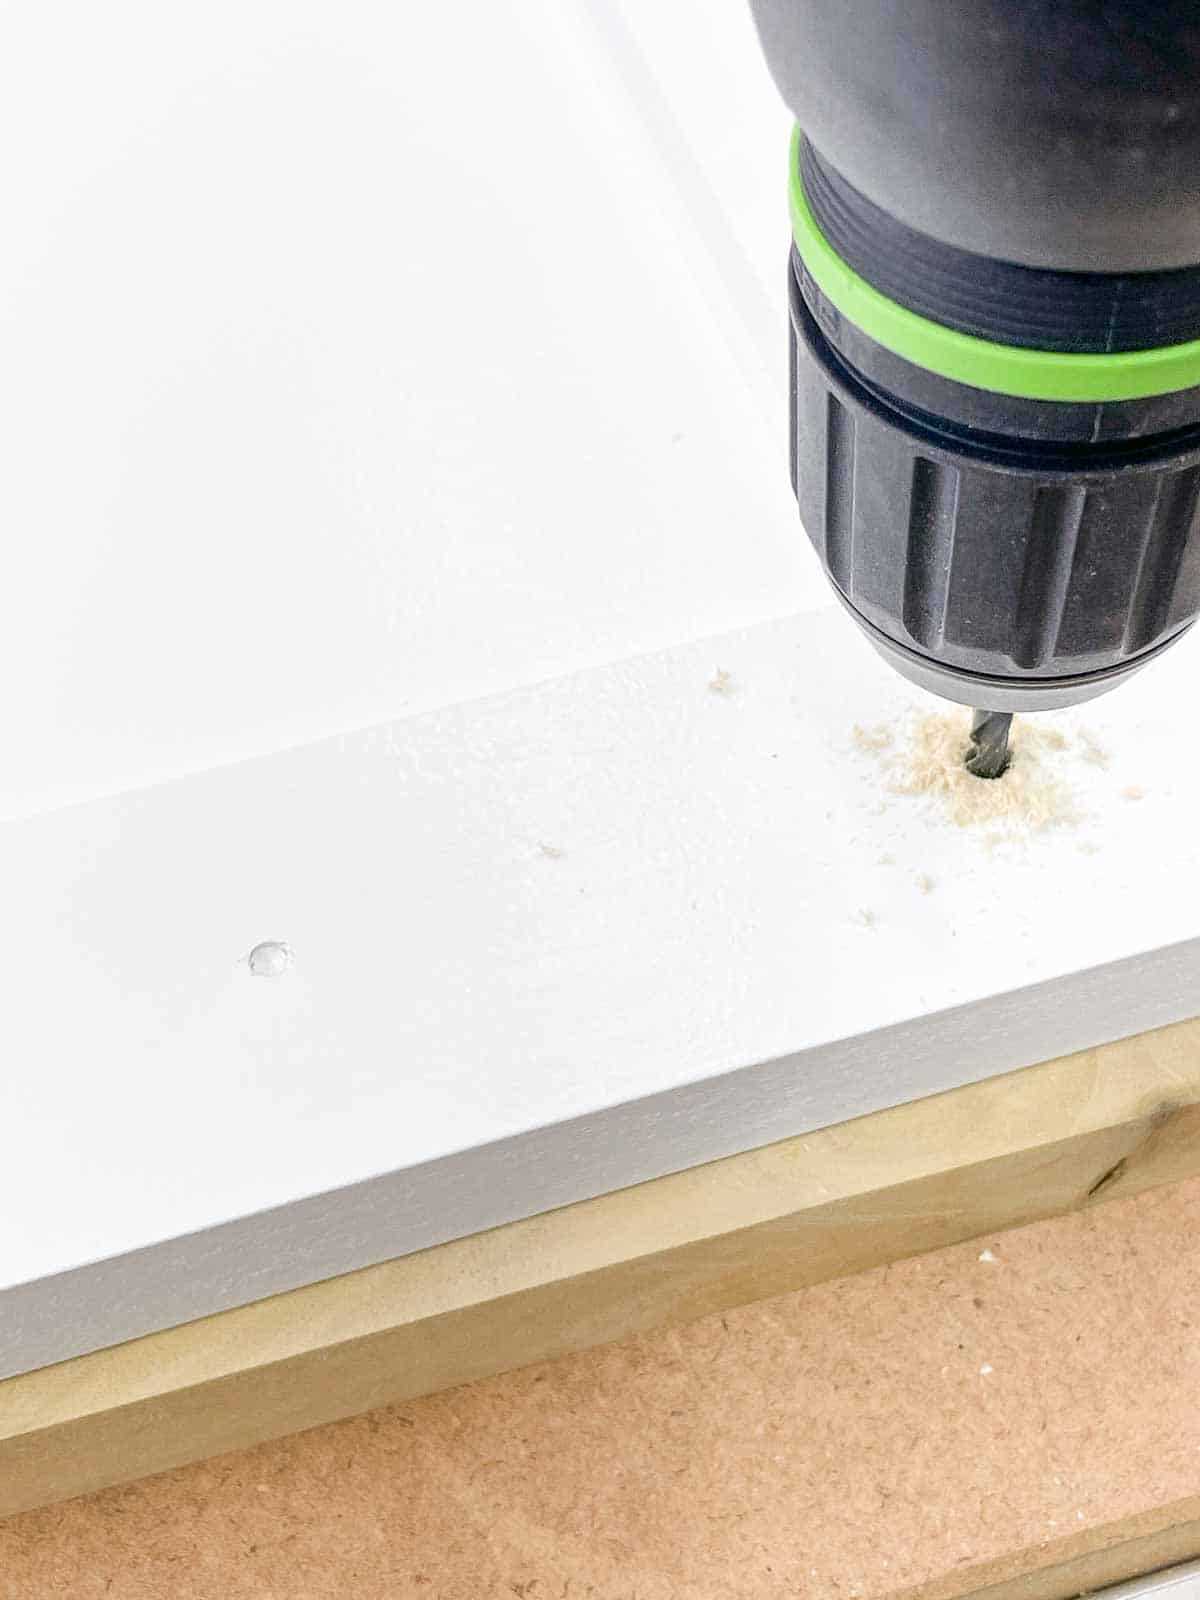
4. Drill the hole:
Position the drill bit directly over the marked spot on the masking tape.
Apply light pressure to the drill and begin drilling. Keep the drill perpendicular to the surface to ensure a straight hole.
Drill at a steady pace, being careful not to apply too much pressure. Let the drill bit do the work.
5. Check the hole:
Once the hole is drilled, remove the masking tape and inspect the hole for any rough edges or splintering.
If needed, use sandpaper or a file to smooth out any imperfections and make sure the hole is clean and tidy.
6. Repeat for additional holes:
If you have multiple holes to drill, repeat Steps 2-5 for each hole, taking care to measure and mark accurately each time.
7. Install the drawer pulls:
Once all holes are drilled and cleaned up, it’s time to attach your new drawer pulls. Insert the screws through the holes from the back and tighten them securely using a screwdriver or drill.
Check that the pulls are level and properly aligned before fully tightening the screws.
Congratulations! You have successfully drilled new holes for your drawer pulls with precision and care.
Filling and Concealing any Existing Holes
If you need to replace your drawer pulls or handles, but the new ones have a different hole spacing, you will need to fill and conceal any existing holes. Here are the steps to do so:
1. Measure the Hole Spacing
Before you can fill the existing holes, you need to measure the hole spacing of the new drawer pulls or handles. Use a tape measure or ruler to determine the distance between the centers of the holes. Make sure to measure accurately to ensure a proper fit.
2. Select a Filler
There are several options available for filling the existing holes, including wood filler, wood putty, or epoxy. The type of filler you choose will depend on the material of your drawer fronts or cabinets. If you’re unsure, consult with a hardware or home improvement store for recommendations.
3. Remove the Old Pulls or Handles
Start by removing the old pulls or handles from the drawer fronts or cabinets. Use a screwdriver or drill to remove any screws or bolts that are holding them in place. Set aside the old hardware for future use or disposal.
4. Clean the Area
Once the old pulls or handles are removed, clean the area around the existing holes. Use a damp cloth or sponge to remove any dust, dirt, or grease. This will ensure that the filler adheres properly to the surface.
5. Fill the Holes
Take a small amount of filler and apply it to the holes using a putty knife or your fingers. Make sure to fill the holes completely, but avoid overfilling. Smooth out the surface of the filler and remove any excess using the putty knife or a damp cloth.
6. Let the Filler Dry
Allow the filler to dry according to the manufacturer’s instructions. This could take anywhere from a few hours to overnight. Make sure to let the filler dry completely before moving on to the next step.
7. Sand the Filled Holes
Once the filler is dry, use fine-grit sandpaper or a sanding block to sand the filled holes. Sand in a circular or back-and-forth motion until the surface is smooth and even with the surrounding area. Wipe away any dust or debris with a clean cloth.
8. Conceal the Holes
If the filled holes are still visible, you may want to consider using a wood stain or paint to conceal them. Match the color of the surrounding area as closely as possible. Apply the stain or paint with a brush or sponge, following the manufacturer’s instructions.
9. Install the New Pulls or Handles
Once the filler is completely dry and any concealing methods are applied, you can install the new pulls or handles. Line up the holes of the hardware with the filled holes, and insert the screws or bolts. Use a screwdriver or drill to tighten them securely.
10. Test the Functionality
Before considering the project complete, make sure to test the functionality of the new pulls or handles. Open and close the drawers or cabinets multiple times to ensure they are secure and functioning properly.
By following these steps, you can successfully fill and conceal any existing holes when replacing drawer pulls or handles. Remember to take your time and follow the manufacturer’s instructions for the chosen filler and concealing method.
Attaching and Securing the Drawer Pulls
Materials Needed
- Drawer pulls
- Screwdriver or drill
- Screws
- Measuring tape or ruler
Step 1: Determine the Placement
Using a measuring tape or ruler, decide on the exact location for the drawer pulls. This can be based on personal preference or a specific measurement for uniformity.
Step 2: Mark the Hole Positions
Using a pencil, mark the positions for the holes on each drawer. Make sure to align the marks symmetrically for a balanced look.
Step 3: Pre-drill the Holes
If your drawer pulls require pre-drilled holes, use a screwdriver or drill to create these holes at the marked positions. Make sure the holes are deep enough to securely fit the screws.
Step 4: Attach the Drawer Pulls
Line up the holes in the drawer pulls with the pre-drilled holes on the drawer. Insert the screws through the holes and tighten them using a screwdriver or drill.
Step 5: Secure the Drawer Pulls
Make sure the drawer pulls are securely attached by double-checking the tightness of the screws. The pulls should feel stable and not move when pulled or pushed.
Step 6: Repeat for all Drawers
Follow the same steps for attaching and securing the drawer pulls on all of the drawers in your project. Take your time to ensure consistency in placement and tightness of the screws.
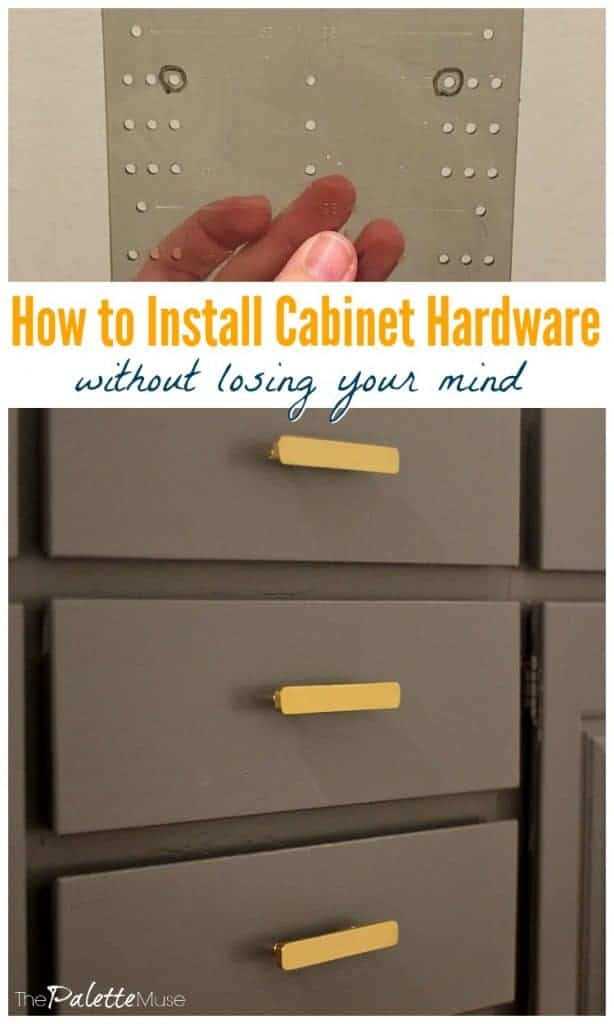
| Tip 1: | Consider using a template or guide to ensure accurate hole placement for multiple drawers. |
| Tip 2: | If you are drilling holes in a material that is prone to splintering, use a piece of masking tape to create a barrier and prevent damage. |
| Tip 3: | Before tightening the screws completely, check the alignment of the drawer pulls and make any necessary adjustments. |
Following these steps will help you successfully attach and secure drawer pulls to your drawers, giving them a functional and visually appealing finish.
Cleaning and Finishing Touches for a Professional Look
Cleaning the Area
Once you have finished drilling new holes for your drawer pulls, it is important to clean the area to remove any dirt, dust, or debris. This will ensure that the finished look is professional and polished.
Start by wiping down the surface with a damp cloth to remove any loose dirt or dust. If there is any stubborn dirt or grime, you can use a mild detergent solution to clean the area. Rinse with clean water and dry thoroughly before moving on to the next step.
Finishing the Holes
After cleaning the area, you may need to finish the newly drilled holes to make them smooth and ready for the drawer pulls. If the holes are rough or uneven, they could cause the pulls to sit unevenly or become loose over time.
One way to finish the holes is by using a countersink bit. This bit will create a wider and deeper recess around the hole, allowing the drawer pull to sit flush with the surface. Attach the countersink bit to your drill and carefully drill around each hole, making sure to stop when you reach the desired depth.
Another option is to use a wood filler or putty to fill in any gaps or imperfections around the holes. Apply a small amount of filler or putty to a putty knife and smooth it over the holes, making sure to fill in any gaps or cracks. Allow the filler or putty to dry completely before sanding it smooth.
Applying a Finish
To give the newly drilled holes and the surrounding area a professional look, you can consider applying a finish to the surface. This will not only enhance the appearance but also provide protection to the wood.
You can choose from a variety of finishes depending on your preference, such as stain, paint, or varnish. Follow the manufacturer’s instructions for applying the chosen finish, making sure to cover the newly drilled holes and the surrounding area evenly.
Allow the finish to dry completely before proceeding with attaching the drawer pulls. This will ensure that the pulls adhere properly and provide a seamless and professional look to your newly drilled holes.
Final Touches
Once the entire process is complete, take a step back and inspect your work. Make sure that the newly drilled holes are aligned properly, and the drawer pulls sit evenly and securely.
If there are any remaining scuffs or marks, you can gently sand them with fine-grit sandpaper. Be careful not to press too hard or sand too aggressively, as this could damage the wood or finish.
Finally, give the area a final wipe down with a clean, dry cloth to remove any dust or residue. This will give your drawer pulls and the surrounding area a pristine and professional look.
With these cleaning and finishing touches, your newly drilled holes for drawer pulls will have a polished and professional appearance, giving your furniture a fresh and updated look.
FAQ:
What tools do I need to drill new holes for drawer pulls?
To drill new holes for drawer pulls, you will need a power drill, a drill bit, a measuring tape, a pencil, a straight edge or ruler, and a clamp to secure the drill in place.
What is the purpose of drilling new holes for drawer pulls?
Drilling new holes for drawer pulls allows you to update the look of your furniture by changing the position or style of the pulls. It can also be necessary if you have replaced old pulls with new ones that have a different hole spacing.
How do I measure the distance between the holes for the new drawer pulls?
To measure the distance between the holes for the new drawer pulls, you can use a measuring tape or ruler. Start by measuring the width of the drawer front, then divide it by the number of pulls you want to install. This will give you the spacing between the holes.
Can I use a template to drill the new holes?
Yes, using a template can make drilling the new holes easier and ensure that they are evenly spaced. You can either buy a template specifically made for drawer pulls or create your own by tracing the hole pattern onto a piece of cardboard or plywood.
What precautions should I take when drilling new holes for drawer pulls?
When drilling new holes for drawer pulls, it’s important to wear safety goggles to protect your eyes from flying debris. You should also clamp down the drawer front securely to prevent it from moving while you drill. Take your time and apply steady pressure to avoid damaging the wood.
Is it possible to fill old holes before drilling new ones?
Yes, it is possible to fill old holes before drilling new ones. You can use wood filler or putty to fill in the old holes, then sand it down until it is flush with the surface. This will create a smooth surface for drilling the new holes.
Video:

How to keep a tent cool

Meet Harrison Clayton, a distinguished author and home remodeling enthusiast whose expertise in the realm of renovation is second to none. With a passion for transforming houses into inviting homes, Harrison's writing at https://thehuts-eastbourne.co.uk/ brings a breath of fresh inspiration to the world of home improvement. Whether you're looking to revamp a small corner of your abode or embark on a complete home transformation, Harrison's articles provide the essential expertise and creative flair to turn your visions into reality. So, dive into the captivating world of home remodeling with Harrison Clayton and unlock the full potential of your living space with every word he writes.


