Step-by-Step Guide: Drilling Holes in Rocks with a Drill Press

Drilling holes in rocks can be a challenging task, especially if you don’t have the right tools or techniques. However, with a drill press, you can easily and accurately drill holes in rocks of various sizes and shapes. In this step-by-step guide, we will walk you through the process of drilling holes in rocks using a drill press.
Step 1: Prepare the Rock
Before you start drilling, it’s important to prepare the rock properly. First, choose a suitable rock that is sturdy and won’t crumble easily. Clean the rock and remove any loose debris or dirt using a brush. If the rock is too large, you may need to break it into a smaller, manageable size using a hammer or chisel.
Pro tip: Wear safety goggles and gloves to protect yourself from flying rock fragments.
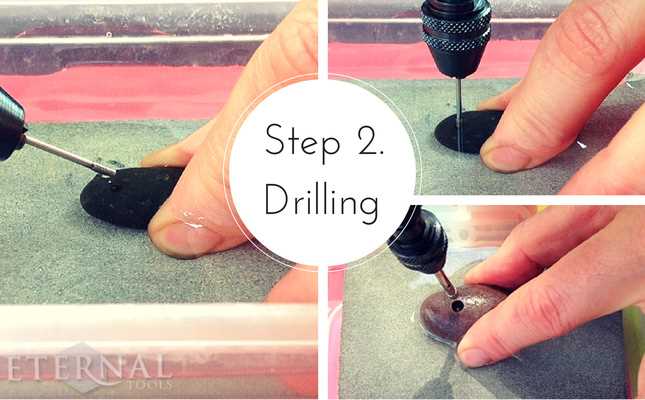
Step 2: Mark the Hole

Next, mark the spot where you want to drill the hole on the rock’s surface. Use a marker or a pencil to make a small dot or cross. Make sure the mark is centered and visible, as this will guide your drilling.
Step 3: Set up the Drill Press
Now it’s time to set up the drill press. Place the rock on the drill press table and secure it firmly with clamps or a vise. Adjust the height of the table so that the drill bit will be at the right level for drilling. Make sure the drill press is switched off before making any adjustments.
Step 4: Choose the Right Drill Bit
Choosing the right drill bit is crucial for drilling holes in rocks. For most rocks, a carbide-tipped masonry bit is recommended. The size of the drill bit should match the size of the hole you want to create. Insert the drill bit into the drill press chuck and tighten it securely.

Step 5: Start Drilling
Before you start drilling, put on your safety goggles and switch on the drill press. Position the drill bit over the marked spot on the rock and slowly lower it towards the surface. Apply steady downward pressure on the drill press handle to start drilling the hole.
Pro tip: Use a lubricant, such as water, to keep the drill bit cool and prevent it from overheating.
Following these step-by-step instructions, you can drill holes in rocks with ease and precision using a drill press. Remember to take your time, use the appropriate safety precautions, and always double-check your measurements. Happy drilling!
Step-by-Step Guide to Drilling Holes in Rocks with a Drill Press
Materials Needed:
- A drilling press with a drill bit
- Safety goggles
- Rocks or stones
- Clamp or vise
- Spray bottle with water
- Masking tape
Step 1: Prepare the Work Area:
Set up your drilling press in a well-ventilated area with a sturdy table or workbench. Make sure you have enough space to work comfortably.

Step 2: Secure the Rock:
Place the rock on the table or workbench and use a clamp or vise to hold it securely in place. Make sure it is stable and won’t move during drilling.
Step 3: Mark the Hole:
Use a pencil or masking tape to mark the exact spot where you want the hole to be drilled. This will help guide your drilling.
Step 4: Wear Safety Gear:
Put on safety goggles to protect your eyes from flying debris and gloves to protect your hands.
Step 5: Set the Depth:
Adjust the depth stop on your drill press to control the depth of the hole. This will prevent you from drilling too far into the rock.
Step 6: Lubricate the Rock:

Spray water onto the surface of the rock to cool it and reduce friction as you drill. This will prevent the rock from overheating and cracking.
Step 7: Start Drilling:
Switch on the drill press and gently lower the drill bit onto the marked spot. Apply steady and even pressure as you drill into the rock. Let the drill bit do the work and avoid forcing it.
Step 8: Cool the Drill Bit:
Periodically remove the drill bit from the hole and spray it with water to cool it down. This will prevent the bit from overheating and keep it working effectively.
Step 9: Repeat the Process:
If you need to drill multiple holes, repeat steps 6 to 8 for each hole. Take breaks as needed to rest and reposition the rock.
Step 10: Clean up:
After you have drilled all the necessary holes, clean up your work area and put away your tools. Dispose of any debris or waste properly.

Following this step-by-step guide will help you successfully drill holes in rocks using a drill press. Remember to always prioritize safety and take breaks when needed.
Step 1: Gather the Necessary Materials
Before you can begin drilling holes in rocks with a drill press, you will need to gather the necessary materials. Here is a list of the items you will need:
- Rock: Select a rock that you would like to drill a hole in. Make sure it is a suitable rock for drilling and that it is not too hard or brittle.
- Drill Press: You will need a drill press for this project. A drill press is a stationary power tool that can provide the accuracy and control needed for drilling holes in rocks.
- Drill Bits: Choose the appropriate drill bits for your project. The type of drill bit you need will depend on the size and type of hole you want to create.
- Clamps: Clamps will help to secure the rock in place while you are drilling. This will prevent the rock from moving or slipping during the drilling process.
- Safety Equipment: Always prioritize safety while working with power tools. Wear safety goggles or glasses to protect your eyes from flying debris, and wear ear protection to reduce noise exposure.
- Workbench: Find a stable workbench or table to place your drill press on. This will provide a solid foundation for your drilling operation.
Once you have gathered all of these materials, you will be ready to move on to the next step of the process.
Step 2: Prepare the Rock
Before you begin drilling into the rock, it’s important to properly prepare it. Follow these steps to ensure smooth and successful drilling:

1. Select the right rock
Choose a rock that is suitable for drilling. Not all rocks are suitable for drilling, so it’s important to select one that is solid and doesn’t have any cracks or weaknesses. It’s also helpful to choose a rock that is flat on one side, as it will make it easier to stabilize during drilling.
2. Wear safety gear
Drilling into rocks can create flying debris, so it’s important to wear appropriate safety gear. This includes safety goggles to protect your eyes from any debris, as well as gloves to protect your hands from sharp edges.
3. Clean the rock
Before drilling, make sure that the rock is clean and free from any dirt or loose particles. Use a brush or a cloth to wipe away any debris. This will prevent the drill bit from getting clogged and ensure a cleaner hole.
4. Mark the drilling spot
Use a pencil or a marker to mark the spot on the rock where you want to drill the hole. This will help you stay focused and drill accurately. Make sure to place the mark in a visible location that won’t interfere with the stability of the rock.
5. Secure the rock
Place the rock on a stable surface or secure it in a clamp to prevent it from moving while drilling. This is important for accuracy and safety. If using a clamp, make sure it’s secure and won’t damage the rock.

6. Consider using a template
If you need to drill multiple holes in the same location on different rocks, it can be helpful to create a template. This can be a piece of wood or cardboard with pre-drilled holes that you can use as a guide for drilling. Simply align the template with the marking on the rock and drill through the pre-drilled hole.
7. Apply water as a lubricant
Drilling into rocks can generate a lot of heat, which can cause the drill bit to dull or overheat. To prevent this, apply water as a lubricant while drilling. You can use a spray bottle to mist the drilling area or dip the drill bit into a container of water intermittently.
By following these steps to prepare the rock, you’ll be ready to move on to the next stage of the drilling process.
Step 3: Select the Right Drill Bit

Choosing the right drill bit is crucial for drilling holes in rocks with a drill press. Different types of rocks require different types of drill bits. Here are some factors to consider when selecting the right drill bit:
- Rock Type: Determine the type of rock you are drilling into. Soft rocks, such as sandstone or limestone, can be drilled with most types of drill bits. However, harder rocks like granite or quartz may require a diamond-tipped drill bit.
- Drill Bit Material: Consider the material composition of the drill bit. Carbide-tipped drill bits are durable and suitable for drilling into various types of rocks. High-speed steel drill bits are more affordable but may wear down faster when drilling into harder rocks.
- Drill Bit Size: The size of the hole you need to drill will determine the size of the drill bit. Choose a bit that matches the desired hole diameter. It’s advisable to start with a smaller bit and gradually increase the size if necessary.
Note: It’s important to use sharp drill bits to ensure efficient drilling. Dull or worn-out bits may cause unnecessary friction and can lead to overheating, damage to the drill press, or even injury.
Refer to the manufacturer’s guidelines or consult an expert to determine the specific drill bit requirements for your rock drilling project. Additionally, always wear safety goggles and protective gear when operating a drill press.
Step 4: Secure the Rock in the Drill Press
Once you have selected the appropriate drill bit and determined the location of the hole, it is important to securely hold the rock in place while drilling. This will ensure accuracy and prevent accidents.
Tools and Materials Needed:
- Drill press
- Vise
- Scrap wood
- Clamps
Instructions:
- Place the rock on a sturdy surface, such as a workbench, and position it so that the desired drilling point is accessible.
- Attach a vise to the drill press table. Make sure the vise is securely fastened and will not wobble during drilling.
- Place a scrap piece of wood on the drill press table beneath the vise. This will protect the table and provide additional stability.
- Open the vise and position the rock between its jaws. Adjust the vise so that it securely grips the rock without crushing it.
- Once the rock is secure in the vise, tighten the jaws to hold it in place. Make sure the rock is aligned with the desired drilling point.
- If necessary, use clamps to further secure the rock and prevent any movement during drilling.
Note: It is important to take necessary safety precautions when working with a drill press and other tools. Wear safety goggles, gloves, and follow all manufacturer’s instructions and safety guidelines.
With the rock securely in place, you are now ready to move on to the next step, which is actually drilling the hole in the rock.
Step 5: Set the Drill Press Speed
Before you start drilling, it’s important to set the drill press speed correctly. The speed at which you should operate the drill press will depend on the type of rock you are drilling and the size of the hole you want to create. Here are some general guidelines on how to set the drill press speed:
- Refer to the manufacturer’s recommendations: Different drill press models may have different speed settings, so it’s always a good idea to consult the user manual or any documentation provided by the manufacturer. They may provide specific speed settings for different materials and hole sizes.
- Start with a slow speed: If you don’t have any specific recommendations for your rock and hole size, it’s generally safe to start with a slower speed. Slow speeds are less likely to cause the drill bit to overheat, which can lead to dulling or even breakage.
- Adjust the speed as needed: As you begin drilling, pay attention to how the drill bit is performing. If it seems to be struggling or producing smoke, it’s an indication that the speed may be too high. In this case, it’s recommended to decrease the speed gradually until you find the right setting.
Remember, drilling too fast can cause damage to both the drill bit and the rock, so it’s better to start slow and make adjustments as necessary. Experimenting with different speed settings can help you find the optimal speed for your specific drilling project.
Step 6: Start Drilling
Now that you have prepared your drill press and secured your rock, it’s time to start drilling!
Follow these steps to begin drilling holes in your rock:
- Before turning on the drill press, double-check that the rock is securely clamped or held in place. This will prevent any movement or accidents during the drilling process.
- Position the rock directly under the drill bit. Ensure that the bit is perpendicular to the rock’s surface for accurate drilling.
- Align the markings you made on the rock with the center of the drill bit. This will guide you as you begin drilling.
- Turn on the drill press and adjust the speed settings to a moderate speed. Starting with a slower speed will help you gain control and minimize the risk of overheating the drill bit or damaging the rock.
- Gently lower the drill bit onto the rock’s surface. Apply a moderate amount of pressure to start drilling into the rock. Let the drill bit do the work, and avoid exerting too much force that could cause the bit to break or the rock to crack.
- Continue drilling into the rock slowly and steadily. Take breaks every few minutes to allow the drill bit to cool down and prevent overheating. You can also spray some water onto the drilling area to lubricate and cool the bit.
- Monitor your progress by periodically removing the drill bit from the hole and checking the depth. This will help you to drill to the desired depth and ensure consistency across all the holes you are drilling.
- Once you have drilled the desired number of holes or reached the desired depth, turn off the drill press and carefully remove the rock from the clamp or holding device.
Congratulations! You have successfully completed the drilling process for your rock. The next step is to clean any debris or dust from the drilled holes and use them for your desired purpose. Remember to always prioritize safety during the drilling process!
Step 7: Clean the Rock and Check the Hole
After drilling the hole in the rock, it’s important to clean the rock and check the hole to ensure it is clean and free of any debris or obstructions. Follow the steps below to properly clean the rock and check the hole:
1. Remove the Rock and Clean It
Carefully remove the rock from the drill press and place it on a clean surface. Use a brush or cloth to remove any dust or debris from the surface of the rock. If there are any stubborn residue or stains on the rock, you can use water and mild soap to clean it. Be sure to dry the rock thoroughly before proceeding to the next step.
2. Inspect the Hole
Examine the hole that you drilled in the rock. Check for any remaining debris or obstructions that may have been pushed into the hole during the drilling process. You can use a flashlight or magnifying glass to get a better view of the inside of the hole.
3. Clean the Hole
If you notice any debris or obstructions in the hole, use a compressed air can or a small brush to clean it out. Be gentle and take care not to damage the walls of the hole. Make sure the hole is completely clean and clear of any debris before proceeding.
4. Check the Depth and Diameter
Use a ruler or measuring tape to check the depth and diameter of the hole. Compare the measurements to the desired specifications for your project. If the hole is too shallow or not wide enough, you may need to redrill it.
5. Test the Fit
Before using the rock with the drilled hole for your intended purpose, it’s important to test the fit of the desired object, such as a wire or a dowel, in the hole. Make sure the object fits securely without being too loose or tight. Adjust the size of the hole if necessary.
By following these steps, you can ensure that your drilled hole in the rock is clean and meets your desired specifications. This will enable you to use the rock for various projects, such as jewelry making, crafts, or decorative purposes.
FAQ:
What materials do I need to drill holes in rocks with a drill press?
To drill holes in rocks with a drill press, you will need a drill press, a diamond drill bit, a rock or gemstone, water, and a clamp or vise to hold the rock in place.
Can I use any type of drill bit to drill holes in rocks?
No, you cannot use any type of drill bit to drill holes in rocks. You will need to use a diamond drill bit specifically designed for drilling through hard materials like rocks.
How do I choose the right size of drill bit for drilling holes in rocks?
When choosing the right size of drill bit for drilling holes in rocks, you should consider the size of the hole you want to create. Measure the width of the object you want to pass through the hole and select a drill bit that is slightly larger than that measurement.
What safety precautions should I take when drilling holes in rocks with a drill press?
When drilling holes in rocks with a drill press, it is important to wear safety goggles or glasses to protect your eyes from flying debris. You should also wear gloves to protect your hands. Additionally, make sure to secure the rock properly in a clamp or vise to prevent it from slipping during drilling.
Video:


Harrison Clayton
Meet Harrison Clayton, a distinguished author and home remodeling enthusiast whose expertise in the realm of renovation is second to none. With a passion for transforming houses into inviting homes, Harrison's writing at https://thehuts-eastbourne.co.uk/ brings a breath of fresh inspiration to the world of home improvement. Whether you're looking to revamp a small corner of your abode or embark on a complete home transformation, Harrison's articles provide the essential expertise and creative flair to turn your visions into reality. So, dive into the captivating world of home remodeling with Harrison Clayton and unlock the full potential of your living space with every word he writes.


