Step-by-Step Guide: Drill and Tap a Shotgun Like a Pro

If you’re a shotgun enthusiast who wants to customize your weapon, one skill you’ll definitely want to learn is how to drill and tap your shotgun. Drilling and tapping allows you to add accessories like optics, sights, or rails to your shotgun, giving you improved accuracy and versatility.
Drilling and tapping may seem daunting at first, but with the right tools and knowledge, you can do it like a pro. In this step-by-step guide, we’ll walk you through the process of drilling and tapping your shotgun, ensuring you have all the information you need to successfully complete the task.
Before you start, it’s important to gather all the necessary materials. You’ll need a drill press or a high-quality hand drill, a tap set, a center punch, drill bits, cutting oil, a clamp or vise to secure your shotgun, and safety equipment such as safety glasses and gloves. Once you have everything ready, you can begin the process of drilling and tapping.
Step 1: Prepare Your Shotgun
The first step in drilling and tapping your shotgun is to ensure it is properly prepared. Start by disassembling your shotgun to access the area where you want to drill and tap. Clean the area thoroughly and remove any existing finishes or coatings that may interfere with the drilling process. Use a degreaser to remove any oil or dirt that may be present.
What is Drilling and Tapping?

Drilling and tapping is a process commonly used in gunsmithing and firearms modification. It involves creating new holes in a firearm’s receiver or barrel and installing threaded inserts, known as tap holes, for the attachment of accessories such as scopes, sights, and mounts.
This process is often necessary when a firearm does not come with pre-drilled and tapped holes or when the existing holes do not align with the desired accessory placement. By drilling and tapping new holes, gun owners can customize their firearms to suit their specific needs and preferences.
The Drilling Process
The first step in drilling and tapping is to carefully plan and mark the location of the new hole. This is typically done using a center punch, which creates a small indentation in the metal surface to guide the drill bit. Gunsmiths must take precise measurements and ensure the new hole aligns with the desired accessory placement.
Once the location is marked, a drill press or hand drill with a suitable drill bit is used to create the hole. It is crucial to use the correct drill bit size to match the tap hole’s diameter. The drilling process requires patience and precision to avoid damaging the firearm’s internals or creating an off-center hole.
The Tapping Process
After the hole is drilled, the next step is tapping. Tapping involves threading the hole in order to accept the threaded insert. A tap is a specialized tool with cutting threads that matches the desired thread pattern and size for the accessory being installed.

The tap is carefully inserted into the hole and rotated in a clockwise motion to cut the threads. It is essential to apply steady pressure and ensure proper alignment to prevent damaging the threads or cross-threading the hole. The tap is typically rotated a quarter turn forward and a half turn back to break up metal debris and prevent binding.
Benefits and Considerations
Drilling and tapping provides gun owners with the flexibility to attach accessories to their firearms, enabling customization and improved performance. Some accessories, such as scopes and red dot sights, require precise alignment for optimal accuracy.
However, it is important to note that drilling and tapping should only be performed by experienced individuals or professional gunsmiths. Incorrect drilling or tapping can weaken the firearm’s structure and compromise safety. Gun owners should also consult the firearm manufacturer’s guidelines or consult with a gunsmith to ensure compatibility and prevent voiding warranties.
Overall, drilling and tapping is a valuable skill in gunsmithing and firearms modification, allowing gun owners to customize their firearms with a wide range of accessories.
Why Drill and Tap a Shotgun?
Drilling and tapping a shotgun is a common modification that many firearm enthusiasts choose to do. It involves drilling holes into the receiver of the shotgun and threading them to create new mounting points for accessories such as optics, sights, or rails.

Here are a few reasons why you might want to drill and tap your shotgun:
- Improved Versatility: By adding mounting points, you can easily attach accessories that enhance the versatility and functionality of your shotgun. This allows you to customize your shotgun to better suit your specific needs, whether that’s for hunting, competition shooting, or self-defense.
- Optics and Sights: Adding a scope or red dot sight to your shotgun can greatly improve your accuracy and target acquisition. Drilling and tapping the receiver provides a secure and stable mounting solution for these types of optics.
- Accessory Rails: If you want to attach accessories like a flashlight, laser sight, or vertical grip to your shotgun, drilling and tapping provides a strong and reliable way to do so. Accessory rails can give you the ability to customize your shotgun with various add-ons.
- Personalization: Some shooters simply enjoy customizing their firearms. Drilling and tapping your shotgun allows you to add a personal touch and make it stand out from the crowd. It can also be a fun and satisfying project for those who enjoy working on their guns.
Before drilling and tapping your shotgun, it’s important to understand the process and have the necessary tools and skills. If you’re not confident in your abilities, it’s recommended to seek the assistance of a professional gunsmith who can perform the modification safely and effectively.
Remember to always follow local laws and regulations when modifying firearms, and ensure that any accessories you add are legal and compliant.
Step 1: Gather the Necessary Tools and Materials
Before starting the process of drilling and tapping a shotgun, it is important to gather all the necessary tools and materials. Having everything prepared beforehand will make the process easier and more efficient. Here are the tools and materials you will need:
- Shotgun: The shotgun that you want to drill and tap.
- Drill: A power drill capable of drilling through metal.
- Tap and die set: A set of taps and dies that match the thread size of the screws you will be using.
- Center punch: A tool used to mark the center of the holes you will be drilling.
- Clamps: Clamps to hold the shotgun securely in place while drilling and tapping.
- Lubricant: Lubricant, such as cutting oil, to reduce friction and heat while drilling and tapping.
- Protective gear: Safety glasses and gloves to protect yourself from debris and metal shavings.
- Cleaning supplies: Cleaning supplies to remove any metal shavings or debris after drilling and tapping.
Make sure to have all these tools and materials ready before proceeding to the next step.

Step 2: Prepare the Shotgun for Drilling and Tapping
Before you can start drilling and tapping your shotgun, it’s important to properly prepare it. Follow these steps to ensure your shotgun is ready for the process:
- Gather the necessary tools: Before getting started, make sure you have all the tools you’ll need for the job. This typically includes a drill press, a tap and die set, a center punch, a vise, and a set of drill bits.
- Choose a safe work area: Find a secure and well-lit work area where you can perform the drilling and tapping without any distractions. Ensure that the area is clear of any flammable materials and that you have enough space to safely maneuver your shotgun.
- Unload the shotgun: Before working on your shotgun, make sure it is completely unloaded. Double-check that there are no shells in the chamber, magazine, or anywhere else in the firearm.
- Disassemble the shotgun: If possible, disassemble your shotgun to make it easier to work on. Remove the stock, forearm, and any other parts that may obstruct your access to the areas you plan to drill and tap.
- Secure the shotgun in a vise: Once the shotgun is disassembled, securely clamp it in a vise to keep it stable and prevent any movement or slipping while you’re drilling and tapping. Make sure the vise is tightened enough to firmly hold the shotgun, but be careful not to over-tighten and damage the firearm.
- Prepare the area to be drilled and tapped: Identify the specific area on the shotgun where you plan to drill and tap. Use a center punch to create a small indentation in the spot to help guide the drill bit. This will help prevent the drill bit from slipping and ensure accurate drilling.
By following these steps and properly preparing your shotgun, you’ll be ready to move on to the next step of the process: drilling and tapping. Taking the time to prepare your shotgun correctly will help ensure that you achieve accurate and reliable results.
Unload and Disassemble the Shotgun
Before you begin any work on your shotgun, it is absolutely crucial to ensure that it is unloaded. Safety should always be your top priority. Follow these steps to properly unload and disassemble your shotgun:
- Find a safe and secure location to work on your shotgun. Make sure there are no distractions and that you have plenty of space to move around.
- Check the chamber of the shotgun to make sure it is empty. Point the shotgun in a safe direction and open the action to visually inspect the chamber.
- Remove any ammunition from the area and place it in a safe and separate location.
- Next, disassemble the shotgun according to the manufacturer’s instructions. This may involve removing the barrel, stock, and other components.
- Use a screwdriver or other appropriate tool to loosen and remove any screws or fasteners holding the shotgun together.
- Take care to keep track of any small parts and components as you disassemble the shotgun. Use a tray or container to organize and store these items.
- As you disassemble the shotgun, pay attention to any specific instructions or precautions mentioned in the manufacturer’s manual.
- Once the shotgun is fully disassembled, set aside any components that will not be involved in the drilling and tapping process.
Following these steps will ensure that your shotgun is properly unloaded and disassembled, setting the stage for the drilling and tapping process.
Secure the Barrel in a Vise
Before you begin drilling and tapping your shotgun barrel, it is important to securely position it in a vise. This will ensure stability and prevent any unwanted movements during the process. Here’s how you can do it:

- Start by selecting a vise that is suitable for holding your shotgun barrel. A bench vise with jaws that are wide enough to accommodate the barrel without damaging it should work well.
- Attach the vise securely to a stable workbench or surface. Make sure the vise is tight and will not move or wobble during the procedure.
- Place a protective jaw cover on the vise to prevent any marks or scratches on the barrel. A soft material like aluminum or rubber is recommended for this purpose.
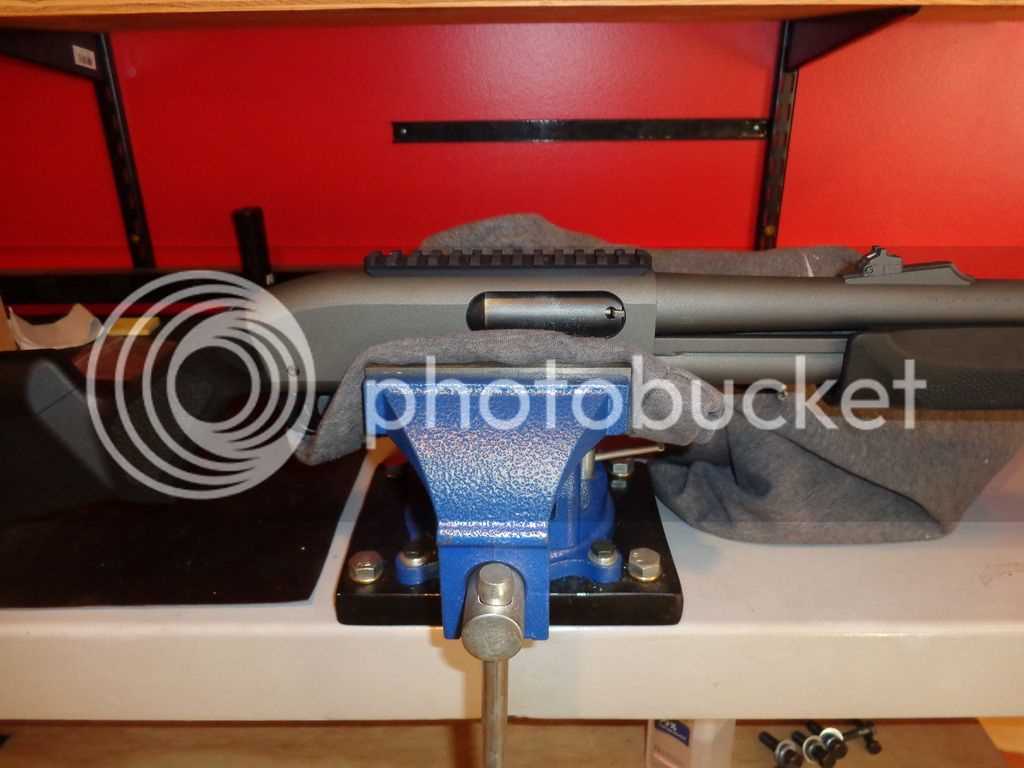
- Position the shotgun barrel in the vise, making sure it is centered and aligned properly. The barrel should be held securely without any unnecessary movements.
- Tighten the vise gradually and evenly to avoid putting excessive pressure on one side of the barrel. Make small adjustments as needed to ensure an even grip on the barrel.
Once the shotgun barrel is securely positioned in the vise, you are ready to proceed with drilling and tapping. Take the necessary precautions and follow the appropriate steps for a successful outcome.
Step 3: Measure and Mark the Drilling Points
Before drilling into your shotgun barrel, it’s crucial to measure and mark the drilling points accurately. This will ensure that your holes are in the correct positions and prevent any damage to your firearm. Follow these steps to measure and mark the drilling points:
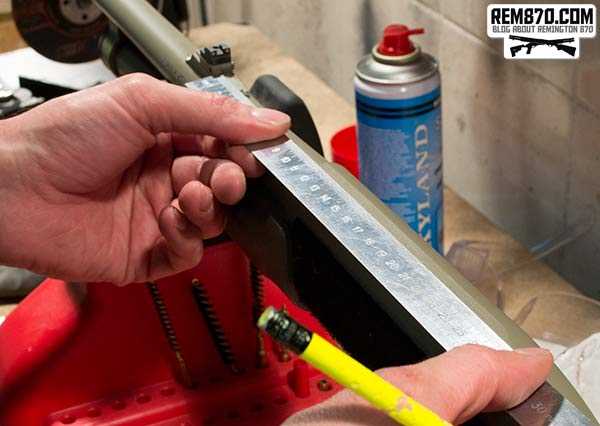
- Start by using a tape measure or ruler to determine the distance between the existing sights or mounting holes on your shotgun barrel. Measure the width and height of the area where you’ll be drilling.
- Once you have the measurements, find the center point by dividing the width in half and marking it with a pencil or marker. Repeat this step for the height measurement as well.
- Next, use a center punch and a hammer to create small indents at the marked center points. This will provide a starting point for your drill bit and help prevent it from slipping during drilling.
- After creating the center punch indents, double-check the measurements and make sure they align with your desired drilling positions.
It’s essential to take your time and be precise during this step. Measure multiple times to ensure accuracy before creating the indents. Remember, once you start drilling, there’s no going back.
Pro Tip: If you’re unsure about the measurements or marking process, it’s always a good idea to seek assistance from a professional or an experienced gunsmith.
Identify the Desired Scope Mounting Location
Before you start drilling and tapping your shotgun for a scope mount, you need to first identify the desired location for mounting the scope.
Here are a few factors to consider when choosing the scope mounting location:
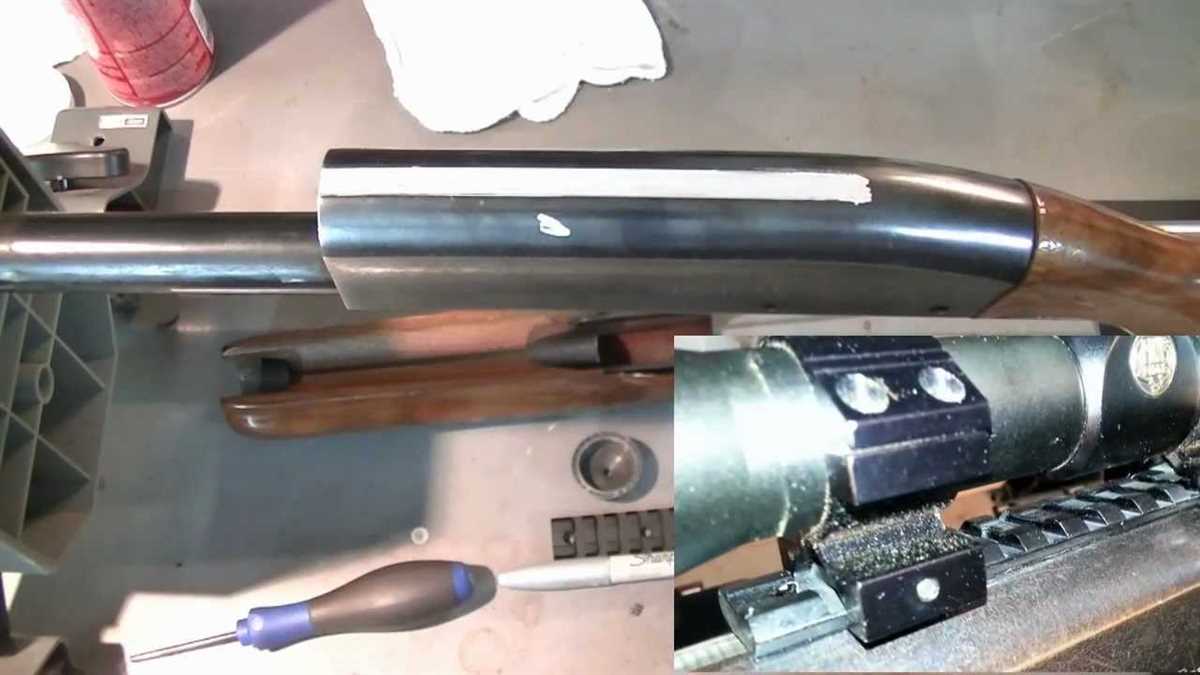
- Receiver design: Take into account the design of your shotgun’s receiver. Look for a flat and solid area where the scope base can be securely attached.
- Eye relief: Consider the eye relief of your scope. Make sure the mounting location allows you to achieve the proper distance between your eye and the scope for optimal sight picture.
- Balance: Think about the balance of your shotgun. Mounting the scope too far forward or too far back can affect the balance and handling of the firearm.
- Accessibility: Ensure that the mounting location doesn’t obstruct the operation of any controls or accessories on your shotgun, such as the safety or the magazine tube.
It’s a good idea to consult the owner’s manual or contact the manufacturer of your shotgun for any specific recommendations or restrictions regarding scope mounting locations.
Use a Center Punch to Mark the Drilling Points
Once you have determined the appropriate locations for drilling the holes on your shotgun, you will need to use a center punch to mark the exact spots. The center punch will create a small indentation that will guide the drill bit and ensure that the holes are drilled in the correct positions.
Here is a step-by-step guide on how to use a center punch to mark the drilling points on your shotgun:
- Prepare the surface: Before using the center punch, make sure that the surface of the shotgun is clean and free of any debris or oil. This will ensure that the punch makes a clear and precise mark.
- Position the center punch: Place the center punch directly over the spot where you want to drill the hole. Make sure that the punch is perpendicular to the surface of the shotgun.
- Apply pressure: Using a hammer or mallet, gently tap the end of the center punch to create an indentation. Be careful not to hit too hard, as this could cause the surface of the shotgun to deform.
- Repeat for all drilling points: Move to the next drilling point and repeat the process of positioning the center punch and tapping it to create an indentation. Make sure that all drilling points are marked accurately.
By using a center punch, you can ensure that your drilling points are marked with pinpoint accuracy. This will make the drilling process much easier and help prevent any mistakes or misalignment.
Step 4: Drill the Pilot Holes
Now that you have marked the positions for the holes, it’s time to drill the pilot holes. These holes will guide the drill bit when you start drilling the final holes for tapping. Follow the steps below to drill the pilot holes:
- Choose the right drill bit: Select a drill bit that matches the size of the pilot holes you need to make. Refer to the manufacturer’s guidelines for the appropriate bit size.
- Secure the shotgun: Make sure the shotgun is properly secured in a vice or clamp to prevent movement during drilling. This will ensure accurate hole placement.
- Mark the drill depth: Using a piece of tape or a marker, mark the desired depth on the drill bit. This will help you control the depth of the pilot holes.
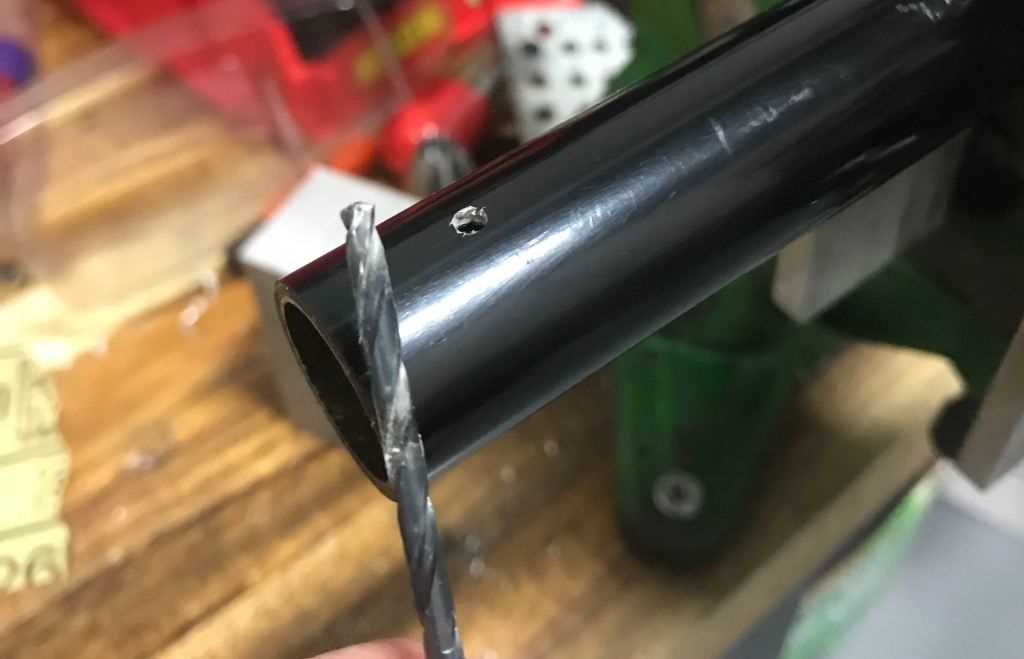
- Begin drilling: Position the drill bit at the first marked hole and apply steady pressure. Start drilling slowly and maintain a straight angle to prevent the bit from wandering off course.
- Monitor the drilling process: While drilling, periodically withdraw the bit to clear any chips or debris that may accumulate. This will prevent the bit from getting clogged and ensure a smooth drilling process.
- Repeat for all pilot holes: Once you have completed drilling the first pilot hole, move on to the remaining marked holes and repeat the process until all pilot holes are drilled.
Once you have drilled the pilot holes, you are ready to move on to the next step: drilling the final holes for tapping. Make sure to handle the shotgun and drill with caution to avoid any accidents or damage.
FAQ:
What tools do I need to drill and tap a shotgun?
To drill and tap a shotgun, you will need a drill press, a tap and die set, a center punch, a sharp drill bit, cutting oil, and a bench vise.
Is it difficult to drill and tap a shotgun?
Drilling and tapping a shotgun can be a bit challenging, especially if you don’t have prior experience with gunsmithing. However, with the right tools and step-by-step guidance, it is definitely doable.
What is the purpose of drilling and tapping a shotgun?
Drilling and tapping a shotgun allows you to attach additional accessories, such as scopes or red dot sights, to enhance your shooting experience and accuracy.
Do I need any specific knowledge or skills to drill and tap a shotgun?
While prior experience with drilling and gunsmithing is helpful, it is not absolutely necessary. With the right tools and following a step-by-step guide, you can successfully drill and tap your shotgun.
What should I consider before drilling and tapping my shotgun?
Before drilling and tapping your shotgun, you should consider the type of accessory you want to attach, determine the appropriate location for drilling and tapping, and take into account any potential modifications that may be required.
Can I easily remove the drill and tap holes if I change my mind?
The drill and tap holes can be removed from a shotgun, but it may not be a simple process. If you decide to remove the accessories and fill the holes, it is best to consult with a professional gunsmith to ensure proper removal and restoration of your firearm.
Video:


Meet Harrison Clayton, a distinguished author and home remodeling enthusiast whose expertise in the realm of renovation is second to none. With a passion for transforming houses into inviting homes, Harrison's writing at https://thehuts-eastbourne.co.uk/ brings a breath of fresh inspiration to the world of home improvement. Whether you're looking to revamp a small corner of your abode or embark on a complete home transformation, Harrison's articles provide the essential expertise and creative flair to turn your visions into reality. So, dive into the captivating world of home remodeling with Harrison Clayton and unlock the full potential of your living space with every word he writes.


