Simple steps to remove drill bit from Black and Decker drill

If you own a Black and Decker drill, it’s important to know how to properly remove a drill bit. Whether you want to switch to a different size bit or simply need to replace a worn-out one, knowing how to remove the drill bit safely can prevent damage to your drill and ensure your safety.
Here are some simple steps to follow when removing a drill bit from your Black and Decker drill:
- Power off the drill: Before attempting to remove the drill bit, make sure the drill is powered off and unplugged from any power source. This step is crucial to avoid accidental injuries.
- Locate the chuck: The chuck is the component that holds the drill bit in place. It is usually located at the front end of the drill. Take a moment to familiarize yourself with the chuck and how it operates.
- Secure the drill bit: Use one hand to hold the drill and the other hand to steady the chuck. Ensure that the drill bit is securely fastened in the chuck and that it is not twisted or loose.
- Release the chuck: To release the drill bit, rotate the chuck counterclockwise. This will loosen the grip of the chuck and allow you to remove the drill bit more easily.
- Remove the drill bit: Once the chuck is loosened, gently pull the drill bit out of the chuck. Be careful not to apply too much force or twist the bit forcefully, as this can cause damage to the drill.
By following these simple steps, you can safely and easily remove a drill bit from your Black and Decker drill. Remember to always exercise caution and refer to the manufacturer’s instructions for specific guidance on your particular drill model.
Tip: When removing a drill bit, it’s a good idea to have a designated container or space where you can store the removed bits. This will help you stay organized and prevent misplaced or lost drill bits.
Removing a drill bit from your Black and Decker drill should now be a breeze. With these simple steps, you can confidently switch between drill bits and perform a variety of tasks with ease.
Why do you need to remove a drill bit from a Black and Decker drill?
Removing a drill bit from a Black and Decker drill is a necessary step in various situations. Whether you want to change the drill bit size, switch to a different type of bit, or simply replace a worn-out bit, knowing how to remove the drill bit is essential.

Reasons for removing a drill bit:
- Changing the drill bit size: Different projects require different hole sizes. By removing the current drill bit, you can replace it with one that matches the specific size needed for your current task.
- Switching to a different type of bit: Depending on the material you are drilling into, you may need to use a different type of drill bit. For example, a wood drill bit is not suitable for drilling into metal. By removing the current bit, you can easily switch to the appropriate one.
- Replacing a worn-out bit: Over time, drill bits can become dull or damaged, affecting their performance. When this happens, it is important to remove the old bit and replace it with a new one to ensure efficient drilling and avoid any accidents.
Note: It is crucial to remove a drill bit from a Black and Decker drill properly to avoid injury. Always make sure the drill is turned off and unplugged before attempting to remove or replace the bit. Refer to the user manual or follow manufacturer guidelines for your specific drill model.
Step 1: Power off the drill
Before attempting to remove the drill bit from your Black and Decker drill, it is important to make sure that the drill is powered off. This will help prevent any accidents or injuries while working on the drill bit.
Here are the steps to power off the Black and Decker drill:

- Locate the power switch on the drill body. It is usually located near the grip or the top of the drill.
- Move the power switch to the “off” position. This will ensure that the drill is completely powered off.
- Double check that the drill is not connected to any power sources, such as an electrical outlet or a battery pack.
Once you have successfully powered off the drill, you can proceed with the next steps to remove the drill bit.
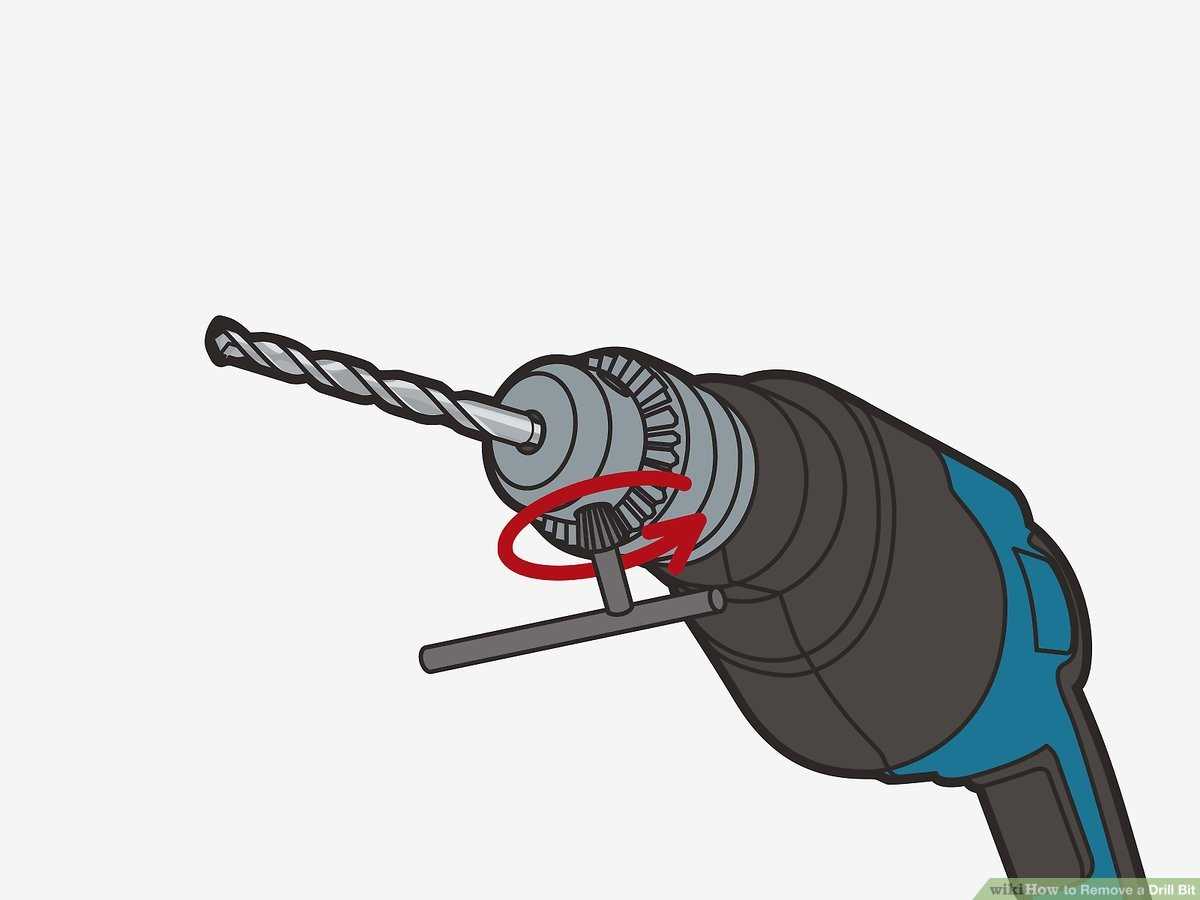
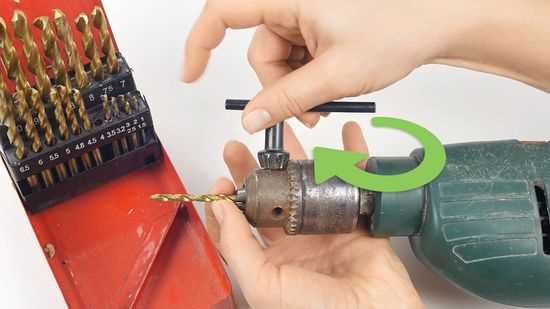
Step 2: Loosen the chuck
Once you have turned off the power to the drill and secured it in place, it’s time to loosen the chuck. The chuck is the part of the drill that holds the drill bit in place.
To loosen the chuck, you will need to rotate it counterclockwise. Most Black and Decker drills have a keyless chuck, which means you can loosen it by hand. However, some models may require the use of a chuck key.
If your drill has a keyless chuck, simply grip the chuck with one hand and rotate it counterclockwise. You may need to apply some force to loosen it, especially if it’s been tightly secured.
If your drill requires a chuck key, locate the chuck key and insert it into the holes on the chuck. Then, turn the key counterclockwise to loosen the chuck.

- For keyless chucks, grip the chuck and rotate counterclockwise.
- For chucks that require a key, insert the chuck key and turn counterclockwise.
Once the chuck is loose, you can continue to the next step in removing the drill bit.
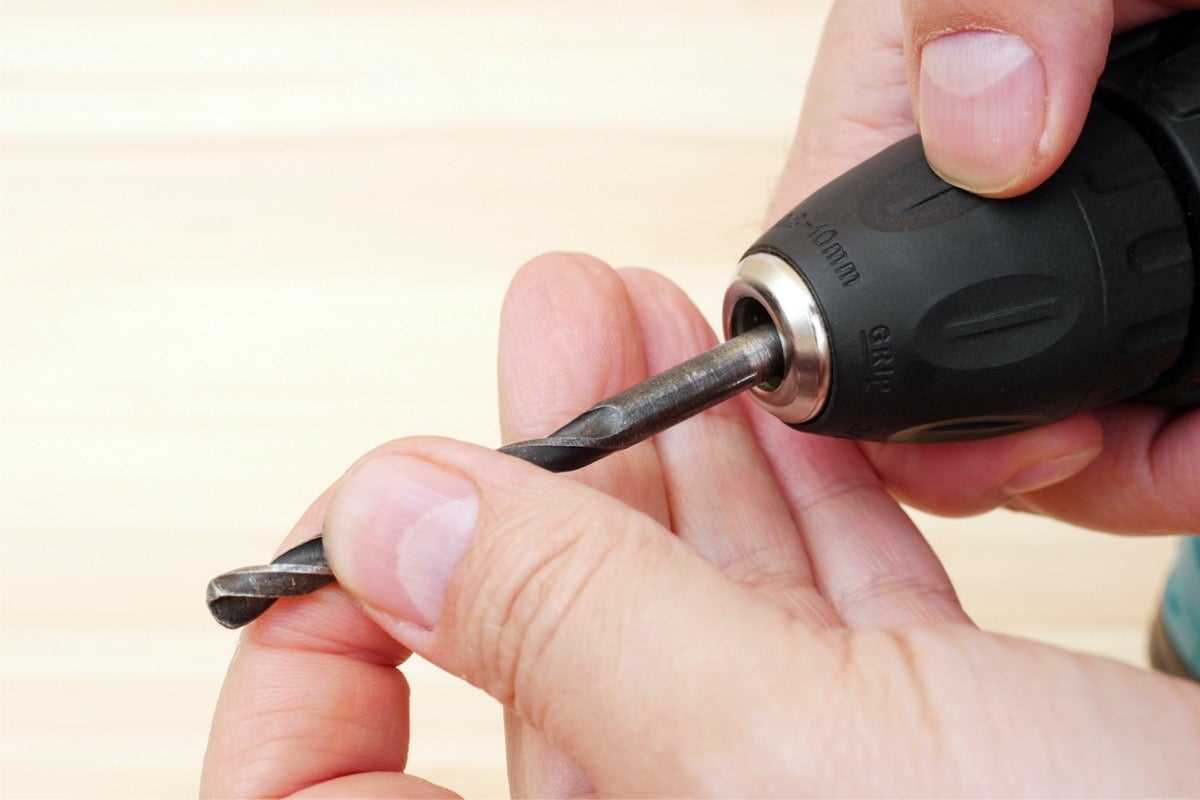
Step 3: Remove the drill bit
Once you have finished using the drill, it is important to remove the drill bit properly. Follow these steps to remove the drill bit from your Black and Decker drill:
- Turn off the drill and unplug it from the power source.
- Locate the chuck, which is the part of the drill that holds the drill bit in place. It is usually at the front of the drill.
- Hold the drill bit firmly with one hand to prevent it from rotating.
- Rotate the chuck counterclockwise with your other hand to loosen it. Keep rotating until the chuck is fully open.
- Gently pull the drill bit out of the chuck.
- Inspect the chuck to make sure no debris or other objects are stuck inside. Clean it if necessary.
Remember to handle the drill and drill bit with care. Use proper safety precautions and avoid any unnecessary pressure or force while removing the drill bit.
Step 4: Clean the chuck
After removing the drill bit, it’s important to clean the chuck to ensure optimal performance and longevity of your Black and Decker drill. Follow these steps to clean the chuck:

- Take a clean cloth or rag and dampen it with water or a mild cleaning solution.
- Gently wipe the exterior of the chuck to remove any dust, dirt, or debris that may have accumulated.
- If there are any stubborn stains or buildup, you can use a small brush or toothbrush to scrub the chuck gently.
- Once you have cleaned the exterior, open the chuck fully to expose the interior.
- Inspect the jaws of the chuck for any debris or obstructions. If there is any buildup, use the brush or toothbrush to clean it out.
- Once the chuck is clean, wipe it dry with a clean cloth or let it air dry for a few minutes.
- Inspect the chuck one final time to ensure there is no remaining debris or moisture.
Cleaning the chuck regularly will help maintain its functionality and prevent any issues during future drilling tasks. This simple step can go a long way in extending the lifespan of your Black and Decker drill.
Step 5: Replace the drill bit
- Choose the appropriate drill bit for your project. Consider the type of material you will be drilling into and the size hole you need.
- Hold the drill firmly with one hand, ensuring that the power is switched off.
- Align the shank of the new drill bit with the chuck and insert it into the opening.
- Rotate the chuck in a clockwise direction to tighten it around the drill bit. Use the chuck key, if necessary, to further secure the bit.
- Ensure that the drill bit is tightly fitted by gently pulling on it.
- Once you are confident that the drill bit is secure, you can proceed with your drilling task.
FAQ:
Can I use any type of pliers or wrench to remove the drill bit from a Black and Decker drill?
Yes, you can use any type of pliers or wrench that fits securely around the drill bit to remove it from a Black and Decker drill. However, it’s important to use caution and not apply too much force, as this can damage the chuck or the drill bit. It’s also a good idea to use a towel or some protective material to protect the chuck from scratches or dents while using the pliers or wrench.
Do I need to unplug the drill before removing the drill bit?
Yes, it is very important to unplug the drill before removing the drill bit. This is for your safety to avoid accidentally turning on the drill while removing the bit, which can result in injury. By unplugging the drill, you eliminate the risk of the drill accidentally turning on and ensure a safer environment while working on removing the drill bit.

Are there any special tools required to remove a drill bit from a Black and Decker drill?
No, you do not need any special tools to remove a drill bit from a Black and Decker drill. All you need is your hand to grip the chuck and rotate it counterclockwise to loosen and remove the drill bit. However, if the drill bit is stuck, you can use a pair of pliers or a wrench for some added leverage to help loosen and remove the bit.
Can I reuse the same drill bit after removing it from a Black and Decker drill?
Yes, you can definitely reuse the same drill bit after removing it from a Black and Decker drill, as long as it is still in good condition. Inspect the drill bit for any signs of wear or damage before reusing it. If the bit is still sharp and in good working condition, you can reinstall it in the drill and continue using it for your projects. However, if the drill bit is dull or damaged, it is best to replace it with a new one for optimal performance.
Video:


Meet Harrison Clayton, a distinguished author and home remodeling enthusiast whose expertise in the realm of renovation is second to none. With a passion for transforming houses into inviting homes, Harrison's writing at https://thehuts-eastbourne.co.uk/ brings a breath of fresh inspiration to the world of home improvement. Whether you're looking to revamp a small corner of your abode or embark on a complete home transformation, Harrison's articles provide the essential expertise and creative flair to turn your visions into reality. So, dive into the captivating world of home remodeling with Harrison Clayton and unlock the full potential of your living space with every word he writes.


