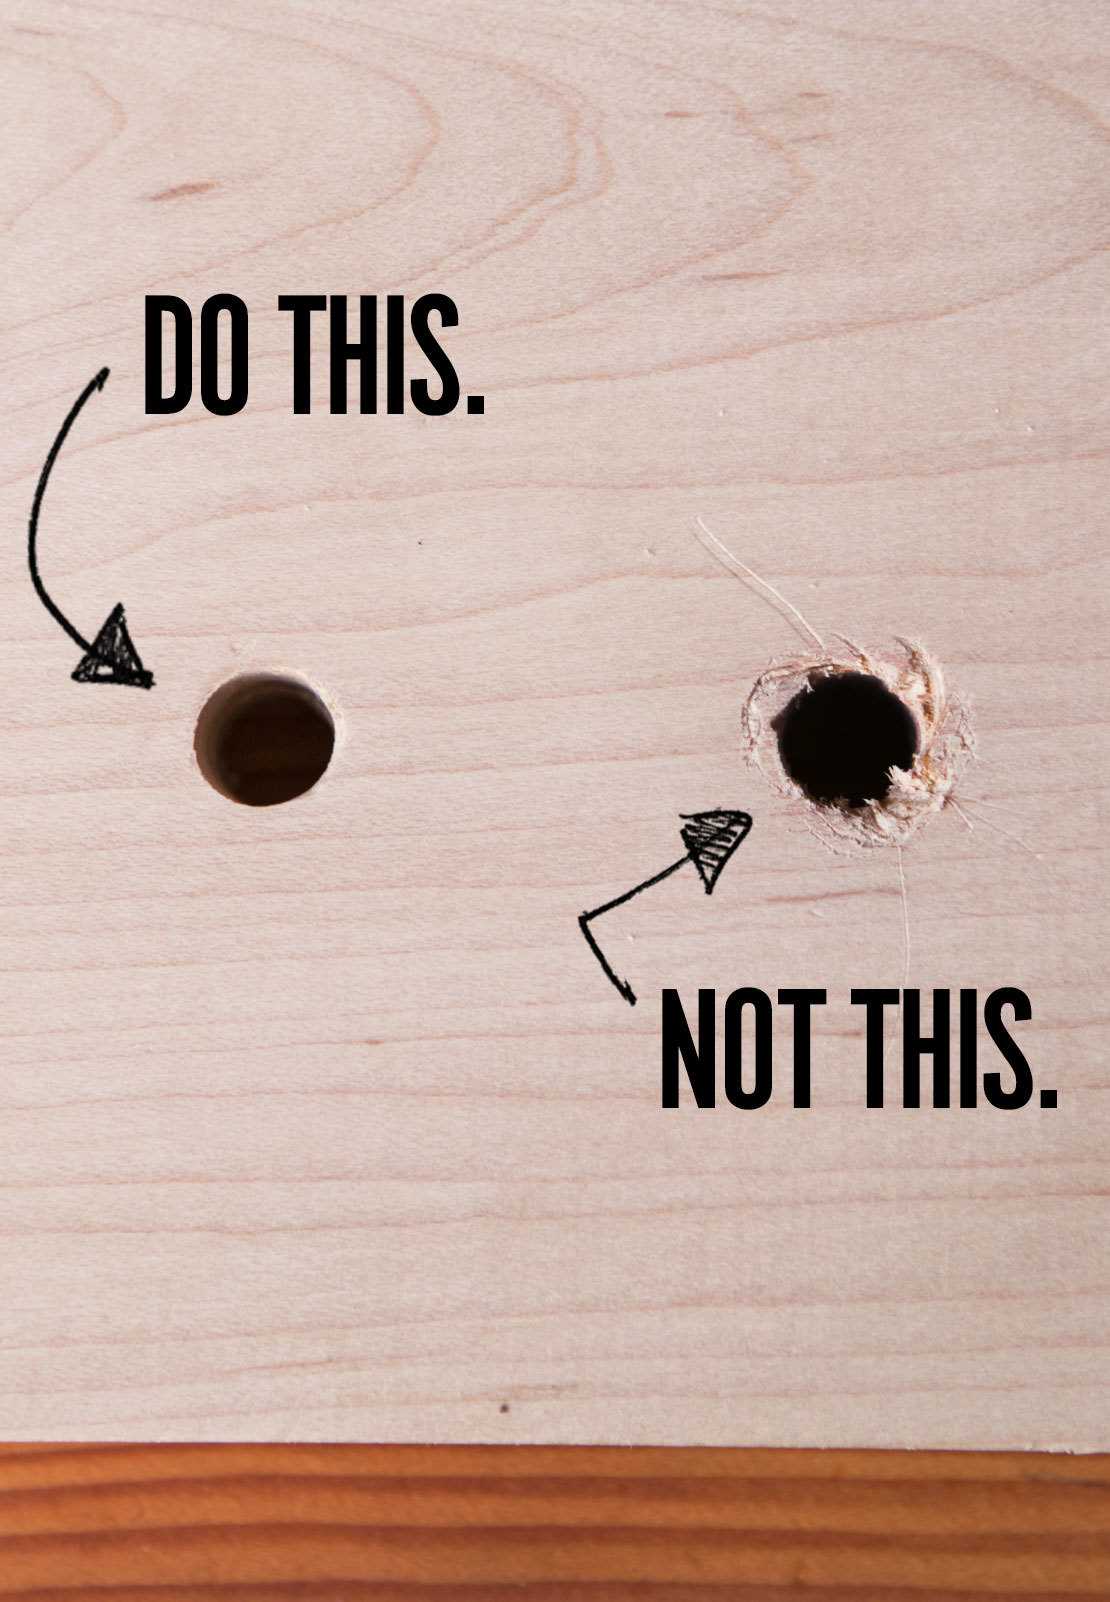
Simple steps to fill drill holes in wood

Drilling holes in wood is a common task in woodworking projects, but sometimes these holes need to be filled to create a smooth, finished surface. Whether you accidentally drilled a hole in the wrong spot or need to fill in old holes for a new project, the process of filling drill holes in wood is simple and can be easily done with a few basic tools and materials.
Before you start filling the drill holes, it’s important to gather all the necessary materials. You will need wood filler, sandpaper, a putty knife, a wooden dowel or plug, and wood glue. Wood filler can be found at most hardware stores and comes in different colors to match the wood you are working with. Sandpaper should be fine-grit, around 220-300, to ensure a smooth finish. The putty knife is used to apply the filler, while the wooden dowel or plug will be used for larger holes that need to be filled.
The first step in filling a drill hole is to clean the hole and surrounding area. Use a damp cloth or brush to remove any debris or dust. Next, apply a small amount of wood glue to the inside of the hole. This will help the filler adhere to the wood and prevent it from falling out over time. Once the glue has dried, you can begin applying the wood filler. Use the putty knife to fill the hole, making sure to press the filler firmly into place. For larger holes, cut a wooden dowel or plug slightly larger than the hole and secure it in place with wood glue before filling the hole with wood filler.
After the filler has been applied, allow it to dry completely. This usually takes a few hours, but the drying time can vary depending on the brand and type of filler used. Once the filler is dry, use sandpaper to smooth the surface. Start with coarse-grit sandpaper to remove any excess filler, and then switch to fine-grit sandpaper for a smoother finish. Sand in a circular motion, working your way around the filled hole until the surface is level and smooth. Wipe away any dust with a damp cloth, and your wood is now ready for finishing or painting.
Step 1: Prepare the materials and tools

Before you begin filling drill holes in wood, you need to gather the necessary materials and tools. Here is a list of items you’ll need:
- Wood filler or wood putty
- Putty knife or a flat-edged scraper
- Sandpaper (medium and fine grit)
- Damp cloth
- Paint or stain
- Paintbrush or sponge
Wood fillers or putties come in different colors, so choose one that matches the color of your wood to ensure a seamless repair.
A putty knife or a flat-edged scraper will help you apply the wood filler smoothly and evenly into the drill holes.
Sandpaper will be used to sand down the filled holes once they’re dry, creating a smooth and flush surface with the rest of the wood.
A damp cloth will come in handy to wipe away any excess wood filler or dust from the surface.

If desired, you can paint or stain the filled holes to match the surrounding wood. A paintbrush or sponge will be needed for this step.
Having all these materials and tools prepared before starting the process will make the job easier and more efficient.
Step 2: Clean the drill holes
After removing the debris from the drill holes, it’s important to clean them properly to ensure a smooth and secure fill. Here are the steps to clean the drill holes:
- Use a small brush or a vacuum cleaner to remove any remaining dust or wood shavings from the holes.
- Inspect the holes closely to ensure they are free from any loose particles or debris.
- If necessary, use a can of compressed air to blow out any stubborn dust that may be trapped in the holes.
Note: It is essential to have clean drill holes to ensure good adhesion between the wood filler and the wood surface.
Once you have completed the cleaning process, you can proceed to the next step, which is choosing the right wood filler to fill the drill holes.

Step 3: Choose the appropriate filler
Choosing the right filler for your drill holes is an important step to ensure a strong and long-lasting repair. There are several options available, each with its own advantages and disadvantages.
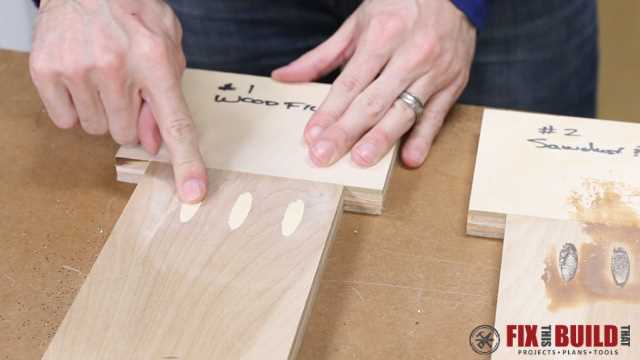
Wood filler
A popular choice for filling small to medium-sized drill holes in wood is wood filler. Wood filler is a putty-like substance that can be applied to the hole and sanded down once it dries. It is easy to use and can be colored and stained to match the surrounding wood. However, wood filler is not as strong as other filler options and may crack or shrink over time.
Epoxy resin
Epoxy resin is a versatile filler option suitable for both small and large drill holes. It consists of two parts – a resin and a hardener that are mixed together to create a strong, durable material. Epoxy resin is resistant to shrinkage and cracking, making it an excellent choice for long-lasting repairs. However, it can be more challenging to work with than wood filler and requires careful mixing and application.
Sawdust and glue mixture
If you prefer a more natural filler option, you can create your own by mixing sawdust with wood glue to create a paste. This mixture can be applied to the drill hole and sanded down once dry. The advantage of using sawdust and glue is that it blends well with the surrounding wood and is a cost-effective option. However, it may not be as strong as other fillers and may not be suitable for larger or deeper drill holes.
Choosing the right filler
When choosing the filler for your drill holes, consider factors such as the size and depth of the hole, the strength required, and the desired aesthetic result. Wood filler is a good choice for small holes and when color matching is important. Epoxy resin is ideal for larger holes and when durability is a priority. Sawdust and glue mixture can be used for smaller holes and when a natural look is desired. It’s always a good idea to test the filler on a small, inconspicuous area before applying it to the entire drill hole.

Step 4: Apply the filler to the drill holes
Now that you have prepared the wood and mixed the filler, it’s time to apply it to the drill holes. Follow these steps to ensure a smooth and seamless finish:
1. Use a putty knife
Take a putty knife or a flexible scraper and dip it into the mixed filler. Make sure to scoop up a sufficient amount to cover the entire drill hole.
2. Apply the filler
Press the putty knife against the drill hole and firmly swipe it across the surface in a perpendicular or diagonal motion. This will fill the hole with the filler and ensure that it is evenly distributed.
3. Scrape off excess filler
After applying the filler, gently scrape off any excess using the putty knife. Be careful not to remove too much or damage the surrounding wood surface.
4. Smooth out the filler
Using the edge of the putty knife, gently smooth out the filler and level it with the surrounding wood surface. This will help create a seamless finish once the filler dries.

5. Allow the filler to dry
Leave the filled drill holes undisturbed for the amount of time specified on the filler’s packaging. This will ensure that the filler dries completely and adheres well to the wood.
6. Sand the filled holes
Once the filler has dried, use sandpaper to smoothen the filled drill holes. Start with a coarse grit sandpaper and gradually move to finer grits until the filled holes are smooth and flush with the surface of the wood.
7. Clean up the excess dust
After sanding, use a clean cloth or brush to remove any dust or debris from the drilling and filling process. This will allow you to achieve a clean and polished finish.
Following these steps will help you successfully fill drill holes in wood and ensure that your finished project looks professional and seamless.
Step 5: Allow the filler to dry
After you have applied the wood filler to the drill holes, you will need to allow it to dry completely. The drying time will vary depending on the brand and type of wood filler you are using, so it is important to consult the manufacturer’s instructions for the recommended drying time.
It is essential to let the filler dry thoroughly before proceeding with any further steps. If you attempt to sand, paint, or finish the filled drill holes before the filler is completely dry, you run the risk of damaging the repair and affecting the overall appearance and durability of the wood.
During the drying process, it is advisable to keep the area well-ventilated to aid in the evaporation of any moisture within the filler. This can be done by keeping windows open or using fans to circulate air. Additionally, it is essential to protect the area from any potential damage or contact while the filler is drying.
Once the recommended drying time has passed, you can proceed to the next step of sanding the filled drill holes to achieve a smooth and seamless finish.
Step 6: Sand the filled drill holes
Once the filler has dried completely, it is time to sand the filled drill holes. Sanding will help to level the filler with the surface of the wood, making it smooth and even. This step is crucial for achieving a professional finish.
- Start by selecting a fine-grit sandpaper, such as 120-grit or higher. This will prevent the wood from getting scratched while sanding.
- Wrap the sandpaper around a sanding block or use your fingers to hold it firmly, ensuring a consistent pressure while sanding.
- Gently sand the filled drill holes in a circular motion, making sure to cover the entire area and keeping the sandpaper flat against the wood surface.
- Check the progress frequently to avoid over-sanding. Once the filled holes are flush with the surrounding wood, stop sanding.
- After sanding, wipe away the dust with a clean cloth or use a vacuum to remove any debris from the surface.
- Inspect the filled drill holes to ensure they are smooth and evenly sanded. If needed, repeat the sanding process to achieve the desired result.
Remember to be gentle and patient while sanding to avoid damaging the surrounding wood. Take your time and make sure the filled drill holes blend seamlessly with the rest of the wood surface.
Step 7: Prime and paint the filled drill holes
After filling the drill holes in the wood, it’s important to prime and paint them to ensure a seamless finish. This step will help the filled holes blend in with the rest of the wood surface.
Materials You Will Need:
- Primer
- Paint (matching the color of the wood)
- Paintbrush
- Sandpaper
- Cloth or rag
Instructions:
- Start by lightly sanding the filled drill holes to smooth out any roughness. Use a fine-grit sandpaper and gently sand the surface in a circular motion.
- Once you’ve sanded the filled areas, wipe away any dust or debris with a clean cloth or rag.
- Apply a coat of primer to the filled drill holes. The primer will help the paint adhere better and ensure an even finish. Use a small paintbrush to apply the primer, making sure to cover the entire filled area.
- Allow the primer to dry according to the manufacturer’s instructions. This usually takes around 1-2 hours.
- Once the primer is completely dry, you can paint over the filled drill holes. Dip your paintbrush into the paint, making sure to coat the bristles evenly.
- Apply the paint to the filled holes using smooth, even strokes. Take your time and be careful not to paint outside the boundaries of the filled area.
- Allow the paint to dry completely between coats. Depending on the paint and the color of the wood, you may need to apply multiple coats for full coverage.
- Once the final coat of paint is dry, inspect the filled drill holes to ensure they are indistinguishable from the rest of the wood surface. If necessary, touch up any imperfections with additional paint.
By following these simple steps, you can achieve a professional-looking finish for your filled drill holes. Remember to allow proper drying time between each step to ensure the best results.
Step 8: Finishing touches and maintenance
Once you have filled the drill holes in your wood, there are a few finishing touches and maintenance steps you can take to ensure that the repair is durable and long-lasting.
Clean the surface
Before proceeding with any additional steps, make sure to clean the surface of the wood. Use a soft cloth or brush to remove any dust or debris from the filled holes and surrounding area.
Sand the repaired area
After the filler has dried completely, use sandpaper to smooth down the filled drill holes. Start with a coarse-grit sandpaper to remove any excess filler and level the surface. Then, switch to a finer-grit sandpaper to achieve a smooth finish.
Apply a wood filler sealer
To further protect and strengthen the repaired area, apply a wood filler sealer. This will help to prevent any moisture or liquids from seeping into the filled holes, which can cause swelling or damage to the wood over time. Follow the manufacturer’s instructions for application and drying times.
Touch up with paint or stain
If your wood has been painted or stained, you may need to touch up the repaired area to match the surrounding wood. Use a small paintbrush or sponge applicator to carefully apply a matching paint or stain to the filled holes. Allow the paint or stain to dry completely before proceeding.
Perform regular maintenance
To ensure the longevity of the repaired wood, it’s important to perform regular maintenance. This may include periodic cleaning, reapplying the wood filler sealer, and touch-ups with paint or stain as needed. By taking these steps, you can keep your wood looking its best and prevent further damage or deterioration.
Following these finishing touches and maintenance steps will help to ensure that the drill holes in your wood are properly filled and well-maintained for years to come.
FAQ:
How can I fill drill holes in wood?
To fill drill holes in wood, you can follow some simple steps. Firstly, gather the necessary materials such as wood filler, putty knife, sandpaper, and a clean cloth. Begin by cleaning the drill hole and removing any debris or dust. Then, apply the wood filler using the putty knife, making sure to slightly overfill the hole. Allow the filler to dry completely. Once dry, use sandpaper to smooth out the surface. Finally, wipe away any dust with a clean cloth and the drill hole should be filled in and ready for further finishing.
What materials do I need to fill drill holes in wood?
To fill drill holes in wood, you will need a few basic materials. These include wood filler or putty, putty knife, sandpaper, and a clean cloth. The wood filler will be used to fill in the hole, while the putty knife is necessary for applying the filler. Sandpaper is needed to smooth out the surface, and a clean cloth is used to wipe away any dust or debris. With these materials on hand, you will be able to easily fill drill holes in wood.
What should I do after filling the drill holes in wood?
After filling the drill holes in wood, there are a few additional steps you can take. Firstly, you can apply a final coat of paint or finish to the filled area to match the surrounding wood. This will help to blend the filled area and make it less noticeable. Additionally, you may want to re-sand and re-finish the entire wood surface to ensure a consistent appearance. If you are working with a larger hole or a more noticeable area, you may also need to consider using a wood patch or a plug to fill the hole instead of just wood filler. Overall, the key is to take the necessary steps to achieve a smooth and seamless finish that matches the rest of the wood surface.
Video:


Meet Harrison Clayton, a distinguished author and home remodeling enthusiast whose expertise in the realm of renovation is second to none. With a passion for transforming houses into inviting homes, Harrison's writing at https://thehuts-eastbourne.co.uk/ brings a breath of fresh inspiration to the world of home improvement. Whether you're looking to revamp a small corner of your abode or embark on a complete home transformation, Harrison's articles provide the essential expertise and creative flair to turn your visions into reality. So, dive into the captivating world of home remodeling with Harrison Clayton and unlock the full potential of your living space with every word he writes.


