Simple steps to cut and drill plexiglass with ease

Plexiglass, also known as acrylic glass, is a versatile material that is used in a wide variety of applications, from windows and signs to furniture and art installations. While it offers many benefits, such as being lightweight and shatter-resistant, working with plexiglass can be challenging if you don’t have the right tools or techniques.
Fortunately, cutting and drilling plexiglass doesn’t have to be difficult. With a few simple steps and the right tools, you can achieve clean, precise cuts and holes in plexiglass without causing any damage or cracking. Whether you’re a DIY enthusiast or a professional craftsman, these tips will help you tackle plexiglass projects with ease.
Before you begin cutting or drilling plexiglass, it’s important to gather all the necessary tools and materials. You will need a few basic tools, such as a scoring knife or a jigsaw with a plexiglass blade for cutting, and a drill with a special acrylic bit for drilling. Additionally, you’ll need a few safety items, including safety goggles to protect your eyes from flying debris and gloves to protect your hands.
Once you have all the tools and materials ready, it’s time to start the process. The first step is to mark the cutting or drilling path on the plexiglass using a marker or a pencil. Use a ruler or a straight edge to ensure straight lines and accurate measurements. For drilling holes, make sure to indicate the center point of the hole with a small dot.
Importance of Cutting and Drilling Plexiglass
Plexiglass, also known as acrylic glass, is a versatile material that is commonly used in various applications such as windows, signage, and displays. It offers several advantages over traditional glass, including being lighter, more impact-resistant, and easier to work with. However, cutting and drilling plexiglass requires careful attention and specific tools to ensure accurate and clean results.

1. Precision and Accuracy
Cutting and drilling plexiglass with precision and accuracy is crucial to achieve the desired outcome. Whether you are creating a custom-sized window or a decorative piece, accurate measurements and clean cuts are essential. Any mistakes or inaccuracies can result in ill-fitting pieces or damage to the material.
2. Avoiding Cracks and Chips
Plexiglass is prone to cracking and chipping if not cut or drilled properly. The material is more brittle compared to glass, so it requires careful handling and the use of appropriate tools. Incorrect cutting or drilling techniques can cause stress on the edges, resulting in cracks, chips, or even breakage.
3. Safety and Protection
Working with plexiglass involves potential hazards, such as sharp edges and flying debris. Accurate cutting and drilling techniques help minimize the risk of accidents while ensuring a safe working environment. It is important to wear appropriate safety gear, such as gloves and eye protection, during the cutting and drilling process.
4. Professional Appearance
Cutting and drilling plexiglass carefully can greatly enhance the overall appearance of the finished product. Clean edges and evenly spaced holes contribute to a professional and polished look. Whether you are creating a display case, a protective shield, or an artistic piece, proper cutting and drilling techniques are essential to achieve a high-quality result.
5. Time and Cost Efficiency
Using the right cutting and drilling techniques can save both time and money. Accurate measurements and cuts ensure that you do not waste any material. Additionally, clean holes eliminate the need for additional finishing or rework. By investing time and effort in learning proper cutting and drilling methods, you can complete your projects more efficiently and cost-effectively.

In conclusion, understanding the importance of cutting and drilling plexiglass with care and precision is vital for achieving desired results. Whether you are a DIY enthusiast or a professional, following proper techniques ensures accurate measurements, minimizes the risk of cracks or chips, promotes safety, enhances the product’s appearance, and increases overall efficiency.
Tools Needed
- Acrylic cutter or plastic scoring tool
- Power drill with a compatible drill bit for plexiglass
- Clamps or a vice to secure the plexiglass
- Measuring tape or ruler
- Masking tape
- Safety goggles
- Sandpaper or a sanding block with different grits
Preparing the Plexiglass
Clean the Plexiglass
Before you start cutting or drilling the plexiglass, it’s important to ensure that the surface is clean and free from any dirt, dust, or debris. Use a mild detergent or glass cleaner and a soft, lint-free cloth to clean the plexiglass thoroughly. Make sure to remove any grease or fingerprints as well.
Measure and mark your cuts
Next, measure and mark the desired cuts on the plexiglass using a pencil or a marker. Be precise and use a ruler or a straight edge to make straight lines. You can also use masking tape as a guide if needed.

Protect the plexiglass
To prevent any damage to the plexiglass during the cutting or drilling process, it’s essential to protect it. Place masking tape along the cutting line or the area where you will be drilling. This will help reduce the risk of chipping or cracking.
Secure the plexiglass
Before you begin cutting or drilling, make sure the plexiglass is properly secured. Place it on a stable surface, such as a workbench or a table, and use clamps or suction cups to hold it in place. This will prevent it from moving or vibrating during the process, ensuring cleaner and more precise cuts or holes.
Wear safety gear
When working with plexiglass, it’s important to protect yourself. Wear safety goggles to shield your eyes from any flying debris, and use gloves to protect your hands. Additionally, consider using a dust mask to avoid inhaling any particles that may be generated during the cutting or drilling process.
Marking the Cutting Lines
Before you begin cutting plexiglass, it’s important to mark the cutting lines accurately. This will help ensure that you make precise cuts and avoid any mistakes.
Here are some simple steps to mark the cutting lines on your plexiglass:

- Measure and mark the dimensions: Use a measuring tape or ruler to determine the length and width of the piece of plexiglass you need. Mark these measurements on the protective film covering the plexiglass using a pencil or marker.
- Use a straight edge: Place a straight edge, such as a ruler or a piece of wood, along the marked lines. This will ensure that your lines are straight and accurate.
- Score the cutting lines: Take a utility knife or a glass cutter and score along the marked lines. Apply firm and even pressure, making sure to keep the tool perpendicular to the surface of the plexiglass.
- Repeat the scoring process: Repeat the scoring process several times, going over the lines to deepen the score. This will make it easier to break the plexiglass along the score line.
- Apply masking tape: If you’re worried about the plexiglass chipping or cracking during the cutting process, you can apply masking tape along the cutting lines. This can help prevent any damage and provide additional support.
By following these steps, you’ll be able to mark the cutting lines accurately and ensure a clean and precise cut when working with plexiglass.
Cutting Plexiglass
When it comes to cutting plexiglass, there are a few simple steps you can follow to ensure a clean and precise cut. Whether you’re using a power tool or a hand tool, it’s important to have the right technique and tools to get the job done safely and effectively.
Step 1: Measure and Mark
Start by measuring and marking the outline of the cut you want to make on the plexiglass. Use a ruler or a measuring tape to ensure accurate measurements. Use a fine-tip marker or a grease pencil to mark the lines on the protective film layer of the plexiglass.
Step 2: Prepare the Tool
Before cutting, make sure your tool is properly set up. If you’re using a power tool like a circular saw or a jigsaw, choose a blade with fine teeth that are designed for cutting plexiglass. If you’re using a hand tool like a handsaw or a scoring knife, make sure the blade is sharp and appropriate for cutting plexiglass.
Step 3: Cutting Techniques
There are several cutting techniques you can choose from depending on the tool you’re using and the type of cut you want to make. For straight cuts, use a straightedge or a guide to help guide the tool along the marked lines. Apply steady and even pressure while cutting, making sure not to force the tool through the plexiglass.

For curved cuts, you can use a jigsaw with a fine-tooth blade or a coping saw. Start by drilling a small hole near the edge of the marked line, then insert the blade into the hole and carefully cut along the curve.
Step 4: Finishing Touches
After cutting the plexiglass, remove the protective film layer and clean any debris or dust from the surface. If there are any rough edges, use sandpaper or a file to smooth them out. For a polished and finished look, you can also use a flame polisher or a heat gun to soften the edges of the cut.
Remember to always wear safety goggles and gloves when cutting plexiglass to protect yourself from flying debris and sharp edges. Take your time and work slowly to ensure a clean and precise cut.
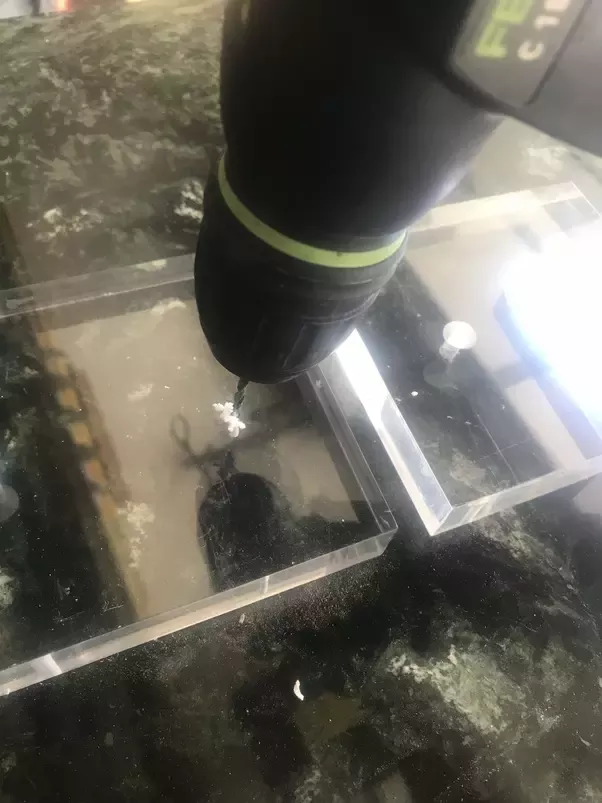
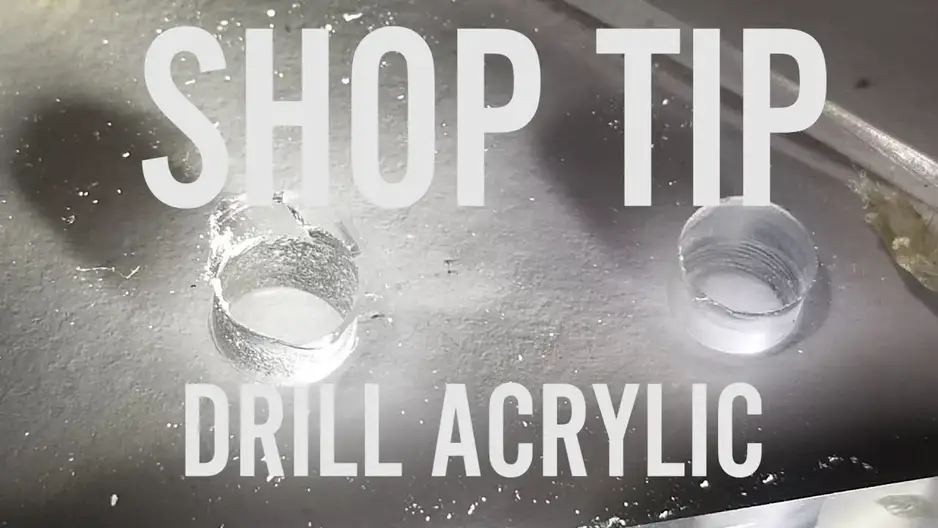
Drilling Plexiglass
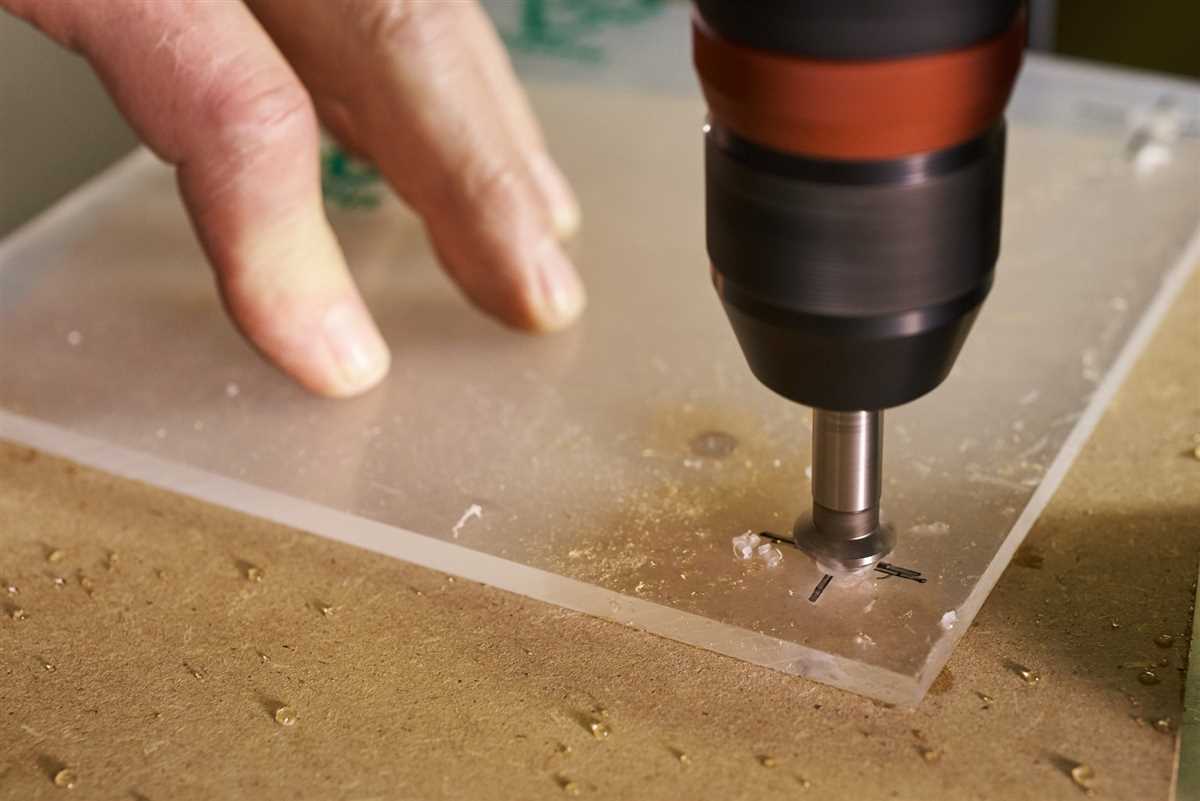
Drilling plexiglass requires caution and the right tools to ensure a clean and precise hole. Follow these steps to drill plexiglass:

- Choose the right drill bit: For drilling plexiglass, it is best to use a drill bit specifically made for plastics or a brad point drill bit. These types of drill bits have a sharper tip and are less likely to cause cracking or splintering.
- Secure the plexiglass: Place the plexiglass on a stable work surface and use clamps or a vise to secure it firmly. This will prevent the plexiglass from moving or vibrating while drilling.
- Mark the drill location: Use a pencil or a marker to mark the exact spot where you want to drill the hole. Double-check the placement to ensure accuracy.
- Apply masking tape: Placing masking tape over the area to be drilled can help prevent cracking or chipping. It acts as a protective barrier and reduces the chance of the drill bit grabbing onto the plexiglass.
- Start at a low speed: The key to drilling plexiglass is to start at a low speed. This reduces the risk of the plexiglass cracking or melting due to excessive heat generated by the friction of the drill bit.
- Drill slowly and steadily: Apply gentle pressure and drill slowly through the plexiglass. Do not force the drill bit and let it do the work. If you notice any signs of cracking or excessive heat, stop immediately and reevaluate the drilling process.
- Use a lubricant: Applying a lubricant, such as water or cutting oil, can help reduce heat and friction while drilling. This can improve the cutting performance and extend the life of the drill bit.
- Clean up the hole: After drilling, remove the masking tape and use a file or sandpaper to smooth the edges of the hole. This will ensure a clean and polished finish.
By following these steps and using the right tools and techniques, you can easily drill holes in plexiglass without damaging or cracking the material.
Finishing Touches
After cutting and drilling your plexiglass, there are a few finishing touches you can apply to make your project look even better.
1. Sanding
Using sandpaper with a fine grit, gently sand the edges of the cut plexiglass to remove any rough edges or burrs. Be careful not to apply too much pressure or use a coarse grit, as this could cause the plexiglass to crack or shatter.
2. Cleaning
Before applying any adhesive or finishing products, it’s important to clean the plexiglass thoroughly. Use a mild soap or detergent mixed with warm water and a soft cloth to remove any dust, fingerprints, or debris. Rinse with clean water and dry with a lint-free cloth.
3. Buffing
If you want to achieve a polished finish on the edges of your plexiglass, you can use a buffing wheel or a handheld rotary tool with a buffing attachment. Apply a polishing compound to the edge and gently buff in a circular motion until the desired shine is achieved. Be careful not to apply too much pressure to avoid overheating the plexiglass.

4. Sealing
If your project will be exposed to moisture or outdoor elements, it’s recommended to seal the edges of the plexiglass to prevent water infiltration. You can use a clear adhesive or sealant specifically designed for plexiglass, applying it evenly along the edge. Be sure to follow the manufacturer’s instructions for drying time and curing.
5. Finishing Options
If you’re looking for additional finishing options, you can consider applying a protective film or coating to the surface of the plexiglass to prevent scratches or UV damage. There are also specialty products available that can provide a matte or glossy finish, depending on your desired look.
Conclusion
By following these finishing touches, you can ensure your plexiglass project looks professional and polished. Remember to take your time, use caution, and follow any specific instructions or recommendations from the manufacturer. With the right tools and techniques, you can achieve beautiful and durable results with plexiglass.
FAQ:
What is plexiglass made of?
Plexiglass is made of acrylic, a synthetic material derived from petroleum.
Can I use a regular drill bit to drill plexiglass?
No, using a regular drill bit may cause the plexiglass to crack or shatter. It is recommended to use a drill bit designed specifically for plastics.
What is the best way to cut plexiglass?
The best way to cut plexiglass is by using a suitable saw, such as a circular saw with a fine-toothed blade, or a table saw with a specialized acrylic blade. It is important to secure the plexiglass and go slow to avoid chipping or breaking.
Can I use a jigsaw to cut plexiglass?
Yes, a jigsaw can be used to cut plexiglass. However, it is important to use a fine-toothed blade designed for plastics and to go slow to prevent cracking or splintering of the material.
Is it possible to polish the edges of cut plexiglass?
Yes, it is possible to polish the edges of cut plexiglass. This can be done using a fine-grit sandpaper or a polishing compound specifically designed for acrylic surfaces.
What safety precautions should I take when working with plexiglass?
When working with plexiglass, it is important to wear safety goggles, gloves, and a mask to protect yourself from flying debris. It is also recommended to work in a well-ventilated area and to secure the plexiglass properly to prevent accidents.
Can I use a hot knife to cut plexiglass?
No, using a hot knife to cut plexiglass is not recommended as it can cause the material to melt and create uneven edges. It is best to use a saw or a jigsaw with a fine-toothed blade for clean and precise cuts.
Video:


Meet Harrison Clayton, a distinguished author and home remodeling enthusiast whose expertise in the realm of renovation is second to none. With a passion for transforming houses into inviting homes, Harrison's writing at https://thehuts-eastbourne.co.uk/ brings a breath of fresh inspiration to the world of home improvement. Whether you're looking to revamp a small corner of your abode or embark on a complete home transformation, Harrison's articles provide the essential expertise and creative flair to turn your visions into reality. So, dive into the captivating world of home remodeling with Harrison Clayton and unlock the full potential of your living space with every word he writes.


