Sharpening Drill Bits with a Bench Grinder: Step-by-Step Guide

Drill bits are one of the most widely used tools in home improvement projects and workshops. Over time, they can become dull and lose their cutting edge, making drilling a frustrating and time-consuming task. Fortunately, you don’t have to replace your drill bits every time they become dull. With a bench grinder, you can easily sharpen them and restore their original performance.
Sharpening drill bits with a bench grinder may seem intimidating at first, but with the right technique and practice, it can become a simple and efficient process. In this step-by-step guide, we will walk you through the process of sharpening drill bits using a bench grinder, from preparing the grinder to properly holding the bit and achieving the correct angle.
Before you start, it’s important to note that the sharpening process can generate a significant amount of heat, so it’s essential to take safety precautions. Make sure to wear safety goggles and gloves to protect your eyes and hands. Additionally, keep a container of water nearby to cool down the bit during the sharpening process.
Step 1: Prepare the Grinder
The first step in sharpening drill bits with a bench grinder is to prepare the grinder. Start by checking the condition of the grinding wheel and making sure it is properly aligned. If it is worn out or not aligned, replace or adjust it accordingly. Next, adjust the tool rest to the appropriate angle for sharpening drill bits. It’s recommended to set the angle between 118 and 135 degrees, depending on the type of drill bit you are sharpening.

Choosing the Right Bench Grinder
When it comes to sharpening drill bits with a bench grinder, it’s important to have the right equipment. Choosing the right bench grinder can make all the difference in the quality of the results you achieve. Here are some factors to consider when selecting a bench grinder for sharpening drill bits:
Grinder Size
The size of the bench grinder is an important consideration. A larger grinder will have a larger grinding wheel, which can be advantageous when sharpening bigger drill bits. However, larger grinders also tend to be more expensive and take up more space. Consider the size of the drill bits you typically work with and choose a grinder that can accommodate them.
Motor Power
The power of the grinder’s motor is another important factor to consider. A more powerful motor will be able to grind through tougher materials and maintain a consistent speed, which is crucial for achieving accurate results. Look for a bench grinder with a motor that has at least 1/2 horsepower for best performance.
Variable Speed
Having the ability to adjust the speed of the bench grinder can be beneficial when sharpening drill bits. Different drill bit materials may require different grinding speeds for optimal results. Look for a bench grinder that offers variable speed control, so you can easily adjust the speed to suit the specific drill bit you’re working with.

Wheel Type
The type of grinding wheel that comes with the bench grinder is also worth considering. Different wheels are designed for different materials and purposes. For sharpening drill bits, a grinding wheel with a medium grit is generally recommended. This will provide a good balance between material removal and achieving a sharp edge. Look for a bench grinder that comes with a medium-grit grinding wheel, or consider purchasing one separately.
Safety Features
Safety should always be a top priority when using a bench grinder. Look for a grinder that comes with safety features such as spark guards and eye shields to protect yourself from flying sparks and debris. Additionally, consider a grinder with a work light to improve visibility during the sharpening process.
Brand Reputation
Lastly, consider the reputation of the brand when choosing a bench grinder. Look for a reputable brand with a track record of producing high-quality tools. Reading customer reviews and researching the brand’s reputation can help you make an informed decision.
By considering these factors and choosing the right bench grinder, you can ensure that you have the necessary equipment to sharpen your drill bits effectively and efficiently.
Safety Precautions
- Always wear safety goggles to protect your eyes from any flying debris or sparks during the sharpening process.
- Wear ear protection to prevent hearing damage as the grinder can produce loud noise.
- Ensure that the bench grinder is securely mounted on a stable surface before use to prevent it from moving or tipping over.
- Check that the grinding wheel is properly installed and aligned before turning on the grinder.
- Make sure the drill bit is securely clamped in the grinder’s tool rest and handle it with care to avoid accidental slips or drops.
- Keep your hands and fingers away from the grinding wheel during operation to avoid injury.
- Do not wear loose clothing or jewelry that could get caught in the grinder.
- Do not apply excessive pressure on the drill bit while sharpening, as it can lead to overheating or damage to the bit.
- Take regular breaks during the sharpening process to prevent fatigue and maintain concentration.
- Ensure that the grinder is turned off and unplugged when not in use.
- Read and follow the manufacturer’s instructions and guidelines for the specific model of bench grinder being used.
By following these safety precautions, you can ensure a safe and effective drill bit sharpening process with a bench grinder.

Preparation
Before sharpening your drill bits, you need to gather a few materials and make sure you have a safe and suitable area to work in. Here are the steps you need to follow:
1. Gather the necessary materials:
Make sure you have the following items before attempting to sharpen your drill bits:
- A bench grinder with a fine-grit grinding wheel.
- Protective gear, such as safety glasses and gloves.
- A drill bit gauge or caliper to measure the angles of the drill bits.
- A cleaning brush or cloth to remove debris from the drill bits.
- A container or tray to catch any metal shavings or debris.
2. Set up a safe work area:
Choose a well-lit area with good ventilation for your work. Make sure your bench grinder is securely anchored to a stable surface to prevent it from moving while you work. Clear away any clutter and ensure you have enough space to maneuver.
3. Inspect the drill bits:
Examine the drill bits you want to sharpen for any damages or excessive wear. If a drill bit is cracked, chipped, or has missing carbide tips, it may not be suitable for sharpening and should be replaced instead.
Note: Only sharpen drill bits that are in good condition and not excessively worn or damaged.

4. Familiarize yourself with the grinder:
If you’re new to using a bench grinder, take some time to read the manufacturer’s instructions and understand how the grinder operates. Pay attention to the safety features and precautions that need to be followed.
Tip: It’s always a good idea to practice on an old or inexpensive drill bit before sharpening your more valuable bits, especially if you’re new to using a grinder.
Setting Up the Bench Grinder
Before you start sharpening your drill bits, it’s important to properly set up the bench grinder. Follow these steps to ensure you have a safe and effective setup:

- Choose a suitable location: Select a well-lit area with enough space to comfortably operate the bench grinder. Make sure the grinder is positioned on a sturdy and level workbench or stand.
- Secure the grinder: Attach the bench grinder securely to the workbench or stand using bolts or clamps. This will prevent it from moving or vibrating excessively during use, ensuring stability.
- Check the grinder’s condition: Inspect the grinder for any damage or loose parts. Ensure that the grinding wheels are in good condition and properly aligned. Replace any damaged or worn-out parts before use.
- Select the appropriate grinding wheel: Choose a grinding wheel specifically designed for sharpening drill bits. Check the manufacturer’s recommendations for your grinder model to determine the correct size and type of wheel to use.
- Adjust the tool rest: Set the tool rest at the correct distance from the grinding wheel. The tool rest should be positioned so that it supports the drill bit evenly and allows for smooth and controlled grinding. Consult the grinder’s manual for specific guidelines.
- Ensure proper eye and face protection: Always wear safety goggles or a face shield to protect your eyes from sparks, debris, and the grinding wheel. Safety glasses with side shields are also recommended.
By following these setup steps, you’ll create a safe and efficient working environment for sharpening your drill bits using a bench grinder.
Sharpening Process
The sharpening process for drill bits using a bench grinder involves several steps to ensure precision and effectiveness. Follow the steps below to sharpen your drill bits:
Step 1: Safety Precautions
- Ensure you are wearing safety goggles, gloves, and a dust mask to protect yourself from sparks, metal filings, and debris.
- Secure the drill bit firmly in a vise or clamping device to prevent accidents or slips.
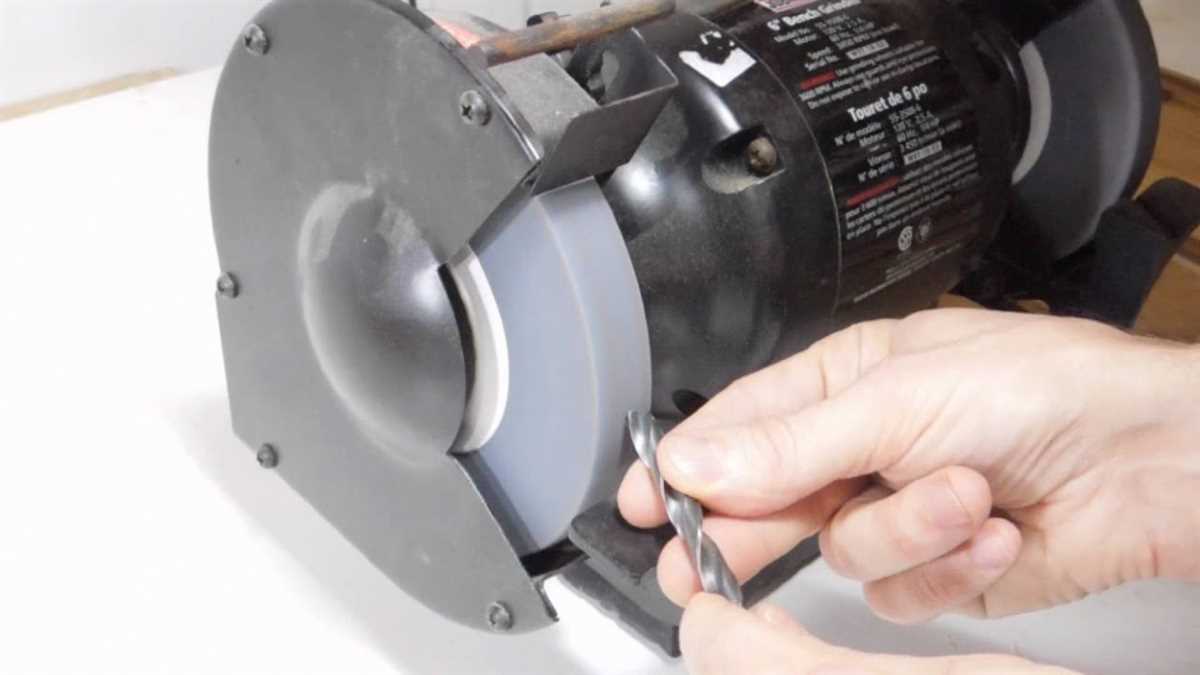
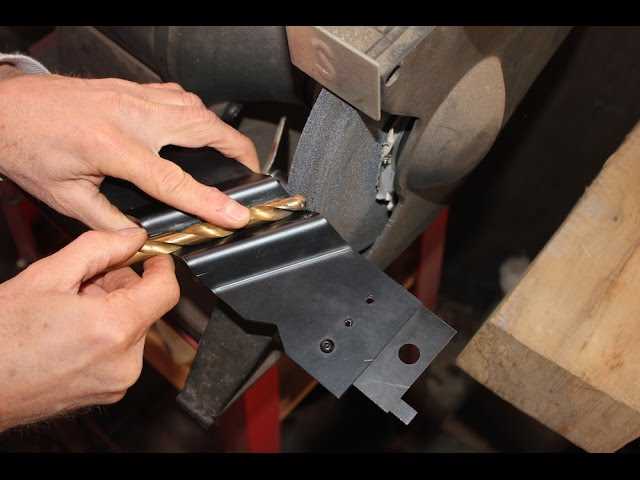
Step 2: Positioning the Drill Bit
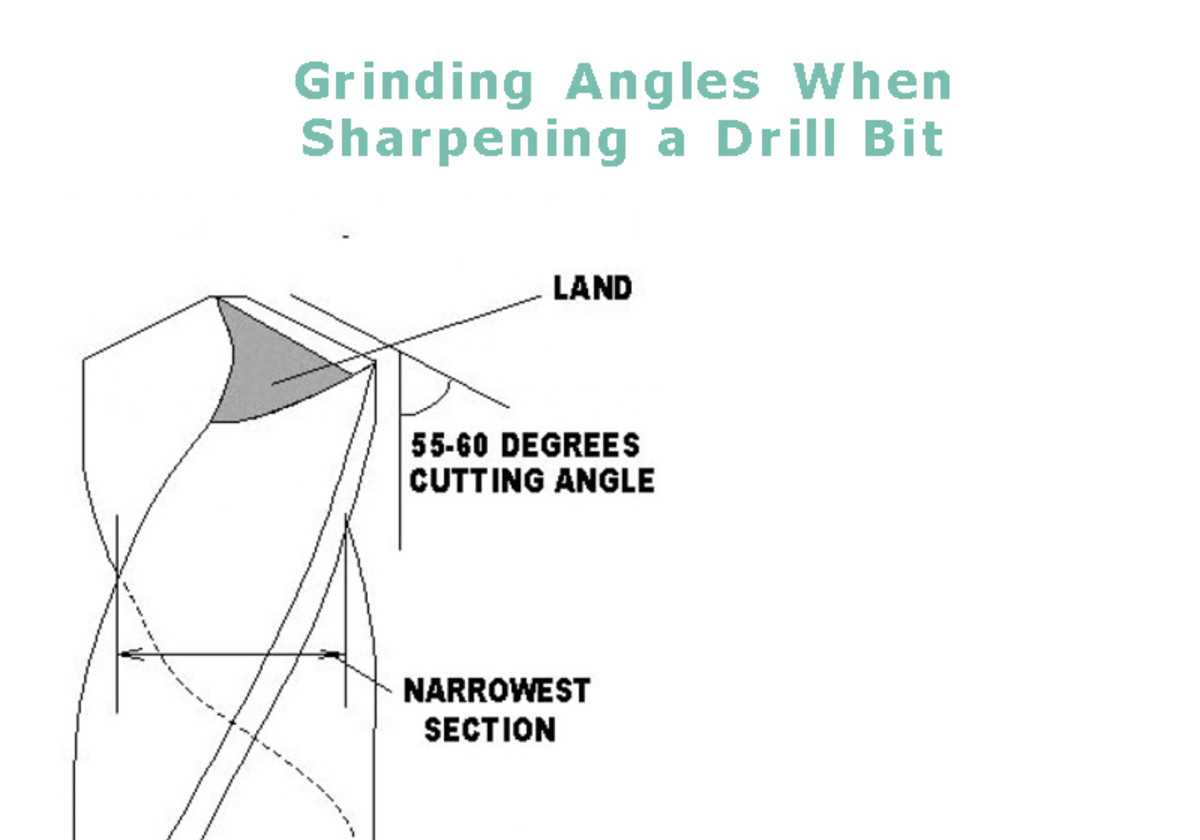
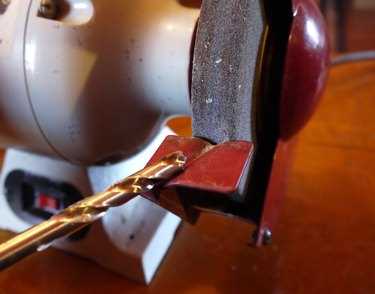
Position the drill bit against the grinding wheel of the bench grinder. Check that the angle of the drill bit matches the original factory angle. Use a protractor or angle gauge if needed to ensure accuracy.
Step 3: Grinding the Cutting Edge
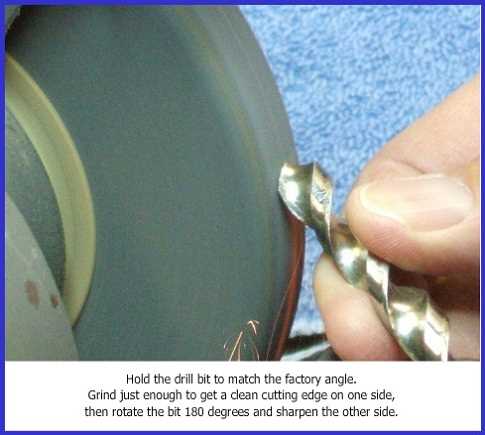
- Turn on the bench grinder and rest the drill bit against the grinding wheel.
- Maintain a steady grip and apply light pressure to the drill bit as it touches the grinding wheel. Slowly rotate the drill bit to ensure even sharpening.
- Grind the cutting edge of the drill bit until it is sharp and the original shape is restored. Avoid overheating the drill bit by periodically cooling it in water.
Step 4: Flute Sharpening
After sharpening the cutting edge, adjust the angle of the drill bit to sharpen the flutes. This process improves the chip removal and overall performance of the drill bit.

Step 5: Final Touches
Inspect the drill bit for any inconsistencies or rough edges. Use a sharpening stone or fine-grit sandpaper to smoothen the surfaces if necessary.
Step 6: Testing
Before using the drill bit again, test it on a piece of scrap material to ensure its sharpness and effectiveness. Make any additional adjustments if needed.
Remember to clean up the area by removing any metal filings or debris from the bench grinder after completing the sharpening process. Properly store your sharpened drill bits in a safe location to prevent damage or accidents.

Testing and Adjusting
After sharpening your drill bits, it’s important to test and adjust them to ensure they perform properly. Here are a few steps you can follow to test and adjust your sharpened drill bits:
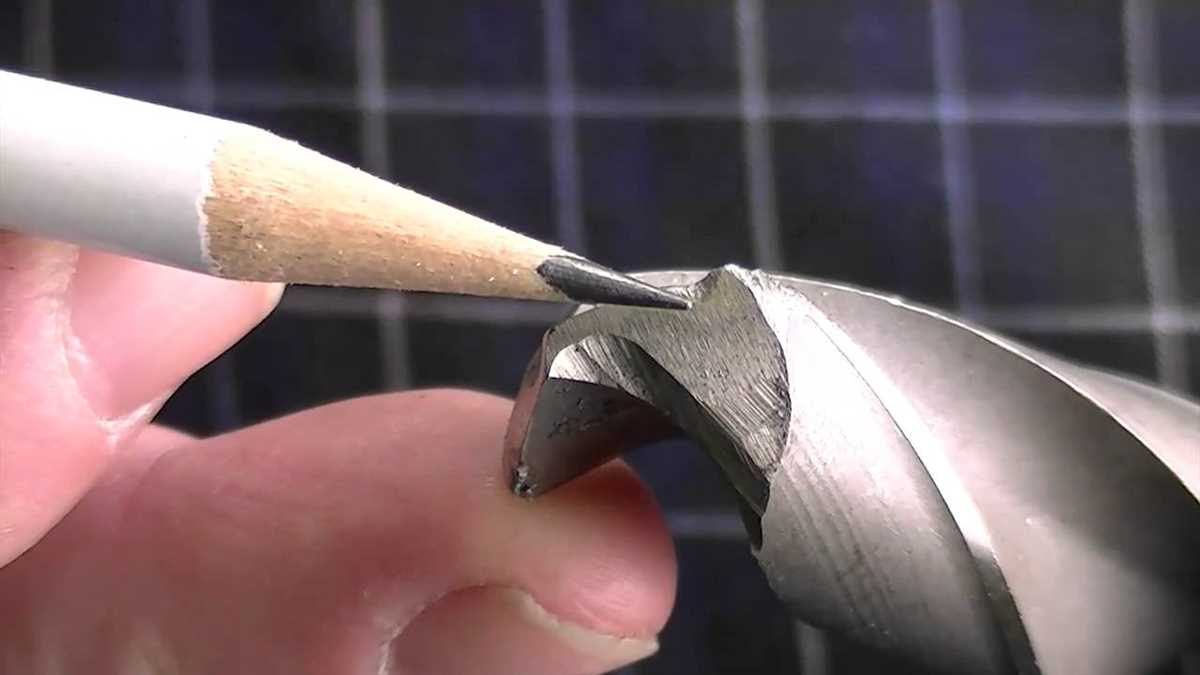
1. Visual Inspection
Start by visually inspecting the sharpened drill bits. Look for any obvious signs of damage or irregularities. Check if the cutting edges are symmetrical and if there are any visible chips or cracks. It’s important to fix any visible issues before proceeding to the next step.
2. Trial Drilling
Next, perform a trial drilling to check the cutting performance of the sharpened drill bits. Choose a suitable test material, such as wood or metal, and drill a few test holes. Pay attention to the ease of drilling and the quality of the drilled holes.
3. Evaluate Cutting Performance
After drilling the test holes, carefully examine the quality of the holes. Look for smooth and clean holes without any signs of burning or tearing. If the drill bits are producing satisfactory results, they are ready to be used. However, if you notice any issues, such as rough holes or difficulty in drilling, some adjustments may be needed.
4. Adjusting Drill Bit Angle
If the drill bits are not performing as expected, it might be necessary to adjust the angle of the cutting edges. Use a protractor or angle guide to measure the angle of the cutting edges and compare it to the desired angle for the specific material you are drilling. Adjust the angle by carefully grinding the cutting edges with the bench grinder until the desired angle is achieved. Be cautious not to overheat the drill bit during this process.
5. Fine-Tuning the Cutting Edges
If the drill bits are still not performing optimally after adjusting the angle, you can further fine-tune the cutting edges. Use a honing stone or a fine grit sandpaper to remove any burrs or rough edges left from the grinding process. This will help improve the cutting performance of the drill bits.
6. Re-Testing and Repeating if Necessary
After making adjustments and fine-tuning the cutting edges, repeat the testing process to evaluate the performance of the freshly adjusted drill bits. If they meet your expectations and produce clean, smooth holes, they are ready for regular use. If not, continue making small adjustments and repeating the testing process until the desired results are achieved.
By thoroughly testing and adjusting your sharpened drill bits, you can ensure they are in optimal condition and ready for use. Remember to take your time and make precise adjustments to achieve the best results.
Final Thoughts
Sharpening drill bits with a bench grinder is a cost-effective and convenient way to keep your drill bits sharp and ready for use. With the right technique and practice, you can easily maintain the sharpness of your drill bits and extend their lifespan.
Remember to always follow safety precautions when using a bench grinder. Wear safety goggles and gloves to protect yourself from any debris or sparks. Additionally, make sure to securely hold the drill bit and maintain a steady hand while sharpening.
Regularly inspect your drill bits for any signs of wear or damage. If a drill bit is too worn or damaged, it may not be salvageable and may need to be replaced. Sharpening can only do so much to restore a drill bit’s effectiveness.
Overall, sharpening your drill bits with a bench grinder is a skill worth mastering. It allows you to save money by extending the life of your drill bits and ensures that they are always ready for use. With practice and attention to detail, you can become proficient in this technique and keep your drill bits sharp for years to come.
FAQ:
What is the purpose of sharpening drill bits?
The purpose of sharpening drill bits is to restore their cutting edges and improve their performance. Over time, drill bits can become dull or damaged, which can result in slower drilling speeds and poor hole quality. Sharpening the drill bits removes any imperfections and reshapes the cutting edge, allowing them to cut through materials more efficiently.
Can I sharpen drill bits with a bench grinder?
Yes, you can sharpen drill bits with a bench grinder. A bench grinder is a powerful and versatile tool that provides a fast and efficient way to sharpen drill bits. By making small adjustments to the angle and position of the grinding wheel, you can reshape the cutting edge of the drill bit and restore its sharpness.
What do I need to sharpen drill bits with a bench grinder?
To sharpen drill bits with a bench grinder, you will need the following tools and materials: a bench grinder, a tool rest or jig, a drill bit gauge, a safety shield or goggles, and a dressing tool. The tool rest or jig is used to hold the drill bit at the correct angle, the drill bit gauge helps you measure the angle of the cutting edge, the safety shield or goggles protect your eyes from flying sparks, and the dressing tool is used to clean and shape the grinding wheel.
Can I sharpen other types of tools with a bench grinder?
Yes, a bench grinder can be used to sharpen other types of tools as well. It is a versatile tool that can sharpen chisels, plane blades, scissors, and other cutting tools. However, it is important to use the appropriate grinding wheel and follow the correct sharpening techniques for each specific tool to achieve the best results.
Video:


Meet Harrison Clayton, a distinguished author and home remodeling enthusiast whose expertise in the realm of renovation is second to none. With a passion for transforming houses into inviting homes, Harrison's writing at https://thehuts-eastbourne.co.uk/ brings a breath of fresh inspiration to the world of home improvement. Whether you're looking to revamp a small corner of your abode or embark on a complete home transformation, Harrison's articles provide the essential expertise and creative flair to turn your visions into reality. So, dive into the captivating world of home remodeling with Harrison Clayton and unlock the full potential of your living space with every word he writes.


