Quick and Easy Guide: How to Drill a 1 Inch Hole in Metal

Drilling holes in metal can be a daunting task, especially if you’re not familiar with the process. However, with the right tools and techniques, drilling a 1 inch hole in metal can be quick and easy. Whether you’re a seasoned DIYer or a beginner looking to tackle a new project, this guide will walk you through the steps to successfully drill a 1 inch hole in metal.
Step 1: Gather the necessary tools and materials.
Before you begin, make sure you have all the tools and materials you’ll need. To drill a 1 inch hole in metal, you’ll need a drill with a 1 inch metal drill bit, safety goggles, work gloves, a center punch, and a measuring tape. Make sure your drill is in good working condition and that the drill bit is sharp.
Step 2: Mark the center of the hole.
To ensure accuracy, it’s important to mark the center of the hole before drilling. Use a center punch to create a small indentation at the center of where you want the hole to be. This will help the drill bit stay in place and prevent it from slipping as you drill.

Step 3: Secure the metal.
Next, secure the piece of metal you’re drilling into. Use clamps or a vise to hold the metal securely in place. This will prevent it from moving around as you drill and will help you maintain control over the drill.
Step 4: Start drilling.
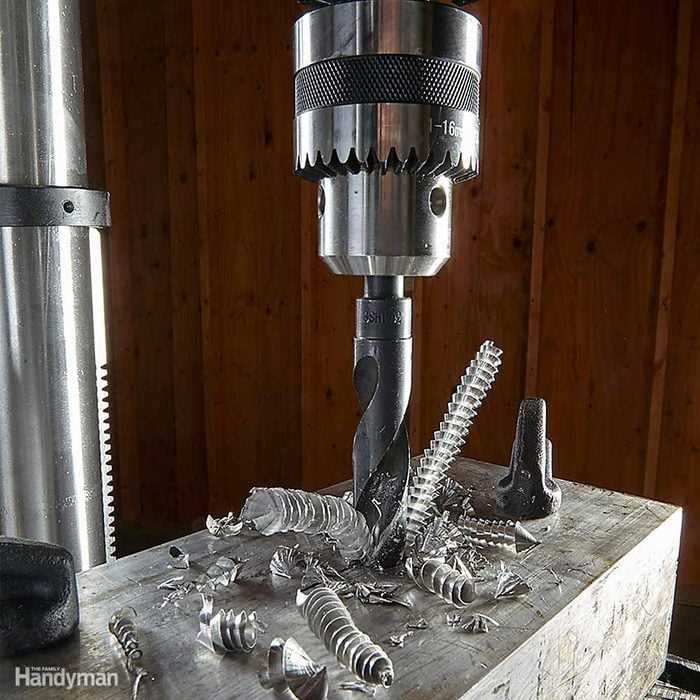
Put on your safety goggles and work gloves, and then position the drill bit at the center punch mark. Start drilling at a slow speed to ensure accuracy and control. Apply steady pressure and let the drill bit do the work. Keep drilling until the hole is complete.
Step 5: Clean up and finish.

Once the hole is drilled, remove the metal shavings and debris. You can use a vacuum or a brush to clean up the area. If desired, you can also use a metal file or sandpaper to smooth the edges of the hole.
Remember, safety is key when drilling into metal. Always wear your safety goggles and work gloves to protect your eyes and hands. Additionally, be aware of any sparks or heat that may be generated during the drilling process. Take your time, use caution, and follow these steps, and you’ll be able to drill a 1 inch hole in metal with ease!
Getting Started: Choosing the Right Tools
Before you begin drilling a 1 inch hole in metal, it is important to have the right tools. Here are the key tools you will need:
1. Power Drill
A power drill is essential for drilling a 1 inch hole in metal. Make sure to choose a drill that has enough power and a variable speed setting.
2. Drill Bits
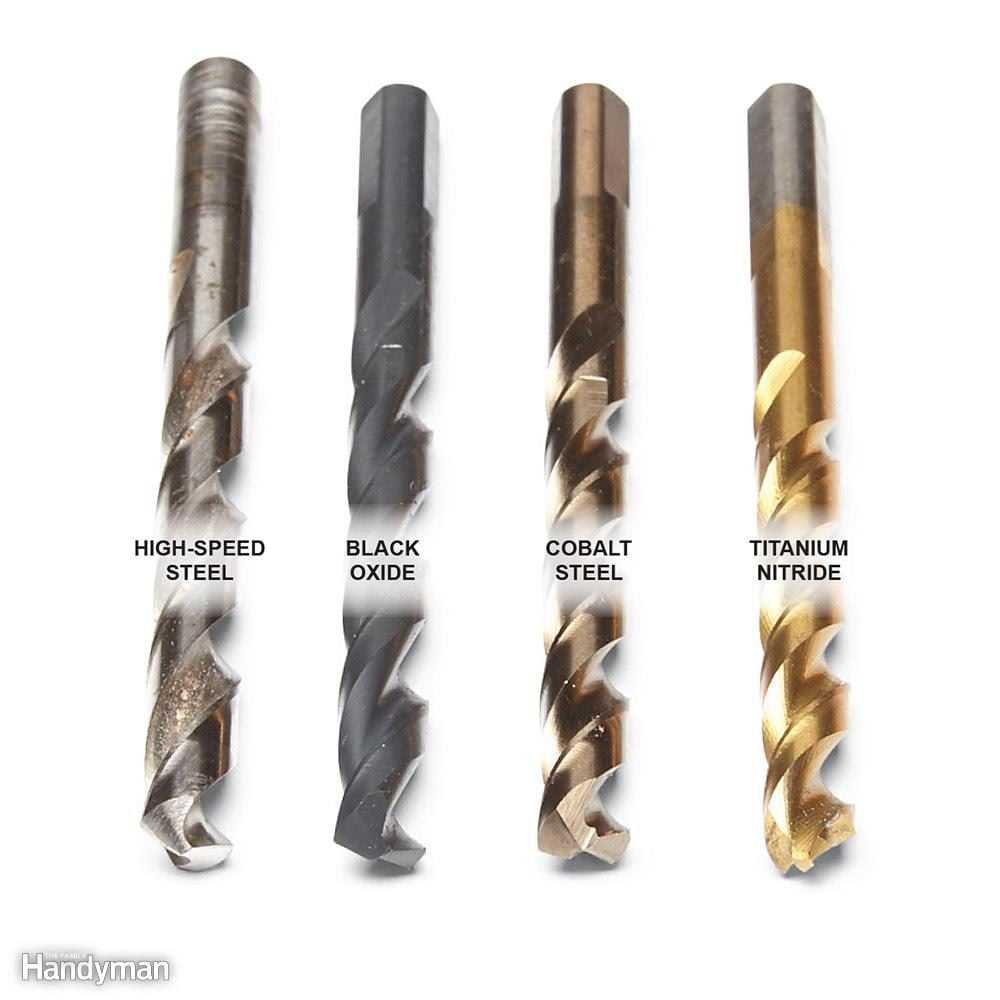
When drilling a 1 inch hole in metal, you will need a high-quality drill bit specifically designed for metal drilling. Look for a drill bit made of cobalt or titanium, as these materials are known for their strength and durability.

3. Lubricant
To reduce friction and heat during the drilling process, it is important to use a lubricant. A cutting fluid or tapping fluid can help prolong the life of your drill bit and make the drilling process smoother.
4. Safety Gear
Always prioritize safety when drilling metal. Wear safety glasses to protect your eyes from flying metal particles and use ear protection to reduce noise levels. Additionally, consider wearing work gloves to protect your hands.
5. Clamps or Vise
When drilling metal, it is important to secure the workpiece. Use clamps or a vise to hold the metal firmly in place, ensuring stability and accuracy during drilling.
By having the right tools at your disposal, you can ensure a smooth and successful drilling process when creating a 1 inch hole in metal.

Measuring and Marking the Hole
Before drilling the hole, it is important to accurately measure and mark the location on the metal surface. This will ensure that the hole is drilled in the desired spot and at the correct size.
Here are some steps to follow when measuring and marking the hole:
- Use a measuring tape or ruler to determine the exact location where the hole needs to be drilled. Take into consideration any surrounding objects or markings to ensure proper placement.
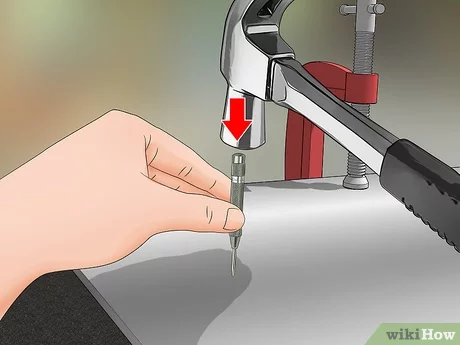
- Once the location is determined, use a center punch to create a small indentation on the surface of the metal. This will act as a guide for the drill bit and help prevent it from slipping during drilling.
- Position the tip of the center punch on the marked location and lightly tap it with a hammer. Be careful not to strike it too hard, as it may cause damage to the metal surface.
- Check the indentation to ensure it is deep enough to hold the drill bit securely. If needed, repeat the process of tapping the center punch until a sufficient indentation is created.
- With the indentation in place, it is now ready to drill the hole. Make sure to double-check the measurements and markings before proceeding with the drilling process.
By properly measuring and marking the hole, you can ensure accurate placement and alignment, resulting in a successful drilling process.
Securing the Metal for Drilling
1. Choose a sturdy work surface
Before you begin drilling, it’s important to choose a work surface that is stable and can withstand the pressure of drilling. A solid workbench or table is ideal for this purpose.

2. Use clamps or a vise
To secure the metal piece in place, use clamps or a vise. This will prevent the metal from moving or shifting during the drilling process, ensuring accuracy and safety.
Note: Make sure to position the clamps or vise in a way that allows easy access to the area you need to drill.
3. Mark the drilling spot
Before drilling, mark the spot where you want to make the 1 inch hole on the metal. This will serve as a guide and help you maintain precision during the drilling process.
4. Use a center punch
Using a center punch, create a small dent at the marked drilling spot. This will provide a starting point for the drill bit, making it easier to drill through the metal.
5. Secure the metal piece
After marking and center punching, make sure to secure the metal piece tightly in place using the clamps or vise. Double-check that it doesn’t move or wobble before starting to drill.

6. Use proper personal protective equipment
Always wear safety glasses and gloves when drilling metal to protect yourself from flying debris and sharp edges. Consider using earplugs or earmuffs if necessary, especially when working with a powerful drill.
7. Check drill bit alignment
Before drilling, ensure that the drill bit is aligned properly with the marked spot on the metal. This will help prevent the bit from wandering during drilling and ensure a clean, precise hole.
8. Start drilling
Once everything is in place and you are ready, turn on the drill and begin drilling at a slow speed. Apply steady pressure and let the drill do the work. Avoid applying excessive force, as it can damage the drill bit or cause the metal to heat up.
Note: Consider using cutting fluid or lubricating the drill bit with oil to reduce friction and heat buildup.
9. Take breaks if necessary
If you’re drilling through thick or hard metal, it may be necessary to take periodic breaks to avoid overheating the drill bit. Give the bit and metal time to cool down before continuing.

10. Complete the drilling
Continue drilling until you have achieved the desired depth for the 1 inch hole. Once finished, turn off the drill and carefully remove the metal piece from the clamps or vise.
Note: Use a file to deburr the edges of the hole and smooth any rough surfaces if needed.
Preparing the Drill and Devising a Strategy
Before you begin drilling a 1-inch hole in metal, it’s important to properly prepare your drill and devise a strategy. Here are some steps to follow:
1. Select the Right Drill Bit
Choosing the correct drill bit is crucial for drilling a 1-inch hole in metal. Look for a high-speed steel (HSS) drill bit that is specifically designed for metal drilling. It should have a 1-inch diameter and a sharp point.
2. Wear Safety Gear
Prior to drilling, it’s essential to wear the appropriate safety gear to protect yourself. This includes safety glasses to shield your eyes from any flying debris, as well as work gloves to protect your hands from sharp edges.
3. Secure the Metal
Before drilling, it’s important to secure the metal properly to prevent any movement or slipping. You can use clamps or a vice to hold the metal securely in place. This will ensure accurate drilling and prevent accidents or injuries.
4. Mark the Hole
Mark the exact spot where you want to drill the 1-inch hole. You can use a permanent marker, a punch, or a center punch to make a small indentation on the metal surface. This will serve as a guide for the drill bit and help prevent it from wandering off track.
5. Lubricate the Drill Bit
Lubricating the drill bit with cutting oil or a suitable lubricant will help reduce friction and heat generated during drilling. Apply a small amount of lubricant to the tip and along the flutes of the drill bit. This will help increase the lifespan of the drill bit and improve drilling performance.
6. Set the Drill Speed
Adjust the drill speed according to the type of metal you’re drilling. For softer metals like aluminum or brass, a slower speed will prevent overheating. However, for tougher metals like steel or iron, a faster speed may be necessary. Consult the drill manufacturer’s instructions for recommended speeds.
7. Start Slowly
When you’re ready to start drilling, begin at a low speed and apply gentle pressure. This will help prevent the drill bit from jumping or skidding across the surface of the metal. Once the drill bit has started to make a groove, you can gradually increase the speed and pressure.
8. Use Coolant or Lubrication During Drilling
To prevent overheating and extend the life of the drill bit, periodically apply coolant or lubrication while drilling the 1-inch hole. This will help dissipate heat and reduce friction, resulting in a smoother drilling process.
9. Clear Chips and Debris
As you drill, metal chips and debris may accumulate around the hole. Clear these periodically to avoid clogging the hole or causing damage to the drill bit. You can use a brush or compressed air to remove the chips.
By following these steps to prepare your drill and devise a strategy, you’ll be ready to confidently drill a 1-inch hole in metal efficiently and effectively.
Drilling the Pilot Hole
A pilot hole is a smaller hole that is drilled before the main hole in order to guide the drill bit and ensure accuracy. It is especially important when drilling into metal, as it helps prevent the drill bit from wandering and damaging the workpiece.
Follow these steps to drill a pilot hole:
- Choose a drill bit that is suitable for drilling into metal, such as a high-speed steel (HSS) bit.
- Secure the metal workpiece to a stable surface using clamps or a vise.
- Mark the spot where you want to drill the pilot hole using a center punch or a marker.
- Put on safety goggles and gloves to protect yourself from any metal chips or debris.
- Set the drill bit into the drill chuck and tighten it securely.
- Position the drill bit tip on the marked spot.
- Apply gentle downward pressure and start the drill at a slow speed.
- Keep the drill bit perpendicular to the metal surface and steadily apply pressure as you drill.
- Rotate the drill bit in a clockwise direction.
- Continue drilling until the pilot hole is deep enough to guide the larger drill bit.
Remember to take breaks if needed and let the drill bit cool down to prevent overheating. Once the pilot hole is drilled, you can proceed with drilling the main hole using the same technique.
Enlarging the Hole with Step Drill Bit
Once you have successfully drilled a pilot hole, you can proceed to enlarge the hole using a step drill bit. Step drill bits are ideal for enlarging holes in metal because they can create multiple hole sizes with a single tool.
Here is a step-by-step guide on how to use a step drill bit to enlarge the hole:
- Choose the appropriate step drill bit: Step drill bits come in various sizes and can be used to create different hole diameters. Select a step drill bit that is suitable for the size of hole you want to create.
- Secure the metal piece: Make sure the metal piece is securely clamped or held in place to prevent it from moving while drilling.
- Apply cutting lubricant: Apply a cutting lubricant to the area where you will be drilling to reduce heat and friction.
- Align the step drill bit: Place the tip of the step drill bit into the pilot hole and align it horizontally with the surface of the metal.
- Start drilling slowly: Begin drilling at a low speed and gradually increase the speed to avoid damaging the metal or the drill bit.
- Control the drilling depth: Periodically check the depth of the hole to ensure you are enlarging it to the desired size. Stop drilling once you have reached the desired diameter.
- Clean the hole: After drilling, remove any metal shavings or debris from the hole using a brush or compressed air.
- Inspect the hole: Examine the enlarged hole to ensure it is clean and smooth. If necessary, use a deburring tool to remove any sharp edges or burrs.
By following these steps, you can easily enlarge a hole in metal using a step drill bit. Remember to take necessary safety precautions, such as wearing protective eyewear and gloves, while drilling.
Finishing the Hole with a Reamer
Once you have drilled the initial hole in the metal using a 1-inch drill bit, you may find that the hole is not perfectly smooth or clean. In order to achieve a precise and professional finish, you can use a reamer.
What is a Reamer?
A reamer is a specialized tool designed to enlarge and smooth out holes that have already been drilled. It consists of a tapered, fluted cutting edge that gradually removes material and improves the roundness and accuracy of the hole.
Steps to Finish the Hole with a Reamer:
- Choose the Right Size Reamer: Select a reamer that matches the desired hole size. Look for a reamer that has a slightly smaller diameter than the finished hole size to ensure a precise fit.
- Apply Lubrication: Lubricate the cutting edge of the reamer with cutting oil or lubricant. This will help reduce friction and heat buildup, allowing the reamer to cut smoothly and prevent it from becoming dull.
- Insert the Reamer: Gently insert the reamer into the drilled hole. Make sure it is aligned properly and centered.
- Rotate and Ream: Begin rotating the reamer in a clockwise motion. Apply gentle pressure while keeping the reamer aligned and centered. Continue rotating until the reamer has passed through the entire length of the hole.
- Inspect the Hole: After removing the reamer, inspect the hole to ensure it is smooth and within the desired dimensions. If necessary, repeat the reaming process until the desired finish is achieved.
Benefits of Using a Reamer:
- Achieves a precise and accurate hole diameter.
- Improves the roundness and surface finish of the hole.
- Helps remove any burrs or imperfections left by the drilling process.
- Provides a clean and professional result, especially for applications that require tight tolerances.
By following these steps and using a reamer, you can easily finish a 1-inch hole in metal with precision and achieve a professional result.
Cleaning Up and Testing the Hole
After drilling the 1 inch hole in the metal, it is important to clean up any debris or metal shavings left behind. This can be done using a brush or a vacuum cleaner to remove the loose metal particles.
Next, it is crucial to test the hole to ensure it meets your requirements. One way to do this is by inserting a 1 inch dowel rod into the hole. The rod should fit snugly with minimal wiggle room. If the fit is too tight, the hole can be enlarged slightly using a round file.
Another test you can perform is to check the hole for burrs or rough edges. These can be smoothed out using a deburring tool or a file. It is important to remove any burrs or rough edges to prevent injury and ensure the hole is suitable for its intended use.
Additionally, you can use a caliper or measuring tape to verify the diameter of the hole. This will help ensure accuracy and confirm that the hole measures 1 inch in diameter.
If the hole passes all the tests and meets the desired specifications, you can proceed with further steps such as inserting screws, bolts, or other fittings into the hole for your project.
FAQ:
What tools do I need to drill a 1 inch hole in metal?
To drill a 1 inch hole in metal, you will need a drill machine with a 1 inch drill bit, safety goggles, gloves, marker, a center punch, and lubricating oil.
What safety precautions should I take while drilling a 1 inch hole in metal?
While drilling a 1 inch hole in metal, it is important to wear safety goggles and gloves to protect your eyes and hands. Make sure to secure the metal piece tightly to avoid it from moving while drilling. Additionally, work in a well-ventilated area to avoid inhaling any metal dust or fumes.
Can I drill a 1 inch hole in metal without lubricating oil?
It is not recommended to drill a 1 inch hole in metal without using lubricating oil. The oil helps reduce friction and heat buildup, making the drilling process easier and preventing the drill bit from getting damaged.
What is the best technique to drill a 1 inch hole in metal?
The best technique to drill a 1 inch hole in metal is to start by marking the center of the hole using a marker. Then, use a center punch to create a small indentation at the marked spot. This will help the drill bit stay in place and prevent it from slipping. Apply lubricating oil on the drilling area and start drilling at a slow speed, gradually increasing the speed as you go deeper.
How long does it take to drill a 1 inch hole in metal?
The time it takes to drill a 1 inch hole in metal can vary depending on various factors such as the thickness and hardness of the metal, the power of the drill machine, and the drilling technique used. On average, it may take anywhere between a few minutes to several minutes to drill a 1 inch hole in metal.
What type of metal can I drill a 1 inch hole in?
You can drill a 1 inch hole in various types of metal, including steel, aluminum, brass, and copper. However, the hardness and thickness of the metal may affect the drilling process, so it is important to choose the appropriate drill bit and drilling technique accordingly.
Video:

Am Tech Rotating Hand Shears

Meet Harrison Clayton, a distinguished author and home remodeling enthusiast whose expertise in the realm of renovation is second to none. With a passion for transforming houses into inviting homes, Harrison's writing at https://thehuts-eastbourne.co.uk/ brings a breath of fresh inspiration to the world of home improvement. Whether you're looking to revamp a small corner of your abode or embark on a complete home transformation, Harrison's articles provide the essential expertise and creative flair to turn your visions into reality. So, dive into the captivating world of home remodeling with Harrison Clayton and unlock the full potential of your living space with every word he writes.


