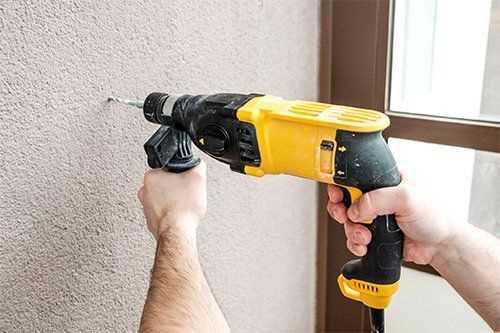
Pro Tips for Drilling a Hole Close to a Wall

Drilling a hole close to a wall can be a challenging task, but with the right techniques and equipment, you can do it safely and efficiently. Whether you’re hanging a picture frame, installing a shelf, or mounting a TV, this article will provide you with pro tips to help you drill a hole close to a wall without causing any damage.
Tip 1: Use a Stud Finder
Before drilling a hole close to a wall, it’s crucial to locate any studs in the area. A stud finder is a handy tool that can detect the presence of wooden studs behind the wall. By finding the studs, you can ensure that your hole is drilled into a solid and secure surface. This will prevent any unnecessary damage to the wall and provide a sturdy anchor for your mounted item.
Tip 2: Mark the Spot
Once you’ve located the studs, mark the spot where you want to drill your hole. Use a pencil or masking tape to clearly indicate the exact location. This will help you maintain accuracy and prevent the drill from wandering off course. It’s also recommended to use a level to ensure that the hole is straight and aligned with the wall.

Tip 3: Use a Drill Bit Extension
Drilling a hole close to a wall can be tricky due to the limited space. To overcome this challenge, consider using a drill bit extension. This extension will allow you to reach the desired depth while keeping the drill away from the wall. It’s important to choose the right size and type of extension for your specific drilling needs.
Tip 4: Start Slowly and Apply Light Pressure
When drilling a hole close to a wall, it’s crucial to start slowly and apply light pressure. This will help you maintain control over the drill and prevent any sudden slips or jerks. Gradually increase the speed and pressure as you make progress, but always be cautious and mindful of the wall.
Tip 5: Use a Vacuum Attachment
To minimize any mess or debris, consider using a vacuum attachment on your drill. This accessory will suction away the dust and debris as you drill, keeping your work area clean and preventing any damage to the wall. It’s a small addition that can make a big difference in maintaining a tidy workspace.
By following these pro tips, you can confidently drill a hole close to a wall without damaging the surface. Remember to always prioritize safety and take your time to ensure accurate and precise drilling. With practice and experience, you’ll become an expert at this essential DIY task.
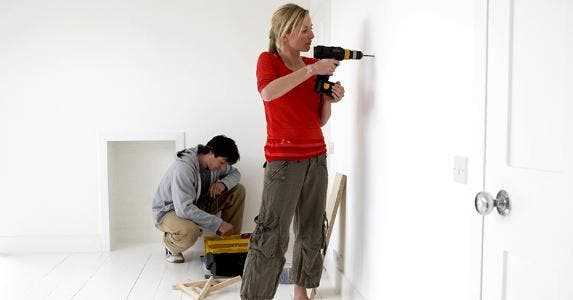
Essential Steps for Drilling a Hole Close to a Wall
1. Measure and Mark
Before starting the drilling process, it’s important to accurately measure and mark the spot where you want to drill the hole. Use a measuring tape to ensure precision, and mark the spot with a pencil or marker.
2. Check for Obstructions
Before drilling, it’s crucial to check for any obstructions that may be behind the wall. Use a stud finder or a similar tool to locate any electrical wires, pipes, or other obstacles. This will help you avoid damaging anything while drilling.
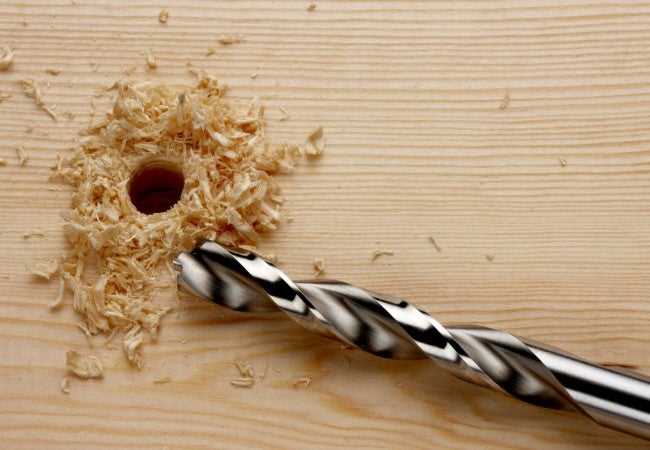
3. Use a Pilot Hole
When drilling close to a wall, it’s recommended to start with a pilot hole. A pilot hole is a small hole that acts as a guide for the larger hole you want to drill. The pilot hole helps prevent the drill bit from slipping or wandering off course.
4. Choose the Right Drill Bit
Selecting the correct drill bit is crucial for drilling a hole close to a wall. Using a masonry bit for drilling into concrete or a wood bit for drilling into wood will ensure clean and precise holes. Make sure the drill bit matches the type of material you’re drilling into.
5. Use a Drill with a Depth Stop
A depth stop feature on your drill will help you control the depth of the hole. This is especially important when drilling close to a wall to avoid drilling too deep and damaging the surface behind the wall. Set the depth stop according to the thickness of the material you’re drilling into.
6. Drill Slowly and Steadily
When drilling close to a wall, it’s important to drill slowly and steadily. This will give you better control and reduce the chances of the drill bit slipping or causing damage. Apply gentle pressure and let the drill do the work.
7. Clean Up the Area
After drilling the hole, make sure to clean up the area. Remove any debris or dust that may have accumulated. This will help ensure a clean and tidy workspace, as well as prevent any potential hazards.
8. Secure the Fixture
If you’re drilling the hole for a fixture or anchor, make sure to securely attach it using the appropriate screws or fasteners. Follow the manufacturer’s instructions for proper installation.
By following these essential steps, you can safely and effectively drill a hole close to a wall without causing any damage or accidents.
Measuring the Distance
Step 1: Gather the necessary tools
Before you begin measuring the distance, make sure you have the following tools:
- Tape measure
- Pencil
- Straightedge
Step 2: Identify the reference point
The first step in measuring the distance is to identify a reference point. This can be any fixed object or point on the wall that you can easily measure from. For example, you can use a corner of the wall or a molding as your reference point.
Step 3: Measure the distance from the reference point
Using the tape measure, measure the distance from your reference point to the desired location for the hole. Make sure to measure horizontally or vertically, depending on the orientation of the hole you want to drill.
Step 4: Make a mark
Once you have measured the distance, use a pencil to make a small mark on the wall at the desired location for the hole.
Step 5: Double-check the measurements
Before proceeding with drilling the hole, double-check your measurements to ensure accuracy. Use the tape measure and straightedge to confirm that the mark you made is at the correct distance from the reference point.
Step 6: Adjust if necessary
If you find that the mark is not at the desired distance, make any necessary adjustments. Repeat steps 3 to 5 until you have the mark placed accurately.
Step 7: Proceed with drilling the hole
Once you are confident that the mark is at the correct distance from the reference point, you can proceed with drilling the hole following the appropriate guidelines and safety precautions.
Marking the Spot
Before you start drilling a hole close to a wall, it is important to accurately mark the spot where you want the hole to be. This will ensure that your hole is in the right location and prevent any damage to the wall or other objects nearby.
Here are some pro tips for marking the spot:
- Use a pencil: Using a pencil to mark the spot is a good idea, as it is easily visible and can be easily erased if needed. Avoid using markers or pens, as they can be permanent and difficult to remove.
- Measure twice: Before marking the spot, make sure to measure twice to ensure accuracy. Use a tape measure or ruler to measure the distance from the nearest edge of the wall or other reference point.
- Use a level: To ensure that your hole is straight, use a level to make a straight line or mark. Place the level against the wall and adjust until the bubble is centered. Then, use the level to draw a straight line or mark.
- Consider the purpose: Think about the purpose of the hole you are drilling. If you are drilling a hole for a screw or anchor, make sure to mark the spot accordingly. If you are drilling a hole for a pipe or wire, consider the position and direction of the hole.
By following these tips and taking the time to accurately mark the spot, you can ensure a successful drilling experience and avoid any unnecessary damage or mistakes.
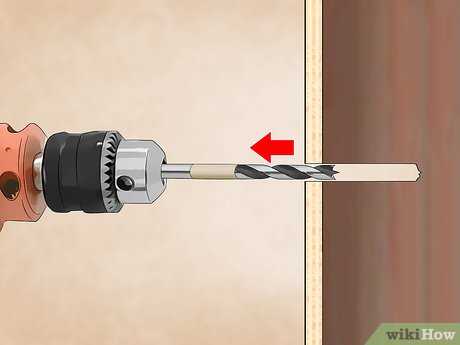
Choosing the Right Drill Bit
When drilling a hole close to a wall, it is important to choose the right drill bit for the job. The type of drill bit you use will depend on the material you are drilling into and the size of the hole you need.
1. Twist Drill Bit
A twist drill bit is the most common type of drill bit and can be used on a variety of materials, including wood, metal, and plastic. These bits have a spiral-shaped cutting edge that helps to remove material as you drill. Twist drill bits come in various sizes, so make sure to choose one that is appropriate for the size of hole you need.
2. Spade Drill Bit
If you need to drill a larger hole, a spade drill bit may be the best choice. These bits have a flat, paddle-shaped cutting edge that quickly removes material. Spade drill bits are commonly used for drilling holes in wood and are available in larger sizes than twist drill bits. Keep in mind that these bits can be more difficult to control, so it is important to use them cautiously near a wall.
3. Masonry Drill Bit
When drilling into concrete or other masonry materials, a masonry drill bit is necessary. These bits have a carbide tip that can withstand the hardness of these materials. Masonry drill bits often have a different type of shank, so make sure your drill is compatible with this type of bit.
4. Step Drill Bit
If you need to drill multiple hole sizes, a step drill bit can be a convenient option. These bits have multiple stepped cutting edges that allow you to drill different-sized holes with one bit. Step drill bits are commonly used for drilling holes in metal and are available in various sizes.
Remember to always wear protective eyewear and follow the manufacturer’s instructions when using a drill bit. Choosing the right drill bit for the job will help ensure successful and efficient drilling close to a wall.
Using a Drill with a Depth Stop
When drilling a hole close to a wall, using a drill with a depth stop can be a helpful tool to ensure that the hole is drilled to the appropriate depth without damaging the wall.
A depth stop is a feature on many modern drills that allows you to set the maximum depth that the drill bit can penetrate. This can be especially useful when drilling near a wall, as it prevents the drill bit from going too deep and potentially damaging the wall or any wiring or pipes behind it.
To use a drill with a depth stop:
- Begin by making sure the depth stop is properly attached to the drill. The depth stop can usually be found as a separate attachment that is inserted into the chuck of the drill.
- Set the desired depth for the hole. This can typically be done by adjusting the depth stop attachment to the desired measurement. Make sure to take into account the length of the drill bit that will be used.
- Securely tighten the depth stop attachment in the drill chuck.
- Hold the drill perpendicular to the wall and position the drill bit at the desired location for the hole.
- Slowly start the drill and apply gentle pressure to begin drilling into the wall.
- As the drill bit reaches the set depth, the depth stop will engage and prevent the drill bit from going any further. You may feel or hear a slight click or resistance when this happens.
- Once the drill has stopped, carefully remove it from the wall.
Using a drill with a depth stop can save you time and effort by ensuring that your holes are drilled to the correct depth. It also helps to prevent any accidental damage to the wall or any hidden obstacles behind it.
Remember to always wear appropriate safety gear, such as safety glasses, when drilling to protect your eyes from any flying debris.
Drilling at the Right Angle
One of the most important factors in drilling a hole close to a wall is maintaining the right angle. Drilling at the correct angle ensures that the hole goes straight into the wall and prevents any unnecessary damage or difficulties.
Tip 1: Use a Guide
Using a guide can help you maintain the right angle while drilling. A guide can be as simple as a piece of masking tape placed on the wall, forming a straight line or a square. Align the guide with the desired drilling location and use it as a visual reference to keep the drill perpendicular to the wall.
Tip 2: Use a Level
Another useful tool for drilling at the right angle is a level. Place the level on top of the drill or on the wall surface near the drilling location. Ensure that the bubble in the level is centered, indicating that the drill is perpendicular to the wall. This method provides a more accurate result and is especially effective for larger holes.
Tip 3: Start with a Pilot Hole
When drilling close to a wall, it’s often helpful to start with a smaller pilot hole. A pilot hole serves as a guide for the larger drill bit and helps you maintain the right angle. Once the pilot hole is drilled, you can switch to a larger bit and continue drilling with confidence.
Tip 4: Take Your Time
Drilling at the right angle requires patience and precision. It’s essential to take your time during the process and avoid rushing. By going slowly and carefully, you can ensure that the hole is drilled accurately and prevent any accidental damage to the wall.
Tip 5: Practice on Scrap Material
If you’re concerned about drilling close to a wall and want to perfect your technique, consider practicing on scrap material first. This can be a piece of wood or any other similar material. By practicing, you can gain confidence and improve your drilling skills before working near a wall.
By following these tips and techniques, you can successfully drill a hole close to a wall while maintaining the right angle. Remember to always prioritize safety and use the appropriate tools for the job.
Starting with a Pilot Hole
When drilling a hole close to a wall, it is often helpful to start with a pilot hole. A pilot hole is a smaller hole that serves as a guide for the larger hole you want to drill. Here are some tips for starting with a pilot hole:
1. Measure and mark the location
Begin by measuring and marking the exact location where you want to drill the hole. Use a pencil or a marker to make a clear, visible mark on the wall.
2. Choose the right drill bit
Select a drill bit that is slightly smaller in diameter than the one you will use for the final hole. For example, if you plan to drill a 1/2-inch hole, start with a 1/8-inch or 1/4-inch drill bit.
3. Insert the drill bit
Insert the smaller drill bit into your drill, making sure it is securely in place. Hold the drill perpendicular to the wall and align the tip of the drill bit with the marked location.
4. Start drilling
Apply gentle pressure and start drilling into the wall at a slow speed. The purpose of the pilot hole is not to drill the final hole, but to create a guide for the larger drill bit. Take your time and make sure to keep the drill bit steady and aligned with the mark.
5. Drill to the desired depth
Drill the pilot hole to a depth of about 1/4 to 1/2 inch. Stop drilling once you reach the desired depth. This will depend on the size and type of fastener you plan to use.
6. Remove the drill bit
Carefully remove the drill bit from the hole after you have finished drilling. Be mindful not to brush against the wall or accidentally hit the surrounding area as you withdraw the drill bit.
Starting with a pilot hole can make it easier to drill a larger hole close to a wall. It provides a guide for drilling straight and helps prevent the drill from slipping or damaging the wall. Remember to always wear the appropriate safety gear and exercise caution when using power tools.
Taking Precautions for Electric Wires
When drilling a hole close to a wall, it is crucial to take precautions for electric wires. Electrical wires are typically hidden behind walls and drilling into them can be not only dangerous but also result in damage to your electrical system. Follow these precautions to ensure the safety of yourself and your home:
1. Identify Potential Wire Locations
Prior to drilling, you should identify potential wire locations. Use a digital wire detector or a stud finder device to locate any electrical wires running behind the wall. These devices can detect the presence of live wires and help you determine a safe area to drill.
2. Turn Off the Power
Before drilling, it is always recommended to turn off the power to the specific area where you will be working. Locate the circuit breaker that controls the power supply to that area and switch it off. This will minimize the risk of electric shock or damage to the electrical system.
3. Use a Drill Bit with a Depth Stop
When drilling close to a wall, use a drill bit with a depth stop feature. This will prevent the drill bit from going too deep and potentially hitting any electrical wires behind the wall. Set the depth stop to slightly less than the thickness of your wall to ensure a safe drilling depth.
4. Drill Slowly and Carefully
When drilling close to a wall, take your time and drill slowly and carefully. Apply gentle pressure and avoid excessive force, as this can increase the risk of damaging any hidden electrical wires. Be mindful of the surroundings and listen for any unusual sounds or vibrations that may indicate contact with a wire.
5. Inspect the Hole Before Proceeding
After drilling the hole, inspect it carefully before proceeding with any further construction or installation. Look inside the hole with a flashlight to check for any signs of wiring or other obstructions. If you notice any wires or objects inside the hole, stop drilling immediately and reconsider the location or seek professional assistance.
6. Call a Professional if Unsure
If you are unsure about the presence of electrical wires or feel uncomfortable drilling close to a wall, it is always best to call a professional electrician. They have the expertise and tools necessary to safely handle any electrical wiring and can ensure a reliable and secure drilling process.
By following these precautions, you can minimize the risks associated with drilling close to a wall and ensure the safety of yourself, your home, and your electrical system.
Finishing and Patching the Hole
Once you have successfully drilled a hole close to a wall, it is important to properly finish and patch the hole to maintain the aesthetics of the wall. Here are some tips to help you finish and patch the hole:
1. Remove any debris
Start by removing any debris or excess material around the drilled hole. Use a small brush or vacuum cleaner to carefully clean the area. This will ensure that the patching material adheres properly and the finished result looks clean.
2. Choose a patching material
Depending on the size and depth of the hole, you will need to choose an appropriate patching material. For small holes, you can use spackling compound or a premixed patching compound. For larger holes, you may need to use a patching plaster or joint compound.
3. Apply the patching material
Using a putty knife or a scraper, apply the chosen patching material to the hole. Make sure to completely fill the hole and smooth out any excess material. For larger holes, you may need to apply the patching material in layers, allowing each layer to dry before applying the next.
4. Sand the patched area
Once the patching material is dry, use fine-grit sandpaper to smooth out the patched area. Sand in a circular motion, gradually blending the edges of the patch with the surrounding wall. This will help create a seamless finish.
5. Prime and paint
After sanding, apply a coat of primer to the patched area. This will help the paint adhere properly and ensure that the patch is not noticeable. Once the primer is dry, you can paint the area to match the rest of the wall. Use a small brush or roller to carefully apply the paint, blending it with the surrounding wall for a seamless finish.
Following these steps will help you achieve a professional-looking finish when patching a hole close to a wall. Remember to take your time and pay attention to detail for the best results.
FAQ:
How can I drill a hole close to a wall without damaging it?
One pro tip is to use a piece of cardboard as a buffer between the drill and the wall. This will prevent the drill bit from causing any damage to the wall surface.
What tools do I need to drill a hole close to a wall?
You will need a drill, a drill bit suitable for your wall material, a level to ensure the hole is straight, and possibly a piece of cardboard or other buffer material to protect the wall.
Are there any alternative methods to drilling a hole close to a wall?
Yes, you can use adhesive hooks or other adhesive holders instead of drilling a hole. These can be easily removed without causing any damage to the wall.
What precautions should I take before drilling a hole close to a wall?
Before drilling, it is important to locate any electrical wires or studs in the wall to avoid damaging them. You can use a stud finder or consult a professional for assistance.
How can I ensure that the hole I drill is straight?
Using a level can help you ensure that the hole is drilled straight. You can also use a pencil to mark the exact spot where you want to drill, making it easier to drill accurately.
Can I use a regular drill or do I need a special one for drilling close to a wall?
You can use a regular drill for drilling close to a wall. However, it is important to use the appropriate drill bit for the wall material to avoid damaging the drill or the wall.
Video:
How many feet is 7meters

Meet Harrison Clayton, a distinguished author and home remodeling enthusiast whose expertise in the realm of renovation is second to none. With a passion for transforming houses into inviting homes, Harrison's writing at https://thehuts-eastbourne.co.uk/ brings a breath of fresh inspiration to the world of home improvement. Whether you're looking to revamp a small corner of your abode or embark on a complete home transformation, Harrison's articles provide the essential expertise and creative flair to turn your visions into reality. So, dive into the captivating world of home remodeling with Harrison Clayton and unlock the full potential of your living space with every word he writes.


