Preventing Wood Splintering: How to Drill Clean Holes in Wood

Woodworking is a popular hobby and craft that requires precision and attention to detail. One common issue that woodworkers face is wood splintering when drilling holes. This can be frustrating and can ruin the final look of a project. Fortunately, there are several techniques that can be employed to prevent wood splintering and achieve clean, professional-looking holes.
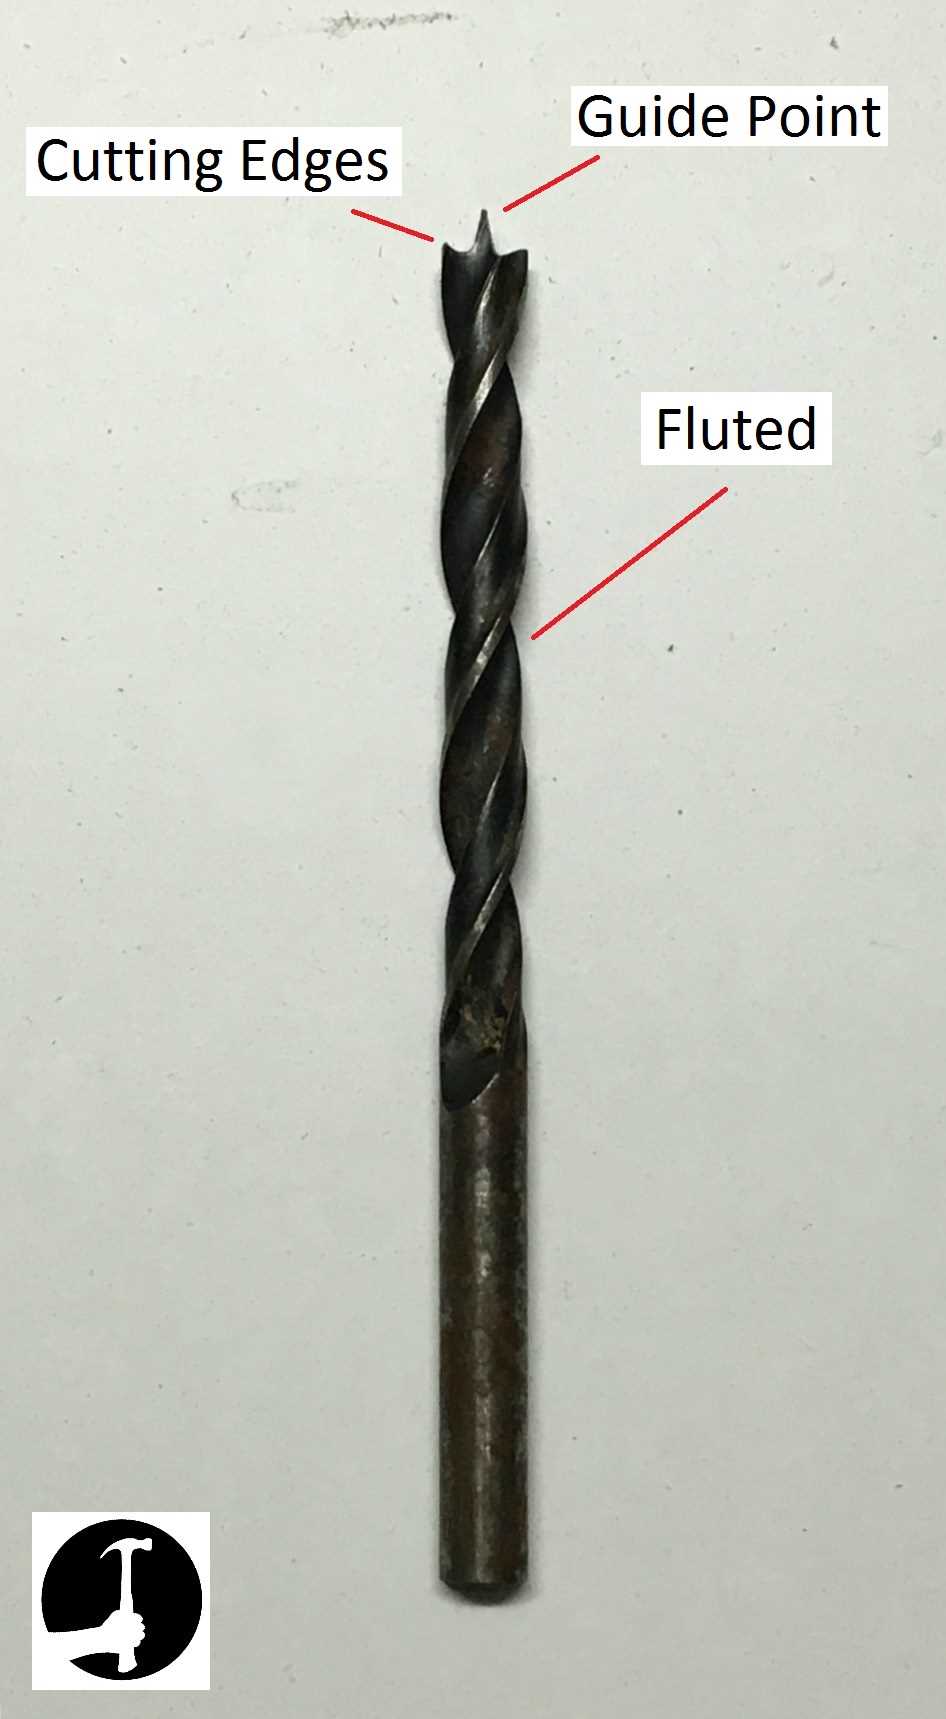
Choose the right drill bit: The first step in drilling clean holes in wood is selecting the right drill bit. For most woodworking projects, a brad point drill bit is recommended. This type of bit has a sharp point and angled cutting edges, which helps to cut through wood fibers cleanly without causing splintering.
Use a backer board: Another helpful technique for preventing wood splintering is to use a backer board. This can be a scrap piece of wood or a specially designed backer board that is clamped to the workpiece. When drilling the hole, the backer board provides support and helps to prevent wood fibers from tearing out.
Apply masking tape: Masking tape can also be used as a preventative measure when drilling holes in wood. By applying a strip of masking tape over the area where the hole will be drilled, the tape acts as a barrier, reducing the likelihood of splintering. It is important to secure the tape firmly to the wood surface to ensure it does not move during drilling.
Drill at a slow speed: Finally, drilling at a slow speed can help prevent wood splintering. By reducing the speed of the drill, the bit has more time to cut through the wood fibers cleanly, rather than tearing them apart. This technique requires patience and a steady hand, but it can greatly improve the quality of the drilled hole.

By following these techniques, woodworkers can achieve clean, professional-looking holes in wood without the issue of splintering. With practice and attention to detail, drilling holes can become a seamless part of any woodworking project.
Choose the Right Drill Bit
When drilling clean holes in wood, it is important to choose the right drill bit for the job. Using the wrong drill bit can result in splintered wood and messy holes. Here are some factors to consider when selecting a drill bit:
1. Material
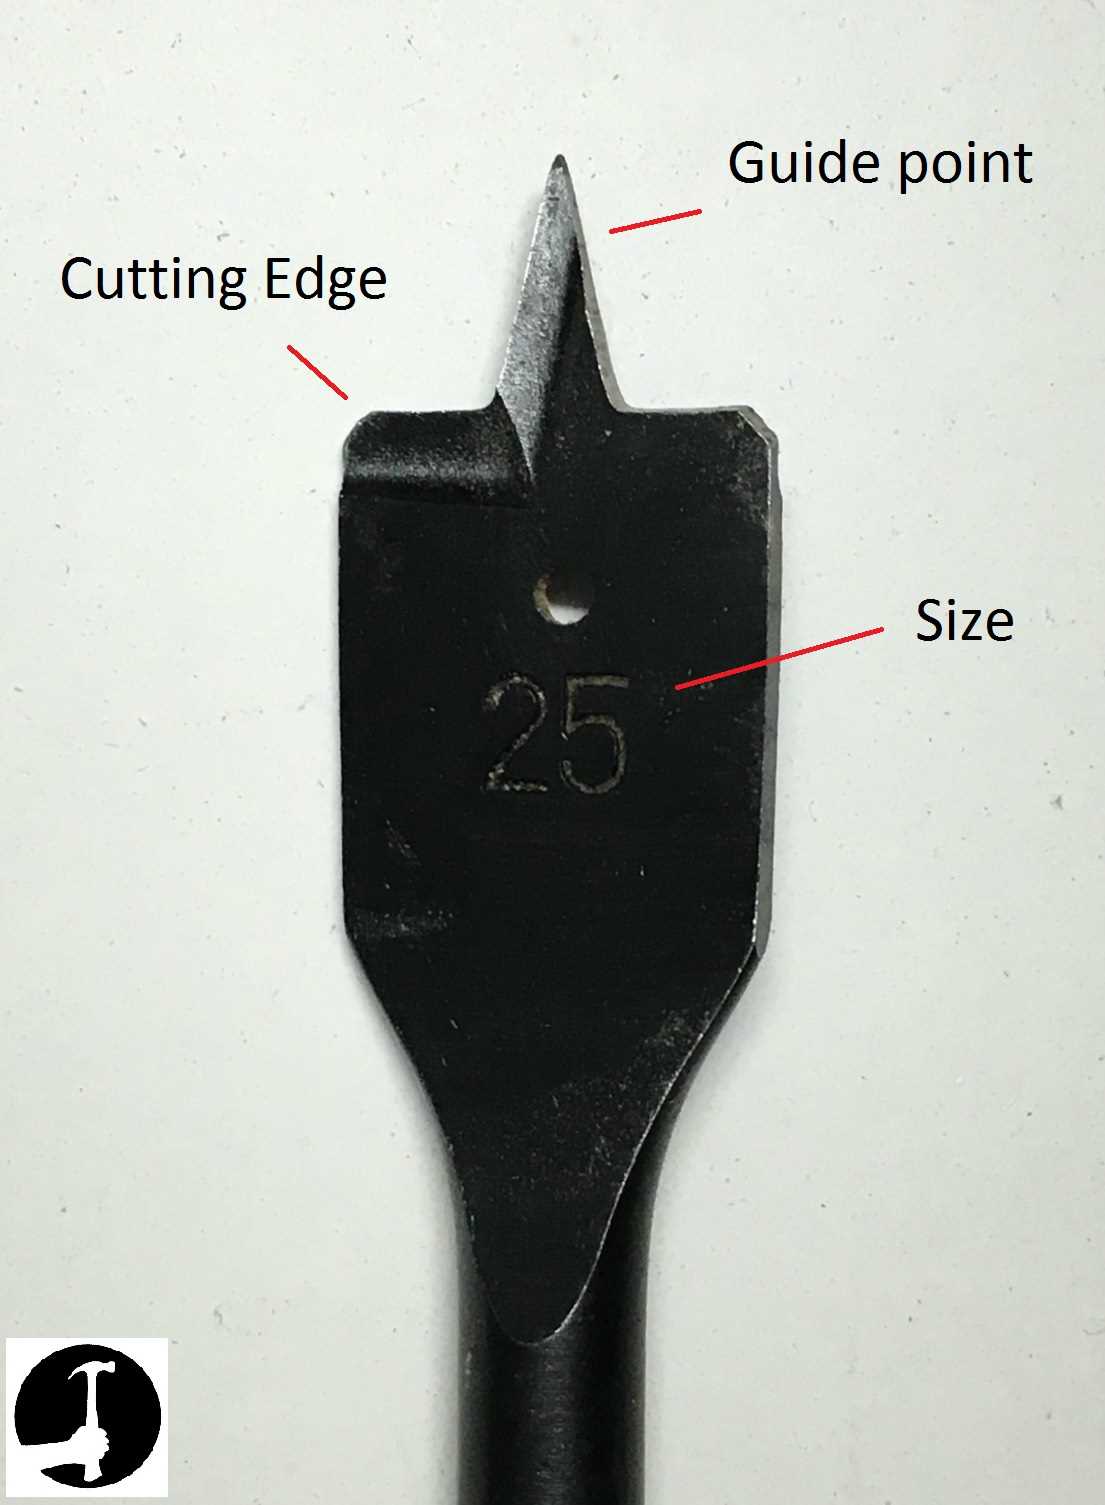
The material of the drill bit is crucial in determining its effectiveness in drilling clean holes in wood. For wood drilling, it is recommended to use a drill bit specifically designed for wood, such as a brad point bit or a spade bit. These bits are designed with a sharp, pointed tip that helps prevent splintering and ensure a clean entry hole.
2. Size
The size of the drill bit also plays a role in preventing wood splintering. Generally, a larger drill bit will be more prone to splintering, especially if the wood is prone to splitting or if the drill speed is too high. It is important to select a drill bit that is appropriate for the size of the hole you need to drill. If you need to drill a larger hole, consider using a hole saw with a pilot bit to guide the saw and reduce the risk of splintering.
3. Cutting Edge Design
The cutting edge design of the drill bit can also impact its performance in preventing splintering. Look for drill bits with sharp cutting edges that can cleanly slice through the wood fibers. For example, a brad point bit has a sharp center point and outer spurs that help create a clean hole with minimal splintering. A spade bit, on the other hand, has a flat cutting surface that can produce clean holes when used at the appropriate speed and with careful control.

| Drill Bit Type | Advantages | Disadvantages |
|---|---|---|
| Brad Point Bit |
|
|
| Spade Bit |
|
|
By considering the material, size, and cutting edge design of the drill bit, you can select the right tool for the job and prevent wood splintering when drilling clean holes in wood. Remember to use appropriate drilling techniques, such as using a pilot hole for deeper drilling or adjusting the drill speed, to further minimize the risk of splintering.
Mark the Hole Location

Before you start drilling, it’s important to mark the exact location where you want to drill the hole. This will help ensure accuracy and prevent any unnecessary damage to the wood.
Here are a few steps to follow when marking the hole location:

- Measure and mark the desired location on the wood using a tape measure or ruler. Make sure to use a pencil or a marker that is easily visible on the wood.
- If you are drilling multiple holes, you can use a square or a straight edge to ensure that the holes are evenly spaced and aligned.
- Consider using a center punch or an awl to create a small indentation at the center of the marked location. This will help guide the drill bit and prevent it from slipping off the mark.
By taking the time to accurately mark the hole location, you can save yourself from the frustration of drilling crooked or misplaced holes in your wood.
Secure the Wood
Before you start drilling, it’s important to secure the wood in place to prevent any movement that could lead to splintering. There are a few different methods you can use to secure the wood, depending on the size and shape of your project.
Clamps
One of the easiest ways to secure your wood is by using clamps. Clamps provide a strong grip and keep the wood in place while you drill. Make sure to position the clamps in a way that they won’t interfere with your drilling path.
Vises
If you’re working with a larger piece of wood or need a more secure hold, consider using a vise. Vises are designed to hold materials firmly in place and can be adjusted to accommodate different sizes. Just make sure to tighten the vise securely before drilling.

Workbench
Another option is to secure the wood to a workbench. If your project allows for it, use clamps or a vise to attach the wood to the surface of your workbench. This will provide stability and prevent any unwanted movement while drilling.
Backing Board
If you’re unable to secure the wood using clamps, vises, or a workbench, consider using a backing board. A backing board is a piece of scrap wood that you place underneath the area where you’ll be drilling. This helps support the wood and reduces the risk of splintering.
No matter which method you choose, the goal is to keep the wood secure and stable while drilling. By taking the time to properly secure the wood, you’ll greatly reduce the risk of splintering and ensure clean, precise holes.
Apply Tape or Veneer
Splintering can often occur when drilling through wood, especially if the wood is prone to splintering. One effective way to prevent this is to apply tape or veneer to the surface of the wood before drilling.

Tape
Using tape is a simple and inexpensive method to prevent splintering. You can use masking tape, painter’s tape, or even duct tape. The tape acts as a barrier, preventing the wood fibers from splitting and splintering.
Before drilling, carefully apply the tape to the area where you will be drilling. Make sure the tape is firmly and evenly pressed down onto the wood surface. This will help to ensure that the tape stays in place and provides a strong barrier to prevent splintering.
Veneer
Veneer is a thin layer of wood that can be applied to the surface of the wood to provide added protection against splintering. Veneer can be purchased in various thicknesses and can be easily glued to the wood surface.
To apply veneer, measure and cut the veneer to the desired size and shape. Then, apply a thin layer of wood glue to the back of the veneer and the wood surface. Press the veneer firmly onto the wood, making sure it is aligned properly and free of any bubbles or wrinkles.
Once the veneer is in place, allow it to dry completely before drilling. The veneer will provide a smooth and stable surface to drill into, reducing the chances of splintering.
By applying tape or veneer before drilling, you can greatly reduce the risk of wood splintering. These simple methods can help you achieve clean and precise holes when working with wood.
Start Slowly
When drilling holes in wood, it’s important to start slowly. This allows the drill bit to ease its way into the wood, reducing the risk of splintering. By starting slowly, you give the wood time to adjust to the drilling motion and minimize the chance of any tear-out or cracking.
Before you begin drilling, make sure your drill bit is in good condition. Dull or damaged bits can cause splintering even with the slowest drilling speed. Inspect your bit for any signs of wear or damage, and replace it if necessary.
To start drilling, place the tip of the drill bit on the desired location and apply gentle pressure. Gradually increase the speed of the drill as you continue to drill into the wood. This gradual increase in speed helps to prevent any sudden splintering or chipping.
It’s also important to use the correct drill bit for the type of wood you’re working with. Different woods have different densities and hardness levels, so using the appropriate bit can help reduce the risk of splintering. Research the specific type of wood you’re working with to determine the best drill bit to use.
By starting slowly and using the right drill bit, you can significantly minimize the chances of splintering when drilling holes in wood.
Use the Correct Drill Speed
Using the correct drill speed is essential for preventing wood splintering when drilling clean holes in wood. The drill speed refers to the rotational speed of the drill bit and is measured in revolutions per minute (RPM).
Why is the Correct Drill Speed Important?
When drilling into wood, the rotational speed of the drill bit can greatly affect the quality of the hole. If the drill speed is too high, it can cause the wood fibers to tear and splinter, resulting in a messy and uneven hole. On the other hand, if the drill speed is too low, it can cause the bit to dig into the wood too aggressively, leading to a rough and distorted hole.
How to Determine the Correct Drill Speed
When drilling into wood, it’s important to match the drill speed to the type of wood and the size of the hole you’re drilling. As a general guideline, harder woods require slower drill speeds, while softer woods can tolerate faster speeds.
Here are some recommended drill speeds based on the diameter of the drill bit:
- 1/8-inch to 3/16-inch drill bits: 2,000 to 3,000 RPM
- 1/4-inch to 3/8-inch drill bits: 1,500 to 2,500 RPM
- 7/16-inch to 5/8-inch drill bits: 1,000 to 1,500 RPM
- 3/4-inch to 1-inch drill bits: 500 to 1,000 RPM
It’s important to note that these are general guidelines, and the specific drill speed may vary depending on factors such as the wood species and the type of drill being used.
Tips for Using the Correct Drill Speed
Here are some tips to help you use the correct drill speed when drilling clean holes in wood:
- Select the appropriate drill speed based on the diameter of the drill bit and the type of wood you’re working with.
- Begin drilling at a lower speed and gradually increase the speed as you progress. This will help prevent splintering at the start of the hole.
- Use a sharp drill bit. Dull bits can cause the wood to splinter more easily.
- Apply steady pressure while drilling, but avoid pressing too hard. Let the drill bit do the work.
- Consider using a drill press for more precise control over the drill speed.
By using the correct drill speed and following these tips, you can prevent wood splintering and achieve clean, professional-looking holes in wood.
Clear the Chips
When drilling wood, it is important to clear the chips that are generated. This prevents the chips from clogging the drill bit or the hole, which can lead to splintering or an incomplete hole.
There are a few ways to clear the chips while drilling wood:
- Back off regularly: While drilling, it is important to periodically release pressure on the drill bit and pull it out slightly. This allows the chips to fall out of the hole and prevents them from building up.
- Use a vacuum or blower: Another option is to use a vacuum or blower to remove the chips as you drill. This can be helpful, especially when drilling deep holes, as it allows you to continuously clear the chips without having to stop and remove the drill bit.
- Apply cutting fluid: For harder types of wood, applying cutting fluid to the drill bit can help lubricate the drilling process and prevent the chips from sticking to the bit. This allows the chips to be removed more easily.
- Clear the hole with a brush: After drilling is complete, use a brush to clean out any remaining chips from the hole. This helps ensure that the hole is clean and free from debris, which can affect the quality of the finished project.
By taking these simple steps to clear the chips while drilling wood, you can significantly reduce the risk of wood splintering and achieve clean, professional-looking holes.
Finish and Sand the Hole
Once you have drilled a clean hole in the wood, it’s important to finish and sand the hole to ensure a smooth and professional-looking result. Here are some steps to follow:
1. Flush the hole
Before sanding, it’s a good idea to flush the hole with water or compressed air to remove any debris or dust that may be inside.
2. Sand the edges
Using fine-grit sandpaper or a sanding block, gently sand the edges of the hole to smooth out any roughness. Be careful not to sand too aggressively, as this may cause the hole to become larger than intended.
3. Sand the surface
If necessary, lightly sand the surface around the hole to blend it with the rest of the wood. This will ensure a seamless and professional finish.
4. Apply a finish
Depending on the application and personal preference, you may want to apply a finish to the wood to enhance its appearance and protect it from moisture. This can be done using a brush or rag and a suitable wood finish, such as stain, varnish, or paint.
5. Allow the finish to dry
Once the finish has been applied, allow it to dry according to the manufacturer’s instructions. This will ensure that it properly adheres to the wood and provides a long-lasting and durable finish.
By following these steps, you can ensure that the drilled hole in the wood is finished and sanded properly, resulting in a clean and professional-looking result.
FAQ:
What tools do I need to drill clean holes in wood?
To drill clean holes in wood, you will need a power drill, drill bits, a drill press, or a handheld drill guide.
How can I prevent wood splintering when drilling?
To prevent wood splintering when drilling, you can use a sacrificial backing board, tape, or a center punch.
What is the best way to choose the right drill bit for wood?
The best way to choose the right drill bit for wood is to match the size and type of the bit to the project requirements, considering factors such as hole diameter and the type of wood being drilled.
Can I use a regular drill to drill clean holes in wood?
Yes, you can use a regular handheld drill to drill clean holes in wood, but using a drill press or a handheld drill guide will provide more control and precision.
Are there any techniques to drill clean holes in wood without splintering?
Yes, there are several techniques to drill clean holes in wood without splintering, such as using a sharp drill bit, drilling slowly with steady pressure, and using a backer board or tape to support the wood.
Video:


Harrison Clayton
Meet Harrison Clayton, a distinguished author and home remodeling enthusiast whose expertise in the realm of renovation is second to none. With a passion for transforming houses into inviting homes, Harrison's writing at https://thehuts-eastbourne.co.uk/ brings a breath of fresh inspiration to the world of home improvement. Whether you're looking to revamp a small corner of your abode or embark on a complete home transformation, Harrison's articles provide the essential expertise and creative flair to turn your visions into reality. So, dive into the captivating world of home remodeling with Harrison Clayton and unlock the full potential of your living space with every word he writes.


