Preventing Screw Stripping: A Guide to Effective Drilling
When it comes to construction and DIY projects, using screws is a common practice. However, one of the most frustrating issues that can arise is screw stripping. This occurs when the screwdriver or drill bit slips out of the screw head, leaving the screw impossible to tighten or remove. Not only is this a waste of time and effort, but it can also potentially jeopardize the structural integrity of the project.
Fortunately, there are several steps you can take to prevent screw stripping and ensure efficient drilling. Firstly, it is crucial to choose the right type and size of screwdriver or drill bit for the job. Using a Phillips screwdriver on a slotted screw, for example, will almost certainly result in stripping. Additionally, selecting a driver or bit that is too small or too large can lead to similar issues. Taking the time to match the tool to the screw will save you headaches down the line.
Another important consideration is the speed and pressure applied during drilling. It is essential to maintain a steady and controlled pace while exerting sufficient pressure to allow the screw to penetrate the material. Rushing the drilling process or using excessive force can cause the screw to strip. Remember, it’s better to take your time and get it right the first time.
Lastly, it is crucial to ensure that the hole you are drilling is the correct size and shape for the screw. Pre-drilling a pilot hole when working with hardwood or other dense materials can prevent stripping. In addition, countersinking or counterboring the hole can provide a recess for the screw head, reducing the risk of stripping.
By following these guidelines, you can prevent screw stripping and ensure that your construction or DIY projects are executed effectively. Taking the time to choose the right tools, maintain control during drilling, and prepare the correct holes will save you time, effort, and frustration in the long run.
The Importance of Proper Screw Installation
Proper screw installation is crucial for ensuring the stability and longevity of your projects. Whether you are working on a simple DIY project or engaging in a more complex construction endeavor, using screws correctly can make a significant difference in the overall outcome. Here are a few reasons why proper screw installation is important:

1. Enhanced Structural Integrity
When screws are installed properly, they provide stronger connections between materials. This enhanced structural integrity ensures that your project is more durable and less prone to damage or collapse. By properly inserting and tightening screws, you can create secure joints and prevent loosening over time.
2. Decreased Risk of Screw Stripping
One common issue with improper screw installation is screw stripping. This occurs when the screw head becomes worn or damaged, making it difficult to remove or tighten the screw. By following proper installation techniques, such as using the correct screwdriver size and applying the right amount of force, you can reduce the risk of screw stripping and avoid unnecessary frustrations.
3. Prevention of Splitting or Cracking
Improper screw installation can lead to splitting or cracking of the materials being joined. This is particularly common when using screws near the edges of wood or other fragile materials. By using the appropriate size and type of screw for the job and properly pre-drilling holes, you can avoid these potential issues and keep your project intact.
4. Improved Aesthetic Appeal
Properly installed screws not only provide functional benefits but also improve the overall appearance of your project. When screws are securely and flushly inserted into the materials, they create a seamless and professional finish. This attention to detail can enhance the aesthetic appeal of your work and showcase your craftsmanship.
Conclusion
Investing time and effort into proper screw installation is essential for achieving successful and long-lasting results. By following the guidelines for screw installation and considering factors such as material type, screw size, and pre-drilling, you can ensure the integrity, stability, and aesthetic appeal of your projects.

Choosing the Right Drill Bit
When it comes to preventing screw stripping, one of the key factors is choosing the right drill bit. Here are some tips to help you select the appropriate drill bit for your project:
1. Consider the Material
The material you are drilling into plays a crucial role in determining the type of drill bit you should use. Different materials require different drill bits in order to achieve the best results. For example:
- Wood: Use a brad point or twist drill bit for wood. These bits have sharp tips that help prevent the wood from splitting.
- Metal: For drilling into metal, choose high-speed steel (HSS) or cobalt drill bits. These bits are designed to withstand the heat generated by drilling into metal.
- Concrete: When drilling into concrete or masonry, use a masonry drill bit. These bits have a carbide tip that can penetrate through the tough surface.
2. Consider the Screw Size
The size of the screw you are using also affects the type of drill bit you should choose. The drill bit needs to be slightly smaller than the diameter of the screw to ensure a snug fit. If the drill bit is too small, it may cause the screw to strip or become loose. On the other hand, if the drill bit is too big, the screw may not have enough material to grip onto, leading to a weakened connection.
3. Think about the Shank Type
The shank type of the drill bit refers to the part of the bit that is inserted into the drill. There are two main types:
- Straight Shank: These drill bits have a straight, cylindrical shank that fits into most drill chucks. They are commonly used for drilling smaller holes.
- Hex Shank: Hex shank drill bits have a hexagonal shank that allows for easy and secure attachment to a drill. They are often used with impact drivers and are ideal for larger holes and tougher materials.
4. Quality Matters
Lastly, it is important to choose high-quality drill bits. Cheap or low-quality drill bits may not be sharp enough, leading to poor drilling performance and increased risk of screw stripping. Invest in good-quality drill bits that are made from durable materials and have a sharp cutting edge.

By considering the material, screw size, shank type, and quality, you can choose the right drill bit for your project and minimize the risk of screw stripping. Remember to always use the appropriate safety precautions and techniques when drilling.
Understanding Drill Speed and Pressure
One of the key factors to consider when drilling is speed and pressure. The speed at which you drill and the pressure you apply can greatly impact the success of your drilling project and can help prevent screw stripping. It is important to understand the relationship between drilling speed and pressure to achieve optimal results.
Drilling Speed
The drilling speed refers to how fast the drill bit rotates during the drilling process. The speed at which you should drill depends on several factors, including the material you are drilling into and the size of the hole you are trying to create.
When drilling into soft materials such as wood or plastic, a higher drilling speed can be used. However, when working with harder materials such as metal or concrete, a slower drilling speed is recommended. Higher drilling speeds in harder materials can cause excessive heat, which can damage the drill bit and reduce its effectiveness.

It is also important to start drilling at a slow speed and gradually increase the speed as the hole progresses. Starting at a high speed can cause the drill bit to slip, resulting in an inaccurate hole and potential screw stripping.
Drilling Pressure
The drilling pressure refers to the force that is applied to the drill bit as it cuts into the material. Applying too much pressure can increase the risk of screw stripping and can also cause the drill bit to become overheated.
When drilling, it is important to let the drill bit do the work. Applying gentle, steady pressure is usually sufficient to achieve a clean and accurate hole. If you encounter resistance while drilling, it is important to stop and assess the situation. Applying excessive pressure can damage the drill bit, the material, or both.
In addition, using a drill with adjustable clutch settings can be beneficial. The clutch can help control the drilling pressure by automatically disengaging the drill’s motor when a certain level of resistance is reached.
Tips for Effective Drilling
- Choose the appropriate drill bit for the material you are working with.
- Always wear safety goggles and gloves when drilling.
- Use a cutting fluid or lubricant when drilling into metal to reduce heat and extend the life of the drill bit.
- Take breaks during prolonged drilling to give the drill bit and motor a chance to cool down.
By understanding the relationship between drill speed and pressure, you can improve the efficiency and effectiveness of your drilling projects. Proper drilling techniques not only prevent screw stripping but also help prolong the life of your drill bits and ensure accurate and clean holes.
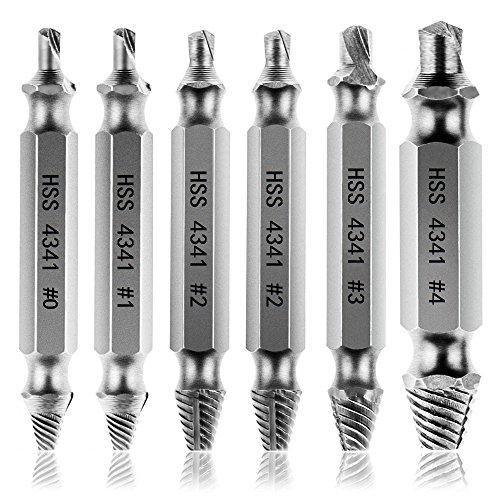
![Screw Extractor, [6 Pieces] Diyife Stripped Screw Remover, Damaged Screw Remover and Extractor Set, Speed Out Drill Bits Guide Set for Broken or Damaged Screw Made from H.S.S. 4341# Hardness 62-63hrc](https://m.media-amazon.com/images/I/5118W1-37EL._SL160_.jpg)
Using Pilot Holes for Screw Placement
When it comes to effectively and securely fastening screws, one important technique to consider is using pilot holes. Pilot holes are small, pre-drilled holes that are created before driving a screw into a material. They can help prevent screw stripping, splitting, and cracking of the material, making them a valuable technique for any DIY or construction project.
Why Use Pilot Holes?
Pilot holes provide several benefits when it comes to screw placement:
- Preventing splitting: Pilot holes help to prevent wood from splitting when driving screws close to the edges of the material. The pilot hole allows the screw to enter the wood smoothly without causing any damage.
- Reducing cracking: When screws are driven without pilot holes, they can cause the material to crack or splinter. Pilot holes reduce the risk of cracking, ensuring a stronger and more durable connection.
- Allowing for precise screw placement: Pilot holes allow you to precisely position screws, making it easier to align multiple pieces of material or to attach hardware such as hinges or brackets.
- Preventing screw stripping: Pilot holes reduce the risk of screw stripping, which occurs when the screw’s threads become damaged or worn. By creating a pilot hole, you create a clear path for the screw to follow, reducing the likelihood of stripping.
How to Use Pilot Holes:
Here are the steps to follow when using pilot holes for screw placement:
- Choose a drill bit that is slightly smaller than the diameter of the screw.
- Mark the desired position for the screw on the material.
- Using the chosen drill bit, gently drill a hole at the marked position. The hole should be deep enough to accommodate the screw, but not too deep to compromise the material’s integrity.
- Remove any debris from the hole, ensuring that it is clean and free from any obstructions.
- Place the screw into the pilot hole and slowly drive it into the material using a screwdriver or drill.
- Stop driving the screw once it is securely fastened, being careful not to overtighten and risk stripping the screw or damaging the material.
| Use the right drill bit: | Choosing a drill bit that matches the diameter of the screw is crucial for creating a pilot hole that is the right size. If the hole is too small, the screw may not fit properly; if it’s too large, the screw may not have enough material to hold onto securely. |
| Use the right depth setting: | Drilling the pilot hole to the appropriate depth is important for achieving a secure and stable connection. If the pilot hole is too shallow, the screw may not have enough material to hold onto; if it’s too deep, the screw may not provide enough grip. |
| Consider lubrication: | For some materials, such as hardwood or metal, using a lubricant like soap or wax can help reduce friction and make driving the screw easier. |
| Practice on scrap material: | If you’re new to using pilot holes, it’s a good idea to practice on a piece of scrap material before working on your actual project. This will help you get a feel for the process and ensure that you are creating the pilot holes correctly. |
Effective Drilling Techniques for Different Materials
1. Wood
- Choose a wood drill bit with a sharp point and cutting edges designed specifically for wood.
- Use a drilling speed that matches the hardness of the wood; faster for soft woods and slower for hardwoods.
- Apply light pressure and maintain a steady speed to prevent splintering.
- Use a backing board when drilling through thin or fragile wood to minimize tear-out.
2. Plastic
- Use a drill bit specifically designed for plastic, such as a high-speed steel or carbide-tipped bit.
- Use a slow drilling speed to prevent melting or warping of the plastic.
- Apply light pressure and keep the drill bit cool by periodically dipping it in water.
- Use masking tape to mark the drilling location and prevent cracking or chipping of the plastic surface.
3. Metal
- Choose a drill bit made of high-speed steel or cobalt, which are designed for drilling through metal.
- Use a lubricant, such as cutting oil or drilling fluid, to reduce heat and friction during drilling.
- Use a slow drilling speed and apply steady pressure to avoid overheating and dulling of the drill bit.
- Drill a pilot hole before using a larger drill bit to prevent wandering and ensure accurate drilling.
4. Concrete
- Use a masonry drill bit made of tungsten carbide or diamond-tipped, which are specifically designed for drilling through concrete.
- Use a hammer drill or rotary hammer tool with a hammering action to penetrate the hard surface of the concrete.
- Use a slow drilling speed and apply steady pressure to prevent overheating and premature wearing of the drill bit.
- Periodically withdraw the drill bit to clear away dust and debris, as this will improve drilling efficiency.
5. Tiles
- Choose a drill bit specifically designed for tiles, such as a diamond-tipped or carbide-tipped bit.
- Use a slow drilling speed and apply light pressure to prevent cracking or shattering of the tile.
- Place masking tape over the drilling area to minimize chipping or splintering of the tile surface.
- Consider using a lubricant, such as water, to cool the drill bit and reduce friction while drilling through tiles.
By following these effective drilling techniques for different materials, you can ensure successful and efficient drilling without the risk of screw stripping or damage to the material.
The Role of Torque Control in Preventing Screw Stripping
When it comes to preventing screw stripping, one of the most important factors to consider is torque control. Torque refers to the amount of force applied to rotate an object around an axis. In the context of drilling, torque control is essential for ensuring that the correct amount of force is applied to the screw, preventing it from becoming stripped or damaged.
There are several reasons why torque control is crucial in preventing screw stripping:
- Optimal Tightness: Torque control allows for precise control over the tightness of the screw. Over-tightening can lead to screw stripping, while under-tightening can result in loosening over time.
- Consistency: With torque control, each screw can be tightened to the same level of tightness, ensuring consistency across the project. This is especially important for applications that require multiple screws or when using automated drilling systems.
- Compatibility: Different types of screws require different amounts of torque. By using torque control, you can ensure that the correct amount of force is applied to each screw, regardless of its size or type.
- Safety: Excessive torque can cause damage to the screw, but it can also be dangerous for the operator. Torque control helps prevent overexertion and reduces the risk of injury.
Depending on the specific application, there are different methods of torque control that can be employed:
- Manual Torque Control: This method involves using a torque wrench or similar tool to manually apply the correct amount of force to the screw.
- Automatic Torque Control: For larger projects or repetitive tasks, automated drilling systems with built-in torque control can be used. These systems ensure consistent and accurate torque application.
- Software Control: Some advanced drilling systems utilize software control to monitor and adjust torque in real-time. This allows for precise control and customization based on the specific requirements of the project.
In conclusion, torque control plays a vital role in preventing screw stripping. By ensuring the optimal tightness, providing consistency, offering compatibility, and enhancing safety, torque control helps maintain the integrity of the screw and the overall project.
Maintaining and Sharpening Drill Bits
Regular maintenance and sharpening of drill bits is essential for ensuring their optimal performance and longevity. Here are some tips and techniques to help you maintain and sharpen your drill bits:
1. Cleaning the Drill Bits
- After each use, clean the drill bits thoroughly to ensure the removal of any debris or chips that may have accumulated during drilling.
- Use a brush or compressed air to clean out the flutes and remove any residue that may hinder the bit’s cutting ability.
- Inspect the tip of the drill bit for any signs of damage or wear, such as chipped edges or dullness.
2. Sharpening Drill Bits
- Invest in a high-quality drill bit sharpening tool or grinder specifically designed for sharpening drill bits.
- Follow the manufacturer’s instructions for setting up and using the sharpening tool.
- Place the drill bit into the sharpening tool and adjust the angle to match the original angle of the bit.
- Slowly grind the tip of the drill bit against the sharpening wheel, making sure to maintain a steady and even pressure.
- Remove the bit from the sharpening tool and test its sharpness on a scrap piece of material before using it.
3. Replacing Worn-out Drill Bits
- If a drill bit is severely damaged or cannot be effectively sharpened, it is best to replace it with a new one.
- Regularly check your drill bits for signs of wear and damage, such as excessive dullness or missing cutting edges.
- Keep a backup supply of drill bits to ensure that you always have sharp and reliable bits on hand.
4. Proper Storage and Handling
- Store drill bits in a clean, dry place to prevent rust or corrosion.
- Avoid dropping or mishandling drill bits, as this can lead to chipping or breaking.
- Use the appropriate size and type of drill bit for the material you are drilling to avoid unnecessary strain and damage to the bit.
By regularly maintaining and sharpening your drill bits, you can ensure their optimal performance, extend their lifespan, and prevent screw stripping during drilling.
Common Mistakes to Avoid When Drilling for Screws
1. Using the wrong drill bit size: One of the most common mistakes when drilling for screws is using the wrong size drill bit. Using a drill bit that is too small can result in the screw not fitting properly and being loose. On the other hand, using a drill bit that is too large can cause the screw to strip or the hole to be too big for the screw to hold securely. It is important to use the correct drill bit size based on the size of the screw you are using.
2. Not using a pilot hole: Another mistake is not using a pilot hole before drilling for screws. A pilot hole is a small hole that is drilled before inserting the screw. It helps to guide the screw and ensures that it goes in straight and doesn’t split the wood. By not using a pilot hole, you run the risk of the wood splitting or the screw not going in straight, resulting in a weak connection.
3. Drilling too deep: Drilling too deep is another common mistake. If you drill too deep, the screw may go through the material or poke out the other side. This can weaken the connection and make it less secure. It is important to measure the length of the screw and drill the hole to the appropriate depth to avoid this mistake.
4. Using too much force: Using too much force when drilling for screws can also cause issues. Applying excessive pressure can lead to the screw breaking or stripping the threads. It is important to let the drill do the work and apply consistent, gentle pressure. If you encounter resistance, it may be an indication that you need to use a different technique or adjust the drill settings.
5. Not using the correct speed and torque: The speed and torque settings on the drill are important factors to consider when drilling for screws. Using the wrong speed or torque can result in the screw not going in smoothly or the drill bit overheating. It is important to use the recommended speed and torque settings for the specific type of material you are drilling into and the size of the screw you are using.
6. Using a dull or worn-out drill bit: Using a dull or worn-out drill bit can make drilling for screws more difficult and result in a poor connection. A sharp drill bit can cleanly cut through the material, while a dull drill bit may cause the material to splinter or the screw to strip. It is important to regularly check and replace drill bits to ensure optimal performance.
7. Not securing the material: Failing to secure the material properly can also lead to mistakes when drilling for screws. If the material is not held securely, it can move or vibrate while drilling, resulting in a misaligned or poorly drilled hole. It is important to clamp or secure the material firmly before drilling to ensure accuracy and precision.
8. Ignoring safety precautions: Finally, one common mistake is ignoring safety precautions when drilling for screws. It is important to wear protective eyewear and gloves to protect yourself from any flying debris or accidents. Additionally, make sure to read and follow the manufacturer’s instructions and guidelines for safe and proper use of the drill and other tools.
Avoiding these common mistakes can help ensure a successful and secure drilling process when working with screws. By using the right tools and techniques, you can prevent screw stripping and achieve optimal results in your projects.
FAQ:
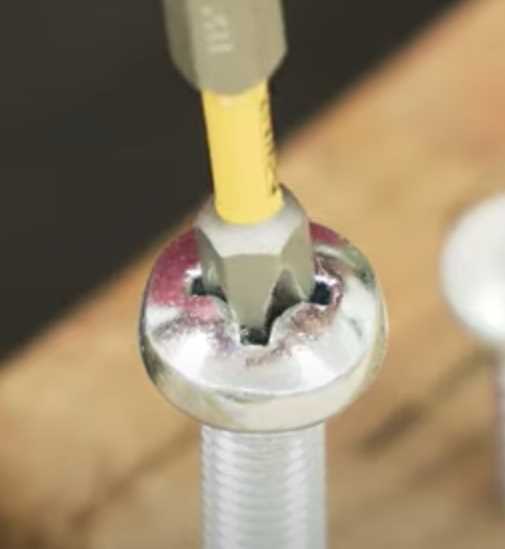
What causes screw stripping?
Screw stripping can be caused by various factors such as using the wrong size or type of drill bit, applying too much pressure while drilling, or using a damaged screwdriver or screw head.
How can I prevent screw stripping?
To prevent screw stripping, ensure that you are using the correct size and type of drill bit for the screw you are using. Apply moderate and consistent pressure while drilling and avoid using damaged tools. Additionally, drilling a pilot hole before inserting the screw can help prevent stripping.
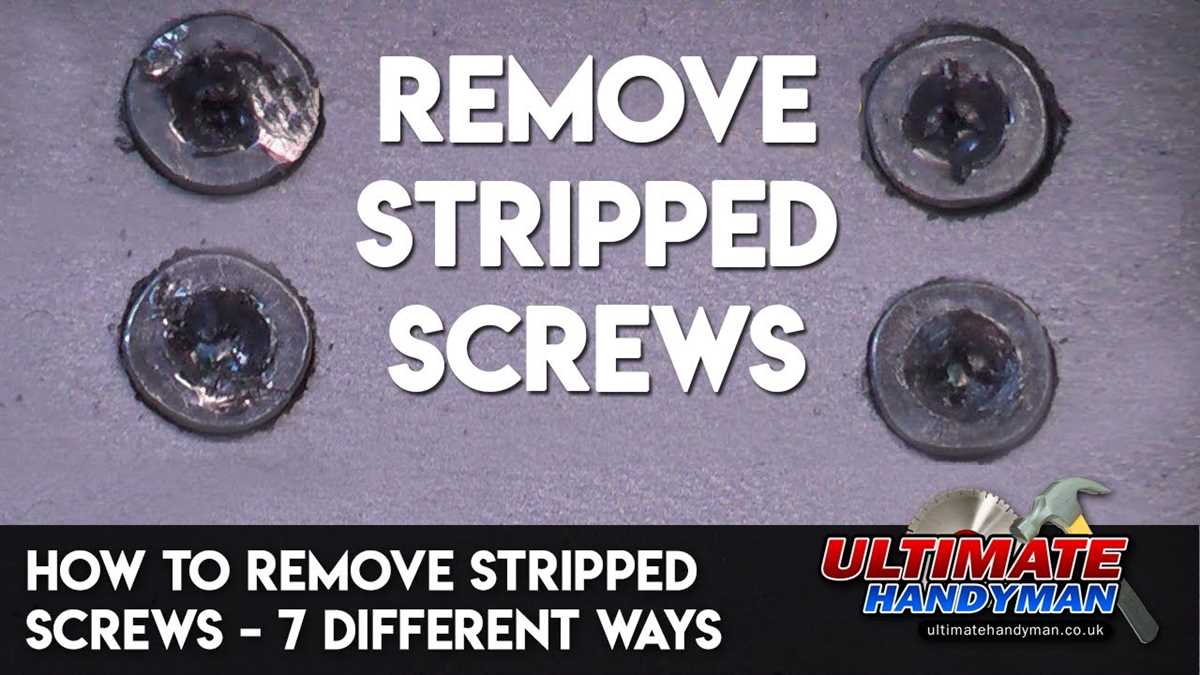
What are some signs of screw stripping?
Some signs of screw stripping include the screw becoming loose or not tightening properly, visible damage to the screw head, or the screwdriver slipping out of the screw head.
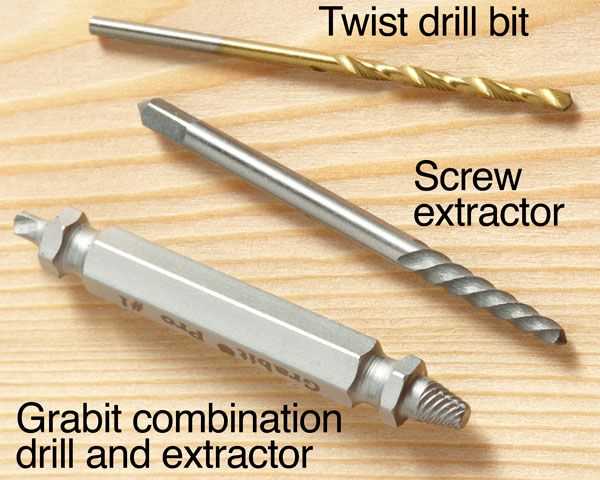
Can screw stripping be repaired?
In some cases, screw stripping can be repaired. One method is to use a rubber band between the screwdriver and the screw head to provide extra grip. Another option is to use a screw extractor tool to remove the stripped screw and replace it with a new one.
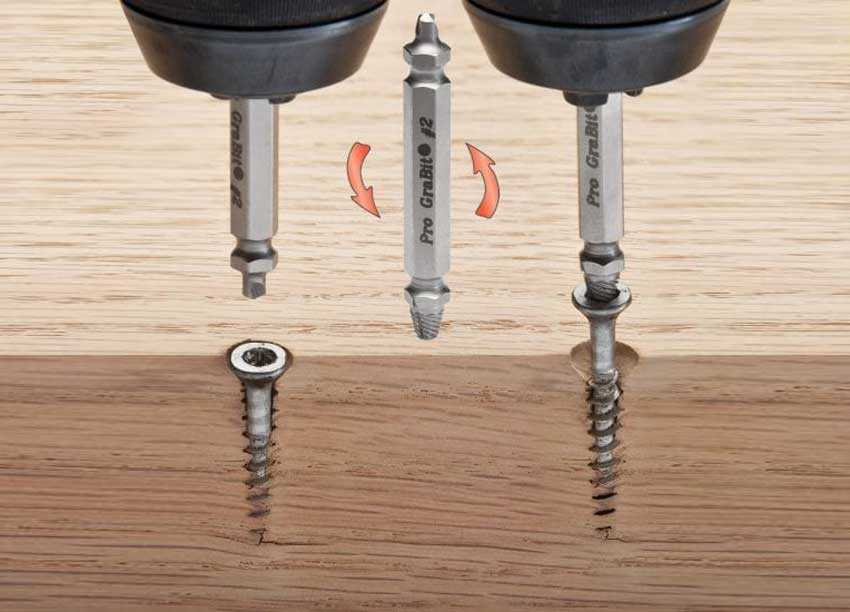
Are there specific drill bits that are better for preventing stripping?
Yes, there are drill bits specifically designed to prevent stripping. For example, some drill bits have specially designed tips that provide better grip on the screw head and reduce the likelihood of stripping. These bits are often made from high-quality materials and may have a coating for increased durability.
What should I do if I encounter a stripped screw?
If you encounter a stripped screw, there are several steps you can take. First, try using a larger screwdriver or a different type of screwdriver that may provide a better grip. If that doesn’t work, you can try using pliers to grip the screw and turn it out. If all else fails, you may need to use a screw extractor tool or consult a professional for assistance.
Is it possible to prevent screw stripping entirely?
While it may not be possible to prevent screw stripping entirely, following proper drilling techniques and using the correct tools can greatly reduce the risk. Taking the time to select the right drill bit, apply the correct amount of pressure, and use a good-quality screwdriver can go a long way in preventing screw stripping.
Video:


Harrison Clayton
Meet Harrison Clayton, a distinguished author and home remodeling enthusiast whose expertise in the realm of renovation is second to none. With a passion for transforming houses into inviting homes, Harrison's writing at https://thehuts-eastbourne.co.uk/ brings a breath of fresh inspiration to the world of home improvement. Whether you're looking to revamp a small corner of your abode or embark on a complete home transformation, Harrison's articles provide the essential expertise and creative flair to turn your visions into reality. So, dive into the captivating world of home remodeling with Harrison Clayton and unlock the full potential of your living space with every word he writes.