Preventing Cracks: A Guide to Drilling Holes in Acrylic

Drilling holes in acrylic can be a tricky task, as this material is prone to cracking. Whether you are working on a DIY project or a professional job, it is important to follow the right techniques to avoid damaging the acrylic. In this guide, we will provide you with useful tips and tricks to prevent cracks and ensure a successful drilling experience.
Choose the Right Drill Bit
When drilling holes in acrylic, the type of drill bit you use can make a significant difference. It is recommended to use a drill bit specifically designed for acrylic or a carbide-tipped drill bit. These types of drill bits have a sharper cutting edge and are less likely to cause cracks compared to regular drill bits. Additionally, using a drill bit with a smaller diameter can also help prevent cracking, as it reduces the stress on the acrylic material.
Apply Steady Pressure
When drilling holes in acrylic, it is important to apply steady pressure to avoid cracks. Start the drilling process at a slow speed and gradually increase the speed as you go deeper into the acrylic. Using too much force or applying sudden pressure can cause the acrylic to crack, so it is essential to maintain a steady and consistent pressure throughout the drilling process.

Use Lubrication
Using lubrication can significantly reduce the risk of cracking when drilling holes in acrylic. Apply a few drops of a lubricant, such as water or cutting oil, on the drilling area to cool down the material and prevent it from overheating. The lubrication will also help the drill bit move smoothly through the acrylic, reducing friction and minimizing the chances of cracking.
Take Breaks
Drilling holes in acrylic can generate heat, which can increase the risk of cracking. It is important to take breaks during the drilling process to allow the acrylic to cool down. This can be done by simply stopping the drilling for a few seconds every now and then. Taking breaks will prevent the acrylic from overheating and reduce the chances of cracks.
In conclusion, drilling holes in acrylic requires careful attention to prevent cracks. By using the right drill bit, applying steady pressure, using lubrication, and taking breaks, you can significantly reduce the risk of cracking and ensure a successful drilling experience. Remember to always take your time and follow these guidelines to achieve the best results when working with acrylic.
Choosing the Right Drill Bit
When drilling holes in acrylic, choosing the right drill bit is crucial to prevent cracking or damaging the material. There are several factors to consider when selecting a drill bit for acrylic, including the material of the bit, the size of the hole needed, and the drilling speed. Here are some tips to help you choose the right drill bit for your acrylic project:

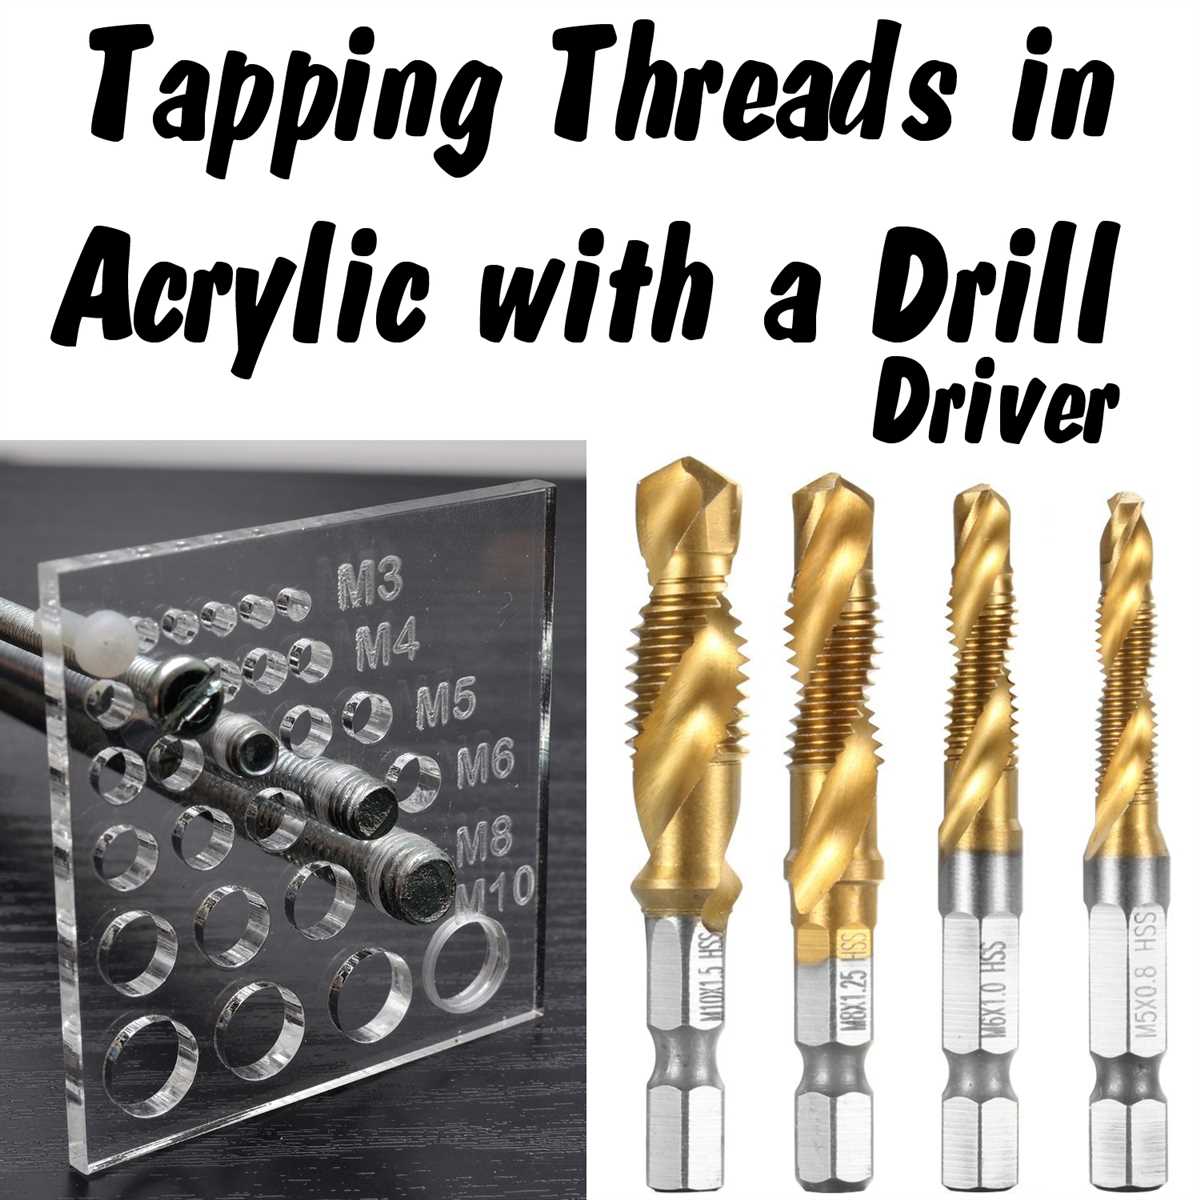
1. Use a High-Speed Steel (HSS) or Carbide Drill Bit
When drilling acrylic, it is recommended to use a high-speed steel (HSS) or carbide drill bit. These types of drill bits are specifically designed for drilling through hard materials like acrylic and are less likely to cause cracking. Avoid using regular twist bits or wood drilling bits, as they can cause heat buildup and damage the acrylic.
2. Consider the Size of the Hole
Before choosing a drill bit, determine the size of the hole you need to drill in the acrylic. Drill bits come in various sizes, so selecting the right size is important to achieve the desired result. Measure the diameter of the hole you need and choose a drill bit that matches that size.
3. Opt for a Brad Point or Spade Bit for Larger Holes
If you need to drill larger holes in the acrylic, consider using a brad point or spade bit. These types of bits have a wider cutting edge and are specifically designed for drilling larger holes. They provide better control and reduce the chance of cracking the acrylic.

4. Use a Drill Bit with a Pointed Tip for Smaller Holes
For smaller holes in acrylic, a drill bit with a pointed tip, such as a twist bit or brad point bit, can be used. These types of drill bits allow for more precise drilling and reduce the risk of cracking. Make sure the size of the pointed tip matches the size of the hole you need.
5. Adjust the Drilling Speed
When drilling acrylic, it is important to adjust the drilling speed to avoid overheating the material and causing cracks. Use a slow drilling speed and apply gentle pressure to prevent the acrylic from melting or cracking. If the acrylic starts to melt or chip, stop drilling and let the material cool down before continuing.
6. Lubricate the Drill Bit
To further reduce the risk of cracking, you can lubricate the drill bit with water or a lubricating oil before drilling. This helps to keep the bit cool and reduce friction, making it easier to drill through the acrylic without causing damage.
Remember to always wear safety goggles and gloves while drilling acrylic to protect yourself from debris and prevent any accidents. Following these tips and choosing the right drill bit will help you drill holes in acrylic with minimal risk of cracking or damaging the material.
Preparing the Surface
The first step in drilling holes in acrylic is to prepare the surface. This involves cleaning the acrylic sheet to remove any dirt, dust, or debris that may be present. This is important because any foreign particles on the surface can interfere with the drilling process and increase the risk of cracking or chipping.

Cleaning the Acrylic Sheet
To clean the acrylic sheet, follow these steps:
- Use a mild soap or detergent and water solution to gently wipe down the surface of the acrylic with a soft cloth or sponge. Avoid using abrasive cleaners or materials, as these can scratch the surface of the acrylic.
- Rinse the acrylic sheet thoroughly with clean water to remove any soap residue.
- Dry the surface of the acrylic sheet with a clean, lint-free cloth or towel.
Masking the Drilling Area
After cleaning the acrylic sheet, it’s a good idea to mask off the drilling area to provide extra protection against cracking. This involves placing a strip of masking tape or painter’s tape over the area where the hole will be drilled.
Tip: Make sure the tape is secure and covers the entire drilling area to prevent any chips or cracks.
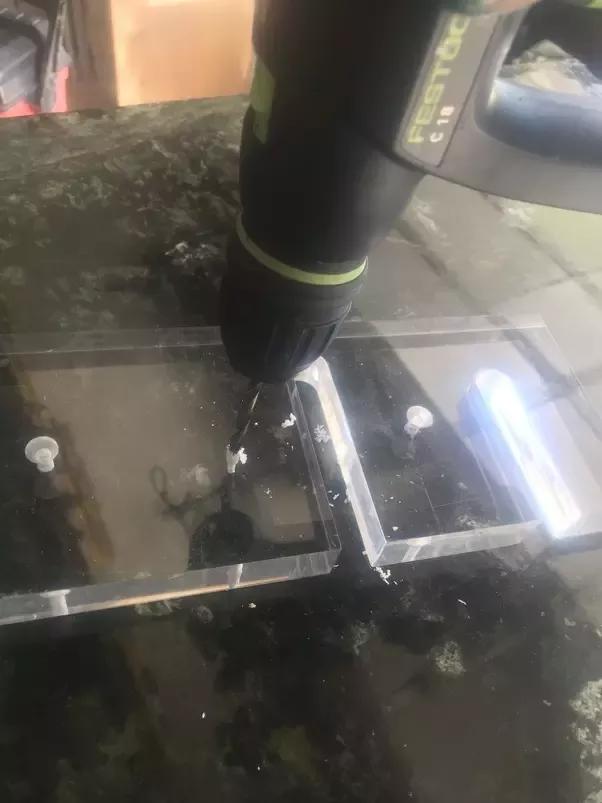
Clamping the Acrylic Sheet
Before drilling, it’s important to securely clamp the acrylic sheet to a stable work surface. This helps to prevent the sheet from moving or vibrating during drilling, which can increase the risk of cracking.
- Choose a stable work surface that can support the acrylic sheet.
- Position the acrylic sheet on the work surface and use clamps to hold it securely in place. Make sure the clamps are not obstructing the drilling area.
- Ensure that the acrylic sheet is level and flat to prevent any flexing or bending during drilling.
Caution: Be careful not to overtighten the clamps, as this can crack or damage the acrylic sheet.

Summary
Preparing the surface is an essential step in drilling holes in acrylic. By cleaning the acrylic sheet, masking the drilling area, and clamping the sheet securely to a stable work surface, you can create the ideal conditions for successful drilling without cracks or chipping.
Marking the Hole
Before beginning the drilling process, it is important to mark the hole’s location on the acrylic. This will ensure accuracy and prevent any mistakes.
Materials Needed:
- Acrylic sheet
- Marker pen or pencil
- Straightedge or ruler
Instructions:
- Place the acrylic sheet on a flat and stable surface.
- Using a marker pen or pencil, make a small dot or mark at the center of where you want the hole to be drilled.
- If the hole needs to be positioned at a specific distance from the edge or other reference point, use a straightedge or ruler to measure and mark the desired distance.
- Double-check the location and measurements to ensure accuracy.
Note: It is recommended to make a small pilot hole before drilling the final hole. This will help guide the drill bit and prevent any potential cracking.
| Method | Description |
|---|---|
| Dot | The simplest method is to mark the center of the hole with a small dot using a marker pen or pencil. |
| Circle | If the hole needs to have a larger diameter, you can draw a circle around the dot using a compass or any circular object with the desired diameter |
| Masking tape | If you’re concerned about marking the acrylic directly, you can place a piece of masking tape on the acrylic and mark the hole on the tape instead. This can be especially useful for larger holes. |
With the hole location properly marked on the acrylic, you can now proceed to the next step – drilling the hole.
Applying Proper Pressure
When drilling holes in acrylic, it is important to apply proper pressure to prevent cracks. Too much pressure can cause the acrylic to crack, while too little pressure can result in an uneven or incomplete hole. Here are some tips for applying the right amount of pressure:
- Start slow: Begin drilling at a slow speed to get a feel for the material and to allow the drill bit to create an initial groove.
- Gradually increase pressure: As you continue drilling, gradually increase the pressure on the drill. Apply constant, steady pressure without forcing the drill bit.
- Use lubricant: Applying a lubricant, such as a cutting oil or a soap and water mixture, can reduce friction and prevent the acrylic from overheating. This can help the drill bit move smoothly through the material.
- Take breaks: Drilling holes in acrylic can generate heat, which can increase the risk of cracking. Take breaks every so often to allow the acrylic to cool down.
- Keep the drill bit sharp: Dull drill bits can cause excessive heat and increase the likelihood of cracking. Make sure to use a sharp drill bit and replace it when necessary.
- Support the acrylic: Placing a scrap piece of wood or a backer board beneath the acrylic can help provide support and prevent it from flexing or cracking while drilling.
By following these tips and applying proper pressure, you can minimize the risk of cracks and achieve clean and precise holes in acrylic.
Using the Correct Speed
When drilling holes in acrylic, it is important to use the correct speed. Using the wrong speed can cause the acrylic to crack or melt, resulting in a less-than-perfect hole and potentially damaging the material.
Acrylic is a thermoplastic material that softens and melts when exposed to high temperatures. When drilling, the friction between the drill bit and the acrylic can generate heat, which can then cause the acrylic to melt and deform.
To prevent this from happening, it is recommended to use a low speed setting on your drill. A slower speed reduces the friction and heat generated during drilling, minimizing the risk of cracking or melting the acrylic.
It is also important to use a drill bit specifically designed for drilling acrylic. These bits have a sharper cutting edge and are designed to effectively remove material without generating excessive heat. Using a regular drill bit can result in a less clean cut and increase the chances of melting the acrylic.
Before starting to drill, it is a good idea to test the speed on a scrap piece of acrylic. This allows you to fine-tune the speed setting and ensure that it is appropriate for the specific acrylic material you are working with.
Minimizing Heat Buildup
When drilling holes in acrylic, it is important to minimize heat buildup to prevent cracks and damage to the material. Heat can be generated during the drilling process, especially if the drill bit is spinning too fast or if too much pressure is applied.
To minimize heat buildup, follow these steps:
- Choose the right drill bit: Use a drill bit specifically designed for acrylic or other plastics. These bits have a sharper cutting edge and are designed to dissipate heat more efficiently.
- Use a slower drilling speed: Set your drill to a slower speed to reduce friction and heat buildup. High speeds can melt the acrylic, leading to cracks and damage.
- Apply steady and even pressure: Apply a moderate amount of pressure while drilling, but avoid applying too much force. Excessive pressure can generate more heat and increase the risk of cracking.
- Take breaks: While drilling, periodically stop to let the acrylic cool down. This will help dissipate any heat that has built up during the drilling process.
- Use a lubricant: Applying a small amount of lubricant, such as water or a specialized drilling coolant, can help reduce heat buildup. Lubricants also assist in keeping the drill bit cool and prevent it from getting stuck in the acrylic.
By following these steps, you can minimize heat buildup during the drilling process and reduce the risk of cracks and damage to your acrylic material.
Clearing Debris
Clearing debris from the drilled holes is an essential step in preventing cracks and ensuring a clean finish. It is important to remove any leftover acrylic pieces, dust, or shavings that may have accumulated during the drilling process. Failure to clear debris can lead to cracks or affect the appearance of the acrylic.
There are several methods for effectively clearing debris from drilled holes in acrylic:
- Compressed Air: Using a can of compressed air is one of the easiest and most effective ways to blow away debris. Aim the nozzle directly into the holes and apply short, controlled bursts of air to remove any loose debris.
- Soft Bristle Brush: Gently brush the holes with a soft bristle brush to dislodge and remove any remaining debris. Ensure that the brush you use is made of soft material to prevent scratching the acrylic surface.
- Vacuum Cleaner: If you have a vacuum cleaner with a small attachment, you can use it to suck out any debris from the holes. Ensure that the vacuum is set to a low suction level to avoid damaging the acrylic.
After clearing the debris, it is important to inspect the drilled holes for any remaining residue. Use a clean, lint-free cloth or a cotton swab dipped in isopropyl alcohol to wipe away any stubborn debris or residue. Make sure to dry the holes thoroughly before proceeding with any further steps.
By clearing debris properly, you can ensure that your drilled holes in acrylic are clean, free from obstructions, and less likely to develop cracks or blemishes.
Finishing and Smoothing the Hole
Once you have drilled the hole in acrylic, it is important to finish and smooth the edges to prevent cracking and create a professional-looking result. There are several methods you can use to achieve this.
1. Sandpaper
One of the most common methods is to use sandpaper to smooth the edges of the hole. Start with a coarse-grit sandpaper, such as 120-grit, and gently rub it along the edges in a circular motion. Gradually switch to finer-grit sandpapers, such as 220-grit and 400-grit, until the edges are smooth and no longer rough to the touch.
2. Flame Polishing
Another method is flame polishing, which involves using a flame to melt and smooth the edges of the hole. This method requires caution and should only be done by experienced individuals. Hold the flame, such as a propane torch, a few inches away from the edges and move it in a circular motion. Be careful not to apply too much heat or keep the flame in one spot for too long, as this can cause the acrylic to melt or warp.
3. Acrylic Edge Polishing Kit
If you want a more professional finish, you can invest in an acrylic edge polishing kit. These kits typically include different grits of sandpaper, a buffing wheel, and polishing compound. Follow the instructions provided with the kit to sand and polish the edges of the hole to a smooth finish.
4. Diamond File
A diamond file is another tool that can be used to smooth the edges of the hole in acrylic. Gently file the edges in a back-and-forth motion, applying light pressure. This will help remove any roughness and burrs, resulting in a polished and smooth edge.
Regardless of the method you choose, be patient and take your time. Rushing the finishing process can lead to cracks or uneven edges. Always wear safety goggles and work in a well-ventilated area when drilling and finishing acrylic.
FAQ:
What precautions should be taken when drilling holes in acrylic?
When drilling holes in acrylic, it is important to take several precautions. First, always make sure to use a drill bit specifically designed for acrylic. Regular drill bits can cause cracks or shattering. Second, start by drilling a pilot hole before drilling the final hole. This will help guide the drill bit and prevent any sudden cracks. Third, use a slow speed when drilling to avoid overheating the acrylic, as this can also cause cracks. Finally, always use a piece of scrap acrylic underneath the workpiece to prevent tear-out.
What type of drill bit should I use when drilling holes in acrylic?
When drilling holes in acrylic, it is important to use a drill bit specifically designed for acrylic. Regular drill bits can cause cracks or shattering. Acrylic drill bits typically have a 90-degree point angle and a sharp edge that helps to create a clean hole without any chipping or cracking. These drill bits are often made of carbide or high-speed steel.
Is it necessary to drill a pilot hole before drilling the final hole in acrylic?
Yes, it is highly recommended to drill a pilot hole before drilling the final hole in acrylic. A pilot hole is a smaller hole that is drilled before the final hole to guide the drill bit and prevent any sudden cracks or shattering. By starting with a pilot hole, you can ensure a clean and precise hole without any damage to the acrylic.
What speed should I use when drilling holes in acrylic?
When drilling holes in acrylic, it is important to use a slow speed. Acrylic is a relatively soft material, and drilling at a high speed can generate heat, which can cause the acrylic to melt or crack. It is recommended to use a drill speed of around 1500-2000 RPM (rotations per minute) for best results. Additionally, using a lubricant or spraying water on the drilling area can help to dissipate heat and prevent damage to the acrylic.
Can I use a regular drill bit to drill holes in acrylic?
No, it is not recommended to use a regular drill bit to drill holes in acrylic. Regular drill bits are designed for harder materials and can cause cracks or shattering when used on acrylic. It is important to use a drill bit specifically designed for acrylic, which typically has a 90-degree point angle and a sharp edge to create clean holes without any chipping or cracking. These acrylic drill bits are often made of carbide or high-speed steel.
Video:


Meet Harrison Clayton, a distinguished author and home remodeling enthusiast whose expertise in the realm of renovation is second to none. With a passion for transforming houses into inviting homes, Harrison's writing at https://thehuts-eastbourne.co.uk/ brings a breath of fresh inspiration to the world of home improvement. Whether you're looking to revamp a small corner of your abode or embark on a complete home transformation, Harrison's articles provide the essential expertise and creative flair to turn your visions into reality. So, dive into the captivating world of home remodeling with Harrison Clayton and unlock the full potential of your living space with every word he writes.


