Mastering the Art of Drilling Through Studs for Wiring

When it comes to electrical wiring projects, drilling through studs is often necessary to run wires from one area to another. However, this task can be tricky if you don’t know what you’re doing. Improperly drilling through studs can weaken the structure of your building and lead to potential safety hazards.
That’s why it’s crucial to master the art of drilling through studs for wiring. This skill will not only ensure that your electrical work is done safely and efficiently but also prevent any damage to the studs themselves.
One of the key considerations when drilling through studs is choosing the right drill bit. Using a drill bit that is too small can make it difficult to pass the wires through, while using a bit that is too large can compromise the integrity of the stud. It’s important to select a drill bit that is the appropriate size for the wire you are running.
Another important factor to keep in mind is the position of the studs. Studs are typically placed 16 or 24 inches apart, which means you need to carefully determine the exact location of the stud before drilling. A stud finder can be a useful tool to locate the center of the stud, ensuring that you drill in the right spot.
By following these guidelines and practicing proper technique, you can become proficient in drilling through studs for wiring. This skill will not only make your electrical projects easier but also help maintain the structural integrity of your building. So, take the time to learn this art and ensure the safety and efficiency of your electrical work.

The Importance of Drilling Through Studs for Wiring Safely
Why is it important to drill through studs for wiring?
When it comes to electrical wiring, safety should always be the top priority. Drilling through studs is an essential part of the wiring process, as it ensures that the wiring is securely installed and reduces the risk of accidental damage or fire hazards.
The risks of not drilling through studs
Not drilling through studs when installing wiring can pose several risks:
- Electrical hazards: If wiring is not secured to studs, it can become loose, creating the potential for electrical short circuits or sparks, which can lead to fires or electrical shock.
- Damage to walls: Without proper support, the weight of the wiring can cause the walls to weaken or crack over time, resulting in costly repairs.
- Inaccessible wiring: Wiring that is not routed through studs may be hidden behind walls, making it difficult to access if repairs or modifications are needed in the future.
The benefits of drilling through studs
Drilling through studs offers several key benefits:
- Secure installation: By drilling through studs, the wiring is firmly anchored and less likely to come loose or be damaged by external factors.
- Fire safety: Mounting wiring to studs reduces the risk of electrical fires, as the studs act as a barrier between the wiring and flammable materials.
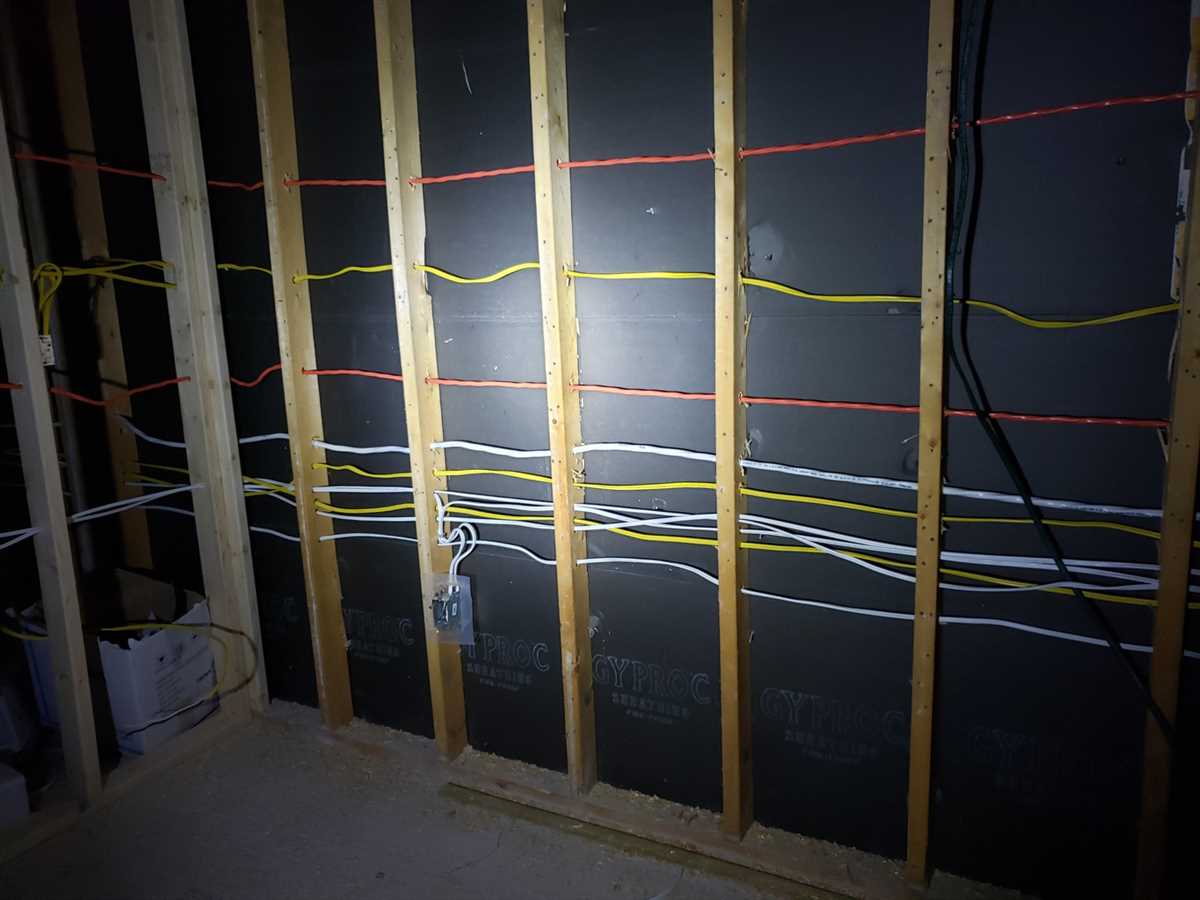
- Easier access: Routing wiring through studs makes it easily accessible for future repairs or modifications, saving time and money.
- Neat and organized appearance: Wiring that is properly routed through studs provides a clean and professional look, enhancing the overall aesthetics of the space.
How to drill through studs safely
Drilling through studs for wiring should be done with caution to minimize the risk of accidents. Here are some safety tips:

- Locate studs: Use a stud finder or knocking technique to locate the position of the studs.
- Mark drilling points: Once the studs are located, mark the drilling points on the wall surface to ensure accurate placement.
- Choose the right drill bit: Select a drill bit that is appropriate for the size of the wiring and the type of material you are drilling through.
- Wear protective gear: Always wear safety goggles, gloves, and a dust mask to protect yourself from debris.
- Drill slowly and steadily: Drill at a slow and controlled speed to avoid splintering or damaging the studs.
- Secure wiring: After drilling, secure the wiring using appropriate fasteners or staples to keep it in place.
By following these precautions, you can ensure a safe and effective installation of wiring through studs.
Tools and Materials Needed for Drilling Through Studs
Drilling through studs requires the use of specific tools and materials to ensure accurate and safe drilling. Before beginning the process, gather the following items:
Tools:
- Power drill
- Drill bits (suitable for wood or metal studs)
- Tape measure
- Level
- Pencil
- Stud finder
- Hammer
- Chisel
- Protective eyewear
- Work gloves
Materials:
- Electrical cables
- Wire staples or cable clips
- Electrical boxes
- Wire connectors
- Wall plates
- Screws
- Anchors
- Wire nuts
Additional Considerations:
It is important to ensure that the drill bits you choose are appropriate for the material of the studs you are drilling through. Wood studs typically require standard wood drill bits, while metal studs may require specialized bits designed for metal.
Additionally, when working with electrical wiring, it is essential to follow proper safety procedures and guidelines to prevent electrical shocks or fires. Always turn off the power to the area before drilling and consult with a qualified electrician if you are unsure about any aspect of the wiring process.
Remember to wear appropriate protective gear, such as eyewear and gloves, to protect yourself while drilling through studs. This will help prevent injury from flying debris or accidental contact with electrical components.

Preparing the Work Area for Drilling Through Studs
Before you start drilling through studs for wiring, it is important to properly prepare the work area. This will ensure that the process is safe and efficient. Here are some steps to follow:
1. Clear the area
Remove any obstructions or clutter from the area where you will be drilling. This includes furniture, decorations, or other items that may be in the way. Clearing the area will provide you with a clean and spacious work environment.
2. Locate the studs
Use a stud finder to locate the position of the studs in the wall. Mark their locations with a pencil, making sure to outline the edges so that they are clearly visible. This will help you drill accurately and avoid damaging the studs.
3. Check for electrical wiring
Before drilling into any stud, it is crucial to check for electrical wiring. Use a voltage tester to ensure that there are no live wires behind the wall. If you detect any electrical current, consult a professional electrician to safely re-route the wiring before proceeding.
4. Wear protective gear
Always wear appropriate protective gear while drilling through studs, including safety glasses and gloves. This will protect your eyes and hands from any potential hazards or flying debris that may occur during the drilling process.

5. Prepare the drill
Make sure your drill is properly set up and ready to use. Attach the correct drill bit for the job, ensuring that it is securely tightened. Adjust the drill’s speed and torque settings according to the material you will be drilling through.
6. Secure the workpiece
If you are drilling through a workpiece such as a piece of wood or metal, make sure it is securely clamped down or held in place. This will prevent it from moving or shifting during the drilling process, allowing for more accurate and controlled drilling.
7. Create a pilot hole
Before drilling through the studs, it is recommended to create a pilot hole. This will serve as a guide for the drill bit and help prevent any splintering or damage to the studs. Use a smaller drill bit than the one you will use for the final hole, and drill slowly and steadily.
8. Protect the surrounding area
Cover nearby surfaces or furniture with drop cloths or plastic sheets to protect them from dust or debris that may be produced during the drilling process. This will prevent any damage or staining to your surroundings.
By following these steps to prepare the work area, you can ensure a safe and efficient drilling process when working with studs for wiring.

Step-by-Step Guide to Drilling Through Studs for Wiring
1. Gather the necessary tools and materials
Before you begin drilling through studs for wiring, make sure you have the following tools and materials:
- Drill
- Drill bit suitable for wood
- Pencil or marking tool
- Stud finder
- Electrical wire
2. Locate the studs
Use a stud finder to locate the positions of the studs in the wall. Mark the locations with a pencil or marking tool. This step is crucial to ensure that you drill through the studs and not in between them.
3. Measure and mark the drilling points
Measure the distance from the edges of the studs where you want to drill. Mark these points on the wall with a pencil or marking tool. It’s important to be precise with your measurements to avoid any mistakes when drilling.
4. Choose the appropriate drill bit size
Select a drill bit that is suitable for wood and slightly smaller in diameter than the wire you will be running through the hole. This will prevent the wire from getting stuck and make it easier to pass through the drilled hole.
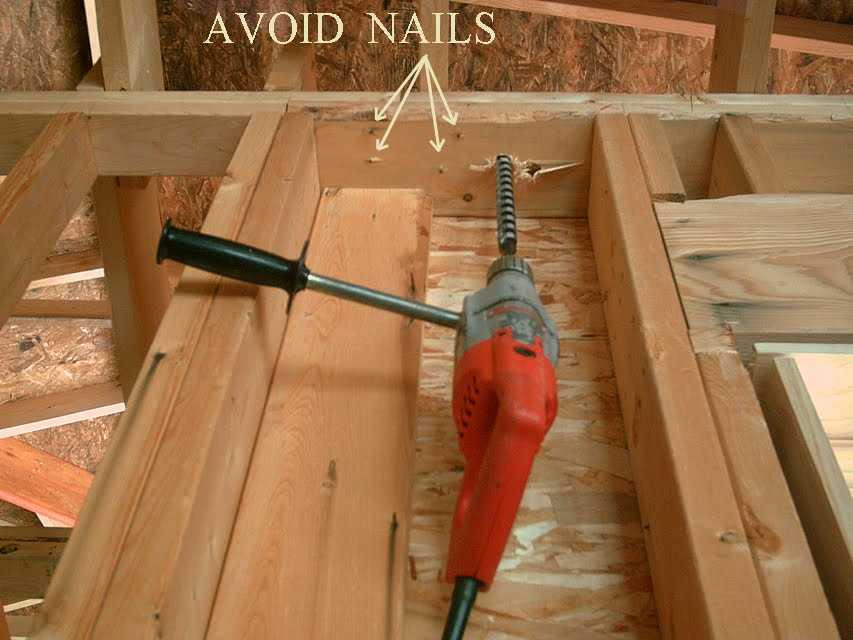
5. Drill through the studs
Position the drill bit on the first marked point and start drilling slowly. Apply even pressure as you drill through the stud. It’s important to keep the drill level and straight to avoid drilling at an angle or damaging the stud.
Repeat this process for all the marked points, drilling through each stud along the way.
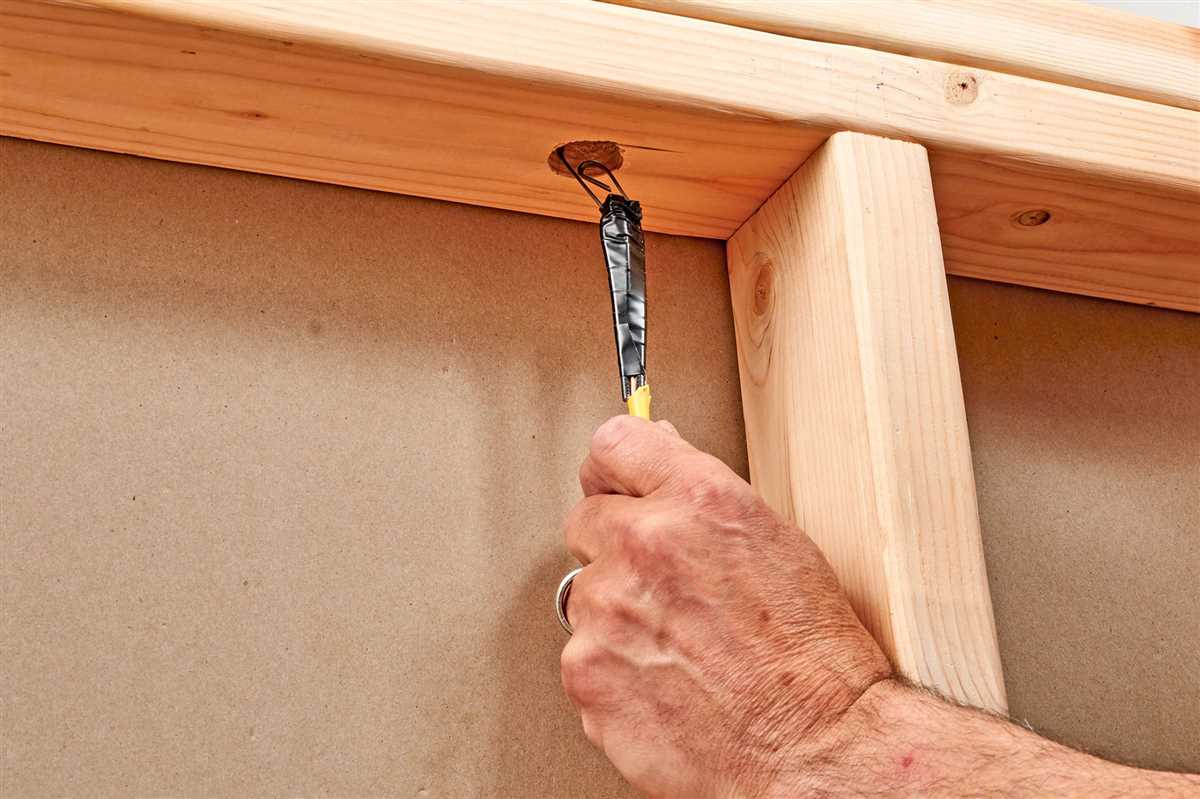
6. Run the wire through the drilled holes
Once you have drilled through all the studs, you can now run the electrical wire through the drilled holes. Start from one end and feed the wire through each hole, making sure it is secure and not snagged on any rough edges.
7. Install electrical boxes and secure the wire
If you are installing electrical outlets or switches, you will need to mount electrical boxes on the studs. Follow the manufacturer’s instructions to properly install the boxes and secure the wire inside them.
8. Test the wiring
After completing the installation, it’s important to test the wiring to ensure it is functioning properly. Use a voltage tester to check for live wires and make any necessary adjustments or repairs.
9. Seal the drilled holes
Finally, seal the drilled holes with appropriate sealant to protect the wall and prevent any drafts or pests from entering through the holes.
Congratulations! You have successfully drilled through studs for wiring. Always remember to follow safety precautions when working with electrical wiring and consult a professional if you are unsure.
Tips and Techniques for Avoiding Common Mistakes in Drilling Through Studs
1. Measure Twice, Drill Once
One of the most common mistakes when drilling through studs is inaccurate measurements. Before drilling, take your time to measure the exact location where you need to drill. Use a tape measure or ruler to ensure that your measurements are precise.
2. Use a Stud Finder
Another common mistake is drilling in the wrong spot and hitting electrical wires or plumbing pipes. To avoid this, use a stud finder to locate the edges of the studs. This will help you determine the exact location to drill.
3. Start with a Small Pilot Hole
When drilling through studs, it’s best to start with a small pilot hole before using a larger drill bit. This will help guide the drill and prevent it from wandering off course. Make sure the pilot hole is smaller than the diameter of the final hole you need.
4. Use a Drill Bit Designed for Wood
Using the wrong drill bit can lead to splintering or chipping of the wood stud. To avoid this, use a drill bit specifically designed for wood. These bits have a sharp point and flutes that help remove wood chips during drilling.
5. Drill at a Slight Angle
Drilling straight into the stud can cause the drill to bind or grab, leading to an uncontrolled rotation. To prevent this, drill at a slight angle, known as a “camber angle”. This will help the drill bit bite into the wood more smoothly and reduce the risk of the drill binding.
6. Use a Backing Board
If you’re concerned about the wood splitting when drilling through studs, place a scrap piece of wood, known as a backing board, behind the stud. This will provide support and help prevent any damage to the stud.
7. Work with a Spotter
Having someone assist you while drilling through studs can be beneficial. They can hold the drill steady, provide guidance, and alert you if any wires or pipes are nearby. This can help ensure that the drilling process goes smoothly and safely.
8. Clean Up and Secure Wires
After drilling through studs, it’s important to clean up any wood chips or debris that may have accumulated. Additionally, make sure to secure any wires and cables properly to prevent them from getting tangled or damaged.
9. Test for Stability
Before proceeding with any further installations or modifications, test the stability of the drilled hole. Ensure that the hole is secure and can support the weight or load that will be placed on it.
Conclusion
By following these tips and techniques, you can avoid common mistakes when drilling through studs for wiring. Remember to take accurate measurements, use a stud finder, start with a small pilot hole, use the right drill bit, drill at a slight angle, use a backing board if needed, work with a spotter, clean up after drilling, and test for stability. With practice and attention to detail, you can master the art of drilling through studs for wiring.
Safety Precautions to Consider When Drilling Through Studs
When drilling through studs for wiring, it is important to take certain safety precautions to avoid accidents and damage. Follow these guidelines to ensure a safe and successful drilling process:
1. Use Safety Equipment
Always wear appropriate safety equipment such as safety goggles, gloves, and a dust mask to protect yourself from potential hazards. Safety goggles will prevent debris from entering your eyes, gloves will protect your hands from sharp edges or splinters, and a dust mask will protect your lungs from dust particles.
2. Determine the Location of Electrical Wiring
Prior to drilling, it is crucial to locate any electrical wiring that may be hidden behind the stud. Use a stud finder or a wire detector to identify the wiring and avoid drilling into it. Drilling into electrical wires can cause electric shock or damage to the wiring system.
3. Switch Off the Power
If you are unsure about the location of the electrical wiring or want to take extra precautions, switch off the power supply to the area where you plan to drill. This will eliminate the risk of electric shock and prevent any accidental damage to the electrical system.
4. Choose the Right Drill Bit
Select a drill bit that is appropriate for the material of the stud you are drilling into. Different types of studs, such as wood, metal, or concrete, require different drill bits. Using the wrong drill bit can lead to poor drilling performance, damage to the bit, or even accidents.
5. Use a Drill with a Clutch
A drill with a clutch setting is highly recommended as it allows you to control the torque or rotational force applied while drilling. This can prevent the drill bit from getting stuck or snapping if it encounters an obstruction, reducing the risk of injuries.
6. Secure the Stud
Before drilling, make sure the stud is securely held in place. If the stud is loose or unstable, it may move and cause the drill bit to slip or damage the stud. Use clamps or braces to secure the stud if necessary.
7. Start with a Small Pilot Hole
Begin drilling a small pilot hole before using a larger drill bit. This will help guide the larger bit and prevent it from slipping or causing damage to the stud. Starting with a small pilot hole also allows you to check for any obstacles or obstructions behind the stud.
8. Drill Straight and Slow
Drill straight and apply steady pressure while drilling. Drilling at an angle or forcing the drill can cause the bit to bind or break, increasing the risk of accidents. Take your time and allow the drill bit to cut through the material gradually.
9. Clear Debris and Dust
Regularly clear debris and dust from the drilling area. Accumulated debris can obstruct your view and make it difficult to drill accurately. Clearing away the debris will also reduce the risk of the drill bit getting stuck or causing damage due to increased friction.
10. Inspect the Drilled Hole
After drilling through the stud, carefully inspect the drilled hole for any signs of damage or obstructions. Remove any remaining debris or sharp edges that may pose a safety risk. Take necessary precautions to protect the exposed wiring when feeding it through the drilled hole.
By following these safety precautions, you can ensure a safe and successful drilling process when working with studs for wiring.
Common Problems and Solutions in Drilling Through Studs for Wiring
1. Studs that are difficult to locate
Finding the exact location of studs can be a challenging task, especially if you don’t have access to a stud finder. Here are a few solutions to this problem:
- Use a magnet: Studs are usually made of wood or metal, so a magnet can help you locate them by detecting the nails or screws used to secure the drywall.
- Look for visual clues: Look for electrical outlets or switches on the wall, as they are typically mounted to studs. Additionally, you can look for nail pops or vertical lines on the wall, which may indicate the presence of studs.
- Tap the wall: By lightly tapping the wall, you can listen for a hollow sound, which may indicate the absence of a stud, or a solid sound, which may indicate the presence of a stud.
2. Hitting plumbing or electrical lines
Drilling through a stud without causing damage to plumbing or electrical lines can be a major concern. Here’s how to avoid this problem:
- Turn off the power: Before drilling, ensure that the power is turned off for any nearby electrical outlets or switches to prevent accidental electrocution or damage.
- Use a stud sensor: A stud sensor can help detect not only studs but also any electrical wires or pipes located behind the wall.
- Research the wall layout: If possible, research the layout of plumbing and electrical lines in your specific building. This information may be available in architectural plans or from previous renovations.
3. Drilling at the wrong angle
Drilling at the wrong angle can result in the wire not sitting flush against the wall or damaging the stud. Here are some solutions to this problem:
- Use a level: Before drilling, use a level to ensure that your drill is aligned vertically or horizontally, depending on your wiring needs.
- Mark the drill bit: Use a marker to mark the desired depth on your drill bit. This will help you gauge how deep you need to drill into the stud.
- Practice on scrap wood: If you’re unsure of your drilling skills, practice on a piece of scrap wood before drilling into the stud. This will allow you to get a feel for the drill and practice your technique.
4. Breaking or splintering the stud
If you accidentally break or splinter the stud while drilling, this can weaken its structural integrity. Here’s how to prevent this problem:
- Use the right drill bit size: Ensure that you’re using the correct drill bit size for the job. Using a drill bit that is too large can cause excessive force and damage the stud.
- Drill slowly and steadily: Apply even pressure and drill slowly to prevent the drill bit from catching and causing the stud to splinter.
- Pre-drill pilot holes: To reduce the risk of splintering, consider pre-drilling pilot holes with a smaller drill bit before drilling the final hole.
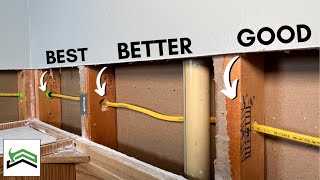
5. Inadequate support for wires
When drilling through studs, it’s important to provide adequate support for the wires to prevent them from sagging or rubbing against the edges of the hole. Here’s how to address this problem:
- Use protective plates: Install protective plates over the holes to protect the wires from being damaged by screws or nails.
- Secure wires with staples: Use wire staples to secure the wires against the surface of the stud, ensuring they are held securely in place.
- Use conduit: If necessary, consider using conduit to provide additional protection and support for the wires.
By being aware of these common problems and implementing the suggested solutions, you can master the art of drilling through studs for wiring with confidence and precision.
FAQ:
Why is it necessary to drill through studs for wiring?
Drilling through studs is necessary for wiring because it allows you to run electrical cables and wires through the walls, connecting them to outlets, switches, and other fixtures.
What tools do I need to drill through studs for wiring?
To drill through studs for wiring, you will need a power drill, a drill bit suitable for the size of the hole needed, a stud finder, and a pencil or marker for marking the location of the hole.
What is the best technique for drilling through studs?
The best technique for drilling through studs is to first use a stud finder to locate the position of the stud, then mark the spot where you want to drill. Start drilling slowly and steadily, applying pressure evenly. Once the bit has gone through the stud, continue drilling until you reach the desired depth.
Are there any precautions I should take when drilling through studs?
Yes, there are precautions you should take when drilling through studs. Be sure to turn off the power to the area where you’ll be drilling. Also, make sure to wear safety goggles to protect your eyes from any flying debris. Additionally, be aware of any pipes or other obstacles that may be behind the stud before drilling.
Can I drill through studs with plumbing pipes behind them?
You should avoid drilling through studs if there are plumbing pipes behind them, as it can damage the pipes and lead to leaks or other plumbing issues. It’s best to consult a professional plumber if you need to run wiring near plumbing pipes to ensure it’s done safely and correctly.
Video:


Meet Harrison Clayton, a distinguished author and home remodeling enthusiast whose expertise in the realm of renovation is second to none. With a passion for transforming houses into inviting homes, Harrison's writing at https://thehuts-eastbourne.co.uk/ brings a breath of fresh inspiration to the world of home improvement. Whether you're looking to revamp a small corner of your abode or embark on a complete home transformation, Harrison's articles provide the essential expertise and creative flair to turn your visions into reality. So, dive into the captivating world of home remodeling with Harrison Clayton and unlock the full potential of your living space with every word he writes.


