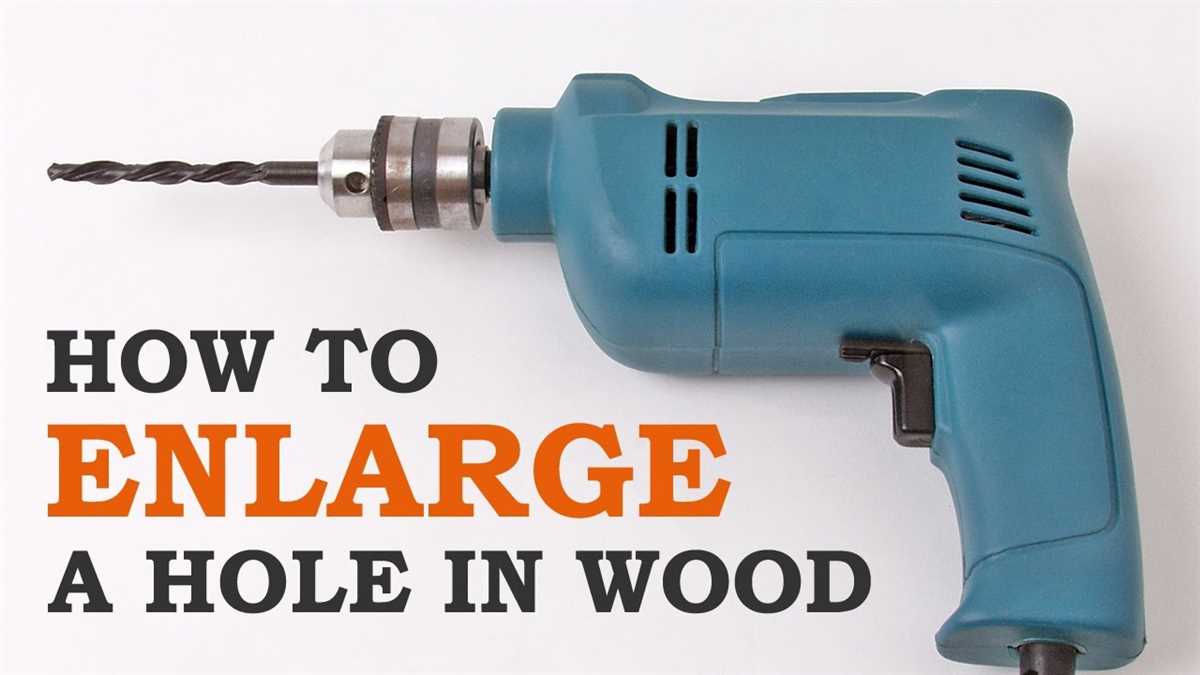
Master the art of drilling large holes in wood

Whether you’re a professional woodworker or just a DIY enthusiast, drilling large holes in wood can be a challenging task. It requires precision, patience, and the right tools. But with the right techniques and a few handy tips, you can master the art of drilling large holes and achieve professional-looking results.
First and foremost, it’s important to choose the right drill bit for the job. When drilling large holes, a spade bit or a hole saw is often the best choice. These bits are designed specifically for drilling larger holes and are available in various sizes. Make sure to select a bit that matches the size of the hole you want to drill.
Another key factor to consider is the speed and pressure applied while drilling. It’s important to start at a slow speed and gradually increase the speed as you go. Applying too much pressure can cause the bit to heat up and dull quickly. It’s better to let the bit do the work and apply only enough pressure to keep it steady.
Dust and debris can also be a concern when drilling large holes. To prevent them from getting in the way or damaging your workpiece, it’s a good idea to use a dust collection system or a shop vacuum. Additionally, periodically retract the bit while drilling to clear out any built-up debris.
By following these tips and practicing your technique, you’ll soon become proficient in drilling large holes in wood. Remember to always prioritize safety and use the appropriate protective gear, such as safety glasses and a dust mask. With time and experience, you’ll be able to tackle even the most challenging drilling projects with ease.

Mastering the Craft of Drilling Large Holes in Wood
Introduction
Drilling large holes in wood can be a challenging task, but with the right techniques and tools, it can become a manageable and even enjoyable part of your woodworking projects. In this article, we will explore various methods and tips to help you master the art of drilling large holes in wood.
Choose the Right Drill Bit

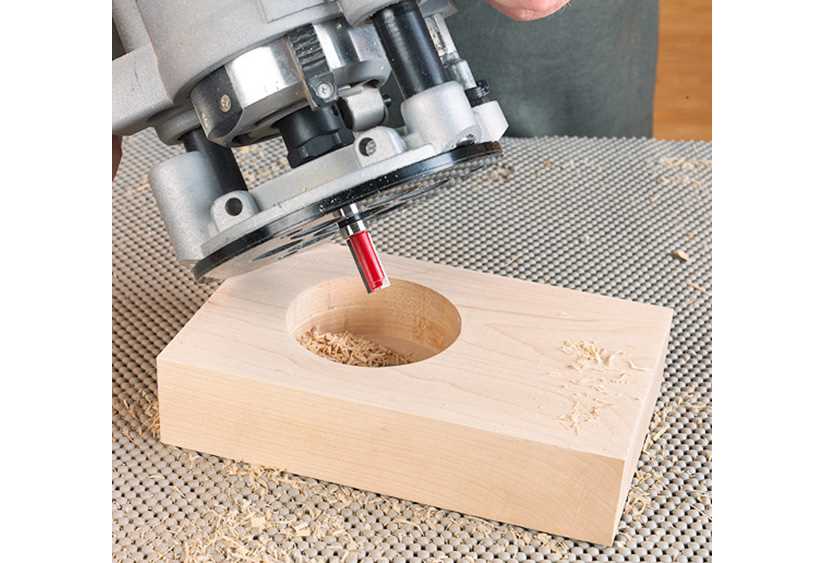
When it comes to drilling large holes in wood, the choice of drill bit is crucial. For holes larger than 1-1/2 inches in diameter, a Forstner bit is your best bet. It has a flat bottom and sharp cutting edges, making it perfect for clean and precise holes. For even larger holes, a hole saw is a suitable option. These cylindrical saws come in various sizes and can be attached to your drill.
Prepare the Wood
Before drilling large holes, it is essential to prepare the wood to minimize the risk of splitting or tearing. Mark the center of the hole using a pencil and a measuring tape. Then, use a smaller drill bit to create a pilot hole. This will help guide the larger hole saw or Forstner bit and prevent any wandering or misalignment.
Drilling Technique
When drilling large holes, it is important to keep the drill speed low to avoid overheating and reduce the chances of tear-out. Start drilling at a slow speed and gradually increase it as you progress. Apply steady and even pressure to the drill, allowing the bit to do the work. Keep the drill perpendicular to the wood surface to ensure a straight and clean hole.

Clearing Chips and Debris
Large drill bits can generate a significant amount of wood chips and debris. Regularly stop drilling to clear away the chips and debris, as they can clog the hole and affect the performance of the drill bit. Use a brush or a blast of compressed air to remove the chips and keep the hole clean as you drill.
Finishing Touches
Once you have drilled the large hole, you may need to clean up any rough edges or splinters. Use sandpaper or a file to smooth out the edges and ensure a clean finish. If the hole will be visible in the final project, you may also consider using a wood filler to fill any gaps or imperfections.
Conclusion
Mastering the craft of drilling large holes in wood requires the right tools, proper technique, and attention to detail. By choosing the right drill bit, preparing the wood properly, employing the correct drilling technique, clearing away chips, and finishing the hole, you can achieve clean and professional results in your woodworking projects. With practice and patience, you will become proficient in drilling large holes and unlock a world of possibilities in your woodworking endeavors.
Understanding the Importance of Proper Tools
Choosing the Right Tools
When it comes to drilling large holes in wood, having the proper tools is essential. Using the wrong tools can lead to inefficient drilling, damaged wood, and even potential injury. It is important to choose the right tools for the job.

The Right Drill Bit
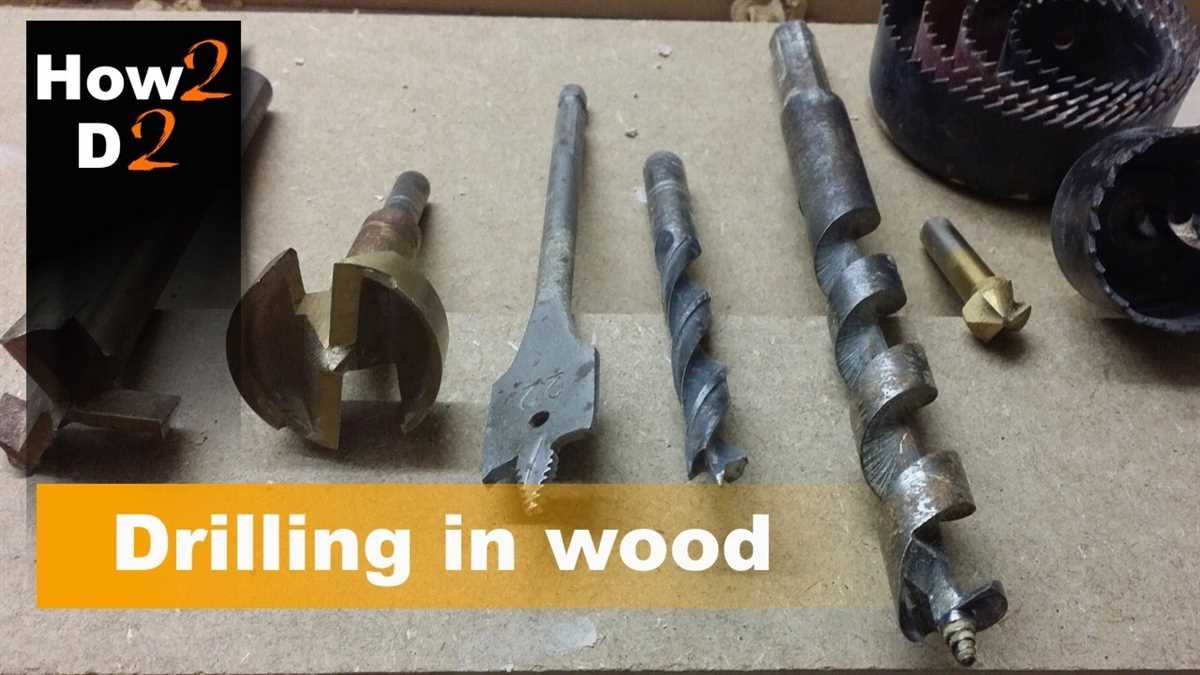
One of the most important tools for drilling large holes in wood is the drill bit. There are various types of drill bits available, and each one is designed for a specific purpose. When drilling large holes, it is recommended to use a spade bit or an auger bit, as they are specifically designed to handle the task.
- A Spade Bit: This type of drill bit has a flat, paddle-like shape with a central point. It is ideal for drilling holes up to 1½ inches in diameter.
- An Auger Bit: This drill bit has a spiral shape and is designed for drilling larger holes, typically between ¾ inch to 1½ inches in diameter. Unlike spade bits, auger bits extract the wood chips as they drill, making the process more efficient.
The Right Drill
In addition to the right drill bit, using the right drill is also crucial when drilling large holes in wood. A drill with enough power and speed is necessary to efficiently drill through the wood without causing damage. A drill with adjustable speed settings also provides better control during the drilling process.
Other Essential Tools
Aside from the drill and drill bits, there are a few other essential tools that are important for drilling large holes in wood:
- A measuring tape or ruler to ensure accurate hole placement.
- A pencil or marker to mark the center of the hole before drilling.
- A clamp to secure the wood in place while drilling to prevent it from moving.
- A depth stop or a piece of tape on the drill bit to control the depth of the hole.
Importance of Safety
Lastly, it is crucial to prioritize safety when working with power tools. Always wear appropriate safety gear, such as safety glasses and gloves, to protect yourself from potential accidents.

| Tool | Importance |
|---|---|
| Proper drill bit (spade bit or auger bit) | Designed for drilling large holes efficiently. |
| Drill with sufficient power and speed | Allows for efficient drilling without damaging the wood. |
| Measuring tape or ruler, pencil or marker | Ensures accurate hole placement. |
| Clamp | Holds the wood securely in place while drilling. |
| Depth stop or tape | Controls the depth of the hole. |
Choosing the Right Drill Bit for the Job
Introduction
When it comes to drilling large holes in wood, choosing the right drill bit is crucial for achieving the desired results. There are various types of drill bits available, each designed for specific applications. In this article, we will explore the different types of drill bits and how to select the appropriate one for your woodworking projects.
Types of Drill Bits
1. Twist Drill Bits: These are the most common type of drill bits and are suitable for drilling holes in wood, metal, and plastic. They have a spiral groove that helps remove drilled material.
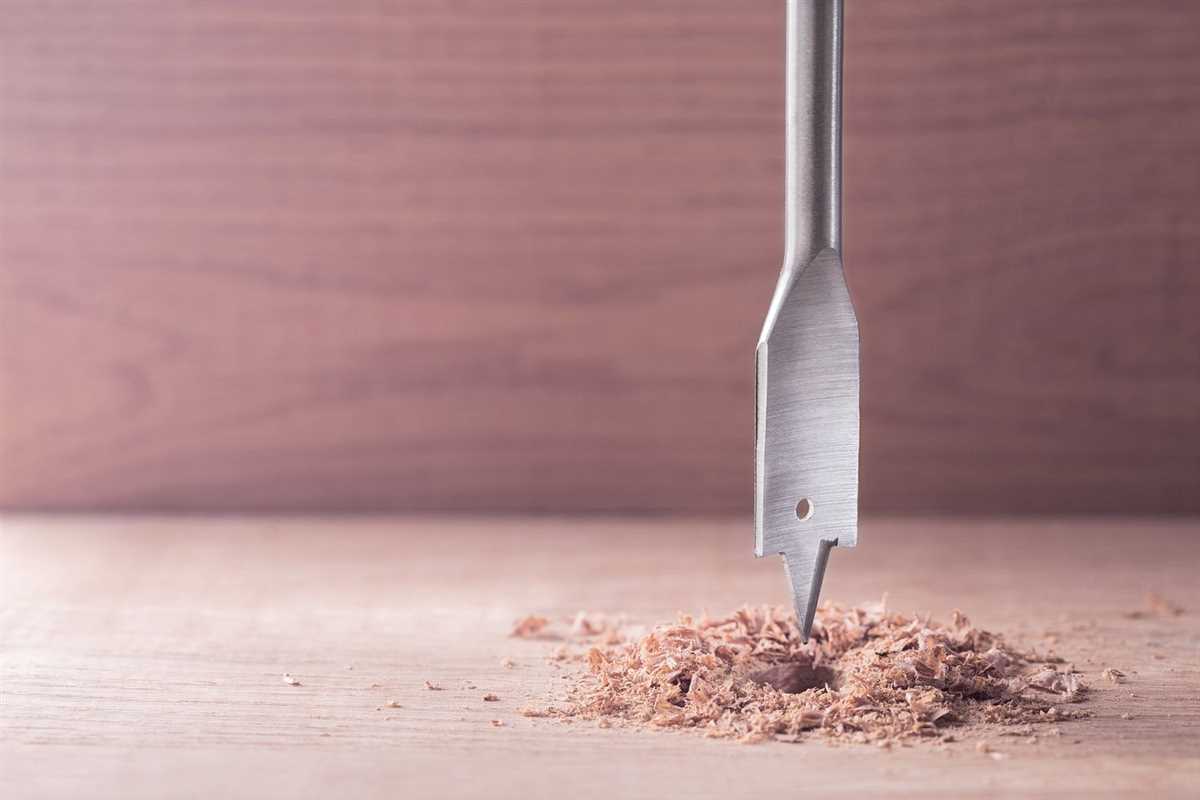
2. Spade Bits: Also known as paddle or flat bits, these are designed for drilling large holes in wood. They have a flat, paddle-shaped cutting surface and are ideal for creating holes for electrical outlets and pipes.
3. Forstner Bits: Forstner bits are used for drilling flat-bottomed holes in wood. They create clean, precise holes and are commonly used for drilling holes for dowels and hinges.
4. Hole Saw Bits: Hole saw bits have a cylindrical shape with a sawtooth edge. They are used for drilling large-diameter holes and are suitable for making holes for pipes, conduits, and recessed light fixtures.

5. Auger Bits: Auger bits have a spiral shape and are used for drilling deep holes in wood. They are commonly used for drilling holes for large-sized screws and dowels.
Factors to Consider
1. Material: Consider the type of material you will be drilling into. Different materials require different types of drill bits. For example, wood drill bits are not suitable for drilling into metal.
2. Hole Size: Determine the size of the hole you need to drill. Different drill bits are available in various sizes, ranging from small holes to larger holes.
3. Drill Type: Consider the type of drill you will be using. Some drill bits are specifically designed for use with certain types of drills, such as cordless drills or drill presses.
4. Accuracy: If you require precise and clean holes, choose drill bits that are specially designed for creating accurate holes, such as forstner bits or hole saw bits.
Conclusion
Choosing the right drill bit is essential for drilling large holes in wood. Consider the type of material, hole size, drill type, and desired accuracy when selecting a drill bit for your woodworking projects. With the right drill bit, you can achieve clean, precise holes and create professional-looking results.
Exploring Different Drilling Techniques
When it comes to drilling large holes in wood, there are several techniques and tools that can be used to achieve the desired result. Each technique has its own benefits and drawbacks, so it is important to understand the options available before starting a project.
1. Spade Bits
Spade bits are one of the most commonly used tools for drilling large holes in wood. They have a flat, paddle-like blade with a point at the center, which helps guide the bit into the wood. Spade bits are best suited for drilling holes up to about 1-1/2 inches in diameter. They are relatively inexpensive and can be found in a variety of sizes.
2. Hole Saws
Hole saws are another popular option for drilling large holes in wood. They consist of a circular blade with teeth that cuts through the wood. Hole saws are available in a wide range of sizes and can be attached to a drill or drill press. They are capable of drilling holes up to several inches in diameter.
3. Forstner Bits
Forstner bits are specifically designed for drilling clean, precise holes in wood. They have a center point and a rim with sharp teeth that cut through the wood. Forstner bits are commonly used for drilling large holes for dowels and other woodworking applications. They are available in various sizes and can produce holes with flat bottoms.
4. Auger Bits
Auger bits are often used for drilling large holes in wood for construction projects. They have a screw-like design that pulls the bit into the wood as it rotates. Auger bits are best suited for drilling deep holes and can be used with a hand brace or power drill. They are available in various lengths and diameters.
5. Adjustable Hole Cutters
Adjustable hole cutters are versatile tools that can be adjusted to drill holes of different sizes. They consist of a cutter with multiple cutting edges that can be changed to match the desired diameter. Adjustable hole cutters are typically used for cutting large holes in wood for plumbing and electrical installations.
These are just a few of the different drilling techniques that can be used to drill large holes in wood. The choice of technique will depend on factors such as the size of the hole, the type of project, and personal preference. It is always important to follow safety guidelines and use proper techniques when operating power tools.
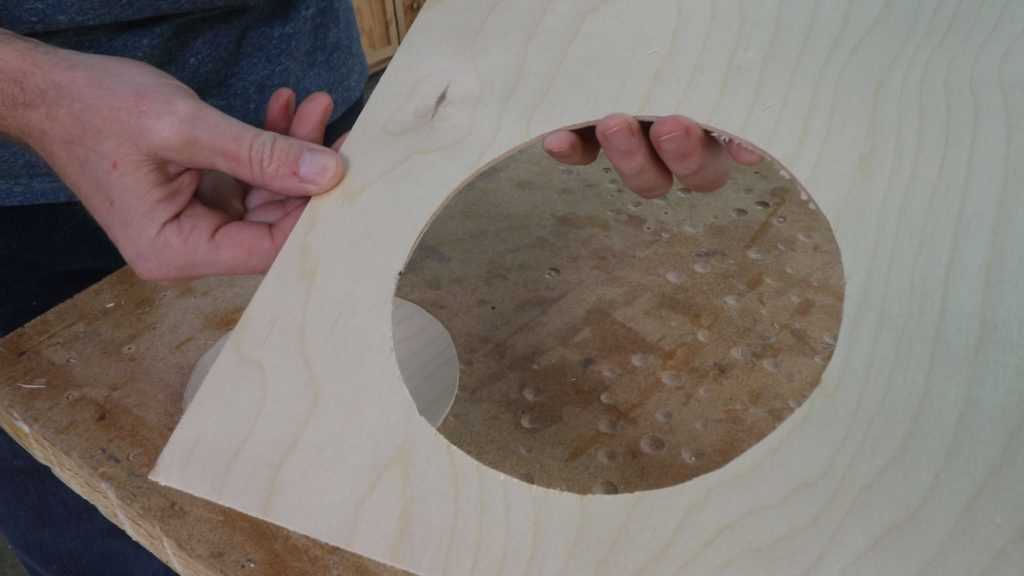
Preparing the Workpiece for Drilling
Before you start drilling large holes in wood, it is important to properly prepare the workpiece. Taking the necessary steps to prepare the wood will help ensure clean and accurate holes, as well as prevent the wood from splintering or cracking.
1. Marking the Hole Location
Begin by marking the exact location where you want to drill the hole. Use a pencil or marking tool to make a small dot on the surface of the wood. This will serve as a guide for positioning your drill bit.
2. Securing the Wood
Next, secure the wood in place to prevent it from moving or vibrating during the drilling process. You can use clamps or a vise to hold the wood firmly in place. This will provide stability and help ensure accurate drilling.
3. Choosing the Right Drill Bit
When drilling large holes, it is important to use the right drill bit. A spade bit or hole saw is commonly used for drilling large holes in wood. Select a drill bit that matches the desired hole size and attach it securely to your drill.
4. Using a Backing Board
If you are drilling through a thin piece of wood or one that is prone to splintering, it is recommended to use a backing board. Place a scrap piece of wood underneath the workpiece to provide support and minimize tear-out on the exit side of the hole.
5. Using Pilot Holes
For larger holes, it may be beneficial to create pilot holes before drilling the main hole. Pilot holes help guide the drill bit and reduce the chances of the wood splitting or cracking. Use a smaller drill bit to create a pilot hole that is slightly smaller than the diameter of your desired hole.
6. Adjusting Speed and Depth
Before drilling, adjust the speed and depth settings on your drill. Slower speeds and shallower depths are generally recommended for drilling larger holes in wood. This will help prevent overheating, splintering, and other potential issues as you drill.
By following these steps to prepare the workpiece, you can improve the accuracy and quality of your drilling when working with large holes in wood.
Taking Safety Measures
Use Protective Gear
When drilling large holes in wood, it is important to prioritize safety. One of the most important safety measures is wearing the appropriate protective gear. This includes safety glasses or goggles to protect your eyes from flying debris, and ear protection to prevent hearing damage from the loud noise produced by the drilling process.
Secure the Wood
Prior to drilling, it is crucial to properly secure the wood. This can be done by using clamps or a vise to hold the wood in place. This will prevent the wood from moving or spinning during the drilling process, reducing the risk of accidents or injuries.
Choose the Right Drill Bit
Selecting the correct drill bit for the task at hand is essential for both safety and efficiency. Using the wrong size or type of drill bit can lead to accidents such as kickback or the drill bit getting stuck in the wood. Consult the manufacturer’s guidelines or seek professional advice to ensure you are using the appropriate drill bit for the specific project.
Operate at the Correct Speed
Drilling at the correct speed is crucial to prevent overheating of the drill bit and to ensure a clean and precise hole. Refer to the manufacturer’s instructions or consult a professional to determine the recommended speed for drilling the specific type of wood you are working with.
Clear the Work Area
Before starting the drilling process, make sure the work area is clear of any potential hazards. Remove any clutter, such as tools, loose wood chips, or debris, that could interfere with the drilling process or pose a safety risk.
Be Mindful of Pressure

Applying excessive pressure while drilling can cause the drill bit to bind or break, leading to potential injuries. It is important to apply steady, even pressure without forcing the drill bit. Let the drill bit do the work and avoid pushing or leaning on the drill excessively.
Inspect Tools and Equipment
Regularly inspect your drilling tools and equipment to ensure they are in good working condition. Check for any signs of damage or wear that could affect their performance or compromise safety. Replace any worn-out drill bits or damaged equipment before using them.
Keep Children and Pets Away
During the drilling process, it is essential to keep children and pets away from the work area. They can easily be injured by flying debris or by accidentally coming into contact with the drill or spinning wood. Create a safe zone and make sure it is well-enforced.
Observe Good Technique
Finally, always observe good drilling technique. Maintain a firm grip on the drill and keep your hands and fingers away from the drilling area. Position yourself in a stable and balanced stance, and avoid reaching over the drill or its cord while it is in operation.
By following these safety measures, you can ensure a safe and successful experience when drilling large holes in wood. Remember, safety should always be your top priority when working with power tools.
Troubleshooting Common Issues
1. Drill Bit Gets Stuck
If your drill bit gets stuck while drilling a large hole in wood, there are a few possible reasons for this issue:
- The drill bit may not be sharp enough. Blunt drill bits can get stuck easily, especially when drilling through hardwood. Replace the dull bit with a sharp one.
- You may be drilling too fast. Slow down the drilling speed to allow the bit to cut through the wood more effectively.
- The drill may not have enough power for the task. Consider using a more powerful drill or applying less pressure while drilling to prevent the bit from getting stuck.
- The wood may have knots or other hard areas that are causing the drill bit to get stuck. Try drilling in a different spot, away from any knots or hard spots, or use a drill bit designed for drilling through knots.
2. Hole is Not Clean or Smooth
If your drilled hole in wood is not clean or smooth, here are some possible solutions:
- The drill bit may not be sharp or may be worn out. Replace the drill bit with a new sharp one.
- You may be drilling too fast or applying too much pressure. Slow down the drilling speed and apply steady pressure to allow the bit to cut through the wood smoothly.
- The type of wood you are drilling may be prone to splintering or tearing. Consider using a different type of wood or using a drill bit designed for smooth drilling in that particular type of wood.
- Your drill may need cleaning or maintenance. Remove any debris or buildup from the drill bit or chuck to ensure smooth drilling.
3. Drill Bit Wanders Off Center
If your drill bit tends to wander off center while drilling a large hole, try these tips:
- Use a center punch to create a small indentation at the center of the hole. This will provide a starting point for the drill bit and help prevent wandering.
- Use a drill bit with a pilot point or a self-centering drill bit. These types of bits have built-in features to prevent wandering and keep the bit centered.
- Take your time and apply steady pressure while drilling. Sudden movements or jerking the drill can cause the bit to wander off center.
- Use a drill press instead of a handheld drill for more precise drilling. A drill press can help keep the drill bit in line and prevent wandering.
4. Drill Bit Breaks
If your drill bit keeps breaking while drilling large holes in wood, consider these possible causes:
- The drill bit may be of low quality or not suitable for drilling large holes in wood. Invest in a high-quality drill bit specifically designed for this purpose.
- Drilling at high speeds or applying too much pressure can cause the bit to break. Slow down the drilling speed and apply steady, controlled pressure to prevent breakage.
- The drill bit may be worn out or damaged. Replace the bit with a new one if it shows signs of wear or damage.
- The wood you are drilling may contain hidden nails or other hard objects that are causing the drill bit to break. Check for any obstructions before drilling and avoid drilling into areas with potential obstacles.
5. Excessive Heat or Smoking
If your drill bit generates excessive heat or starts smoking while drilling, try these solutions:
- You may be drilling too fast and generating too much friction. Slow down the drilling speed and apply a lubricant, such as cutting oil or wax, to reduce heat buildup.
- The drill bit may be dull or not suitable for the type of wood you are drilling. Sharpen or replace the bit with one designed for drilling wood.
- Check for any debris or buildup on the drill bit or inside the chuck that may be causing extra friction. Clean the bit and chuck before drilling.
- Consider using a drill with a built-in cooling system or a drill bit with cooling features to prevent overheating.
Finishing and Protecting Drilled Holes

After drilling a large hole in wood, it is important to take the necessary steps to finish and protect the hole. This will help ensure that the hole remains in good condition and does not become damaged or weakened over time.
1. Sanding:
One of the first steps in finishing a drilled hole is to sand the edges of the hole smooth. This will help remove any rough edges or splinters that may have been created during the drilling process. Use a piece of sandpaper or a sanding block to gently sand the edges of the hole until they are smooth to the touch.
2. Filling:
If the hole is large or if there are any gaps or imperfections in the wood around the hole, it may be necessary to fill the hole with a suitable wood filler. Wood filler can be purchased from most hardware stores and is available in a variety of colors to match the wood. Apply the wood filler to the hole using a putty knife or a small spatula, and smooth it out so that it is level with the surrounding wood. Allow the filler to dry completely before proceeding.
3. Staining or Painting:
To further protect the drilled hole and the surrounding wood, consider applying a stain or paint finish. This will help seal the wood and prevent moisture or other elements from causing damage. Choose a stain or paint color that matches the wood or complements the overall look and feel of the project. Apply the stain or paint using a brush or a cloth, following the manufacturer’s instructions for drying time and any additional coats that may be required.
4. Sealing:
If the drilled hole will be exposed to moisture or other potentially damaging elements, it is important to seal the hole to prevent any potential water damage. There are a variety of wood sealers and protectants available that can be applied to the hole to provide an additional layer of protection. Follow the manufacturer’s instructions for application and drying time.
5. Maintenance:

Once the drilled hole has been finished and protected, it is important to regularly maintain and inspect the hole to ensure that it remains in good condition. Check for any signs of damage or wear, and reapply any necessary finishes or sealers as needed. This will help extend the life of the drilled hole and prevent any potential issues in the future.
By following these steps, you can ensure that your drilled holes in wood are finished and protected properly. This will help maintain the integrity of the holes and keep them in good condition for years to come.
Expanding Your Woodworking Skills

Pursue New Woodworking Techniques
To become a master woodworker, it is essential to continuously expand your skills. Learning new techniques will not only enhance your abilities but also open up new opportunities to create unique and beautiful pieces. Here are a few ways you can expand your woodworking skills:
- Take classes or workshops: Enroll in woodworking classes offered by local community colleges or art centers. These classes often cover advanced techniques and provide hands-on experience under the guidance of experienced instructors.
- Join a woodworking club: Participating in a woodworking club or association allows you to learn from fellow woodworkers and exchange ideas. Many clubs also organize workshops and group projects that further enhance your skills.
- Read woodworking books and magazines: Delve into the rich knowledge shared in woodworking literature. Books and magazines provide detailed instructions, tips, and inspiration to help you improve your woodworking abilities.
- Practice regularly: Carve out time in your schedule specifically for practice. Regular practice of different techniques, such as joinery, carving, or marquetry, will help you refine your skills and gain confidence in tackling more complex projects.
Upgrade Your Toolset
Having the right tools is vital for any woodworker. As you progress in your woodworking journey, consider upgrading your toolset to enhance your capabilities and improve the quality of your work. Here are some tools worth investing in:
- Quality chisels and hand planes: These hand tools are fundamental for precise and intricate woodworking. Investing in high-quality chisels and hand planes will ensure clean cuts and accurate shaping.
- Power tools: As you tackle larger and more ambitious projects, power tools such as a table saw, planer, and jointer become indispensable. These tools increase efficiency and accuracy in cutting, shaping, and surfacing wood.
- Router and router table: A router is a versatile tool that allows for decorative edge profiles, joinery, and precise cuts. Adding a router table to your workshop expands its capabilities even further.
- Dust collection system: Woodworking creates a significant amount of dust and debris that can be harmful to your health. A dust collection system will keep your workshop clean and protect you from inhaling potentially harmful particles.
Experiment with Different Wood Species
Using different wood species in your projects allows you to explore the unique characteristics and aesthetic qualities of each type of wood. Experimenting with various species expands your understanding of how different woods behave, which can influence your design decisions. Some interesting wood species to consider include:
- Maple: Known for its strength and durability, maple is a versatile wood that works well in various applications, from furniture to cabinetry. It has a light, pale color with subtle grain patterns.
- Walnut: Walnut wood is prized for its rich, dark color and attractive grain patterns. It is commonly used in furniture making and for creating ornamental details.
- Cherry: With its reddish-brown hue that darkens over time, cherry wood adds warmth and elegance to any piece. It is often used in high-end furniture and cabinetry.
- Oak: Oak is a popular wood choice due to its strength, durability, and appealing grain patterns. It is commonly used in flooring, furniture, and architectural applications.
Collaborate with Other Woodworkers
Woodworking is a craft that thrives on collaboration and knowledge sharing. Working with other woodworkers allows you to learn new techniques, gain insights into different approaches, and exchange creative ideas. Here are a few ways you can collaborate with fellow woodworkers:
- Join a woodworking project: Participate in group woodworking projects where you work collectively with others towards a common goal. This provides an opportunity to learn from each other and share expertise.
- Attend woodworking events and conferences: Networking events and conferences bring woodworkers from various backgrounds together. These events often feature demonstrations, workshops, and presentations by renowned craftsmen.
- Share your knowledge: Contribute to woodworking forums and online communities by sharing your experiences and techniques. Engage in discussions and learn from the experiences of others in the woodworking community.
Conclusion
Expanding your woodworking skills is an ongoing journey that requires dedication and a passion for learning. By pursuing new techniques, upgrading your toolset, experimenting with different wood species, and collaborating with other woodworkers, you can continuously improve your abilities and create stunning woodwork masterpieces.
FAQ:
What tools do I need to drill large holes in wood?
To drill large holes in wood, you will need a power drill or drill press with a large drill bit, a center punch, a tape measure or ruler, and clamps to secure the wood.
What is the best technique for drilling large holes in wood?
The best technique for drilling large holes in wood is to start by creating a pilot hole with a smaller drill bit. Then, use a larger, spade, or Forstner bit to widen the hole. Go slowly and apply even pressure to avoid splitting the wood.
What are some common mistakes to avoid when drilling large holes in wood?
Some common mistakes to avoid when drilling large holes in wood include using too much force, not properly securing the wood, not using a center punch to mark the drilling spot, and not going slow and steady.
Can I use a regular drill bit to drill large holes in wood?
You can use a regular drill bit to drill large holes in wood, but it may take longer and require more effort. It’s recommended to use a spade or Forstner bit specifically designed for drilling large holes.
What is the difference between a spade bit and a Forstner bit?
A spade bit has a flat, paddle-like shape with a pointed center for drilling holes in wood. A Forstner bit has a cylindrical shape with teeth around the rim, allowing it to drill clean, flat-bottomed holes.
Is it possible to drill large holes in wood without a drill press?
Yes, it is possible to drill large holes in wood without a drill press. However, a drill press provides more stability and precision, especially for drilling larger diameter holes.
What are some safety precautions to take when drilling large holes in wood?
Some safety precautions to take when drilling large holes in wood include wearing safety goggles to protect your eyes, using clamps to secure the wood, and keeping your fingers away from the drill bit.
Video:


Meet Harrison Clayton, a distinguished author and home remodeling enthusiast whose expertise in the realm of renovation is second to none. With a passion for transforming houses into inviting homes, Harrison's writing at https://thehuts-eastbourne.co.uk/ brings a breath of fresh inspiration to the world of home improvement. Whether you're looking to revamp a small corner of your abode or embark on a complete home transformation, Harrison's articles provide the essential expertise and creative flair to turn your visions into reality. So, dive into the captivating world of home remodeling with Harrison Clayton and unlock the full potential of your living space with every word he writes.


