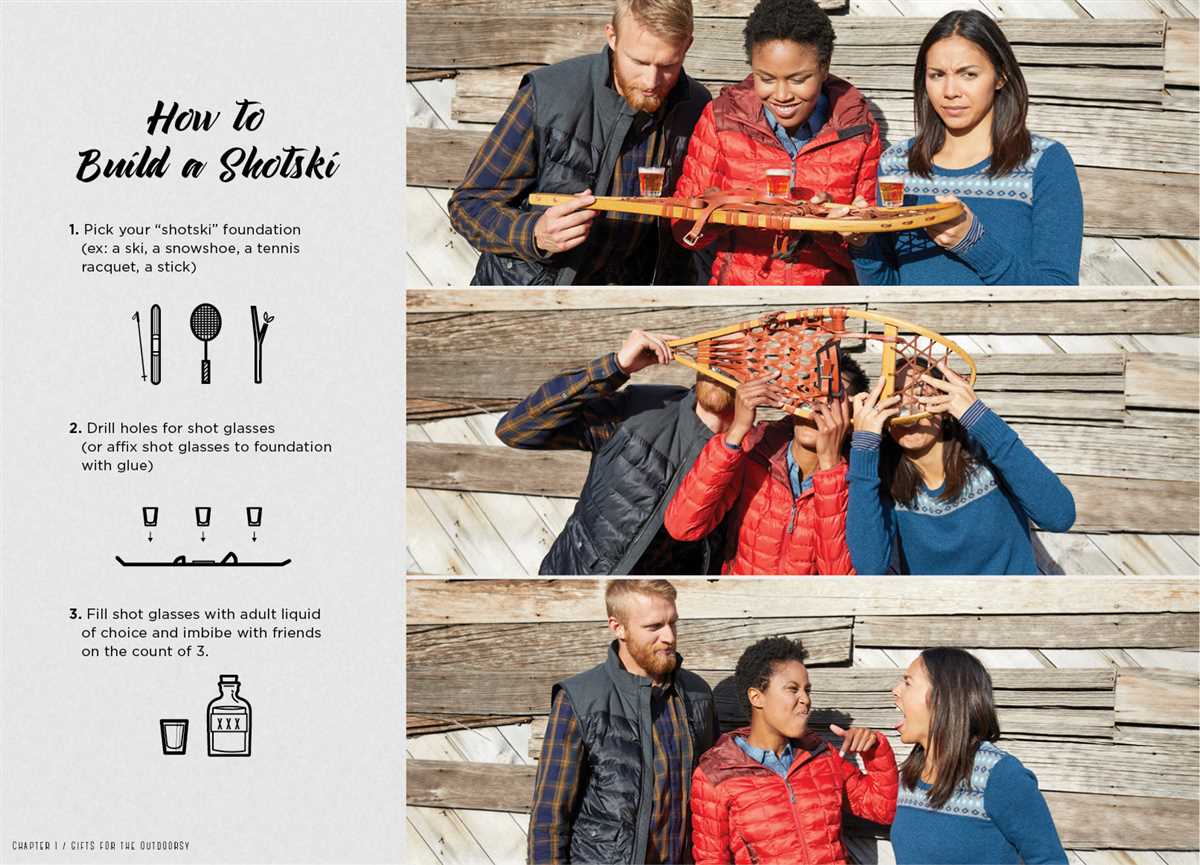
Making a Shot Ski Without a Drill: Easy DIY Guide

If you’re looking to add some fun and excitement to your next party, a shot ski is a perfect addition. A shot ski is a ski that has been modified to hold shot glasses, allowing multiple people to take a shot at the same time. While the traditional way to make a shot ski involves drilling holes in the ski, not everyone has access to a drill or the skills to use one. Fortunately, there is an easy DIY alternative that doesn’t require any drilling.
To make a shot ski without a drill, you’ll need a few simple materials. First, you’ll need a ski, preferably an old one that you don’t mind modifying. You’ll also need shot glasses, epoxy adhesive, and a ruler or measuring tape. Additionally, you’ll need sandpaper or a file to smooth out any rough edges on the ski.
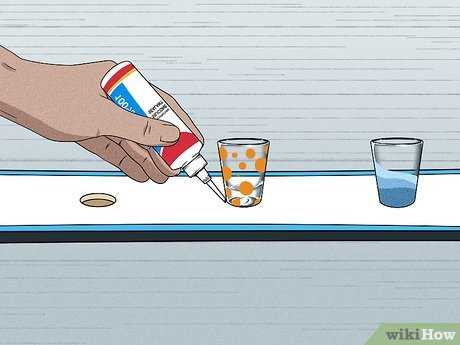
To start, measure the width of the ski and mark the center point. This will be where you’ll attach the shot glasses. Next, apply a small amount of epoxy adhesive to the base of each shot glass and press them firmly onto the ski at the center point. Be sure to space them evenly and leave enough room between glasses so that each person has enough space to comfortably take a shot.
Once the shot glasses are securely attached, allow the epoxy adhesive to dry according to the manufacturer’s instructions. This can take anywhere from a few hours to overnight, so be sure to plan ahead. Once the adhesive is dry, use sandpaper or a file to smooth out any rough edges or excess adhesive on the ski. This will ensure a clean and professional-looking finish.
Now that your shot ski is complete, you’re ready to impress your guests at your next party. Simply pour the shots, gather your friends, and enjoy the fun and camaraderie of taking shots together. Whether you’re hosting a backyard BBQ, a ski trip, or a holiday gathering, a shot ski is sure to be a hit and create lasting memories for all involved. Cheers!

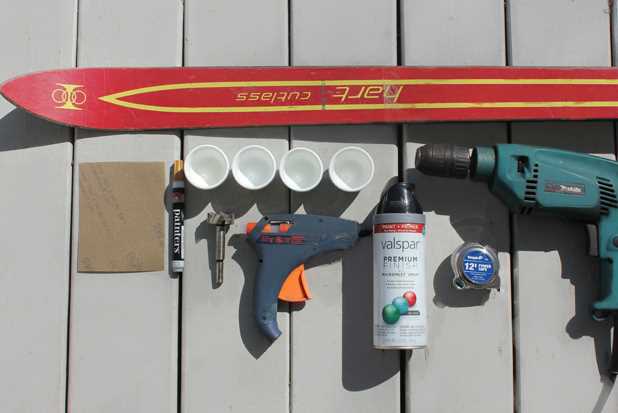
Gather Your Materials
- A ski: Choose a ski that is no longer in use or buy a cheap one from a thrift store.
- Glasses: Gather enough shot glasses for each person participating in the shot ski.
- Adhesive: You will need a strong adhesive that can bond glass to wood, such as epoxy or silicone adhesive.
- Sandpaper: Get some sandpaper to sand down the ski and shot glasses for better adhesion.
- Measuring tape: Use a measuring tape to mark the locations for the shot glasses on the ski.
- Paint or stain (optional): If desired, you can choose to paint or stain the ski for a more polished look.
- Protective gear: Remember to wear safety goggles, gloves, and a mask when working with adhesives and sandpaper.
Prepare the Skis
Before you start making your shot ski, you’ll need to gather the necessary materials and prepare the skis. Follow these steps to get started:
- Choose the skis: Look for a pair of old skis that you no longer use or that you don’t mind repurposing for this project. Make sure the skis are in good condition and free from any major cracks or damage.
- Clean the skis: Give the skis a good cleaning to remove any dirt, dust, or debris. Use a damp cloth or sponge to wipe down the surface of the skis.
- Remove bindings and screws: If your skis still have bindings attached, you’ll need to remove them. Use a screwdriver to unscrew the bindings and carefully detach them from the skis.
- Fill any holes: Inspect the skis for any holes from where the bindings were attached. If there are any holes, fill them with wood filler or epoxy. Allow the filler to dry according to the manufacturer’s instructions.
- Sand the skis: Use sandpaper or a sanding block to smooth out any rough spots or imperfections on the skis. This will help the paint adhere better to the surface.
Measure and Mark
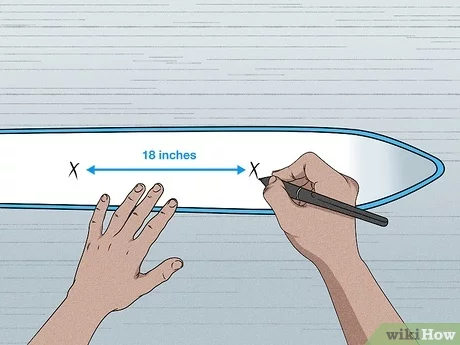
Before you start making your shot ski, you’ll need to measure and mark the spots where the shot glasses will be placed. This will ensure that your shot ski is balanced and functional.
First, gather all the shot glasses you plan to use and place them evenly along the ski. Make sure to leave enough space between each shot glass for people to comfortably take their shots without bumping into each other.
Using a measuring tape, measure the distance between each shot glass and make a mark on the ski. You can use a pencil or a piece of tape to make the marks. Make sure to measure and mark the same distance for each shot glass to ensure they are placed evenly.

Once you have marked the spots for all the shot glasses, double-check your measurements to ensure accuracy. You can use a level or a straight edge to make sure the marks are perfectly aligned.
After you have measured and marked all the spots for the shot glasses, you are ready to move on to the next step of making your shot ski.
Cut the Holes
After you have chosen the ski and gathered the necessary materials, it’s time to cut the holes for the shot glasses. Follow these steps to easily cut the holes without using a drill:
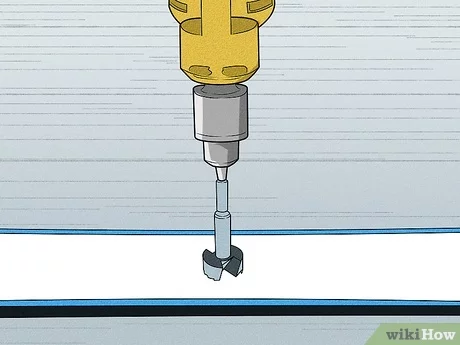
- Measure the width of the shot glasses that you will be using. This will determine the size of the holes that you need to cut. Make sure to leave enough space between the holes to avoid them being too close together.
- Using a ruler or measuring tape, mark the positions where you want to cut the holes. You can place the holes in a straight line or in a staggered pattern, depending on your preference.
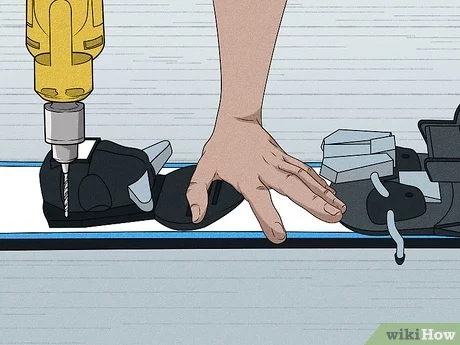
- Once you have marked the positions, use a utility knife to carefully score the surface of the ski along the marked lines. Make sure to apply enough pressure to create a groove in the wood, but be cautious not to cut too deep.
- After scoring the surface, use a chisel and mallet to carefully chip away the wood inside the scored lines. Start from one end of the marked line and work your way towards the other end, removing small sections of wood at a time.
- Continue chiseling until you have removed enough wood to create a hole that is slightly larger than the diameter of the shot glass. Use sandpaper to smooth out any rough edges and to ensure that the hole is the correct size.
- Repeat the same process for each of the marked positions, making sure to cut all the holes with the same depth and size.
- Once you have finished cutting all the holes, clean the ski to remove any wood debris and dust.
Congratulations! You have successfully cut the holes for the shot glasses on your shot ski without using a drill. Now you can move on to the next step in creating your shot ski.
Sand and Seal
Once you have assembled your shot ski and attached the shot glasses securely, you will need to sand and seal the surface of the ski to ensure a smooth and durable finish.

Here are the steps to sand and seal your shot ski:
- Start by using a coarse-grit sandpaper to sand the entire surface of the ski. This will help remove any rough edges and imperfections.
- Next, switch to a fine-grit sandpaper and sand the ski again to create a smooth surface. Be sure to sand in the direction of the wood grain for the best results.
- After sanding, wipe down the ski with a damp cloth to remove any dust or debris.
- Once the ski is dry, you can begin the sealing process. Apply a thin, even coat of wood sealer to the entire surface of the ski using a brush or sponge. Be sure to follow the manufacturer’s instructions for the specific sealer you are using.
- Allow the sealer to dry completely before applying additional coats. Depending on the sealer you choose, you may need to apply multiple coats for optimal protection and finish. Be sure to sand lightly between coats for a smooth surface.
- Once you are satisfied with the number of coats and the finish of the ski, allow the sealer to cure according to the manufacturer’s instructions.
- Finally, inspect the ski for any areas that may need touch-ups or additional sanding. Once you are happy with the final result, your shot ski is ready to use!
Remember to always use caution when using your shot ski and drink responsibly. Enjoy your homemade shot ski with friends and have a great time!
Attach the Shot Glass Holders
Now that you have the ski and the shot glasses ready, it’s time to attach the shot glass holders. These holders will keep the shot glasses in place when you use the shot ski.
Materials needed:
- Shot glass holders (available at most party supply stores or online)
- Strong adhesive or glue
Steps:

- Start by determining the placement and spacing of the shot glass holders on the ski. You can measure and mark the spots beforehand if you prefer a more precise layout.
- Apply a small amount of adhesive or glue to the bottom of each shot glass holder.
- Press each shot glass holder firmly onto the ski, ensuring that it is centered and securely attached.
- Leave the adhesive or glue to dry completely before using the shot ski.
It’s important to make sure that the shot glass holders are securely attached to the ski to prevent any accidents or spills. You can test the stability by gently pulling on the holders after the adhesive has dried.
Note: If you are using a longer ski, you may need to attach more shot glass holders to accommodate the additional glasses.
With the shot glass holders firmly attached, your shot ski is now ready to be used! Gather your friends, pour some shots, and enjoy a fun and memorable drinking experience.
Decorate and Personalize
Once you have completed the construction of your shot ski, it’s time to add some personal touches to make it truly unique. Here are a few ideas to help you decorate and personalize your shot ski:
1. Paint

Add a splash of color by painting your shot ski. Use acrylic paint to create your own custom design or add a simple coat of your favorite color. You can also use painters tape to create stripes or patterns for a more intricate design.
2. Stickers
If painting is not your thing, you can use stickers to decorate your shot ski. Choose stickers that represent your personality, favorite sports team, or hobbies. Stick them on the surface of the shot ski in a way that pleases you
3. Engraving
If you have access to an engraving tool or laser cutter, you can add personalized engravings to your shot ski. This can be your name, initials, or a special message. Engraving can add a more professional and polished look to your shot ski.
4. Bottle Openers
For added functionality, consider adding bottle openers to your shot ski. You can attach them to the surface of the ski by drilling holes or using adhesive. This will allow you and your friends to easily open bottles while enjoying your shots.
5. Custom Shot Glasses
To complete the personalized look, consider getting custom shot glasses. You can have your names or initials engraved on the glasses or choose glasses with unique designs that reflect your style. This will add an extra touch of personalization to your shot ski experience.
Be creative and let your imagination guide you when it comes to decorating and personalizing your shot ski. This way, you can create a one-of-a-kind piece that will bring enjoyment and memories for years to come.
Test and Enjoy!
Now that your shot ski is complete, it’s time to test it out and enjoy the fruits of your labor! Gather your friends or family and get ready for some fun.
Testing the Shot Ski
Before you start using the shot ski, it’s important to make sure that it is stable and safe. Here’s how you can test it:
- Place the shot ski on a level surface.
- Fill each shot glass with your favorite drink. It could be tequila, vodka, or any other spirit of your choice.
- Have one person hold the shot ski securely while others position themselves in front of each glass.
- Countdown from three and then, everyone lifts the shot ski simultaneously.
- As you lift the shot ski, make sure that the glasses are stable and the liquid doesn’t spill.
If everything goes well during the test, your shot ski is ready to be enjoyed!
Enjoying the Shot Ski
Now that your shot ski has passed the test, it’s time to have some fun and enjoy your shots. Here are some tips for a great shot ski experience:
- Invite your friends or family to join you for a shot ski session.
- Line up the shot glasses with your chosen drinks.
- Make a toast or come up with a fun drinking game to play while taking the shots.
- Lift the shot ski together and take your shots simultaneously.
- Have a good time and create lasting memories with your loved ones.
Remember to always drink responsibly and know your limits.
Congratulations on successfully making a shot ski without a drill! Now it’s time to test it out and enjoy the experience with your friends and family.
FAQ:
What materials do I need to make a shot ski without a drill?
To make a shot ski without a drill, you will need a pair of skis, 4 shot glasses, a strong adhesive like epoxy resin or heavy-duty double-sided tape, measuring tape, a pencil, and a marker.
Can I use any type of skis?
Yes, you can use any type of skis as long as they are long enough to fit the number of shot glasses you want to attach.
Is it possible to make a shot ski without using a drill?
Yes, it is possible to make a shot ski without using a drill. Instead of drilling holes for the shot glasses, you can use a strong adhesive like epoxy resin or heavy-duty double-sided tape to attach them to the skis.
How do I attach the shot glasses to the skis without a drill?
To attach the shot glasses without a drill, you can measure the space between the skis and mark the positions for the shot glasses. Then, apply a strong adhesive like epoxy resin or heavy-duty double-sided tape to the marked spots and press the shot glasses firmly against the skis.
Is it safe to use a shot ski without drilling holes?
Yes, using a shot ski without drilling holes is safe as long as you use a strong adhesive to securely attach the shot glasses. Just make sure to follow the instructions for the adhesive and give it enough time to cure before using the shot ski.
Video:


Meet Harrison Clayton, a distinguished author and home remodeling enthusiast whose expertise in the realm of renovation is second to none. With a passion for transforming houses into inviting homes, Harrison's writing at https://thehuts-eastbourne.co.uk/ brings a breath of fresh inspiration to the world of home improvement. Whether you're looking to revamp a small corner of your abode or embark on a complete home transformation, Harrison's articles provide the essential expertise and creative flair to turn your visions into reality. So, dive into the captivating world of home remodeling with Harrison Clayton and unlock the full potential of your living space with every word he writes.


