Learn the Best Techniques for Drilling Holes in Boulders

Holes in boulders can serve a variety of purposes, from creating decorative features in a garden to providing anchors for climbing routes. However, drilling holes in boulders can be a challenging task that requires the right techniques and tools. In this article, we will explore some of the best techniques for drilling holes in boulders, ensuring successful and efficient results.
Choosing the Right Drill: The first step in drilling holes in boulders is selecting the appropriate drill. A power drill with a hammer function is essential for this task. Look for a drill that has adjustable speed and torque settings, as well as a sturdy construction to withstand the force required to penetrate the boulder.
Picking the Ideal Drill Bit: The choice of drill bit is crucial for drilling holes in boulders. It is recommended to use a masonry or carbide-tipped drill bit with a sharp and pointed tip. These types of drill bits are designed to handle the hardness of boulders and provide efficient and clean drilling.
Preparing the Boulder: Before drilling, it is important to prepare the boulder properly. Clear the area around the drilling site from any debris or loose rocks that could interfere with the process. Mark the exact spot where the hole is desired using a washable marker or chalk, ensuring precision and accuracy during drilling.
Drilling Techniques: When drilling into boulders, it is recommended to start with a small pilot hole to guide the drill bit. Apply steady and firm pressure while drilling, allowing the drill bit to work through the boulder gradually. Use a rocking motion or circular movements to create a hole with the desired diameter and depth.

Wet Drilling: To facilitate the drilling process and prolong the life of the drill bit, it is advisable to use water as a lubricant. Wet the drill bit periodically during drilling to keep the bit cool and prevent overheating, which can lead to damage or breakage.
Remember to wear appropriate safety gear, such as safety goggles and gloves, when drilling holes in boulders. The process can create flying debris and dust, so protection is vital. Take breaks as needed to allow the drill and drill bit to cool down, preventing overheating.
By following these best techniques for drilling holes in boulders, you can achieve precise and clean results while ensuring your safety. Whether you are embarking on a DIY project or a larger-scale endeavor, mastering these techniques will help you tackle the task with confidence and efficiency.
Techniques for Drilling Holes in Boulders
Drilling holes in boulders can be a challenging task due to their hard and durable nature. However, with the right techniques and tools, you can successfully create holes in boulders for various purposes like installing anchors, making fire pits, or creating water features.
1. Determine the right drilling technique
There are different drilling techniques that you can choose from depending on the size and hardness of the boulder:
- Percussion drilling: This technique involves striking the boulder repeatedly with a hammer and chisel to create small holes that can be connected to form a larger hole.
- Rotary drilling: This technique requires the use of a rotary hammer drill with a masonry bit. The drill bit spins while exerting pressure on the boulder, gradually creating a hole.
- Core drilling: This technique utilizes a core drill, which removes a cylindrical piece of the boulder to create the hole.
2. Choose the right drill bit
When drilling holes in boulders, it is essential to use the right drill bit to ensure effective drilling and prevent damage to the tool. For most boulders, a masonry drill bit made of tungsten carbide is recommended. The size of the drill bit should correspond to the desired hole diameter.

3. Prepare the boulder
Before drilling, it is important to clean the surface of the boulder and remove any loose dirt or debris. This will help maintain a solid grip and prevent the drill bit from slipping. It is also advisable to mark the drilling spot on the boulder using a pencil or chalk.
4. Secure the boulder
To ensure stability during drilling, it is essential to secure the boulder using clamps, vices, or any other sturdy holdfast. This will prevent the boulder from moving or rolling, allowing for accurate drilling.
5. Start drilling
Hold the drill perpendicular to the boulder’s surface and apply steady pressure while drilling. Make sure to maintain a slow and consistent drilling speed to prevent overheating of the drill bit. Use a lubricant, such as water or cutting oil, to keep the drill bit cool and prolong its lifespan.
6. Clear the debris
Periodically stop drilling to clear out debris from the hole using either compressed air or a handheld blower. Removing the debris will prevent clogging and allow for better visibility and drilling performance.
7. Finish and clean up
Once the desired depth or diameter is achieved, carefully remove the drill bit from the hole. Clean off any remaining debris from the boulder’s surface and the hole using a brush or a vacuum. Inspect the hole for any rough edges and smooth them out if necessary.

By following these techniques, you can successfully drill holes in boulders and unleash the potential for various creative and practical projects. Remember to prioritize safety by wearing protective gear such as safety goggles and gloves, and always exercise caution when using power tools.
Preparing Your Equipment
Before you start drilling holes in boulders, it is important to gather all the necessary equipment and ensure that it is properly prepared. Here are some key steps to follow:
- Choose the Right Drill: Select a drill that is powerful enough to handle drilling through hard rock, such as a rotary hammer drill or a core drill. Make sure the drill has a chuck that can accommodate the drill bit size you plan to use.
- Inspect the Drill Bit: Examine the drill bit to ensure it is in good condition and sharp. Dull or damaged drill bits may not be effective and can lead to accidents.
- Select the Appropriate Drill Bit: Depending on the material of the boulder and the size of the hole you need, choose a drill bit that is suitable. Diamond-tipped drill bits are ideal for drilling through hard rocks, while carbide-tipped bits are better for softer stones.
- Gather Safety Equipment: Safety should always be a top priority when working with power tools. Wear safety goggles to protect your eyes from dust and debris. Additionally, use ear protection if the drilling process produces loud noises.
Once you have gathered and prepared your equipment, you are ready to proceed to the next steps: marking the drilling location and securing the boulder for drilling.
Choosing the Right Drill Bit
When it comes to drilling holes in boulders, choosing the right drill bit is crucial. Using the wrong drill bit can result in inefficient drilling, damage to the boulder, or even injury to yourself. Here are some factors to consider when selecting a drill bit:

1. Material:
The first thing to consider is the material of the drill bit. Different materials are suitable for drilling through different types of rocks. For softer rocks like sandstone or limestone, a carbide-tipped masonry bit is usually sufficient. However, for harder rocks like granite or quartzite, a diamond-tipped drill bit is necessary.
2. Size:
The size of the hole you want to drill will determine the size of the drill bit you need. Make sure to choose a drill bit that is slightly larger than the diameter of the hole you want to create. This will allow for any variations in the rock and ensure that the hole is the right size.
3. Shank Type:
The shank is the part of the drill bit that fits into the drill. There are different types of shanks, including straight shanks and hex shanks. The type of shank you choose should be compatible with your drill. It’s also important to ensure that the shank is long enough to reach the desired depth of the hole.
4. Flute Design:
The flute design of the drill bit affects its ability to remove debris from the hole. For drilling in boulders, a drill bit with wide and deep flutes is recommended. This will help prevent the bit from getting clogged with rock fragments and improve drilling efficiency.
5. Brand and Quality:
Lastly, consider the brand and quality of the drill bit. It’s important to choose a reputable brand that is known for producing high-quality drill bits. While they may be more expensive, these drill bits are likely to last longer and provide better performance, making them a worthwhile investment.

By considering these factors and choosing the right drill bit for the job, you can ensure successful and efficient drilling in boulders.
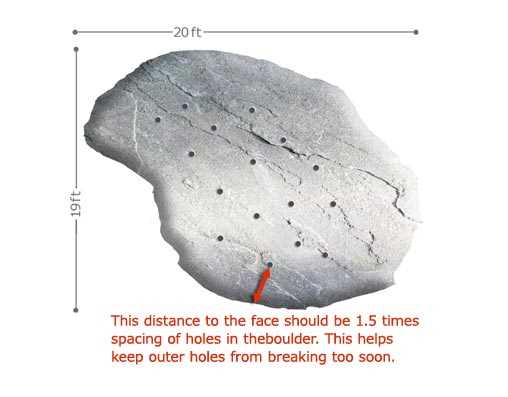
Marking the Area
Before you begin drilling into a boulder, it’s important to mark the area where you want to drill. This will help ensure accuracy and precision during the drilling process.
Here are some steps to follow when marking the area:
- Choose the drilling location: Determine where you want to drill the hole in the boulder. Keep in mind the size of the boulder and the specific purpose of the hole.
- Measure and mark the spot: Use a measuring tool, such as a tape measure or ruler, to determine the exact location and dimensions of the hole. Mark the spot with a pencil or marker.
- Consider the angle: Depending on the type of hole you want to drill, you may need to consider the angle at which you want the hole to be drilled. In some cases, drilling at a slight angle can be beneficial for drainage or aesthetics.
- Protect the surrounding area: Before you start drilling, cover the surrounding area of the boulder with a cloth or plastic sheet to protect it from debris and damage.
By taking the time to carefully mark the area, you can ensure that your drilling process goes smoothly and that you achieve the desired result.
Using a Hammer Drill
A hammer drill is a versatile power tool that can be used for drilling holes into boulders. It combines a rotary drilling motion with a hammering action, allowing for more efficient drilling through hard materials like stone.

Step 1: Choose the Right Bit
Before using a hammer drill, it’s important to select the right bit for the job. For drilling into boulders, a masonry drill bit is recommended. These bits feature a carbide or diamond tip, which is designed to effectively penetrate hard materials.
Step 2: Prepare the Boulder
Prior to drilling, you should ensure that the boulder is securely positioned and stable. Use clamps or supports to hold the boulder in place, as drilling into an unstable rock can be dangerous.
Step 3: Put on Safety Gear
Always prioritize safety when operating power tools. Put on safety glasses to protect your eyes from flying debris, and wear ear protection to reduce noise exposure. Additionally, wearing work gloves can help protect your hands.
Step 4: Mark the Drilling Spot
Use a marker or pencil to mark the exact spot where you want to drill the hole. This will serve as a guide and help you stay on track while drilling.
Step 5: Secure the Drill Bit
Insert the masonry drill bit into the hammer drill’s chuck and tighten it securely. Make sure the bit is straight and aligned with the drill.

Step 6: Start Drilling
Hold the hammer drill firmly with both hands. Position the drill bit on the marked spot and apply steady pressure. Start the hammer drill at a slow speed and gradually increase the speed as you penetrate the boulder. Allow the drill’s hammering action to assist in breaking through the hard material.
Step 7: Remove Debris
Periodically stop drilling to remove debris from the hole. This can be done by simply lifting the hammer drill out of the hole and using a brush or compressed air to clear away the dust and rock fragments.
Step 8: Finish the Hole
Continue drilling until the desired depth is reached. The length of the hole will depend on your project’s requirements. Once the drilling is complete, turn off the hammer drill and carefully remove the bit from the boulder.
Remember to always follow the manufacturer’s instructions and guidelines when using a hammer drill. Practice caution and take breaks as needed to prevent overheating the tool. By using a hammer drill properly, you can efficiently and safely drill holes into boulders for a variety of projects.
Applying the Correct Technique
When it comes to drilling holes in boulders, it is essential to use the correct technique to ensure success and prevent damage. Here are the steps to follow:
Step 1: Assess the Boulder
Before drilling, carefully examine the boulder to determine its composition and structure. This will help you choose the right tools and technique for the job.
Step 2: Gather the Necessary Tools
Make sure you have all the tools you will need for the drilling process. Common tools include a hammer drill, masonry bits, water, safety goggles, and ear protection.
Step 3: Mark the Hole Position
Use a marker or chalk to mark the exact position where you want to drill the hole. Make sure the mark is clear and visible.
Step 4: Start Drilling
Put on your safety goggles and ear protection before operating the hammer drill. Position the drill bit on the marked spot and start drilling slowly and steadily. Apply firm but not excessive pressure.
Step 5: Use Water for Cooling
Drilling into boulders generates a lot of heat, which can damage the drill bit or cause the boulder to crack. To prevent this, use water to cool down the drill bit periodically during the drilling process.
Step 6: Maintain a Proper Angle
While drilling, maintain the drill at a perpendicular or slightly angled position to the surface of the boulder. This will help you achieve the desired depth and prevent the drill bit from slipping or getting stuck.
Step 7: Remove Dust and Debris
Periodically clean the hole by blowing or brushing away dust and debris. This will help you maintain visibility and prevent the drill bit from getting clogged.
Step 8: Test the Hole
Once you have reached the desired depth, test the hole by inserting the anchor or object you plan to use. Make sure it fits properly and is secure. If needed, adjust the hole size accordingly.
Step 9: Clean Up
After drilling, clean up the area by removing any debris and properly storing the tools. Dispose of any waste materials responsibly.
By following these steps and using the correct technique, you can safely and effectively drill holes in boulders for a variety of purposes.
Maintaining a Steady Pressure
When drilling holes in boulders, it is important to maintain a steady pressure to ensure accurate and clean holes. This section will discuss some techniques to help you maintain a steady pressure throughout the drilling process.
Selecting the Right Drill Bit
Choosing the right drill bit is crucial in maintaining a steady pressure while drilling holes in boulders. A good quality diamond-tipped or carbide-tipped drill bit is recommended for drilling through hard materials like rocks.
The size of the drill bit should also be taken into consideration. It is generally advisable to start with a smaller drill bit and gradually increase the size as needed. This helps to prevent the drill bit from getting stuck in the boulder and ensures better control over the drilling process.
Using Proper Drill Speed
The speed at which you drill also plays a significant role in maintaining a steady pressure. For boulders, a slower drill speed is generally recommended, as it allows for better control and reduces the risk of overheating the drill bit.
It is important to note that the drill speed may vary depending on the type of boulder you are drilling into and the type of drill you are using. It is always a good idea to consult the manufacturer’s guidelines or experiment with different speeds to find the most effective one for your specific situation.
Applying Consistent Pressure
Applying consistent pressure while drilling is essential to maintain a steady drilling process. You should strive to apply a constant and steady amount of pressure on the drill throughout the drilling process. This helps to prevent the drill bit from potentially jarring or bouncing off the boulder, which can lead to inaccurate holes or damage to the drill bit.
It is also important to avoid exerting excessive pressure on the drill, as this can strain both the drill and the drill operator. Applying too much force can lead to fatigue, decreased control, and potential damage to the equipment.
Using Clamps or Supports
For larger or more uneven boulders, using clamps or supports can help maintain a steady pressure. These devices can provide additional stability to the boulder and prevent it from moving or shifting during the drilling process.
Clamps or supports can be secured to the boulder using screws or other fastening methods, ensuring that the boulder remains steady and stationary. This allows you to focus on maintaining a steady pressure on the drill without having to worry about the boulder moving or shifting unexpectedly.
Taking Breaks
Drilling through boulders can be a physically demanding task, especially if the boulder is particularly hard or large. It is important to listen to your body and take breaks when necessary.
Taking short breaks during the drilling process can help prevent fatigue and maintain a steady pressure. This allows you to refresh and recharge, ensuring that you can continue drilling with accuracy and control.
Remember to stay hydrated and stretch your muscles during these breaks to prevent any potential injuries or fatigue.
By following these tips and techniques, you can maintain a steady pressure while drilling holes in boulders. This will help you achieve precise and clean holes, ensuring the success of your project.
Cooling the Drill Bit
When drilling holes in boulders, it is important to keep the drill bit cool to prevent overheating and damage. Cooling the drill bit not only extends its lifespan but also improves drilling efficiency. There are several techniques you can use to cool the drill bit during the drilling process.
1. Water Cooling
Water cooling is one of the most common methods used to cool the drill bit. It involves continuously spraying water onto the drill bit while drilling. This helps to dissipate heat and keeps the bit cool. You can use a handheld spray bottle or a hose with a nozzle attachment to direct water onto the drill bit. Make sure to maintain a steady stream of water throughout the drilling process.
2. Lubrication
Applying lubricant to the drill bit can also help cool it down. Lubricants such as cutting oil or even simple cooking oil can be used to reduce friction and heat buildup. You can apply a small amount of lubricant onto the tip of the drill bit or use a lubrication system that automatically dispenses the lubricant while drilling. Remember to reapply the lubricant periodically to ensure optimal cooling.
3. Drilling in Bursts
Drilling in shorter bursts instead of continuously can help prevent overheating of the drill bit. By drilling for a few seconds and then pausing, you allow the bit to cool down before resuming drilling. This technique is especially useful when drilling through tough and heat-inducing materials like granite or quartz. It also helps to prevent the bit from becoming dull too quickly.
4. Using a Cooling Fan
In situations where water cooling or lubrication may not be feasible, using a cooling fan can be an alternative option. Position a portable fan near the drilling area and direct the airflow towards the drill bit. The fan helps to blow away hot air and circulate cooler air around the bit, effectively cooling it down.
Remember, keeping the drill bit cool is crucial for successful drilling in boulders. Whether you choose water cooling, lubrication, drilling in bursts, or using a cooling fan, make sure to prioritize the cooling technique that works best for your drilling situation. Take breaks if necessary to allow the drill bit to cool down before continuing the drilling process.
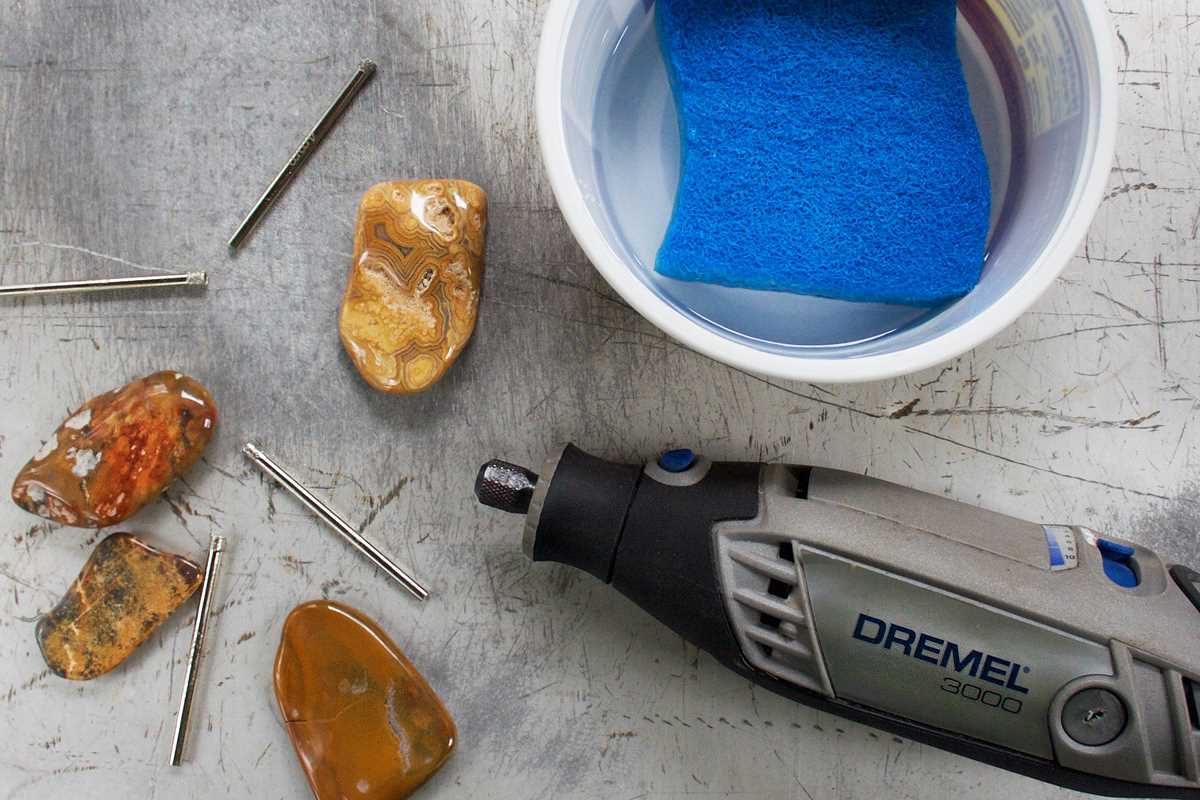
Finishing Touches and Safety Precautions
1. Cleaning and Polishing
Once you have successfully drilled the hole in the boulder, it’s important to clean and polish the surface for a smooth finish. Use a damp cloth to wipe away any dust or debris that has accumulated during the drilling process. This will help improve the appearance of the hole and give it a polished look.
2. Smoothing the edges
After drilling the hole, the edges may be rough or uneven. To smooth out the edges, use a sanding block or sandpaper with a fine grit. Gently sand the edges in a circular motion until they are smooth and even. This will not only improve the aesthetics but also prevent any injuries while handling the boulder.
3. Safety precautions
Wear protective gear: Whenever you are drilling holes in boulders, it’s essential to wear appropriate safety gear. This includes safety goggles, gloves, and a dust mask. These protective items will shield you from potential flying debris and harmful dust particles.
Secure the boulder: To prevent the boulder from rolling or moving during the drilling process, make sure it is securely positioned. Use clamps or other stabilizing devices to keep the boulder in place. This will minimize the risk of accidents and injuries.
Work in a well-ventilated area: Drilling rocks can generate a significant amount of dust. It’s crucial to work in a well-ventilated area or outdoors to avoid inhaling harmful particles. If you are working indoors, open windows or use fans to improve air circulation and wear a dust mask to protect your respiratory system.
Use the right drill bits: Different types of boulders require different drill bits. Make sure you select the appropriate drill bit based on the hardness of the boulder. Using the wrong type of drill bit can not only lead to ineffective drilling but also cause damage to the drill and increase the risk of accidents.
4. Cleaning up
Once you have finished drilling and polishing the hole, it’s important to clean up the work area. Dispose of any debris or waste materials properly. This will ensure a safe and organized workspace for future projects and prevent any potential injuries or accidents.
Conclusion
By following these finishing touches and safety precautions, you can successfully drill holes in boulders while ensuring a polished and safe outcome. Always prioritize safety and take the necessary precautions to protect yourself and others around you during the drilling process.
FAQ:
What tools and techniques can I use to drill holes in boulders?
There are several tools and techniques you can use to drill holes in boulders. Some of the most common tools include diamond-tipped drill bits, hammer drills, and rotary hammers. To drill holes in boulders, you should first mark the spot where you want to drill and then use a center punch to create an indentation. Next, you can start drilling using your chosen tool and technique, making sure to apply steady pressure and periodically removing the bit to clear out any debris.
What type of drill bit is best for drilling holes in boulders?
When drilling holes in boulders, it is recommended to use diamond-tipped drill bits. These drill bits are specifically designed to cut through hard and dense materials like rocks and boulders. Diamond-tipped drill bits are extremely durable and can provide a clean and accurate hole without wearing out quickly.
Do I need any special equipment to drill holes in boulders?
To drill holes in boulders, you will need some special equipment. In addition to a drill and diamond-tipped drill bits, you may also need a hammer drill or rotary hammer to provide the necessary power and force for drilling through hard rocks. It is also recommended to have safety equipment such as safety goggles, gloves, and ear protection to ensure your personal safety.
What are some tips for drilling holes in boulders?
Here are some tips for drilling holes in boulders. First, make sure to use a small center punch to create an indentation in the boulder before drilling. This will help prevent the drill bit from slipping during drilling. Second, use a slow drilling speed and apply steady, even pressure to avoid damaging the drill bit or the boulder. Lastly, periodically remove the drill bit to clear out any debris and prevent the bit from overheating.
Can I use a regular drill to drill holes in boulders?
It is not recommended to use a regular drill to drill holes in boulders. Regular drills are designed for drilling into softer materials like wood or metal and may not have the necessary power and force to effectively drill through hard rocks. It is best to use a hammer drill or rotary hammer, along with diamond-tipped drill bits, to ensure efficient and successful drilling in boulders.
What are some safety precautions I should take when drilling holes in boulders?
When drilling holes in boulders, it is important to take certain safety precautions. Wear safety goggles to protect your eyes from flying debris, gloves to protect your hands, and ear protection to reduce noise exposure. Make sure to secure the boulder in a stable position to prevent it from rolling or shifting during drilling. Additionally, always follow the manufacturer’s instructions for your drill and other equipment, and work in a well-ventilated area to avoid inhalation of dust and debris.
Video:


Meet Harrison Clayton, a distinguished author and home remodeling enthusiast whose expertise in the realm of renovation is second to none. With a passion for transforming houses into inviting homes, Harrison's writing at https://thehuts-eastbourne.co.uk/ brings a breath of fresh inspiration to the world of home improvement. Whether you're looking to revamp a small corner of your abode or embark on a complete home transformation, Harrison's articles provide the essential expertise and creative flair to turn your visions into reality. So, dive into the captivating world of home remodeling with Harrison Clayton and unlock the full potential of your living space with every word he writes.


