Learn How to Drill a Pilot Hole in Wood Like a Pro

Drilling a pilot hole in wood before driving in a screw or nail is a simple yet essential skill every woodworker should master. A pilot hole is a small hole drilled into the wood that helps prevent the wood from splitting or cracking when you drive in a fastener. It also helps guide the screw or nail to ensure it goes in straight and true.
There are a few key considerations to keep in mind when drilling a pilot hole. First, you need to choose the right size drill bit for the job. The size of the pilot hole should be slightly smaller than the diameter of the screw or nail you are using. This will allow the threads of the fastener to grip the wood securely without causing any damage.
Next, you need to determine the depth of the pilot hole. It should be just deep enough for the screw or nail to go in flush with the surface of the wood. To measure the depth, simply place the screw or nail against the drill bit and mark the depth with a piece of tape or a pencil.
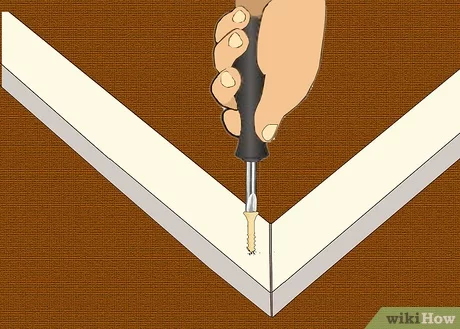
Finally, you need to drill the pilot hole. Start by securing the wood in place to prevent any movement or slipping. Then, align the drill bit with the marked spot and apply steady pressure as you drill into the wood. Be sure to keep the drill bit perpendicular to the wood to ensure a straight hole.
Remember, drilling a pilot hole is a crucial step in woodworking that can save you time, money, and frustration. By learning this simple technique, you can ensure your screws and nails go in smoothly and without any damage to your wood projects.
So, whether you’re a beginner or an experienced woodworker, take the time to master the skill of drilling a pilot hole. It’s a small step that can make a big difference in the quality of your woodworking projects. Happy drilling!

Benefits of Using a Pilot Hole
When it comes to drilling holes in wood, using a pilot hole can provide several benefits. Here are some of the key advantages:
1. Prevents Wood from Splitting
One of the main benefits of using a pilot hole is that it helps prevent wood from splitting. When you drill a pilot hole before driving a screw or nail into the wood, the hole allows the screw or nail to pass through more easily without applying excessive force. This reduces the chances of the wood splitting or cracking, especially when working with hardwood or thin pieces of wood.
2. Ensures Accurate Drilling
Using a pilot hole ensures accurate drilling. By drilling a small hole with a pilot drill bit before using a larger drill bit, you create a guide for the larger bit to follow. This helps ensure that the hole is drilled in the desired location and at the correct angle. It also helps to prevent the larger drill bit from slipping or wandering, which can result in an inaccurate hole.
3. Facilitates Easy Screw Insertion
Another benefit of using a pilot hole is that it facilitates easy screw insertion. When screwing into wood without a pilot hole, it can be difficult to get the screw started and ensure it goes in straight. By using a pilot hole, you provide a pathway for the screw to follow, making it easier to drive it in straight and flush with the surface of the wood.

4. Reduces Risk of Splintering and Damage
By creating a pilot hole, you reduce the risk of splintering and damage to the wood. Without a pilot hole, the screw or nail may cause the wood to splinter or crack as it is driven in. This can not only affect the appearance of the wood but also weaken its structural integrity. A pilot hole helps minimize the risk of such damage, ensuring a clean and secure fastening.
5. Allows for Easier Removal of Screws
Lastly, using a pilot hole allows for easier removal of screws. If you ever need to remove a screw from wood, having a pilot hole makes the process much simpler. The hole provides an exit point for the screw to be easily backed out without damaging the surrounding wood. This can be particularly useful when disassembling furniture or making adjustments to a project.
In conclusion, using a pilot hole when drilling in wood offers various benefits including preventing splitting, ensuring accurate drilling, facilitating easy screw insertion, reducing the risk of splintering and damage, and allowing for easier removal of screws. It is a simple but effective technique that can greatly improve the quality and durability of your woodworking projects.
Choosing the Right Drill Bit
Drilling a pilot hole in wood requires selecting the right drill bit for the job. The type of drill bit you choose will depend on the size and type of hole you need to create, as well as the type of wood you are drilling into. Here are some factors to consider when choosing a drill bit:

Diameter
The diameter of the drill bit will determine the size of the hole you create. Measure the diameter of the screw or fastener you plan to use and select a drill bit with a slightly smaller diameter. This ensures a snug fit for the screw and reduces the risk of splitting the wood.
Material
The material of the drill bit will depend on the type of wood you are drilling into. High-speed steel (HSS) drill bits are versatile and suitable for most wood types. However, if you are drilling into hardwoods or need to drill multiple holes, a carbide-tipped drill bit may be a better choice.
Type of Hole
The type of hole you need to create will also influence your choice of drill bit. For example, if you are drilling a countersink hole for a flat-head screw, a countersink drill bit with a tapered end is needed. If you are drilling a hole for a dowel or anchor, a brad-point bit or a spade bit may be more appropriate.
Length
The length of the drill bit should be sufficient to reach the desired depth of the pilot hole without going too deep. Consider the thickness of the wood and the depth of the hole you need to create when selecting a drill bit with the appropriate length.
Coating
Some drill bits come with coatings that reduce friction and increase the lifespan of the bit. Titanium and black oxide coatings are popular choices for wood drilling applications. These coatings help the drill bit stay sharp and provide better heat resistance.

- Consider the diameter of the hole needed
- Choose a drill bit suitable for the wood type
- Select a drill bit based on the type of hole
- Ensure the drill bit is long enough for the desired depth
- Consider drill bits with coatings for increased durability
By considering these factors and choosing the right drill bit, you can ensure precision and accuracy when drilling pilot holes in wood.
Measuring and Marking the Pilot Hole
Before drilling a pilot hole in wood, it’s important to measure and mark the exact spot where the hole needs to be placed. This ensures accuracy and prevents any damage to the wood.
To measure the location for the pilot hole, you can use a tape measure or a ruler. Take precise measurements that are appropriate for your project. It’s a good idea to mark the measurements with a pencil or a marker for better visibility.
Step 1: Determine the Size of the Pilot Hole
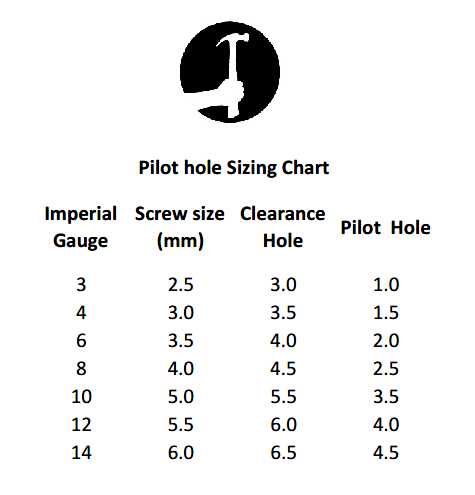
Next, you need to determine the size of the pilot hole. This will depend on the size of the screw or nail that you plan to use. Generally, the diameter of the pilot hole should be slightly smaller than the diameter of the screw or nail. Refer to the manufacturer’s instructions or use a drill bit gauge to determine the right size.
Step 2: Mark the Center for the Pilot Hole
Once you know the size of the pilot hole, mark the center of the hole on the wood. Use a pencil or a marker to draw a small dot or an “X” at the center point. This will serve as a guide for drilling the hole accurately.

Step 3: Use a Square or a Straight Edge for Alignment
For projects that require precise alignment, you can use a square or a straight edge to ensure that the pilot hole is drilled at a right angle to the surface of the wood. Place the square or the straight edge against the wood, align it with the center mark, and then draw a line along the edge of the square or the straight edge.
Step 4: Double Check the Measurements and Marks
Before drilling the pilot hole, double check the measurements and marks to ensure accuracy. This will help you avoid any mistakes and ensure that the hole is drilled in the correct location.
By measuring and marking the pilot hole accurately, you can ensure that your wood drilling project is a success. Taking the time to properly measure and mark the hole will save you from any potential problems or errors later on.
Preparing the Wood Surface
Before drilling a pilot hole in wood, it’s important to prepare the surface to ensure the best results. Follow these steps to properly prepare the wood:
1. Choose the Right Wood
Not all types of wood are created equal when it comes to drilling. Make sure you select a wood that is suitable for your project and drilling needs. Softer woods, like pine or cedar, are generally easier to drill into compared to hardwoods.

2. Measure and Mark
Take measurements and mark the spot where you want to drill the hole. Use a pencil or a marking tool to make an accurate mark on the surface of the wood. This will help guide your drilling and ensure accuracy.
3. Clean the Surface
Remove any dirt, debris, or dust from the wood’s surface. Use a soft cloth or a brush to gently clean the area around the marked spot. This will help create a clean drilling surface and prevent any obstructions that may affect the drilling process.
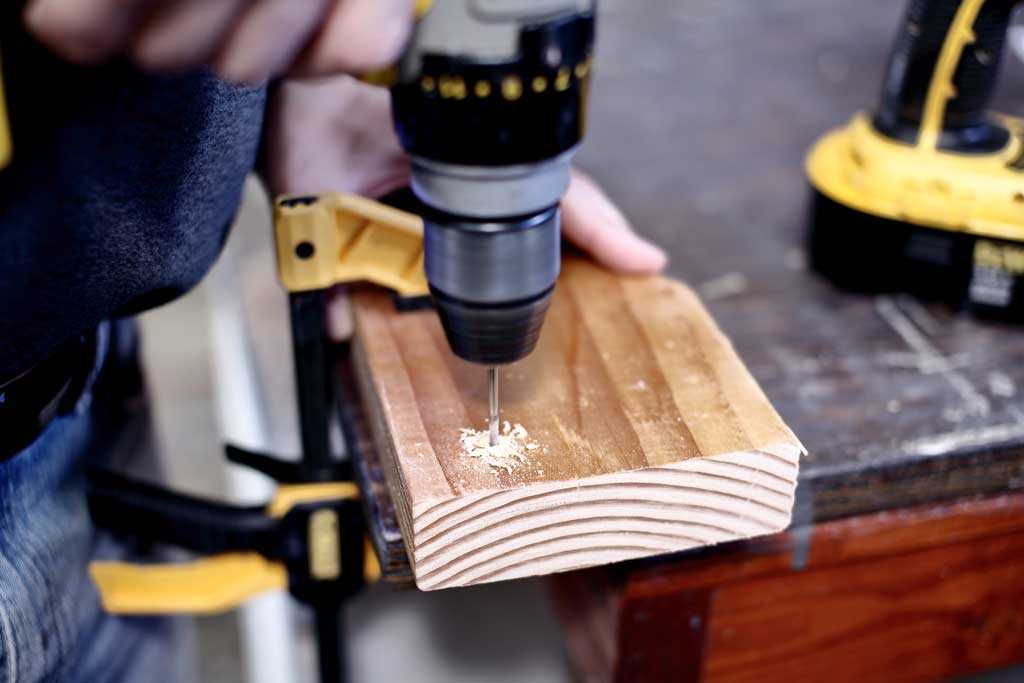
4. Arrange the Wood Securely
Make sure the wood is securely placed on a stable surface before drilling. You can use clamps or other securing devices to hold the wood in place. This will prevent it from moving or sliding during the drilling process and ensure clean and accurate holes.
5. Use a Backing Board
If you’re drilling through thin or delicate wood, it’s a good idea to place a backing board underneath the wood. This will help prevent any tear-out or splintering on the opposite side of the hole.
6. Determine the Hole Diameter
Consider the size of the screw or fastener you will be using and choose the appropriate drill bit size. The diameter of the pilot hole should be slightly smaller than the diameter of the screw or fastener to ensure a snug fit and prevent the wood from splitting.

7. Practice on Scrap Wood
If you’re new to drilling pilot holes or working with a particular type of wood, it’s always a good idea to practice on a scrap piece of wood first. This will give you a chance to familiarize yourself with the drilling process and make any necessary adjustments before working on your actual project.
By properly preparing the wood surface, you can ensure a successful and accurate drilling experience. Taking the time to follow these steps will help you achieve professional results and prevent any damage to the wood. Remember to always prioritize safety when working with power tools and wear appropriate protective gear.
Drilling the Pilot Hole
Drilling a pilot hole is an essential step before driving a screw or nail into wood. It helps prevent the wood from splitting and makes it easier to insert the fastener.
Why is a pilot hole necessary?
When you drive a screw or nail directly into wood, the force can cause the wood to split, especially near the edges. This can weaken the wood and make it difficult to secure the fastener properly.
A pilot hole provides a small guide hole for the fastener to follow, reducing the risk of splitting the wood. It also allows the screw or nail to enter the wood more easily.
Choosing the right drill bit size

The size of the pilot hole depends on the diameter of the screw or nail you plan to use. Selecting the correct drill bit size is crucial for achieving optimal results.
As a general rule of thumb, the diameter of the pilot hole should be slightly smaller than the screw or nail. This ensures that the fastener has enough grip and prevents it from becoming loose over time.
Consult a drill bit size guide or use a drill bit gauge to determine the appropriate size for your pilot hole.
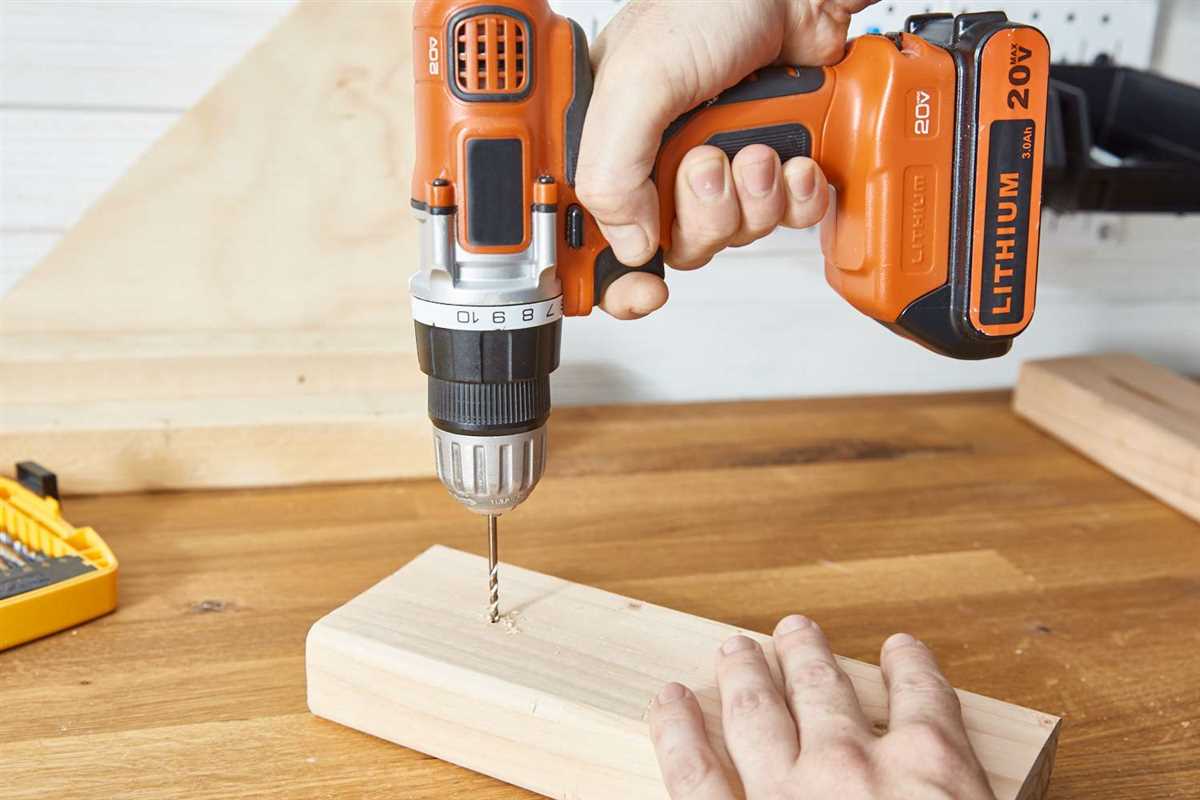
The process of drilling a pilot hole
Follow these steps to drill a pilot hole:
- Mark the location where you want to insert the fastener.
- Select the appropriate drill bit based on the size of the screw or nail.
- Secure the wood firmly in place, either with clamps or by holding it down.
- Position the drill perpendicular to the wood surface.
- Apply steady pressure and start drilling slowly.
- Continue drilling until the desired depth for the pilot hole is reached.
- Remove the drill bit and clean any wood chips or debris from the hole.
- You can now insert the screw or nail into the pilot hole.
Additional tips
- Use a brad point drill bit for better accuracy and precision.
- Hold the drill firmly and maintain control throughout the drilling process.
- Wear safety goggles to protect your eyes from wood chips and debris.
- Ensure that the drill bit is sharp and in good condition for optimal performance.
- Practice on scrap wood before drilling pilot holes in your actual project.
By following these guidelines and techniques, you can drill pilot holes in wood like a pro and ensure secure and sturdy fastening every time.
Proper Technique for Drill Speed and Pressure
When drilling pilot holes in wood, it is important to use the proper drill speed and pressure to ensure a clean and accurate hole. Here are some tips on how to master the technique:
1. Adjust the drill speed
Before drilling, make sure to adjust the drill speed according to the size of the hole and the type of wood you are working with. Higher drill speeds are typically used for smaller holes and softer woods, while lower speeds are better for larger holes and denser woods. Refer to the drill manual or experiment with different speeds to find the best setting for your specific project.
2. Apply consistent and steady pressure
While drilling, it is important to apply consistent and steady pressure. Avoid using excessive force that can cause the drill bit to push through the wood too quickly, resulting in splintering or an uneven hole. On the other hand, if you apply too little pressure, the drill bit may have difficulty biting into the wood and could wander off center. Find the right balance and maintain a steady hand throughout the drilling process.
3. Let the drill bit do the work
When drilling a pilot hole, it is important to let the drill bit do the work. Avoid putting excessive pressure on the drill and trying to force it through the wood. Instead, let the sharpness of the drill bit and the drilling action do the cutting. Applying too much pressure can cause the drill bit to overheat, dull, or break, resulting in a poor-quality hole and potentially damaging the wood.
4. Use the correct drill bit size
Using the correct drill bit size is crucial for drilling a pilot hole. The diameter of the drill bit should be slightly smaller than the diameter of the screw you will be using. This ensures that the screw will have enough grip in the wood, while still allowing for easy insertion. Using a drill bit that is too large can result in a loose connection, while a bit that is too small can cause the wood to split.
5. Practice on scrap wood
If you are new to drilling pilot holes or are working on a particularly important project, it is a good idea to practice on scrap wood first. This will allow you to get a feel for the drill speed and pressure needed for your specific drill and wood combination. By practicing, you can fine-tune your technique and minimize the risk of mistakes or damage to your final piece.
By following these tips, you can improve your drilling technique and achieve clean and accurate pilot holes in wood every time. Remember to always prioritize safety and take your time to ensure the best results.
Finishing Touches and Next Steps
Clean the Area
After drilling the pilot hole, it’s important to clean up the area to ensure no wood shavings or debris are left behind. Use a brush or a vacuum to remove any sawdust or wood chips that may have accumulated.
Inspect the Hole
Take a close look at the pilot hole to ensure that it is clean, smooth, and of the correct size. If there are any imperfections or if the hole is too shallow or deep, you may need to adjust your drilling technique or use a different drill bit size. Remember, a good pilot hole is essential for a successful woodworking project.
Proceed with Your Project
Once you have drilled the pilot hole and ensured that it is clean and accurate, you can continue with your woodworking project. Whether you are attaching a hinge, screwing in a bolt, or inserting a dowel, having a pilot hole will make the process easier and prevent the wood from splitting or cracking.
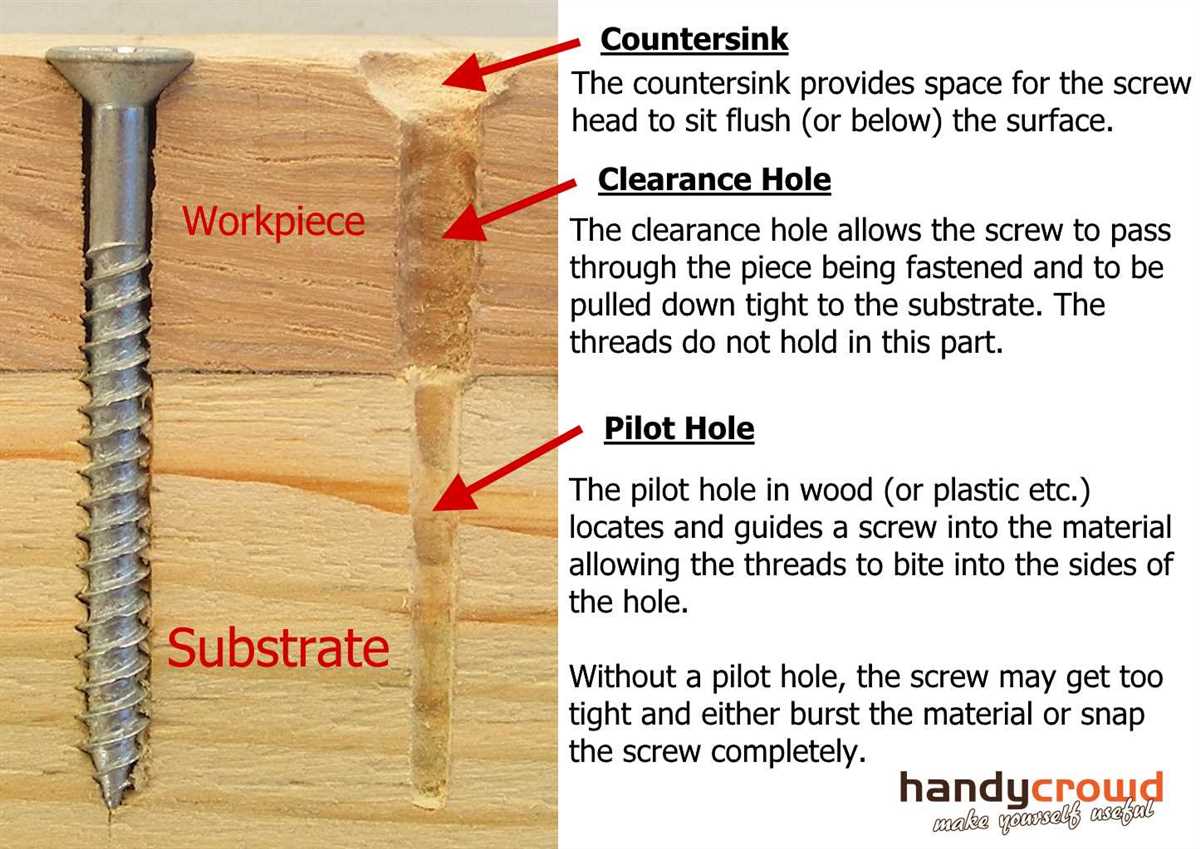
Consider Using a Countersink
In some cases, you may want to use a countersink after drilling the pilot hole. A countersink creates a conical recess that allows the screw or bolt head to sit flush with the surface of the wood. This not only improves the appearance of your project but also helps prevent the wood from splitting or splintering when inserting the screw or bolt.
Experiment and Practice
Drilling pilot holes in wood is a skill that takes practice to master. Don’t be afraid to experiment with different drill bits, drill speeds, and drilling techniques to find what works best for you. As with any skill, the more you practice, the better you will become.
Conclusion
Learning how to drill a pilot hole in wood is a valuable skill for any woodworker. It helps to prevent the wood from splitting and ensures a strong connection between various wood pieces. By following the steps outlined in this guide and taking the time to clean the area, inspect the hole, and consider using a countersink, you will be well-prepared to tackle your next woodworking project.
FAQ:
Why is it important to drill a pilot hole in wood before inserting a screw?
Drilling a pilot hole in wood before inserting a screw is important because it helps prevent the wood from splitting. When you drill a pilot hole, you create a pathway for the screw to go in smoothly, reducing the chances of the wood cracking or splitting.
Video:


Meet Harrison Clayton, a distinguished author and home remodeling enthusiast whose expertise in the realm of renovation is second to none. With a passion for transforming houses into inviting homes, Harrison's writing at https://thehuts-eastbourne.co.uk/ brings a breath of fresh inspiration to the world of home improvement. Whether you're looking to revamp a small corner of your abode or embark on a complete home transformation, Harrison's articles provide the essential expertise and creative flair to turn your visions into reality. So, dive into the captivating world of home remodeling with Harrison Clayton and unlock the full potential of your living space with every word he writes.


