Learn How to Drill a Hole in the Center of a Circle

Drilling a hole in the center of a circle can be a tricky task, especially if you don’t have the right tools or techniques. But with a little knowledge and practice, you can achieve precise results every time. Whether you’re a DIY enthusiast or a professional woodworker, this skill will come in handy for a variety of projects.
To start, you’ll need a few basic tools: a drill, a drill bit, and a center punch. The drill bit should be smaller than the diameter of the hole you want to create, as you can always enlarge the hole later if needed. The center punch is used to create a small indentation in the center of the circle, which will act as a guide for the drill bit.
Once you have your tools ready, you’ll need to secure the circle in place. This can be done by clamping it to a workbench or using a vice grip. Make sure the circle is stable and won’t move while you’re drilling the hole. It’s also important to wear safety goggles and gloves to protect yourself from any flying debris.
Place the center punch at the desired center of the circle and give it a firm tap with a hammer. This will create a small indentation that will serve as a starting point for the drill bit.
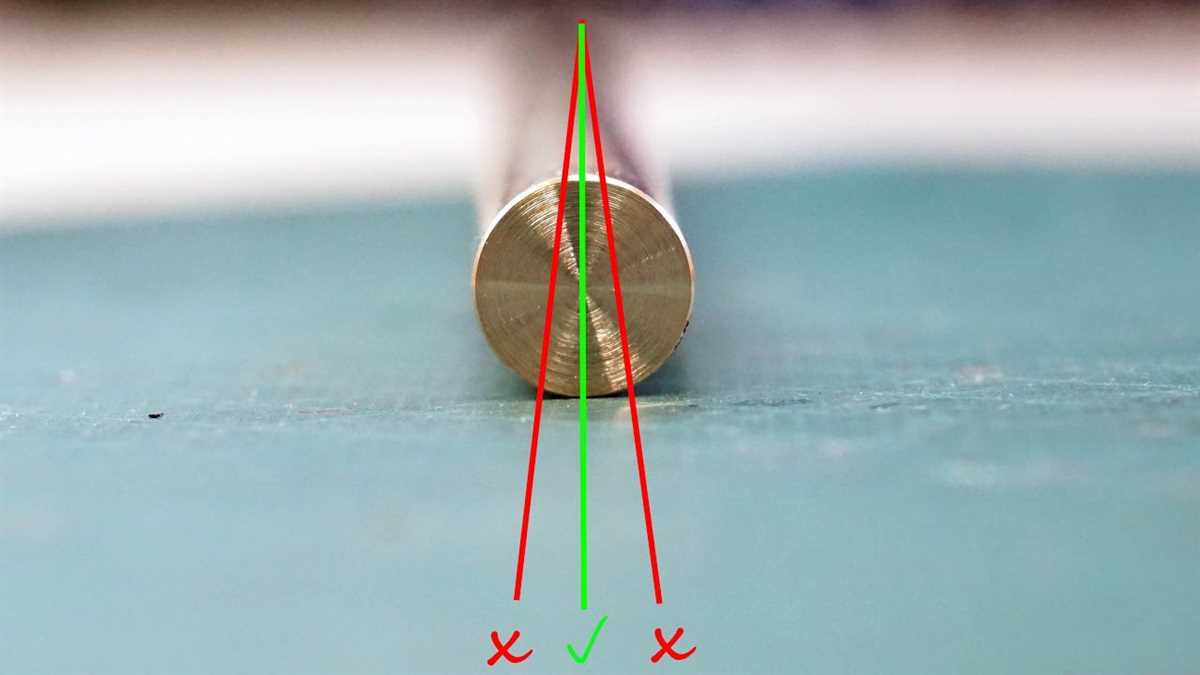
Now it’s time to drill the hole. Start by selecting the appropriate drill bit and attaching it to the drill. Position the drill bit just above the center punch indentation and apply gentle pressure to begin drilling. Use a slow and steady motion, making sure to keep the drill bit straight and perpendicular to the circle’s surface. This will ensure a clean and accurate hole.
As you continue drilling, periodically pull the drill bit out to remove any wood or material that may have accumulated in the hole. This will prevent the drill bit from getting stuck or causing any damage. Once you’ve reached the desired depth, slowly retract the drill bit and remove it from the hole.

With these steps, you can now confidently drill a hole in the center of a circle. Remember to practice caution and precision, and soon you’ll be able to tackle more complex drilling tasks with ease.
What is drilling a hole in the center of a circle?
Drilling a hole in the center of a circle refers to the process of creating a perfectly centered hole within the boundary of a circular shape. This technique is typically employed in various industries, such as woodworking, metalworking, and engineering, where precision is crucial.
When drilling a hole in the center of a circle, it is essential to accurately locate the center point before commencing the drilling process. This ensures that the hole is aligned properly and serves the intended purpose.
The process of drilling a hole in the center of a circle requires the use of specialized tools, such as a drill press or a center punch, to ensure accuracy and precision. These tools help in marking and drilling the hole at the desired center point with minimal deviation.
Importance of drilling a hole in the center of a circle
Drilling a hole in the center of a circle is crucial for various reasons:

- Precision: By drilling a hole in the center of a circle, precise measurements and alignments can be achieved, ensuring that the hole is perfectly centered.
- Functional requirements: In certain applications, such as mounting components or creating rotational mechanisms, a centered hole is necessary for proper functioning.
- Aesthetic purposes: When creating decorative objects or designs, a hole in the center of a circle can create visually pleasing symmetry.
Methods for drilling a hole in the center of a circle
There are several methods to drill a hole in the center of a circle, depending on the tools and materials available:
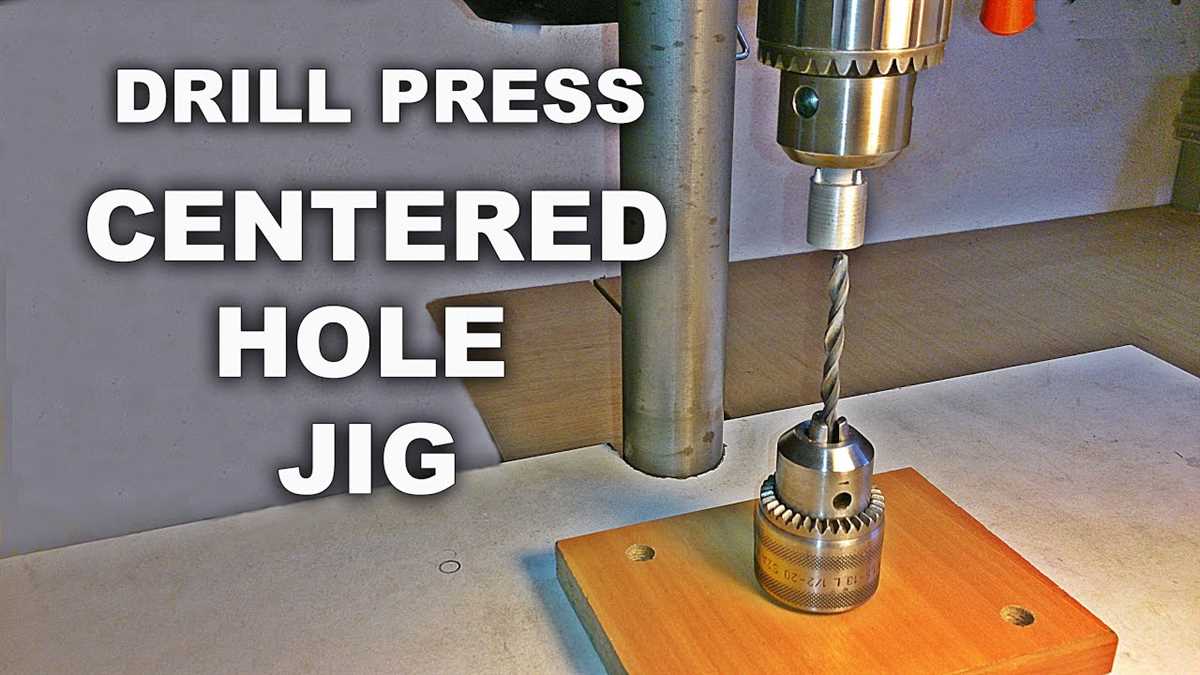
- Using a drill press: A drill press provides a stable platform with adjustable settings to accurately position and drill a centered hole.
- Using a center punch and a drill: This method involves marking the center point with a center punch and then drilling the hole centered on the marked point using a handheld drill.
- Using a compass and a drill: By utilizing a compass to draw the circle and then marking the center point, a hole can be drilled accurately.
Each method has its advantages and limitations, with factors such as precision requirements, available tools, and material characteristics influencing the choice of method.
Why is it important to know how to drill a hole in the center of a circle?

- Precision and accuracy: Drilling a hole in the center of a circle is important because it allows for precise and accurate alignment of components. Whether you are working with woodworking, metalworking, or any other craft, knowing how to drill a hole in the center of a circle ensures that your finished product will be properly aligned and functional.
- Proper fitting: When assembling parts or joining materials, having a hole drilled in the center of a circle allows for proper fitting. This ensures that the parts align correctly, preventing any gaps or misalignments that could affect the overall integrity and functionality of the project.
- Aesthetics: Drilling a hole in the center of a circle is important for aesthetic purposes, especially in crafts or designs where symmetry is desired. By having a perfectly centered hole, the overall appearance of the project is enhanced, and it looks more professional and polished.
- Efficiency: Knowing how to drill a hole in the center of a circle can save time and effort. By having the ability to accurately position the hole in the center, you can avoid trial and error methods, which can be time-consuming and lead to wasted materials.
- Versatility: Being able to drill a hole in the center of a circle is a valuable skill that can be applied to various projects and industries. Whether you are constructing furniture, designing jewelry, or working on a DIY project, knowing this technique opens up a wide range of possibilities and allows you to tackle different types of tasks with confidence.
Overall, knowing how to drill a hole in the center of a circle is a fundamental skill that is beneficial in various aspects of craftsmanship and design. It ensures precision, proper fitting, aesthetic appeal, efficiency, and versatility in your projects, making it an essential technique to master.
Tools and Materials


Before you begin drilling a hole in the center of a circle, it’s important to gather all the necessary tools and materials. Below is a list of what you will need:
- A drill
- A drill bit suitable for the material you are working with
- A compass or a ruler with a compass attachment
- A pencil or marker
- A piece of wood or a surface to drill into
- A clamp or a vise to secure the wood or surface
- Safety glasses or goggles
- Dust mask
Make sure you have all the tools and materials listed above before you start the drilling process. Safety should always be a priority, so remember to wear your safety glasses or goggles and a dust mask to protect your eyes and lungs from any dust or debris that may be generated during drilling.
What tools do you need to drill a hole in the center of a circle?
Drilling a hole in the center of a circle requires a few essential tools to ensure accuracy and precision. These tools include:
- Drill press: A drill press is a machine that can hold the workpiece securely and drill holes with high precision. It is equipped with a motor, a chuck, and an adjustable table.
- Center drill bit: A center drill bit has a pointed tip and is specifically designed to create a center hole in a workpiece. It helps to guide the drill bit and prevents it from wandering.
- Drill bit: After creating the center hole with a center drill bit, a regular drill bit is used to enlarge the hole to the desired size. The size of the drill bit depends on the diameter of the hole needed.
- Clamps or vise: Clamps or a vise are used to secure the workpiece to the drill press table. This ensures stability and prevents movement while drilling the hole.
- Measuring tools: Measuring tools such as rulers, calipers, or center finders are essential for accurately marking the center point of the circle and positioning the workpiece on the drill press.
By using these tools in combination and following proper drilling techniques, you can successfully drill a hole in the center of a circle with precision and accuracy.
What materials do you need?
To drill a hole in the center of a circle, you will need the following materials:

- A drill: You can use either a hand drill or a power drill, depending on your preference and the thickness of the material you are drilling.
- A drill bit: Choose a drill bit that corresponds to the size of the hole you want to drill. For precise drilling, a brad point drill bit or a center drill bit is recommended.
- A circle template: This is not mandatory, but it can help you mark the center of the circle more accurately. You can make a template by cutting out a circle from a piece of cardboard or plastic.
- A pencil or marker: Use this to mark the center of the circle on the surface of the material.
- A clamp or vise: This is optional, but it can help secure the material in place, especially if you are drilling on a small or thin surface.
- Safety goggles: Always wear safety goggles to protect your eyes from debris or metal shavings while drilling.
- Protective gloves: It is recommended to use protective gloves to prevent any injuries while handling the material or the drilling equipment.
- A workbench or a sturdy surface: Make sure you have a stable surface to work on to ensure precision and safety during the drilling process.
By gathering these materials, you will be fully prepared to drill a hole in the center of a circle.
Step-by-Step Guide
-
Prepare the Materials
Before you begin drilling, gather all the necessary materials. You will need a drill, a drill bit with the desired diameter, a center punch, a hammer, a ruler or measuring tape, a clamp or vise, and the object you want to drill a hole in.
-
Mark the Center
Use a ruler or measuring tape to find the center of the object where you want to drill the hole. Once you have located the center, place the center punch on the mark and gently tap it with the hammer. This will create a small dent to guide the drill bit.
-
Secure the Workpiece
Secure the object you are drilling in place using a clamp or vise. This will prevent the object from moving or spinning while you drill.
-
Select the Drill Bit
Choose a drill bit with a diameter that matches the size of the hole you want to create. If you are unsure, start with a smaller drill bit and gradually increase the size until you reach the desired diameter.
-
Align the Drill Bit
Insert the chosen drill bit into the drill chuck and tighten it securely. Position the drill bit over the center mark you made earlier, ensuring that it is aligned and perpendicular to the surface of the object.
-
Start Drilling
Hold the drill with a firm grip, making sure to keep the drill bit aligned with the center mark. Apply steady pressure on the drill and start drilling at a slow speed. Increase the speed gradually as you proceed, but be cautious not to apply too much force.
-
Monitor the Drilling Process
As you drill, periodically remove the drill to clear away any broken material. This will prevent the drill bit from getting clogged. Keep the drill bit lubricated with a small amount of cutting fluid or lubricant designed for drilling.
-
Complete the Hole
Continue drilling until you have reached the desired depth or completely drilled through the object. Once the hole is complete, release the pressure on the drill and turn off the power.
-
Clean up and Inspect
Remove the clamp or vise, and clean up any debris or dust created during the drilling process. Inspect the hole to ensure it meets your requirements and make any necessary adjustments if needed.
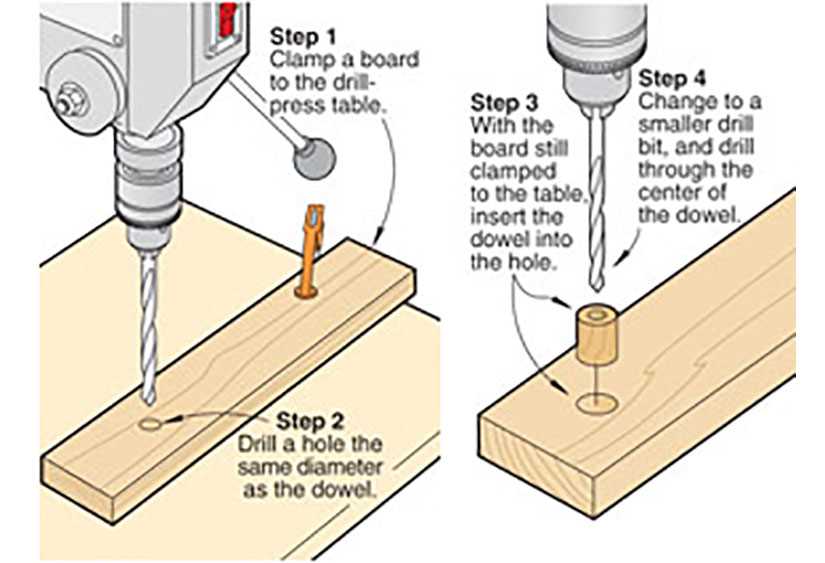
Step 1: Mark the center of the circle
To drill a hole in the center of a circle, you first need to mark the center point. Here is how you can do it:
- Take a ruler and measure the diameter of the circle. Divide it by 2 to find the radius.
- Locate the point where you want the center of the hole to be and make a small mark there using a pencil or a marker.
- Use the ruler to draw a straight line through the center mark. This line will help you align the drill later on.
- If you want to be extra precise, you can use a compass to draw a circle around the center mark to ensure it is perfectly centered.
By marking the center of the circle, you can now proceed with drilling the hole in the right spot.
Step 2: Secure the circle
Once you have marked the center of the circle, you will need to secure it in place before drilling. This will help prevent the circle from moving or shifting while you are drilling.

Here are a few methods you can use to secure the circle:
- Tape: Using tape, such as painter’s tape or masking tape, secure the circle to the surface you are drilling into. Make sure the tape is firmly attached and covers the entire perimeter of the circle.
- Clamps: If you have clamps available, you can use them to hold the circle in place. Position the clamps around the perimeter of the circle and tighten them securely.
- Weigh down: Alternatively, you can weigh down the circle using heavy objects. Place weights or heavy objects around the perimeter of the circle to keep it in place.
Choose the method that works best for you and ensure that the circle is securely held in place before proceeding to the next step.
Step 3: Choose the right drill bit
Choosing the right drill bit is crucial for drilling a hole in the center of a circle. The type of material you are drilling into and the size of the hole you want to create will determine the type and size of the drill bit you should use.
Type of drill bit
- Twist drill bit: This is the most common type of drill bit and is suitable for drilling into various materials, including wood, plastic, and metal.
- Spade drill bit: This drill bit has a flat, paddle-like shape and is primarily used for drilling large holes in wood.
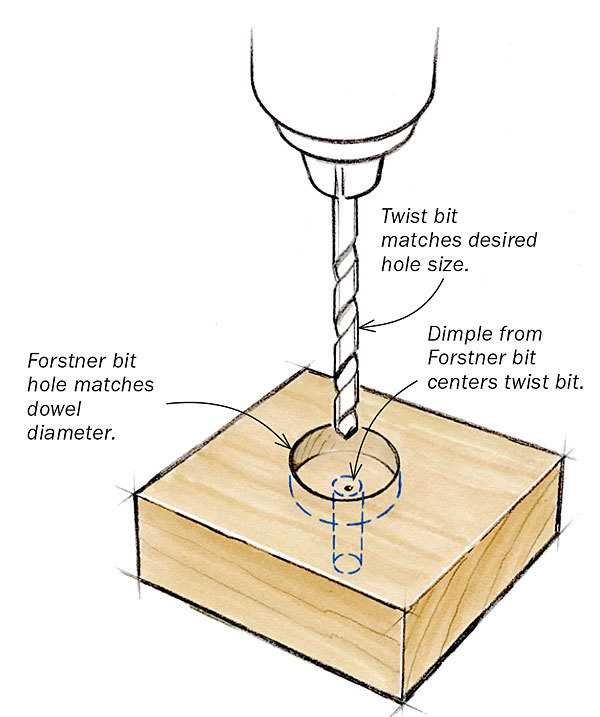
- Forstner drill bit: Designed specifically for woodworking, this drill bit creates clean and precise holes with flat bottoms.
- Hole saw: This is a cylindrical blade with teeth, and it is used for drilling larger holes in materials like wood and plastic.
Size of drill bit
The size of the hole you want to drill will dictate the size of the drill bit you need. Drill bits are typically measured in terms of their diameter in inches or millimeters. Select a drill bit that matches the diameter of the hole you want to create or slightly larger if you need a little more clearance.
Considerations
When choosing a drill bit, consider the following factors:
- The type of material you are drilling into
- The desired size of the hole
- The type of drill you are using
- The availability of the drill bit
Always refer to the manufacturer’s guidelines for the drill bit recommendations for specific materials and applications.
Step 4: Start drilling
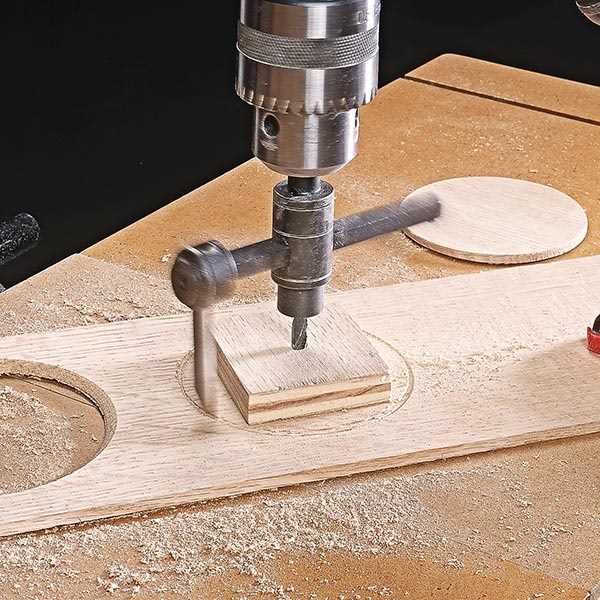
Once you have all the necessary equipment and have marked the center of your circle, it’s time to start drilling.
- Position your drill press or handheld drill directly above the marked center of the circle.
- Make sure the drill bit is the appropriate size for your hole and securely fastened in the drill.
- Set the drill to the appropriate speed for your material. If you’re unsure, start with a slower speed and adjust as needed.
- Hold the drill with both hands for stability.
- Slowly lower the drill bit towards the center of the circle, applying gentle pressure to start the drilling process.
- Continue drilling, maintaining a steady and controlled motion until the drill bit pierces through the material and reaches the other side.
Note: If you’re using a handheld drill, be careful not to apply too much pressure as it may cause the drill to slip or the bit to break.
Drilling through harder materials may require more time and effort, so be patient and take breaks if needed. It’s important to maintain control and precision throughout the drilling process.
FAQ:
Video:

How to make panjiri

Harrison Clayton
Meet Harrison Clayton, a distinguished author and home remodeling enthusiast whose expertise in the realm of renovation is second to none. With a passion for transforming houses into inviting homes, Harrison's writing at https://thehuts-eastbourne.co.uk/ brings a breath of fresh inspiration to the world of home improvement. Whether you're looking to revamp a small corner of your abode or embark on a complete home transformation, Harrison's articles provide the essential expertise and creative flair to turn your visions into reality. So, dive into the captivating world of home remodeling with Harrison Clayton and unlock the full potential of your living space with every word he writes.


