How to Twist Wires with a Drill: A Comprehensive Guide

Twisting wires is a fundamental skill in many DIY and electrical projects. Whether you’re working on a simple wiring repair or tackling a major electrical installation, knowing how to twist wires properly is essential for a secure and reliable connection. In this comprehensive guide, we will walk you through the step-by-step process of twisting wires with a drill, providing you with the knowledge and techniques you need to achieve professional results.
One of the main benefits of using a drill to twist wires is its speed and efficiency. Twisting wires by hand can be time-consuming and tedious, especially when dealing with thick or multiple strands. Using a drill allows you to quickly and evenly twist wires together, saving you valuable time and effort. However, it’s important to note that using a drill requires caution and proper technique to prevent damage to the wires or injury to yourself.
Before you begin twisting wires with a drill, it’s essential to gather the necessary tools and materials. You will need a drill with a chuck that can grip the wires securely, wire strippers to remove any insulation, and electrical tape or wire nuts to secure the twisted wires. Additionally, it’s crucial to wear safety goggles and gloves to protect your eyes and hands from any potential accidents.
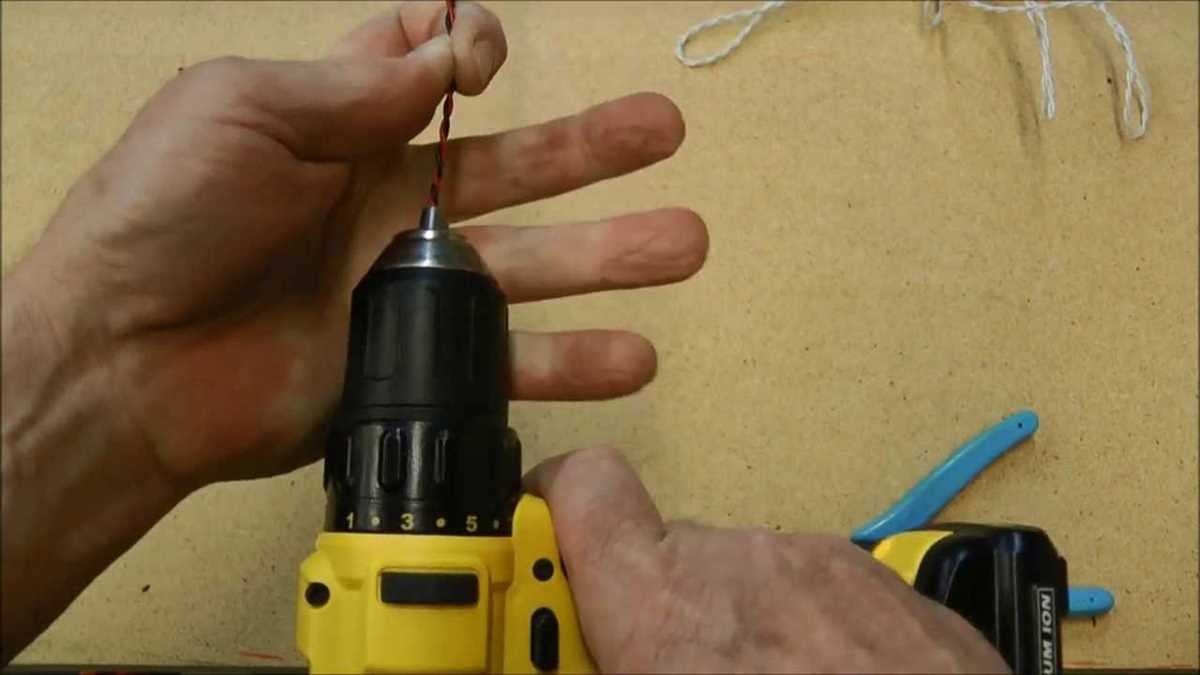
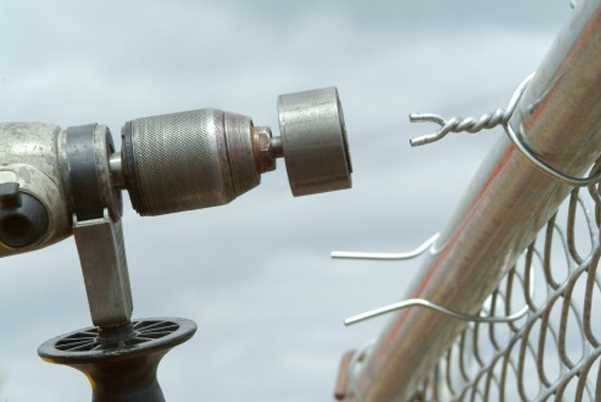
Once you have all the necessary tools and materials, you can begin the process of twisting wires with a drill. Start by stripping the ends of the wires using wire strippers, removing approximately half an inch of insulation. Make sure to expose enough bare wire for a secure connection without leaving too much exposed wire, which can increase the risk of a short circuit. Then, place the stripped ends of the wires into the drill chuck, ensuring they are tightly secured.
What is Wire Twisting?
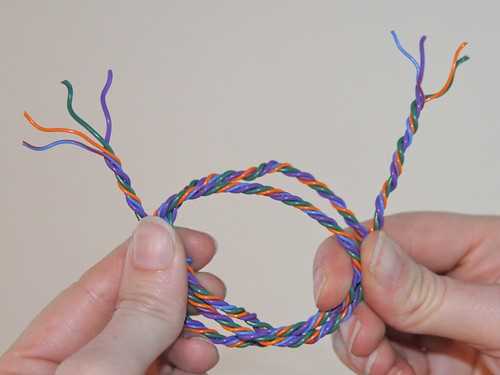
Wire twisting is a method of joining two or more wires together by twisting them in a helical pattern. This technique is commonly used in various electrical and mechanical applications, such as soldering, wire splicing, or creating wire connections for electrical circuits.

Wire twisting provides a secure and reliable connection by increasing the contact area between the wires, enhancing electrical conductivity, and improving mechanical strength. It helps to prevent loose connections and ensures that the wires remain securely joined even when subjected to vibrations or movements.
Twisted wires are commonly used in electronics, electrical wiring, telecommunications, and even in arts and crafts projects. The twisting process can be done manually, but it can also be accomplished with the help of tools and equipment, such as a drill.
Twisting wires with a drill is a convenient method, especially when dealing with a large number of wires or when working with thicker gauge wires. It saves time and effort, allowing for quicker and more efficient wire twisting.
Benefits of Wire Twisting
- Improved Electrical Performance: Twisting wires together helps to reduce the overall resistance of the circuit. This can improve electrical performance by ensuring a more efficient flow of electricity.
- Enhanced Strength: When wires are twisted together, they form a stronger connection and are less likely to come loose or break. This increased strength can prevent issues such as intermittent connections or wire breakages.
- Reduced Electromagnetic Interference: Wire twisting can help to reduce electromagnetic interference (EMI) by cancelling out the magnetic fields produced by the individual wires. This can be particularly beneficial in applications where sensitive electronic equipment is involved.
- Neater and More Organized Appearance: By twisting wires together, they can be neatly bundled and secured, resulting in a tidier and more organized appearance. This can be especially beneficial in applications where aesthetics are important, such as electrical installations in homes or offices.
- Easy Identification: Twisted wires are easier to identify and trace, especially when dealing with multiple wires in a complex circuit. The twisting creates a visually distinguishable pattern that can aid in troubleshooting, repair, and maintenance tasks.
- Reduced Risk of Tangling: Twisting wires can help to prevent tangling and knotting. This can be useful when working with long or complex wire harnesses, preventing time-consuming and frustrating untangling processes.
- Improved Durability: The act of twisting wires can strengthen the individual wires as well as the overall connection. This can enhance the durability and longevity of the wire assembly, reducing the likelihood of premature wear or failure.
Enhanced Durability
The durability of twisted wires is crucial to ensure their long-lasting use. By following these steps and tips, you can enhance the durability of your twisted wires:
- Choose the right wire: Opt for high-quality wire with the appropriate gauge for your intended use. A thicker gauge wire will generally be more durable and less prone to bending or breaking.
- Use a drill with adjustable speed: A drill with adjustable speed settings allows you to twist the wires at a controlled and consistent pace, reducing strain on the wires and minimizing the chances of them getting damaged during the twisting process.
- Apply even pressure: When twisting the wires using a drill, make sure to apply even pressure to both wires. This ensures that they are twisted together tightly and evenly, reducing the likelihood of any weak spots or loose twists that could affect the durability.
- Avoid over-twisting: While it’s important to twist the wires tightly, over-twisting can lead to excessive strain and potential damage to the wires. Find the right balance and don’t twist them excessively.
- Secure the ends: After twisting the wires, it’s recommended to secure the ends using wire nuts or electrical tape. This helps to prevent the wires from unraveling and adds an extra layer of protection to enhance their overall durability.
- Protect the twisted wires: Once you have twisted the wires, consider adding a layer of heat shrink tubing or a flexible conduit to provide additional protection against abrasion, moisture, and other potential hazards. This can significantly enhance the durability and lifespan of the twisted wires.
By following these guidelines, you can ensure that your twisted wires are durable and long-lasting, providing reliable performance for your electrical or DIY projects.
![[100 Meters] Garden Tie Wire 328 Feet Pack of 2 Green Twist Ties with Thread Cutter Flexible Garden Ties Vines Support for Climbing Plants Shrubs Flowers Cable Organization Bag Seal](https://m.media-amazon.com/images/I/51Nstg5uEvL._SS520_.jpg)
Improved Electrical Performance
Twisting wires using a drill offers several benefits, one of which is improved electrical performance. When wires are twisted together, it reduces electromagnetic interference (EMI) and crosstalk.
EMI occurs when electrical currents in one wire generate electromagnetic fields that interfere with the current in another nearby wire. This interference can cause signal degradation, loss of data, and poor electrical performance. By twisting the wires together, the electromagnetic fields are effectively canceled out, reducing the potential for interference.
In addition to reducing EMI, twisting wires also reduces crosstalk. Crosstalk refers to the unwanted transfer of electrical signals between adjacent wires. When wires are twisted, the distance between them is varied, which helps to minimize crosstalk by creating a barrier between the signals.
Furthermore, twisted wires provide better signal integrity and reduce signal loss. The twisted configuration creates a more uniform impedance along the length of the wire, preventing reflections and ensuring a consistent signal throughout.

Overall, by twisting wires with a drill, you can achieve improved electrical performance, better signal quality, and reduced interference. This makes it an effective technique for various electrical applications, such as audio systems, telecommunications, and data transmission.
Tools and Materials Required
- Drill machine
- Wire cutter
- Wire stripper
- Protective gloves
- Protective goggles
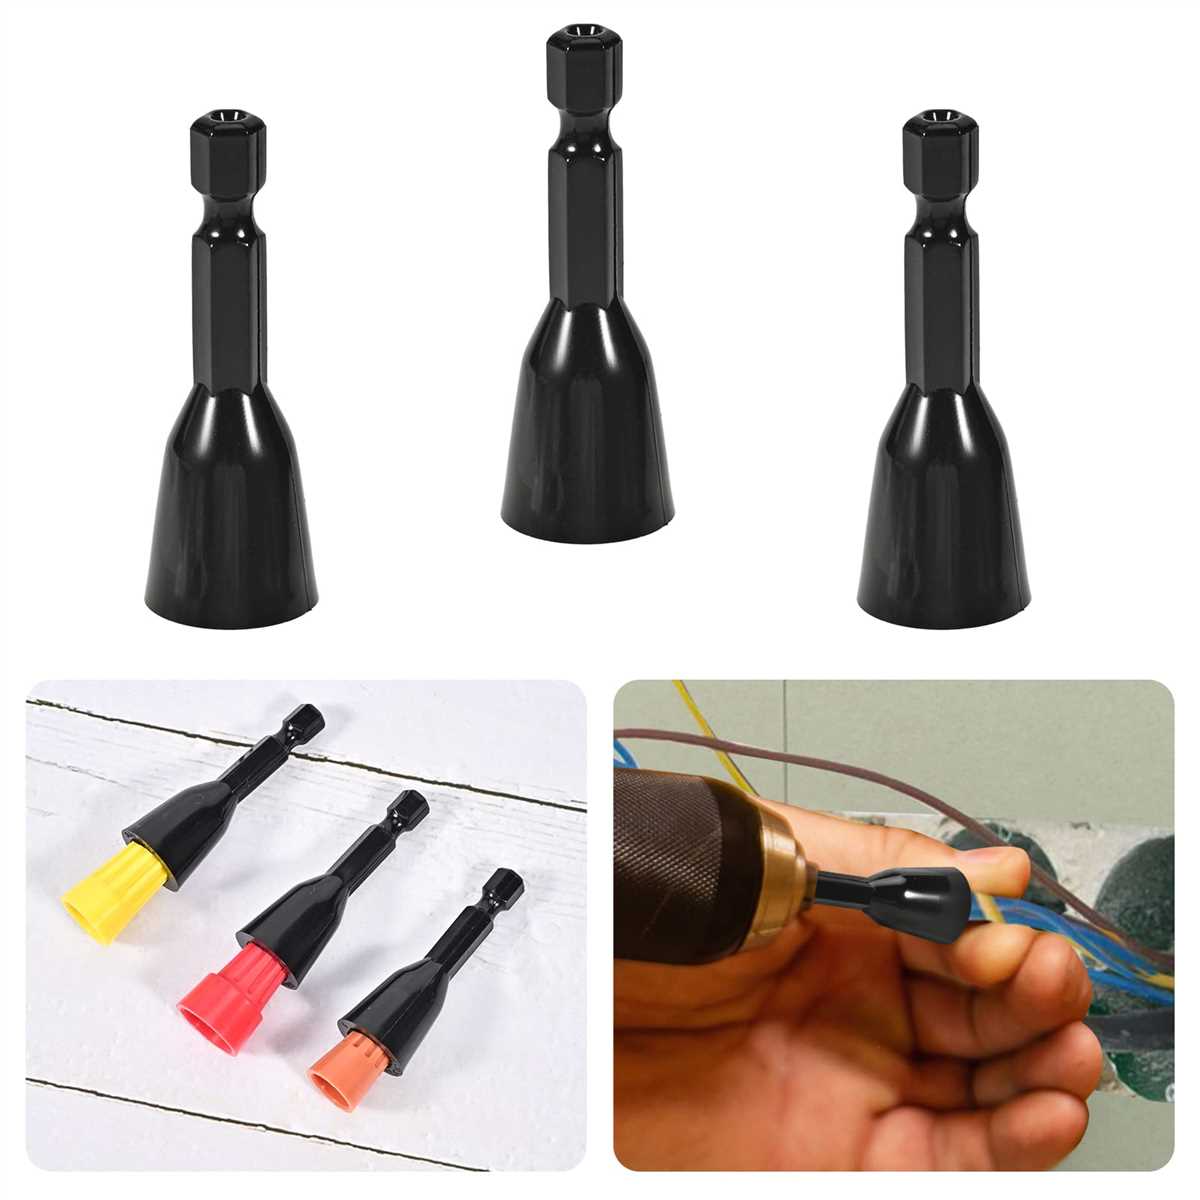
- Twist connectors
- Electrical tape
- Marker or pen
Before you begin twisting wires with a drill, it is important to gather all the necessary tools and materials. Here is a list of items you will need:
- Drill machine: A power drill with a chuck capable of gripping and spinning wires is essential for twisting them.
- Wire cutter: This tool will be used to cut the wires to the desired length.
- Wire stripper: A wire stripper is necessary to remove the insulation from the wire ends.
- Protective gloves: Safety should always be a priority when working with electrical components, so wearing protective gloves is crucial.
- Protective goggles: It is important to protect your eyes from any flying debris or sparks that may occur during the process.
- Twist connectors: These connectors are used to secure the twisted wires together. Make sure to choose the appropriate size for your wires.
- Electrical tape: Electrical tape will be used to insulate the twisted wires and provide protection against any exposed wires.
- Marker or pen: Having a marker or pen handy will help you label the wires and keep track of their connections.
By having these tools and materials ready, you can ensure a smooth and efficient process when twisting wires with a drill.
Electric Drill
An electric drill is a versatile power tool that is commonly used in various DIY projects and professional applications. It is equipped with a powerful motor that rotates a drill bit at high speeds, allowing you to bore holes or drive screws into different materials.

Components of an Electric Drill
An electric drill typically consists of the following components:
- Motor: The motor is the heart of an electric drill. It converts electrical energy into rotational motion, allowing the drill bit to spin.
- Chuck: The chuck is a device located at the front of the drill that holds and secures the drill bit or screwdriver bit. It can be tightened or loosened to install or remove bits.
- Trigger Switch: The trigger switch is a control mechanism that enables you to turn the drill on and off. It is usually located on the handle of the drill and can have variable speed settings.
- Handle: The handle provides a comfortable grip for better control and stability during drilling operations.
- Battery (if cordless): Cordless drills are powered by rechargeable batteries. The battery provides the necessary power to the motor for operation.
Types of Electric Drills
There are various types of electric drills available, each designed for specific applications:
- Drill Drivers: These drills are suitable for drilling holes and driving screws into wood, plastic, and metal.
- Hammer Drills: Hammer drills are designed for drilling into harder materials such as concrete, stone, and masonry. They combine rotational drilling motion with a forward hammering action for increased drilling power.
- Impact Drills: Impact drills deliver high torque rotational force, making them ideal for heavy-duty drilling and driving applications.
- Right Angle Drills: Right angle drills are compact and feature a head that is at a right angle to the drill body. They are used in tight spaces where a regular drill cannot fit.
- Cordless Drills: Cordless drills offer portability and convenience as they are not tethered to a power source. They are powered by rechargeable batteries.
Using an Electric Drill
When using an electric drill, follow these basic steps:
- Select the appropriate drill bit or screwdriver bit for your intended application.
- Secure the bit in the chuck by loosening it, inserting the bit, and tightening it back up.
- Adjust the speed if necessary, using the trigger switch.
- Position the drill perpendicular to the surface you are drilling into.
- Apply gentle, steady pressure and start drilling at a slow speed. Increase the speed gradually until you achieve the desired drilling or driving action.
- Once done, release the trigger switch and wait for the drill bit to stop rotating before setting the drill down.
Remember to wear appropriate safety equipment such as safety glasses and work gloves when operating an electric drill. Always read and follow the manufacturer’s instructions for your specific drill model.
Wire Strippers
Wire strippers are an essential tool for anyone working with wires, whether you’re an electrician, a DIY enthusiast, or just someone looking to do some basic electrical work. These tools are designed to strip the insulation off of wires, making it easier to connect them to other wires or components.

Wire strippers come in various sizes and styles, but they all generally work on the same principle. They have a set of sharp, hardened steel blades that can cut through the insulation without damaging the wire itself. Some wire strippers also have adjustable blades, allowing you to strip wires of different sizes.
Types of Wire Strippers
There are several different types of wire strippers, each with its own advantages and uses:
- Automatic wire strippers: These strippers feature a mechanism that automatically adjusts the blade depth based on the wire size, making stripping wires quick and easy. They are great for repetitive tasks and can save you a lot of time.
- Manual wire strippers: These strippers require you to manually adjust the blade depth. While they may take a bit longer to use, they offer more control and precision, which is important for delicate wires or when working in tight spaces.
- Self-adjusting wire strippers: These strippers have a mechanism that automatically adjusts the blade depth based on the wire size, similar to automatic wire strippers. However, they also feature a wire cutter and crimper, making them a versatile tool for various tasks.
- Multi-function wire strippers: These strippers often have additional features, such as bolt cutters, pliers, or screwdrivers. They are great for those who need a versatile tool that can handle different tasks.
When choosing a wire stripper, consider the types of wires you’ll be working with, your comfort and dexterity with different styles, and your budget. It’s also essential to choose a wire stripper that can handle the wire sizes you typically work with.
Using Wire Strippers Properly
Using wire strippers correctly is crucial to ensure the wire remains undamaged while removing the insulation. Here are some general steps to follow:
- Choose the appropriate wire stripper for the wire size you’re working with.
- Adjust the blade depth if necessary, making sure it only cuts through the insulation and not the wire.
- Position the wire stripper so that the blades are just above the insulation.
- Squeeze the handles firmly to activate the blades, then pull the wire stripper along the length of the wire to remove the insulation.
- Inspect the wire to ensure the insulation has been completely removed, and there are no nicks or cuts on the wire.
Remember to exercise caution when using wire strippers, as the blades can be sharp. Always wear safety goggles and gloves to protect yourself from accidental injuries.
With the right wire stripper and proper technique, you’ll be able to strip wires quickly and efficiently, making your electrical projects much easier to complete.
Wire Cutters
Wire cutters are an essential tool when working with wires. They allow you to cut through wires cleanly and easily, making it easier to work with them.
There are different types of wire cutters available, and each type is designed for a specific purpose. It’s important to choose the right type of wire cutter for the job to ensure optimal results.
Types of Wire Cutters
1. Diagonal Cutters: Diagonal cutters, also known as side cutters or diagonal pliers, are a versatile tool commonly used for cutting wires. They have a cutting edge that is at an angle to the handle, making it easier to reach into tight spaces.
2. Flush Cutters: Flush cutters are similar to diagonal cutters, but their cutting edge is flat instead of angled. This allows them to cut wires flush with a surface, leaving a clean and neat finish.
3. Cable Cutters: Cable cutters, as the name suggests, are designed for cutting cables. They have a larger cutting capacity compared to other wire cutters and are ideal for cutting thicker wires and cables.
4. Wire Strippers: Wire strippers are a specialized type of wire cutter that not only cut through the wire but also remove the insulation. They have multiple cutting edges and stripping holes, allowing you to strip different gauge wires easily.
Choosing the Right Wire Cutter
When choosing a wire cutter, it’s important to consider the size and type of wire you’ll be working with. Different wire cutters have different cutting capacities, so you’ll need to choose one that can handle the diameter of the wire you’ll be cutting.
Additionally, consider the comfort and ergonomics of the wire cutter. Look for one with a comfortable handle that fits well in your hand to prevent hand fatigue during extended use.
Conclusion
In conclusion, wire cutters are an essential tool when working with wires. They allow you to cut through wires cleanly and easily, making it easier to work with them. When choosing a wire cutter, consider the type and size of wire you’ll be working with, as well as the comfort and ergonomics of the tool. With the right wire cutter, you’ll be able to handle any wire cutting task with ease.
Step-by-Step Guide to Wire Twisting
1. Gather Your Materials
Before you begin wire twisting, make sure you have all the necessary materials:
- A drill with a chuck
- Two or more wires to twist
- Wire strippers
- Electrical tape or wire nuts
2. Prepare the Wires
Use wire strippers to remove the insulation from the ends of the wires you want to twist together. Make sure to expose enough wire to create a secure connection.
3. Attach the Wires to the Drill
Insert the exposed ends of the wires into the jaws of the drill chuck. Tighten the chuck securely to hold the wires in place.
4. Set up the Drill
Secure the drill in a vise or clamp it to a stable surface. Make sure the drill is set to the appropriate speed and direction for the wire twisting process.
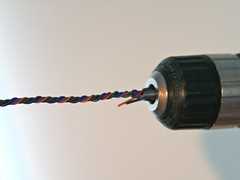
5. Twist the Wires
Hold the wires firmly and start the drill. Allow the drill to twist the wires for several seconds, or until they are tightly twisted together. Be careful not to overtwist the wires, as this can cause damage.
6. Secure the Twisted Wires

Once the wires are twisted, remove them from the drill chuck. Use electrical tape or wire nuts to secure the twisted wires and prevent them from coming apart.
7. Test the Connection
After securing the twisted wires, use a multimeter or other testing device to ensure there is a proper electrical connection. If the connection is not secure, redo the wire twisting process.
8. Repeat if Necessary
If you need to twist additional wires, repeat steps 2-7 for each set of wires.
9. Clean up
Dispose of any wire scraps and put away your tools in their designated places. Ensure the work area is clean and organized.
10. Safety Precautions
When working with electricity, always prioritize safety. Wear appropriate protective gear, such as safety glasses and gloves. Disconnect the power source before working on any wires, and never touch exposed wires with your bare hands.
Follow these steps carefully to twist wires effectively and safely with a drill. Always double-check your work and ensure proper connections before using any electrical circuits or devices.
Step 1: Prepare Your Workstation
- Clear a flat and stable surface to work on. Make sure there is enough space for your tools and materials.
- Gather all the necessary tools and materials for wire twisting, including a drill, wire cutters, safety glasses, and the wires you want to twist.
- Put on your safety glasses to protect your eyes from any flying debris or sparks that may occur during the twisting process.
- Secure the wires you want to twist by clamping them down to your work surface. This will prevent the wires from moving around and ensure a clean and even twist.
- Inspect the wires for any damage or defects that may affect the twisting process. Trim off any frayed ends or damaged sections using the wire cutters.
- Check that your drill is in good working condition. Ensure it is fully charged or connected to a power source, and that the chuck is securely tightened.
By properly preparing your workstation beforehand, you will have a safe and organized space to perform the wire twisting process. This will help ensure a successful and efficient outcome.
FAQ:
What tools do I need to twist wires with a drill?
To twist wires with a drill, you will need a power drill, wire strippers, and electrical tape.
Can I use any type of drill to twist wires?
Yes, you can use any type of power drill to twist wires. Just make sure it has a chuck that can hold the wire securely.
Is it safe to twist wires with a drill?
Twisting wires with a drill can be safe if done correctly. However, it is important to take proper safety precautions, such as wearing safety goggles and gloves, and ensuring the drill is in the off position when not in use.
How do I twist wires together using a drill?
To twist wires together using a drill, start by stripping the ends of the wires. Then, insert the stripped ends into the drill chuck and tighten it securely. Turn on the drill and allow it to twist the wires together. Once they are twisted, use electrical tape to secure the twisted portion.
Can I use this method to twist wires of any gauge?
Yes, you can use this method to twist wires of any gauge. However, keep in mind that thicker wires may require a more powerful drill to effectively twist them together.
Are there any alternative methods to twist wires without a drill?
Yes, there are alternative methods to twist wires without a drill. You can use manual wire twisting tools or simply twist the wires together by hand. However, using a drill is generally faster and more efficient.
Video:


Meet Harrison Clayton, a distinguished author and home remodeling enthusiast whose expertise in the realm of renovation is second to none. With a passion for transforming houses into inviting homes, Harrison's writing at https://thehuts-eastbourne.co.uk/ brings a breath of fresh inspiration to the world of home improvement. Whether you're looking to revamp a small corner of your abode or embark on a complete home transformation, Harrison's articles provide the essential expertise and creative flair to turn your visions into reality. So, dive into the captivating world of home remodeling with Harrison Clayton and unlock the full potential of your living space with every word he writes.


