How to Test a Drill Battery with a Multimeter

Drill batteries are an essential component of any power tool arsenal, and it’s important to make sure they are in good working condition. One way to test the health of a drill battery is by using a multimeter. A multimeter is a versatile tool that can measure voltage, current, and resistance.
In this article, we will guide you through the process of testing a drill battery with a multimeter, step by step. We will explain what readings you should expect to see on the multimeter display and how to interpret them. Additionally, we will discuss the potential causes of any abnormal readings and provide troubleshooting tips.
Testing a drill battery with a multimeter can help you determine if it needs to be charged, replaced, or if there are any underlying issues with it. By regularly testing your drill batteries, you can ensure that they are always ready for use and extend their lifespan. So, let’s get started and learn how to effectively test a drill battery with a multimeter!
Understanding the Importance of Testing a Drill Battery
A drill battery is one of the most crucial components of a power drill. Without a functioning battery, the drill won’t be able to deliver the necessary power for various tasks. Therefore, it is essential to regularly test the drill battery to ensure its efficiency and performance.
Testing a drill battery is important for several reasons:

- Determining battery health: Regular testing allows you to assess the overall condition of the battery. This includes checking its capacity, voltage, and ability to hold a charge. By understanding the health of the battery, you can identify potential issues before they impact your work.
- Identifying battery degradation: Batteries degrade over time due to usage and other factors. Through testing, you can monitor the degradation rate of the battery and plan for its replacement accordingly, ensuring that you never run out of power during a project.
- Saving time and money: With regular testing, you can detect any battery problems early on. This allows you to take necessary actions such as recharging or replacing the battery before it fails completely. By doing so, you can avoid unexpected downtime and unnecessary expenses.
- Maximizing drill performance: A well-maintained and properly functioning battery directly impacts the performance of the drill. By testing the battery, you can ensure that it provides optimal power, leading to efficient and effective drilling operations.
Testing a drill battery can be done using a multimeter, which is a handy tool for measuring voltage, current, and resistance. By following the correct testing procedure, you can accurately assess the battery’s condition and make informed decisions regarding its maintenance or replacement.
| Testing Steps | Description |
|---|---|
| Step 1 | Set the multimeter to the DC voltage mode and select the appropriate voltage range. |
| Step 2 | Connect the positive (+) lead of the multimeter to the positive terminal of the battery and the negative (-) lead to the negative terminal. |
| Step 3 | Read the voltage displayed on the multimeter. It should correspond to the rating of the battery. |
| Step 4 | If the voltage reading is significantly lower than the rating or if it fluctuates rapidly, it indicates a weak or faulty battery that needs attention. |
Remember to always follow safety precautions and manufacturer guidelines when handling batteries and using a multimeter.
In conclusion, understanding the importance of testing a drill battery is crucial for maintaining its performance, identifying potential issues, and ensuring reliable power supply for your drilling needs. Regular testing allows you to take proactive measures, saving you time, money, and unnecessary downtime in the long run.
Choosing the Right Multimeter for Battery Testing
Introduction
When it comes to testing a drill battery with a multimeter, having the right tool is crucial. The multimeter you choose should be able to accurately measure voltage, current, and resistance, among other electrical parameters. In this article, we will discuss the key factors to consider when selecting a multimeter for battery testing.
Accuracy
One of the most important factors to consider is the accuracy of the multimeter. It should be able to provide precise readings so that you can get reliable information about the condition of the battery. Look for a multimeter with a high-resolution display and a low margin of error.
Voltage Range
Since battery testing involves measuring voltage, it is essential to choose a multimeter with an appropriate voltage range. Make sure the multimeter you select can handle the voltage of the battery you are testing. It is recommended to choose a multimeter with a voltage range that exceeds the maximum voltage of the battery.
Current Range
In addition to voltage, you may also need to measure the current draw of the battery during testing. Therefore, it is important to choose a multimeter with a current range that matches the expected current draw of the battery. Some multimeters have multiple current ranges, allowing you to select the appropriate range for your testing needs.
Resistance Range
Resistance is another parameter that you may need to measure when testing a drill battery. Some multimeters come with built-in resistance measurement capabilities, while others may require additional accessories. Choose a multimeter that offers a suitable resistance range for your battery testing requirements.
Additional Features
Consider any additional features that may be useful for battery testing. For example, a multimeter with a backlight can be handy when working in low-light conditions. Other features to look for may include auto-ranging, data logging capabilities, and a hold function that freezes the display reading.
Budget
Last but not least, consider your budget when selecting a multimeter. Multimeters can vary greatly in price depending on their features and quality. Identify your needs and find a multimeter that fits within your budget while still meeting your requirements for battery testing.
Conclusion
Choosing the right multimeter for battery testing is crucial to ensure accurate and reliable results. Consider factors such as accuracy, voltage range, current range, resistance range, additional features, and your budget. By carefully evaluating these factors, you can find a multimeter that is well-suited for your battery testing needs.
Step 1: Safety Precautions
Before you begin testing a drill battery with a multimeter, it is important to take certain safety precautions to prevent accidents or injuries:
1. Wear Protective Gear
Be sure to wear the appropriate protective gear such as safety glasses and gloves to protect yourself from any potential hazards.
2. Choose a Safe Testing Area
Select a well-ventilated area with good lighting to perform the battery test. Make sure the space is clear from any flammable or explosive materials.
3. Check for Damaged Wires or Connectors
Inspect the battery’s wires and connectors for any signs of damage. If you notice frayed wires or loose connections, it is essential to repair or replace them before testing the battery.
4. Disconnect the Battery from the Drill
Prior to testing, ensure that the battery is completely disconnected from the drill. This will prevent accidental triggering of the drill during the testing process.
5. Use a Fully Charged Multimeter
Before starting the test, make sure your multimeter is fully charged or equipped with fresh batteries. A reliable multimeter is necessary for accurate readings during the battery test.
6. Follow the Manufacturer’s Guidelines
Always consult the manufacturer’s guidelines or instruction manual for your specific drill and battery models. This will provide you with important information regarding the proper testing procedure and any specific safety measures.
By following these safety precautions, you can ensure a safe and efficient process when testing a drill battery with a multimeter.
Taking Necessary Precautions Before Testing
Before testing a drill battery with a multimeter, it is important to take some necessary precautions to ensure your safety and avoid any damage to the battery or the multimeter. Follow these steps to ensure a safe testing process:
- Wear Safety Gear: Always wear appropriate safety gear, such as safety glasses and gloves, to protect yourself from any potential hazards during the testing process.
- Ensure a Safe Environment: Make sure you are working in a well-ventilated area or an open space to minimize any risk of inhaling harmful fumes or gases that may be emitted during the testing.
- Disconnect the Battery: Disconnect the drill battery from the power source and remove it from the drill before proceeding with the testing. This will prevent any accidental electrical shocks or short circuits.
- Inspect the Battery: Before testing, carefully inspect the battery for any visible damages, leaks, or signs of corrosion. If you notice any abnormalities, it is recommended to consult a professional or dispose of the battery properly.
- Check the Voltage Range: Ensure that the multimeter is set to the appropriate voltage range for testing. Using the wrong voltage range can lead to inaccurate readings or potential damage to the multimeter.
- Handle the Multimeter with Care: When handling the multimeter, avoid dropping it or subjecting it to any physical stress. Treat it with care to prevent any damage or malfunctions.
- Observe Polarity: When connecting the multimeter probes to the battery terminals, ensure that you match the positive (+) and negative (-) terminals correctly. Reversing the polarity can result in incorrect readings or damage to the multimeter.
- Follow Multimeter Instructions: Familiarize yourself with the specific instructions provided by the manufacturer of the multimeter. Different models may have different features or testing procedures, so make sure you understand how to use your particular multimeter.
- Handle the Battery with Caution: While testing the battery, handle it with caution and avoid touching the battery terminals with bare hands. Battery terminals can carry a charge and may cause electric shock or burns.
- Store the Multimeter and Battery Properly: Once you are finished testing, store the multimeter in a safe place and ensure the battery is stored in a cool and dry location away from any flammable materials.
By taking these necessary precautions, you can ensure a safe and accurate testing process for your drill battery using a multimeter.
Step 2: Setting up the Multimeter
Before you can begin testing the drill battery with a multimeter, you need to make sure the multimeter is set up correctly. Follow these steps to set up the multimeter:
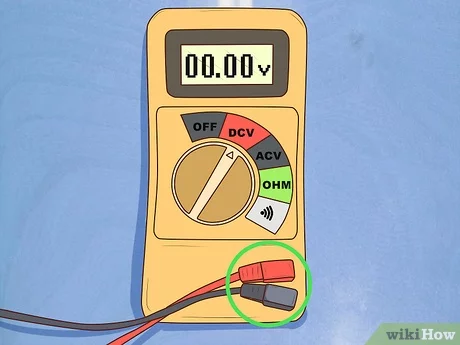
- Turn on the multimeter: Check the power switch on the multimeter and make sure it is in the “On” position. This will ensure that the multimeter is receiving power.
- Select the appropriate voltage setting: Locate the rotary dial on the multimeter that allows you to select different voltage ranges. Choose a voltage setting that is higher than the expected voltage output of the drill battery. For example, if the drill battery is expected to have an output of 12 volts, select a voltage range of 20 volts on the multimeter.
- Insert the test leads into the correct ports: The test leads are the two wires that come with the multimeter. One end of each test lead should have a metal probe, while the other end should have a banana plug. Insert the metal probe end of the black test lead into the “COM” port on the multimeter and insert the metal probe end of the red test lead into the port labeled with a voltage symbol (usually denoted by the letter “V”). This will allow the multimeter to measure the voltage of the drill battery.
- Check the multimeter display: Look at the multimeter display to make sure it is showing a reading of “0.” This indicates that the multimeter is calibrated and ready to take measurements.
Once you have set up the multimeter, you can move on to the next step in testing the drill battery.
Selecting the Proper Voltage Range
When testing a drill battery with a multimeter, it is important to select the proper voltage range on the multimeter to get an accurate reading. Using the wrong voltage range can result in incorrect readings and potential damage to the multimeter.
Before choosing the voltage range, it is essential to know the expected voltage of the drill battery. This information can usually be found in the manual or on the battery itself. Most drill batteries have a voltage rating of 12 volts or 18 volts, but it can vary depending on the model and brand.
Once you have determined the expected voltage, you can select the appropriate voltage range on the multimeter. Multimeters typically have a range selector dial or button that allows you to choose the desired voltage range. Look for a range that is higher than the expected voltage of the battery to ensure accurate readings. For example, if the drill battery is rated at 18 volts, you may want to select a voltage range of 20 volts or higher.
It is also important to consider the accuracy of the multimeter when selecting the voltage range. Some multimeters have a higher accuracy at certain ranges, so it is worth checking the specifications of your multimeter to ensure you are using the most accurate range possible.
Once you have selected the voltage range, you can proceed with testing the drill battery. Make sure to follow the proper safety precautions, such as wearing gloves and eye protection, and always handle the multimeter and battery with care.
Step 3: Testing the Battery
Once you have prepared your multimeter and set it to the appropriate voltage range, you are ready to test the drill battery. Follow these steps:
- Turn off the drill: Before testing the battery, make sure the drill is turned off and unplugged for safety.
- Locate the battery: Identify the battery compartment on the drill. Most drills have a removable cover or a sliding mechanism to access the battery.
- Remove the battery: Take out the battery from the drill, following the manufacturer’s instructions if needed. Be gentle and avoid dropping the battery to prevent any damage.
- Inspect the battery: Before testing, visually inspect the battery for any signs of physical damage or leaking. If you notice any damage, it is recommended to replace the battery instead of testing it.
- Set the multimeter: Set your multimeter to the DC voltage mode and make sure it is set to a voltage range higher than the expected voltage of the battery. For example, if you are testing a 12V battery, set the multimeter to a range higher than 12V.
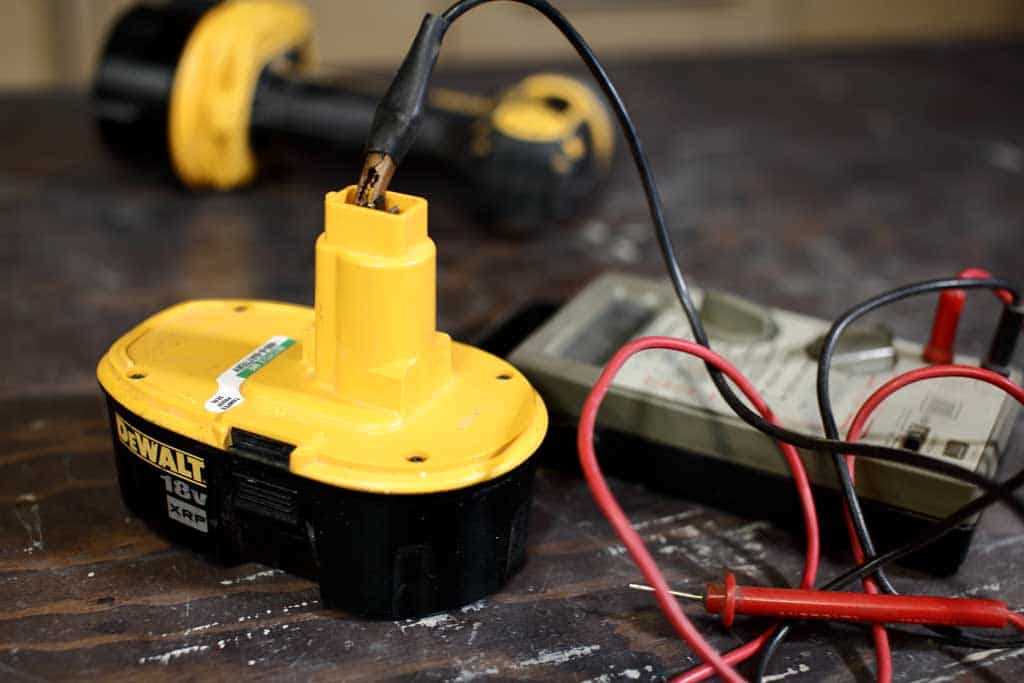
- Test the battery: With the multimeter leads, touch the positive (+) terminal of the battery with the red lead and the negative (-) terminal with the black lead. Ensure a good contact with the terminals.
- Read the voltage: The multimeter will display the voltage reading of the battery. Compare this reading with the expected voltage of the battery. If the reading is significantly lower than the expected voltage, it indicates that the battery is discharged or faulty.
- Repeat the test (optional): If you obtained a low voltage reading, you can repeat the test to confirm the results. Sometimes, a poor contact between the multimeter leads and battery terminals can affect the reading.
- Replace or recharge the battery: Depending on the test results, you can decide whether to replace the battery or recharge it. If the battery is old, damaged, or shows consistently low readings, it is recommended to replace it with a new one for optimal performance.
Testing the drill battery with a multimeter is a simple and effective way to determine if it is in a good working condition. Remember to always follow safety precautions and consult the manufacturer’s instructions for specific guidelines related to your drill and battery.
Connecting the Multimeter to the Battery
Before testing a drill battery using a multimeter, it is important to connect the multimeter correctly to the battery. Here are the steps to follow:
Step 1: Set the Multimeter
Set your multimeter to the DC voltage setting. Look for the symbol that looks like a straight line with a dotted line underneath it, representing direct current (DC).
Note: Make sure your multimeter is set to a voltage range that is equal to or higher than the voltage of the battery you are testing. For example, if you are testing a 12-volt battery, set the multimeter to a range higher than 12 volts.
Step 2: Turn Off the Drill
Before connecting the multimeter to the drill battery, ensure that the drill is turned off. This will prevent any accidental electric shock or damage to the multimeter.
Step 3: Identify the Battery Terminals
Take a closer look at the drill battery and identify the positive and negative terminals. These are typically marked with a “+” (plus) symbol for the positive terminal and a “-” (minus) symbol for the negative terminal.
Step 4: Connect the Multimeter Leads
Take the black multimeter lead (negative) and insert it into the COM (common) port of the multimeter. Then, take the red multimeter lead (positive) and insert it into the VΩmA (voltage, ohms, milliamperes) port of the multimeter.
Step 5: Connect the Multimeter Leads to the Battery
- Connect the black multimeter lead (negative) to the negative terminal of the battery. Ensure a secure connection.
- Connect the red multimeter lead (positive) to the positive terminal of the battery. Again, ensure a secure connection.
Note: It is important to connect the multimeter leads to the battery terminals correctly. Switching the leads or connecting them to the wrong terminal can result in inaccurate readings or damage to the multimeter.
Once you have successfully connected the multimeter to the battery, you can proceed to test the voltage of the drill battery using the multimeter.
Step 4: Interpreting the Results
Once you have completed the measurements using the multimeter, you will need to interpret the results to determine the state of your drill battery. The readings obtained from the multimeter can provide valuable information about the battery’s voltage and overall health.
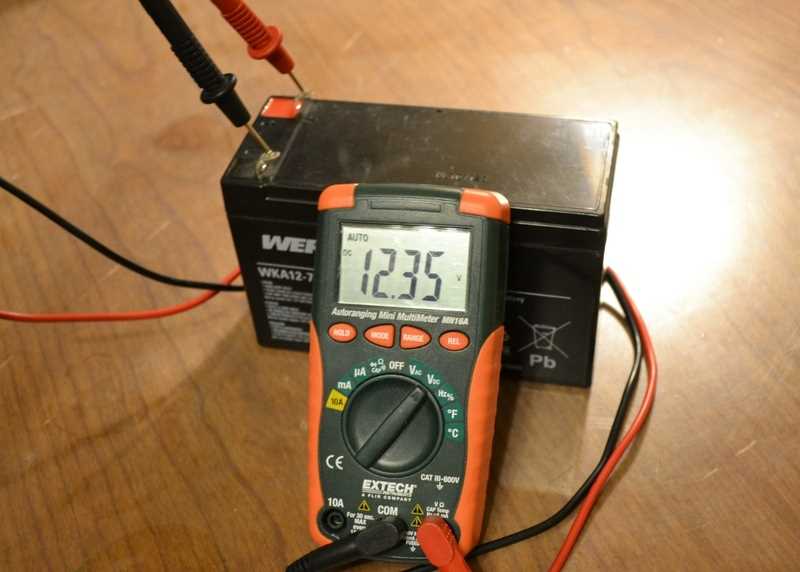
1. Voltage Reading
The most crucial piece of information you will obtain from the multimeter is the voltage reading. A fully charged drill battery should have a voltage close to its rated voltage, which is usually indicated on the battery label. For example, if your battery is rated at 18 volts, a healthy battery should read around 18 volts.
If the voltage reading is significantly lower than the rated voltage, it indicates that the battery is discharged and needs to be recharged. On the other hand, if the voltage reading is higher than the rated voltage, it could suggest that the battery is overcharged and may need to be checked or replaced.
2. Battery Health
Aside from the voltage reading, you can also assess the overall health of the drill battery based on the measurements obtained. One important parameter to check is the internal resistance of the battery. A higher internal resistance indicates that the battery is worn out and may not be able to provide the necessary power for your drill.
Another crucial factor to consider is the consistency of the voltage readings. If the voltage drops significantly when a load is applied, it suggests that the battery’s capacity has diminished, and it may need to be replaced.
3. Comparing with the Manufacturer’s Specifications
To better assess the results, it is recommended to refer to the manufacturer’s specifications for the drill battery. The manufacturer usually provides information about the acceptable voltage range and internal resistance values for a properly functioning battery.
By comparing your measurements with the manufacturer’s specifications, you can easily determine if your drill battery is still within the acceptable range or if it needs maintenance, charging, or replacement.
4. Consulting a Professional
If you are unsure about the interpretation of your multimeter readings or if you believe there might be an issue with your drill battery, it is always a good idea to consult a professional. They can provide expert advice and recommend the best course of action to ensure the longevity and optimal performance of your drill battery.
Understanding the Voltage Reading
The voltage reading on a drill battery is an important factor in determining its condition and performance. When testing a drill battery with a multimeter, the voltage reading will give you an indication of the battery’s current charge level.
The voltage rating of a drill battery is typically printed on the battery itself or can be found in the user manual. This rating represents the amount of electrical potential difference between the battery’s positive and negative terminals.
When testing a drill battery with a multimeter, the voltage reading will be displayed in volts (V) and can be read directly from the multimeter’s screen. A fully charged drill battery will typically have a voltage reading close to its rated voltage, while a depleted battery will have a significantly lower voltage reading.
It’s important to note that different types of drill batteries may have different voltage ratings. For example, lithium-ion batteries typically have a higher voltage rating compared to nickel-cadmium batteries. Therefore, it’s important to refer to the specific voltage rating for your drill battery model.
Additionally, it’s essential to understand that a lower voltage reading does not necessarily mean the battery is defective or unusable. Over time, as the battery is used and discharged, its voltage will naturally decrease. However, if the voltage reading is consistently lower than the rated voltage or drops significantly after a short period of use, it may indicate a faulty or worn-out battery.
While the voltage reading is a useful indicator of a drill battery’s charge level, it’s important to remember that it is just one factor to consider. Other factors, such as the battery’s overall capacity and ability to hold a charge, should also be taken into account when assessing the battery’s condition.
FAQ:
Why is it important to test a drill battery with a multimeter?
Testing a drill battery with a multimeter is important because it allows you to determine the battery’s voltage and overall health. This information is crucial in determining whether the battery needs to be replaced or if it simply needs to be charged.
How do I test a drill battery with a multimeter?
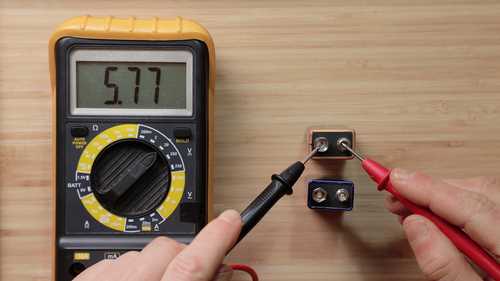
To test a drill battery with a multimeter, first set the multimeter to the DC voltage setting. Then, connect the positive and negative leads of the multimeter to the corresponding positive and negative terminals on the battery. The multimeter will display the voltage of the battery, indicating its current charge level.
What should the voltage of a fully charged drill battery read on a multimeter?
The voltage of a fully charged drill battery should read slightly higher than its nominal voltage. For example, if the battery’s nominal voltage is 18 volts, a fully charged battery should read around 20 volts on a multimeter.
What does it mean if a drill battery reads a lower voltage than its nominal voltage on a multimeter?
If a drill battery reads a lower voltage than its nominal voltage on a multimeter, it likely means that the battery is not fully charged. In this case, the battery may need to be recharged before using it in a drill.
Can a drill battery be tested with a multimeter while it is still in the drill?
Yes, a drill battery can be tested with a multimeter while it is still in the drill. However, it may be easier to remove the battery and test it separately to get accurate readings without any interference from the drill’s electrical system.
What are some common signs that a drill battery needs to be tested with a multimeter?
Some common signs that a drill battery needs to be tested with a multimeter include diminished performance, shorter run time, and difficulty holding a charge. If you notice any of these signs, testing the battery with a multimeter can help determine if it needs to be replaced or simply recharged.
Is it possible to test a drill battery with a multimeter if the battery is completely dead?
If a drill battery is completely dead, it may not be possible to test it with a multimeter since there may not be any voltage left in the battery. In this case, the battery will need to be charged before it can be accurately tested with a multimeter.
Video:


Meet Harrison Clayton, a distinguished author and home remodeling enthusiast whose expertise in the realm of renovation is second to none. With a passion for transforming houses into inviting homes, Harrison's writing at https://thehuts-eastbourne.co.uk/ brings a breath of fresh inspiration to the world of home improvement. Whether you're looking to revamp a small corner of your abode or embark on a complete home transformation, Harrison's articles provide the essential expertise and creative flair to turn your visions into reality. So, dive into the captivating world of home remodeling with Harrison Clayton and unlock the full potential of your living space with every word he writes.


