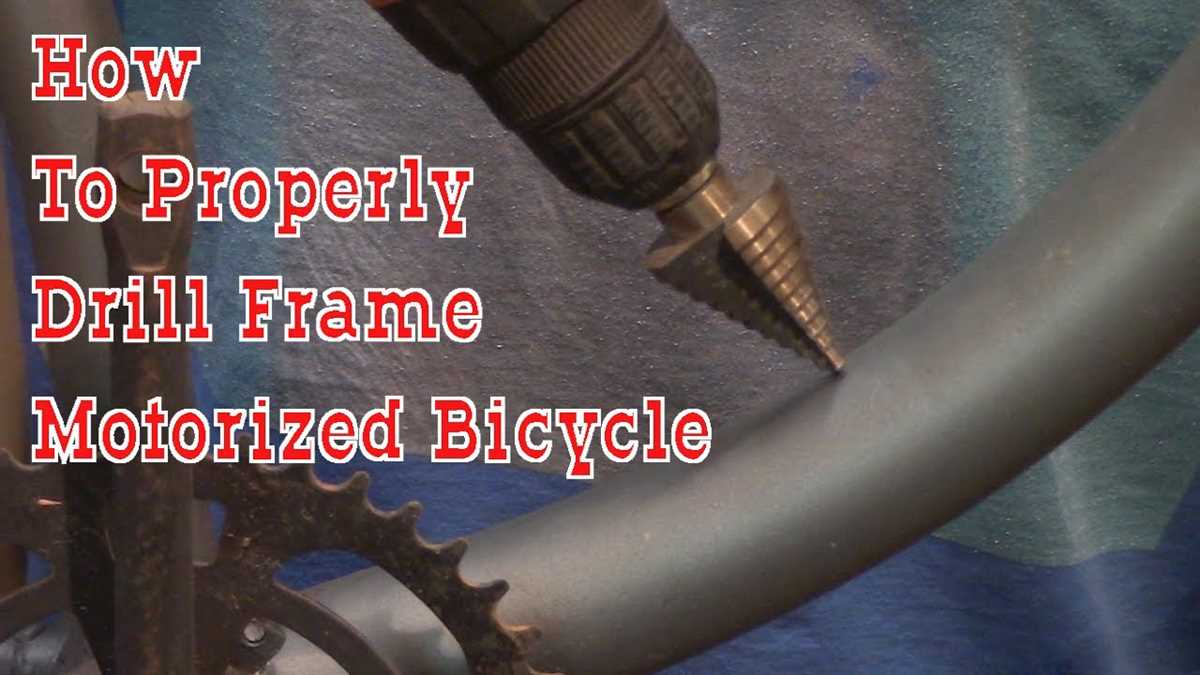
How to Start a Motorized Bicycle with a Drill: A Simple Guide

If you’re an avid cyclist or just looking for a fun and efficient way to commute, a motorized bicycle can be a great option. However, starting these bikes can sometimes be a hassle, especially if you don’t have much strength or are dealing with a faulty engine. Thankfully, there’s a simple solution: using a drill. In this guide, we’ll walk you through the steps of starting a motorized bicycle with a drill, making your life easier and your ride more enjoyable.
Before we dive into the process, let’s talk about why using a drill can be beneficial. Starting a motorized bicycle typically involves a pull-start mechanism, which requires you to yank a cord to get the engine going. This can be cumbersome, particularly if you have limited upper body strength or if the engine is acting up. By using a drill, you can easily and quickly rotate the engine, effectively mimicking the motion of a pull-start.
Now that you understand the benefits, let’s get into the step-by-step process. First, make sure your motorized bicycle is in a secure and stable position. It’s important to have a firm grip on the bike to prevent any accidents or injuries. Next, locate the drive sprocket, which is typically found on the side of the engine. This is the part that connects the drill to the engine.
Pro tip: If your motorized bicycle doesn’t have a designated drive sprocket, you can create one by attaching a sprocket to the crankshaft using a sprocket adapter.
Once you’ve located the drive sprocket, find a drill with an adjustable chuck that can accommodate the size of the sprocket. Attach the drill to the sprocket, making sure it’s securely fastened. Ensure that the drill is set to rotate in the clockwise direction, as this is the same motion as a pull-start.
With everything properly set up, gently squeeze the drill trigger to start the engine. Be careful not to apply too much pressure, as this could damage the bike or cause the drill to slip. If all goes well, the engine should start humming and you’ll be ready to hit the road!

In conclusion, using a drill to start a motorized bicycle is a simple and convenient alternative to a traditional pull-start. By following the steps outlined in this guide, you can easily get your bike up and running, ensuring a smooth and enjoyable ride. So grab your drill and get ready to kickstart your motorized biking adventures!
What is a Motorized Bicycle?
A motorized bicycle, also known as a motorbike, motor-driven cycle, or a moto-cycle, is a bicycle that is powered by a motor. It combines the two-wheeled nature of a bicycle with the added power and speed of an engine. Motorized bicycles are a popular mode of transportation in many parts of the world, especially in urban areas where traffic congestion is a problem.
In general, a motorized bicycle consists of a regular bicycle frame with modifications to accommodate a motor and other necessary components. The motor is usually located either on the front or rear wheel, and it provides power to propel the bicycle forward. Some motorized bicycles use electric motors, while others use internal combustion engines.
Motorized bicycles offer several advantages over traditional bicycles and motorcycles. They are more fuel-efficient than motorcycles, making them a cost-effective option for daily commuting. They are also more environmentally friendly, as they produce fewer emissions compared to motorcycles and cars.
Furthermore, motorized bicycles are easier to maneuver in traffic and can be parked in smaller spaces, making them ideal for navigating busy city streets. They also require less maintenance compared to motorcycles, and their lower speeds make them safer and more suitable for novice riders.

Motorized bicycles come in a variety of designs and sizes, ranging from small, lightweight models to larger, more powerful ones. They are available in both off-road and on-road versions, with features such as suspension systems, headlights, taillights, and braking systems. Some motorized bicycles are even equipped with additional accessories like baskets, racks, and mirrors for added convenience.
Overall, motorized bicycles provide an alternative mode of transportation that offers convenience, efficiency, and environmental benefits. With the right modifications and safety precautions, motorized bicycles can be a fun and practical way to get around town.
Why Use a Drill to Start a Motorized Bicycle?
Starting a motorized bicycle can sometimes be a challenging and tiring task, especially if you have to pedal with all your strength to get the engine running. Using a drill to start a motorized bicycle can make the process much easier and more convenient. Here are some reasons why you should consider using a drill to start your motorized bicycle:
- Efficiency: Using a drill allows you to start your motorized bicycle quickly and effortlessly. You no longer have to spend excessive energy pedaling to get the engine running.
- Convenience: With a drill, you can start your motorized bicycle with just the push of a button. This eliminates the need for physically exerting yourself and gives you the freedom to start your bike with ease.
- Reduced Strain: Starting a motorized bicycle by pedaling can cause strain and fatigue, especially if you have a larger engine or if you are starting the bike multiple times. Using a drill eliminates this strain and makes starting your motorized bicycle a more comfortable experience.
- Compatibility: Most motorized bicycles can be easily modified to be started with a drill. There are various kits available in the market that provide the necessary components to convert your motorized bicycle for drill start.
Overall, using a drill to start a motorized bicycle offers numerous benefits in terms of efficiency, convenience, and reduced strain. It can greatly enhance your experience of owning and operating a motorized bicycle, making it a worthwhile investment for any enthusiast.
Preparation
Before you can start your motorized bicycle with a drill, there are a few important steps you need to take to prepare.

1. Gather Tools and Equipment
Make sure you have all the necessary tools and equipment before you begin. This includes a drill with a compatible socket, fuel, oil, a spark plug socket, and any additional tools required for your specific motorized bicycle.
2. Check Fuel and Oil Levels
Next, check the fuel and oil levels of your motorized bicycle. Make sure the fuel tank is filled with the appropriate fuel mixture and the oil reservoir is filled to the recommended level.
3. Inspect the Spark Plug
Inspect the spark plug to ensure it is in good condition. If it appears worn or damaged, replace it with a new one before attempting to start the motorized bicycle.
4. Inspect the Battery
If your motorized bicycle has a battery, inspect it to ensure it is properly charged and connected. If necessary, charge the battery or replace it with a new one.
5. Secure the Bicycle
Before attempting to start the motorized bicycle, make sure it is securely parked or placed on a stable surface. This will prevent any accidents or injuries while starting the bike with a drill.

6. Familiarize Yourself with the Drill Attachment
If you haven’t used a drill to start a motorized bicycle before, take some time to familiarize yourself with the drill attachment. Understand how it functions and how to safely use it to start the engine.
7. Follow Safety Precautions
Always prioritize safety when working with motorized bicycles and power tools. Wear appropriate protective gear, such as gloves and safety glasses, and follow all safety precautions outlined in the user manuals of your motorized bicycle and drill.
Gather the Necessary Tools
- A motorized bicycle kit
- A bicycle frame
- A drill with a socket attachment
- Wrenches
- Screwdrivers
- Pliers
- Allen wrenches
- Adjustable wrench
- Hammer
- Measuring tape
- Tire pump
- Gasoline can
- Oil
Motorized Bicycle Kit
The motorized bicycle kit contains all the necessary components to convert a regular bicycle into a motorized one. It usually includes an engine, mounting brackets, fuel tank, throttle, chain, and other necessary parts.
Bicycle Frame
You will need a bicycle frame to attach the motor and other components. Make sure the frame is compatible with the motorized bicycle kit you have chosen.
Drill with Socket Attachment
A drill with a socket attachment will be used to tighten the bolts and screws on the motor and other parts of the motorized bicycle.

Wrenches, Screwdrivers, and Pliers
These basic hand tools are essential for assembling and adjusting the motorized bicycle. Different sizes of wrenches and screwdrivers may be needed to fit the various bolts and screws.
Allen Wrenches
Allen wrenches, also known as hex keys, are used to tighten screws and bolts with hexagonal heads. The motorized bicycle kit may include specific sizes of Allen wrenches required for the assembly.
Adjustable Wrench
An adjustable wrench is useful for adjusting bolts and nuts of different sizes. It can be adjusted to fit various diameters, saving you from carrying multiple wrenches of different sizes.
Hammer
A hammer may be needed to tap parts into place or loosen stuck components during the assembly process.
Measuring Tape
A measuring tape can be useful for measuring distances and making accurate adjustments during the assembly process.
Tire Pump
A tire pump is necessary to maintain proper tire pressure and ensure a smooth and safe ride.
Gasoline Can and Oil
You will need a gasoline can to fuel the motor, and oil to lubricate the engine components. Make sure to use the recommended type of gasoline and oil specified in the motorized bicycle kit’s instructions.
Inspect and Prepare the Bike
Before starting your motorized bicycle with a drill, it is important to inspect and prepare the bike properly. This will ensure that the bike is safe to use and will help prevent any accidents or damage.
1. Check the bike frame
Inspect the bike frame for any cracks, damage, or rust. A sturdy and reliable frame is essential for a motorized bicycle. If you notice any issues with the frame, it is recommended to have it repaired or replaced before proceeding.
2. Inspect the wheels and tires
Check the wheels and tires for any signs of wear and tear. Look for any bald spots, cuts, or punctures on the tires. Ensure that the wheels are securely attached to the bike and spin freely. If you notice any issues, replace the tires or have them repaired.
3. Check the brakes
Make sure that the brakes are in good working condition. Squeeze the brake levers and ensure that the brakes engage and release smoothly. Test the brakes by moving the bike forward and backward while applying the brakes. If the brakes feel weak or don’t engage properly, have them adjusted or replaced.
4. Inspect the chain and drivetrain
Check the chain for any signs of rust, damage, or loose links. Make sure that the chain is properly lubricated. Inspect the gears and derailleurs for any bent or broken components. Ensure that the drivetrain is clean and properly adjusted.
5. Verify the fuel tank and fuel lines
If your motorized bicycle is fuel-powered, check the fuel tank for any leaks or cracks. Inspect the fuel lines for any signs of damage or wear. Ensure that the fuel tank is securely fastened to the bike and the fuel lines are properly connected.
6. Secure loose parts
Tighten any loose bolts, screws, or other parts on the bike. This includes the handlebars, seat, pedals, and any other components. Loose parts can lead to instability and accidents while riding, so it’s important to make sure everything is securely fastened.
7. Wear safety gear
Before starting your motorized bicycle, always wear appropriate safety gear. This includes a helmet, gloves, and any other protective equipment you deem necessary. Safety should always be a priority when riding any type of bicycle.
By inspecting and preparing your bike properly, you can ensure a safe and enjoyable motorized bicycle experience. Take the time to address any issues or concerns before using the drill to start your motorized bicycle.
Procedure
1. Gather the necessary tools and materials
Before you start, make sure you have all the required tools and materials for the procedure. These may include:
- A motorized bicycle
- A drill with a compatible attachment
- A set of wrenches or socket wrenches
- A small container of fuel
- A fully charged drill battery
2. Prepare the motorized bicycle
Make sure the motorized bicycle is in a stable position and the engine is turned off. Check the fuel level and make sure there is enough fuel in the tank for the starting procedure.
3. Attach the drill to the motorized bicycle
Depending on the design of your motorized bicycle and the type of drill attachment you have, you will need to find a suitable point of attachment. This is typically a place where you can securely connect the drill to the bicycle to transfer power to the engine.
4. Start the motorized bicycle using the drill
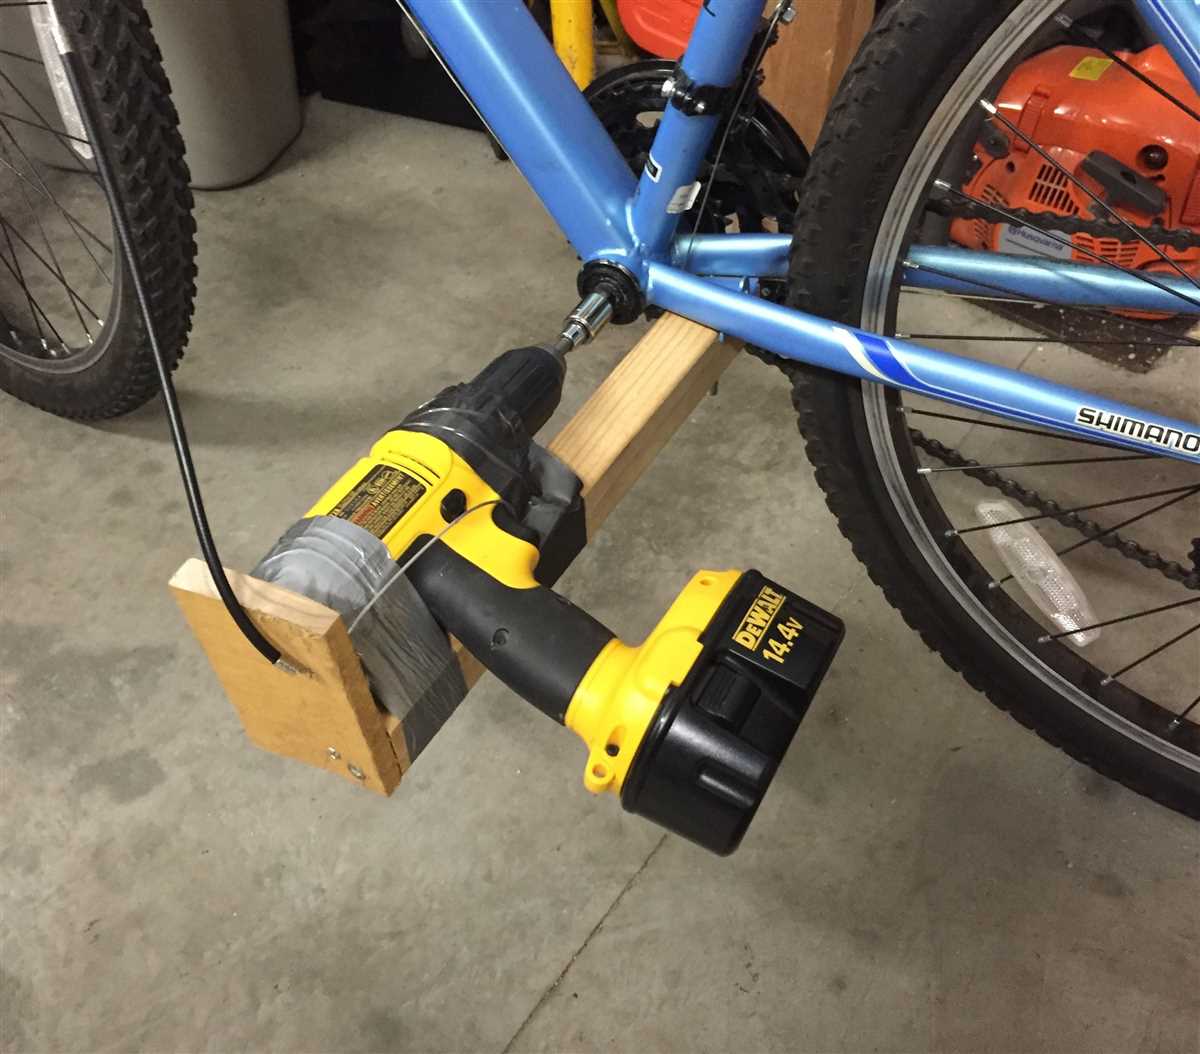
Once the drill is securely attached, turn on the drill and slowly apply pressure to the trigger to start the engine. The drill will transfer power to the engine and help start it.
5. Monitor the engine
Keep an eye on the motorized bicycle’s engine as it starts. Listen for any unusual sounds and make sure everything is running smoothly. If there are any issues, turn off the engine immediately and address the problem before attempting to start it again.
6. Disconnect the drill
Once the engine has started successfully, disconnect the drill from the motorized bicycle. Make sure to detach it properly and safely to avoid any accidents.
7. Test the motorized bicycle
After starting the engine with the drill, take the motorized bicycle for a test ride to ensure everything is functioning correctly. Pay attention to the engine performance, brakes, and overall handling.
8. Maintain the motorized bicycle
Regularly maintain and service your motorized bicycle to keep it in good working condition. This includes checking the fuel level, oil level, and addressing any issues or repairs promptly.
| Tool | Image |
|---|---|
| Motorized Bicycle |  |
| Drill |  |
| Wrenches and Socket Wrenches |  |
| Fuel Container |  |
| Drill Battery |  |
Attach the Drill
Once you have gathered all the necessary materials, it’s time to attach the drill to your motorized bicycle. Follow these steps:
- Position the drill in a way that allows you to easily access the throttle control.
- Make sure the drill’s chuck is securely tightened.
- Place the drill in a stable position, such as attaching it to a workbench or using clamps to secure it to a support structure.
- Ensure the drill is positioned in a way that won’t interfere with the operation of the bicycle.
Attaching the drill securely is important to avoid accidents and ensure proper functionality. Take your time to ensure the drill is positioned correctly and securely fastened.
Engage the Engine
Now that you have the motorized bicycle set up and ready to go, it’s time to engage the engine. This is the crucial step that will kickstart your ride.
Before engaging the engine, make sure that the clutch is disengaged. You can do this by pulling on the clutch lever located on the handlebars. The clutch lever is typically on the left side, opposite the throttle.
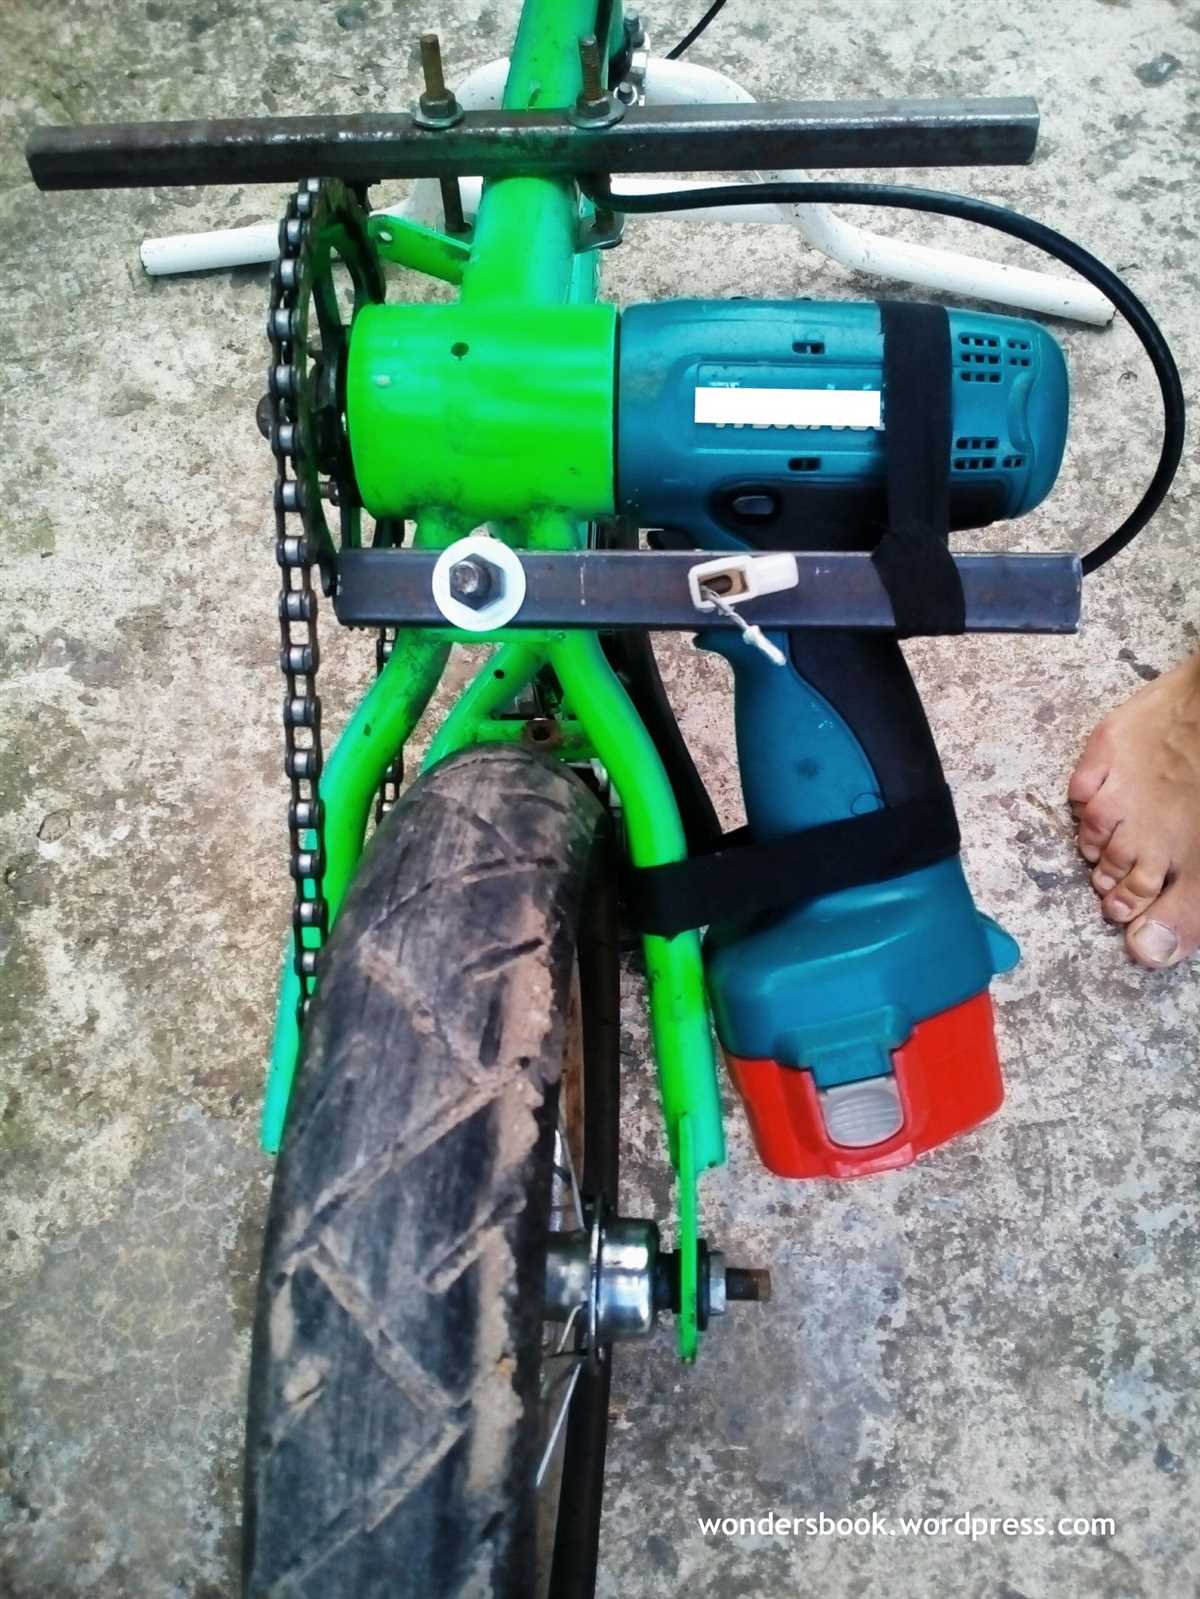
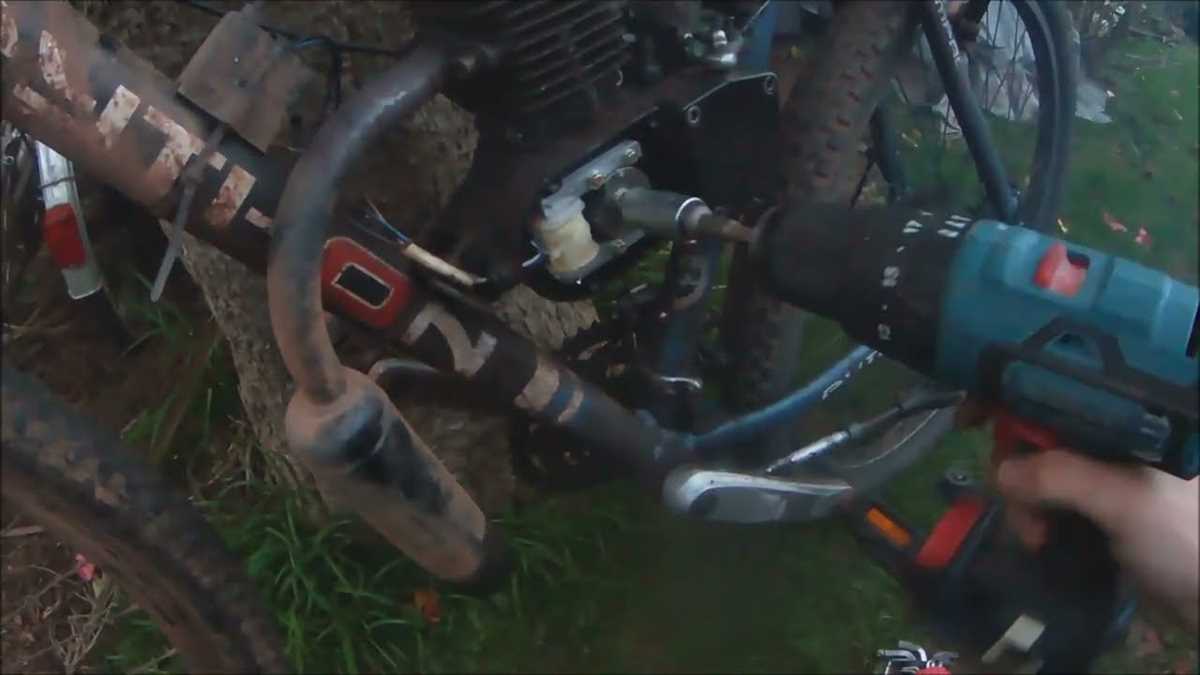
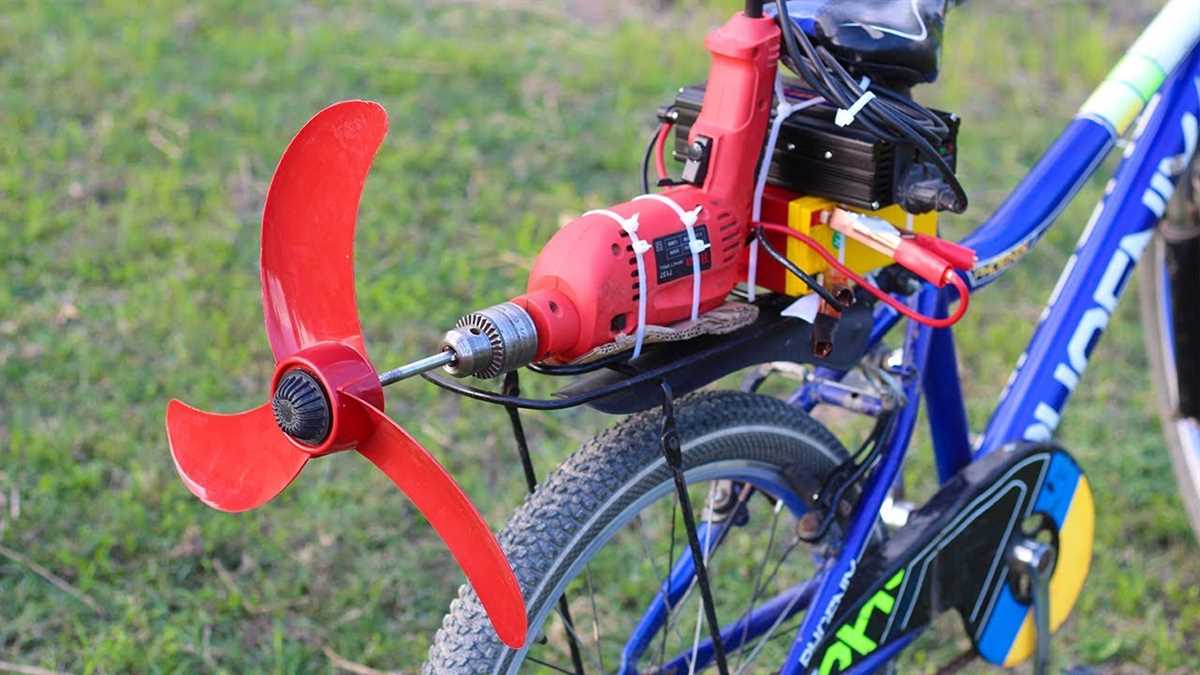
Once the clutch is disengaged, you can start the engine by using a drill. Take a power drill and attach it to the rear sprocket of the motorized bicycle. Make sure that the drill is securely attached and won’t come loose during the starting process.
With the drill attached, turn it on to the forward position. This will start spinning the rear sprocket, which in turn will engage the engine and start the motorized bicycle. Keep holding the clutch lever until the engine has fully started.
Once the engine is running, release the clutch lever slowly to allow the engine power to transfer to the rear wheel. At this point, you can let go of the drill and turn it off. You should now be ready to start riding your motorized bicycle.
It’s important to note that engaging the engine with a drill should only be done when necessary. It’s recommended to use the regular starting method, which involves pedaling and releasing the clutch, whenever possible. Using a drill may be necessary in some situations, such as when the bike’s pedals are not working or if there’s a problem with the starting mechanism.
Start pedaling
Once the motor is engaged with the drill, it’s time to start pedaling. Pedaling is to be done as you would on a regular bicycle to activate the motor. Here are the steps to follow:
- Position yourself on the bicycle seat and get a firm grip on the handlebars.
- Begin pedaling with a smooth and steady motion. Make sure your feet are securely placed on the pedals.
- As you pedal, you should start to feel the motor assisting you with the movement.
- Continue pedaling until you reach the desired speed or until the motor takes over completely.
It’s important to note that you should always maintain control of the bicycle while pedaling. Keep both hands on the handlebars and be aware of your surroundings. Practice pedaling with the motorized bicycle in a safe and open area before taking it out on busy roads or crowded areas.
Troubleshooting
No Spark when Trying to Start the Motorized Bicycle
- Check the spark plug connection and make sure it is securely attached.
- Inspect the spark plug for any signs of damage or wear. Replace if necessary.
- Confirm that the kill switch is not engaged or stuck in the off position.
- Check the ignition coil for any signs of damage or corrosion. Clean or replace if necessary.
- Ensure that the magneto is properly aligned and not damaged.
Engine Turns Over but Does Not Start
- Check for sufficient fuel in the gas tank.
- Inspect the fuel line for any blockages or leaks. Clear or replace if necessary.
- Confirm that the fuel valve is open and allowing fuel to flow into the carburetor.
- Clean or replace the carburetor if it is clogged or not functioning properly.
- Check the air filter for any dirt or debris. Clean or replace if necessary.
Engine Starts but Shuts Off Immediately
- Check for any loose or disconnected wires in the electrical system.
- Inspect the fuel filter for any blockages. Replace if necessary.
- Adjust the idle screw on the carburetor to ensure proper idle speed.
- Make sure the throttle cable is properly adjusted and not binding.
- Verify that the spark plug gap is set correctly.
Engine Runs Roughly or Misfires
- Check the spark plug for any fouling or carbon buildup. Clean or replace if necessary.
- Inspect the ignition timing and adjust if necessary.
- Clean or replace the fuel jets in the carburetor if they are clogged.
- Verify that the fuel mixture is properly adjusted.
- Check for any vacuum leaks in the intake manifold or carburetor gaskets.
Excessive Vibration or Unusual Noises
- Inspect the engine mounts for any signs of wear or damage. Replace if necessary.
- Check for any loose or damaged exhaust components. Tighten or replace if necessary.
- Inspect the chain tension and alignment. Adjust if necessary.
- Check the clutch assembly for any signs of wear or damage. Replace if necessary.
- Inspect the flywheel and crankshaft for any damage. Replace if necessary.
Loss of Power or Poor Performance
- Check the spark plug for any fouling or carbon buildup. Clean or replace if necessary.
- Clean or replace the air filter if it is dirty or clogged.
- Inspect the exhaust system for any blockages or restrictions.
- Verify that the fuel mixture is properly adjusted.
- Check the compression of the engine using a compression tester. Low compression may indicate a worn piston or cylinder.
FAQ:
Why would I want to start a motorized bicycle with a drill?
Starting a motorized bicycle with a drill can be a convenient option, especially if you have difficulty kick-starting it. Using a drill allows you to effortlessly start the engine without the physical effort required for a kick-start.
What kind of drill do I need to start a motorized bicycle?
You will need a drill with a minimum of 12 volts and a chuck that can securely hold a 1/2-inch socket. It is recommended to use a cordless drill with a fully charged battery for ease of use.
What steps do I need to follow to start a motorized bicycle with a drill?
First, make sure the bicycle is in a stable position and the engine is in neutral. Attach a 1/2-inch socket to the chuck of your drill. Insert the socket onto the spark plug and turn it clockwise to unthread and remove the spark plug. Connect the drill to the spark plug socket and slowly rotate the crankshaft in a clockwise direction until you feel resistance. Once you feel resistance, stop rotating and slowly release the drill trigger. This should start the engine.
Are there any risks involved in starting a motorized bicycle with a drill?
While starting a motorized bicycle with a drill is generally safe, it is important to take necessary precautions. Ensure that the drill is securely attached to the spark plug socket and that the bicycle is in a stable position. Be cautious of your surroundings and keep your hands and other body parts away from any moving parts. It is also recommended to wear appropriate safety gear such as goggles and gloves.
Can I start a motorized bicycle with a drill if the engine is cold?
Yes, you can start a motorized bicycle with a drill even if the engine is cold. Follow the same steps mentioned earlier to start the engine, regardless of its temperature. However, keep in mind that a cold engine may require a bit more effort from the drill to start compared to a warm engine.
Video:


Meet Harrison Clayton, a distinguished author and home remodeling enthusiast whose expertise in the realm of renovation is second to none. With a passion for transforming houses into inviting homes, Harrison's writing at https://thehuts-eastbourne.co.uk/ brings a breath of fresh inspiration to the world of home improvement. Whether you're looking to revamp a small corner of your abode or embark on a complete home transformation, Harrison's articles provide the essential expertise and creative flair to turn your visions into reality. So, dive into the captivating world of home remodeling with Harrison Clayton and unlock the full potential of your living space with every word he writes.


