How to Sharpen a Drill Bit: Tips and Techniques

Drill bits are essential tools for any DIY enthusiast or professional tradesperson. Over time, however, drill bits can become dull and less effective, causing frustration and delays in your projects. But fear not! Sharpening your drill bits is easier than you may think, and can save you both time and money in the long run.
There are several techniques you can use to sharpen your drill bits, depending on the type of bit and your level of expertise. One common method is to use a bench grinder. This powerful tool allows you to quickly remove the dull edges from your drill bits, restoring their sharpness. However, it’s important to use caution when using a bench grinder, as it can be easy to overheat and damage the bit if you’re not careful.

If you don’t have access to a bench grinder, don’t worry! There are alternative methods you can use to sharpen your drill bits. For example, you can use a sharpening stone or diamond file to manually sharpen the edges of the bit. This method requires a bit more patience and precision, but can still yield excellent results.
Whether you’re a seasoned professional or a DIY novice, knowing how to sharpen your drill bits is a valuable skill that can extend the lifespan of your tools and improve the quality of your work. So grab your dull drill bits, follow these tips and techniques, and get ready to tackle your next project with precision and ease!
The Importance of Sharpening Drill Bits
Sharpening drill bits is a crucial maintenance task that is often overlooked by many DIY enthusiasts and professionals alike. However, it is important to understand the significance of keeping your drill bits sharp in order to achieve optimal drilling results.

1. Improved Performance
When a drill bit is dull, it struggles to cut through material efficiently. This results in slower drilling speeds and increased heat build-up. By regularly sharpening your drill bits, you can restore their cutting edges and ensure smooth and effortless drilling.
2. Extended Lifespan
Sharp drill bits have a longer lifespan compared to dull ones. Dull bits are more prone to breaking or chipping, especially when used on hard materials. Regularly sharpening your drill bits can help to maintain their structural integrity and prevent unnecessary breakage.
3. Cost Savings
Investing in good quality drill bits can be expensive, and constantly replacing dull ones can add up over time. By sharpening your drill bits, you can extend their usability and save money in the long run.
4. Accurate Drilling
Sharp drill bits provide cleaner and more precise holes compared to dull ones. This is especially important when working on delicate projects or when accuracy is paramount. Sharpened drill bits ensure that you can achieve the desired hole size and minimize the risk of damaging the material.
5. Versatility
Properly sharpened drill bits can be used across a variety of materials, such as wood, metal, and plastic. Dull drill bits, on the other hand, may struggle to cut through certain materials or result in rough and messy holes. By sharpening your drill bits, you enhance their versatility and ensure their effectiveness on different materials.

6. Safety
Dull drill bits can cause the drill to slip or get stuck while drilling, increasing the risk of accidents and injuries. By keeping your drill bits sharp, you can reduce the chances of experiencing any mishaps during your drilling projects.
| Benefits of Sharpening Drill Bits |
|---|
| Improved performance |
| Extended lifespan |
| Cost savings |
| Accurate drilling |
| Versatility |
| Safety |
Benefits of Sharpening Drill Bits
Regularly sharpening your drill bits can provide several benefits:
-
Improved performance: Sharpened drill bits have a sharper cutting edge, allowing them to more easily penetrate materials and create clean holes. This can result in faster and more efficient drilling, saving you time and effort.
-
Extended bit lifespan: Dull drill bits can cause excessive heat buildup and wear down quickly. By sharpening your drill bits, you can prolong their lifespan and avoid the need for frequent replacements. This can ultimately save you money in the long run.
-
Better control and precision: Sharpened drill bits provide greater control and precision while drilling. They are less likely to wander or create off-center holes, allowing for more accurate and professional results.
-
Reduced risk of accidents: Dull drill bits can slip or catch on materials, leading to accidents or injuries. Sharpened drill bits reduce the risk of these incidents, providing a safer drilling experience.
-
Versatility: Sharpening your drill bits ensures that you have a reliable set of tools for various drilling tasks. Whether you’re working with wood, metal, or other materials, sharpened drill bits can handle the job with ease.
Overall, taking the time to sharpen your drill bits is a worthwhile investment that can greatly enhance your drilling experience and yield better results. It is a simple yet effective way to maintain your tools and achieve optimal performance.
Tools and Materials
Sharpening a drill bit requires a few key tools and materials. Before you begin, make sure you have the following:

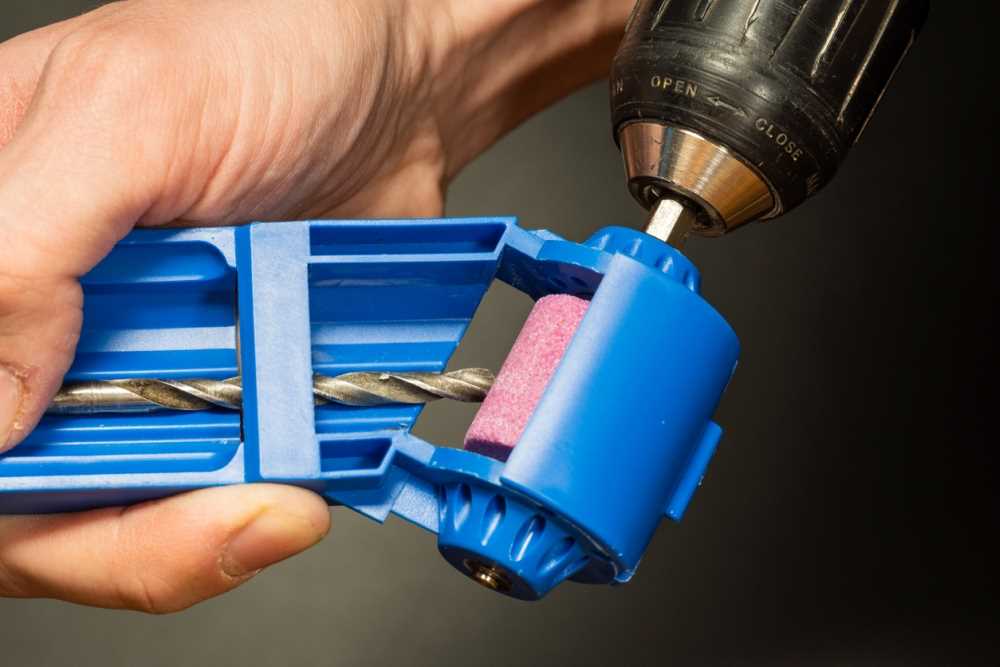
- Drill bit sharpening jig: A jig is a specialized tool designed to hold the drill bit securely in place while you sharpen it. It helps maintain consistency and accuracy during the sharpening process.
- Bench grinder: A bench grinder is a power tool that features a grinding wheel. It allows you to remove the material from the drill bit’s cutting edges, restoring their sharpness.
- Protective gear: Safety should always be a priority when using power tools. Wear safety glasses or goggles to protect your eyes from sparks and debris. Consider wearing a dust mask to avoid inhaling any fine particles.
- Sharpening stones: In addition to a bench grinder, you may also need sharpening stones to refine and hone the cutting edges of the drill bit. Different grits of stones can be used to achieve the desired level of sharpness.
- Drill bit gauge: A drill bit gauge is a handy tool that allows you to measure the angle of the cutting edges on your drill bit. It helps ensure that the angles are consistent and accurate after sharpening.
- Lubricant: Using a lubricant while sharpening your drill bit can help reduce heat and friction, resulting in a smoother sharpening process. You can use a specialized cutting fluid or simply use a little bit of oil, such as light machine oil or honing oil.
Having these tools and materials on hand will make the drill bit sharpening process easier and more effective. Make sure to gather everything before you begin, and always work in a well-ventilated area with proper safety precautions.
Essential Tools for Sharpening Drill Bits
1. Bench Grinder
A bench grinder is a versatile tool that can be used for various sharpening tasks, including sharpening drill bits. It consists of a motor with a grinding wheel that spins at high speeds. This makes it ideal for removing material from the drill bit and shaping it to a sharp point.
2. Drill Bit Sharpening Jig
A drill bit sharpening jig is a tool that helps you maintain a consistent angle when sharpening your drill bits. It typically consists of a platform or base to hold the drill bit, along with guides or clamps to keep it stable. This ensures that you achieve a precise and even edge on your drill bits.
3. Diamond Files or Sharpening Stones
Diamond files or sharpening stones are abrasive tools used to sharpen drill bits. They come in different shapes and grits, allowing you to effectively remove material and shape the cutting edges of the drill bit. Diamond files are known for their durability and efficiency, making them a popular choice for sharpening drill bits.
4. Honing Guide

A honing guide is a tool used to hold the drill bit during the sharpening process. It helps maintain a consistent angle and ensures that the cutting edges are properly aligned. A honing guide is especially useful when using diamond files or sharpening stones to sharpen drill bits.
5. Safety Equipment
When sharpening drill bits, it’s important to prioritize safety. Make sure to wear safety goggles or glasses to protect your eyes from flying debris. Additionally, wearing gloves can provide extra protection and help prevent any injuries.
6. Cleaning Brush
A cleaning brush is essential for removing any metal shavings or debris that may accumulate during the sharpening process. This helps ensure that your drill bits are clean and ready for use.
In conclusion, having the right tools is crucial for sharpening drill bits effectively. A bench grinder, drill bit sharpening jig, diamond files or sharpening stones, honing guide, safety equipment, and a cleaning brush are essential tools to have in your arsenal. With these tools, you can maintain the sharpness and performance of your drill bits, resulting in better drilling efficiency and longer tool life.
Materials Needed for Sharpening Drill Bits
Sharpening drill bits can help extend their lifespan and improve their cutting performance. To sharpen drill bits, you will need a few essential materials. Here are the materials you will need:
1. Bench Grinder
A bench grinder is a powerful tool that is used to sharpen drill bits. It consists of a motor and two grinding wheels, typically made of aluminum oxide or silicon carbide. The bench grinder provides a reliable and efficient way to sharpen the drill bits.
2. Eye Protection
When sharpening drill bits, it is important to protect your eyes from sparks and flying debris. Safety glasses or goggles should be worn to ensure your eyes are shielded from any potential hazards.
3. Drill Bit Gauge
A drill bit gauge is a handy tool that helps you determine the correct angle for sharpening the drill bit. It allows you to measure the angle of the cutting edge and ensure that you are sharpening it at the right angle.
4. Honing Oil
Honing oil is used to lubricate the grinding wheels and prevent them from overheating during the sharpening process. It also helps in achieving a smoother and more precise sharpening results. It is recommended to use a high-quality honing oil for optimal performance.
5. Vise
A vise is a tool that holds the drill bit securely in place while you sharpen it. It provides stability and prevents the drill bit from moving or vibrating during the sharpening process. You can attach the vise to a workbench or any other suitable surface.
6. Cleaning Brush
After sharpening the drill bits, it is important to clean them properly. A cleaning brush, such as a wire brush, can be used to remove any debris or metal shavings from the drill bits. It helps maintain the sharpness and cleanliness of the drill bits.
7. Safety Gloves
Wearing safety gloves is essential to protect your hands from any potential injuries or cuts during the sharpening process. It is recommended to use durable and heat-resistant gloves that provide a good grip on the drill bits and prevent any accidents.
These are the essential materials needed for sharpening drill bits. By having these materials ready, you can effectively sharpen your drill bits and ensure they are in optimal cutting condition.
Sharpening Techniques
1. Manual Sharpening
To manually sharpen a drill bit, follow these steps:
- Secure the drill bit in a vise or clamp.
- Use a bench grinder or file to remove any burrs or rough edges from the bit.
- Hold the drill bit at a 60-degree angle to the grinding wheel.
- Rotate the bit in a clockwise motion while applying light pressure against the grinding wheel.
- Continue sharpening until the cutting edges are sharp and uniform.
- Remove the bit from the vise and test its sharpness by drilling into a piece of scrap material.
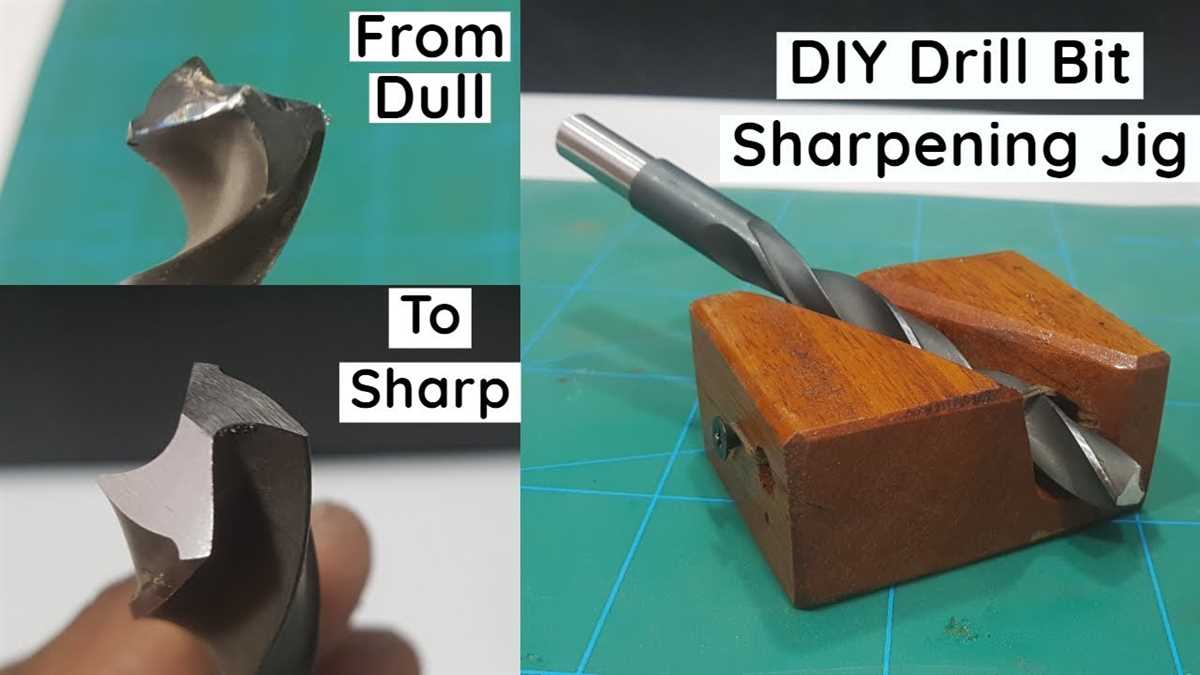
2. Drill Bit Sharpening Jigs
If you prefer a more precise and consistent sharpening method, you can use a drill bit sharpening jig. These jigs are designed to hold the drill bit at the correct angle and ensure an accurate sharpening. Here’s how to use a sharpening jig:
- Attach the jig to your bench grinder or sharpening system.
- Secure the drill bit in the jig according to the manufacturer’s instructions.
- Adjust the angle and position of the jig to achieve the desired sharpening.
- Turn on the grinder or sharpening system and carefully sharpen the drill bit.
- Check the sharpness by drilling into a test material.
3. Professional Sharpening Services
If you don’t have the tools or skills to sharpen drill bits yourself, you can always opt for professional sharpening services. These services use specialized equipment and techniques to restore drill bits to their original sharpness. Simply drop off your dull drill bits at a local sharpening service, and they will do the rest. While this option may cost more than sharpening the bits yourself, it ensures a high-quality result.
| Technique | Pros | Cons |
|---|---|---|
| Manual Sharpening | Low cost, can be done with basic tools | Requires practice and skill to achieve consistent results |
| Drill Bit Sharpening Jigs | Precise and consistent sharpening | Requires additional equipment |
| Professional Sharpening Services | High-quality results | Can be more expensive |
Step-by-Step Guide to Sharpening Drill Bits
Sharpening drill bits is an essential skill for any DIY enthusiast or professional tradesperson. Dull drill bits can lead to inefficient drilling, inaccurate holes, and can even pose safety risks if they slip or bind. Fortunately, sharpening drill bits is a straightforward process that can be done at home with a few basic tools. Follow this step-by-step guide to learn how to sharpen your drill bits effectively:
Step 1: Gather the Necessary Tools
Before you begin sharpening your drill bits, make sure you have the following tools handy:
- A bench grinder
- A drill bit gauge
- Safety glasses
- Protective gloves
Step 2: Inspect the Drill Bit
Examine the drill bit for any signs of damage or wear. Look for dull cutting edges, chips, or nicks. If the drill bit is severely damaged, it may be best to replace it rather than attempting to sharpen it.
Step 3: Secure the Drill Bit
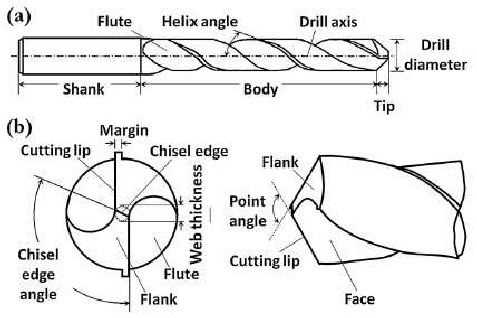
Attach a drill bit gauge to the bench grinder to ensure the correct angle while sharpening. Secure the drill bit in the drill bit gauge, aligning the cutting edge with the reference lines on the gauge. Make sure the drill bit is stable and positioned at the correct angle.
Step 4: Start Grinding
Put on your safety glasses and gloves before proceeding. Turn on the bench grinder and gently apply the drill bit to the grinding wheel. Move the drill bit from left to right along the wheel, maintaining a steady and consistent pressure. Avoid overheating the drill bit by periodically dipping it in a container of water to cool it down.
Step 5: Check the Grinding Progress
As you grind the drill bit, periodically stop and check the progress. Remove the drill bit from the grinder and inspect the cutting edges. Look for a sharp, clean cutting edge free from chips or nicks. If necessary, continue grinding until the desired sharpness is achieved.
Step 6: Test the Sharpness
Once you are satisfied with the grinding, remove the drill bit from the gauge and test its sharpness. Place the drill bit on a piece of scrap wood and attempt to drill a hole. A sharp drill bit should cut through the wood effortlessly, leaving a clean hole with minimal effort.
Step 7: Clean and Store
After sharpening your drill bit, clean off any metal shavings or debris. Store the drill bit in a safe and dry place to prevent damage. It is recommended to periodically sharpen your drill bits to maintain their performance and lifespan.
By following this step-by-step guide, you can easily sharpen your drill bits and ensure they are always ready to tackle any drilling task that comes your way.
Tips for Achieving a Sharp Drill Bit
Having a sharp drill bit is essential for achieving clean and precise holes in your projects. Here are a few tips to help you maintain a sharp drill bit:
1. Regularly Inspect and Clean Your Drill Bit
Inspect your drill bit regularly for any signs of dullness or damage. If you notice any chips or burrs, it’s time to sharpen them. Before sharpening, make sure to clean off any debris or built-up material from the bit.
2. Invest in a Quality Drill Bit Sharpener
Using a dedicated drill bit sharpener can greatly simplify the process and provide consistent results. Look for a sharpener that can accommodate various drill bit sizes and has adjustable settings for different materials.
3. Follow Proper Sharpening Techniques
When sharpening your drill bit, make sure to follow the manufacturer’s instructions. Start by positioning the bit correctly in the sharpener, and then slowly grind away any dull spots or nicks. Be careful not to overheat the bit during the sharpening process.
4. Cool Down the Bit Regularly
Drill bits can get hot during use, especially when drilling into harder materials. To prevent overheating and dulling, periodically dip the bit in a cooling agent like water or a dedicated coolant. This helps to keep the bit cool and improves its overall sharpness.
5. Use the Proper Speed and Pressure
When drilling, it’s important to use the appropriate speed and pressure. Too much speed or pressure can cause excessive heat and dull the bit. Adjust the settings on your drill to match the material being drilled, and let the bit do the work without forcing it.
6. Store Your Drill Bits Properly
After sharpening your drill bits, store them properly to keep them sharp for longer. Use a drill bit case or organizer to keep them organized and protected from damage or dulling. Avoid tossing them in a toolbox where they can rub against other tools and become dull.
7. Replace Worn-Out Drill Bits
If despite your efforts, a drill bit continues to perform poorly and cannot be adequately sharpened, it’s time to replace it. Using a dull drill bit not only affects the quality of your work but can also lead to accidents and injuries.
By following these tips and maintaining a regular sharpening routine, you will be able to achieve sharp drill bits and consistently produce clean and accurate holes in your projects.
Maintenance and Safety
Regular Maintenance
Proper maintenance of your drill bits is essential for ensuring optimal performance and longevity. Here are some tips for keeping your drill bits in top shape:
- Inspect your drill bits regularly for any signs of wear, such as dull edges or cracks.
- Clean your drill bits after each use to remove any debris or build-up that may affect their performance.
- Store your drill bits in a dry and secure location to prevent them from rusting or getting damaged.
- Sharpen your drill bits when necessary using the appropriate technique, as discussed in the previous section.
Safety Precautions
When working with drill bits, it is essential to prioritize safety to minimize the risk of accidents or injuries. Here are some safety tips to follow:
- Always wear safety goggles or glasses to protect your eyes from flying debris.
- Wear appropriate clothing, including long sleeves and pants, to protect your skin from any potential hazards.
- Use clamps or a vice to secure the material you are drilling to prevent it from moving or spinning unexpectedly.
- Ensure that the drill is turned off and unplugged before changing or adjusting the drill bit.
- Keep your hands and fingers away from the drill bit during operation to avoid accidental contact.
- Work in a well-ventilated area or wear a dust mask when drilling to prevent inhalation of potentially harmful dust or particles.
Additional Tips
Here are a few additional tips to keep in mind when using and maintaining your drill bits:
- Use the appropriate drill bit for the material you are drilling to achieve the best results.
- Avoid excessive heat build-up by applying moderate pressure and periodically withdrawing the bit to allow for cooling.
- Consider investing in a drill bit sharpener or using a professional sharpening service for optimal results.
| Maintenance | Safety |
|---|---|
| Inspect regularly | Wear safety goggles or glasses |
| Clean after each use | Wear appropriate clothing |
| Store in a dry location | Use clamps or a vice |
| Sharpen when necessary | Turn off and unplug the drill |
Proper Maintenance for Sharpened Drill Bits
Once you have sharpened your drill bit using the proper techniques, it is important to maintain it properly to extend its lifespan and keep it in good working condition. Here are some tips for maintaining your sharpened drill bits:
- Clean after use: After each use, make sure to clean the drill bit thoroughly to remove any debris or residue that may have accumulated. This can be done using a wire brush or a soft cloth.
- Inspect for damage: Regularly inspect the drill bit for any signs of damage, such as chips or cracks. If you notice any damage, it is important to replace the drill bit to prevent further issues and ensure safe operation.
- Store properly: When not in use, store the sharpened drill bit in a designated case or container to protect it from damage and prevent it from getting dull or blunt.
- Keep it dry: Moisture can cause rust and corrosion on the drill bit, so make sure to keep it dry at all times. If the drill bit does get wet, dry it thoroughly before storing or using it.
- Use cutting fluid: When drilling harder materials or working on a tough project, using cutting fluid can help reduce heat and friction, which can prolong the life of the drill bit.
- Sharpen regularly: Even with proper maintenance, a drill bit will eventually become dull. It is important to sharpen it regularly to maintain its effectiveness. Follow the proper sharpening techniques to ensure consistent results.
By following these maintenance tips, you can ensure that your sharpened drill bits remain in good condition and provide optimal performance for all your drilling needs.
FAQ:
What tools do I need to sharpen a drill bit?
To sharpen a drill bit, you will need a bench grinder or a drill doctor, a 120-grit grinding wheel, a drill bit gauge, a protective face shield, and a pair of safety goggles.
What are some common signs that indicate a need to sharpen a drill bit?
Some common signs that indicate a need to sharpen a drill bit include dull or chipped edges, difficulty in drilling, slower drilling speed, and overheating of the drill bit.
Can I sharpen a drill bit using a hand file?
Yes, you can sharpen a drill bit using a hand file. However, it requires a skilled hand and a bit of practice to achieve the desired sharpness and accuracy.
How often should I sharpen my drill bits?
The frequency of sharpening your drill bits depends on their usage. If you use them frequently or on hard materials, you may need to sharpen them every few months. However, if you use them infrequently or on softer materials, you can sharpen them once or twice a year.
What are some safety precautions to consider while sharpening drill bits?
While sharpening drill bits, it is important to wear a protective face shield and safety goggles to protect your eyes from any flying debris. Additionally, make sure to follow the manufacturer’s instructions for operating the grinding machine and maintain a firm grip on the drill bit to avoid accidents.
Video:


Meet Harrison Clayton, a distinguished author and home remodeling enthusiast whose expertise in the realm of renovation is second to none. With a passion for transforming houses into inviting homes, Harrison's writing at https://thehuts-eastbourne.co.uk/ brings a breath of fresh inspiration to the world of home improvement. Whether you're looking to revamp a small corner of your abode or embark on a complete home transformation, Harrison's articles provide the essential expertise and creative flair to turn your visions into reality. So, dive into the captivating world of home remodeling with Harrison Clayton and unlock the full potential of your living space with every word he writes.


