How to Screw into Wood Without a Drill: Techniques and Tips

When it comes to woodworking projects, having the right tools can make all the difference. But what if you don’t have a drill on hand? Don’t worry – there are still techniques you can use to screw into wood without a drill. Whether you’re a DIY enthusiast or just need a quick fix, we’ve got you covered.
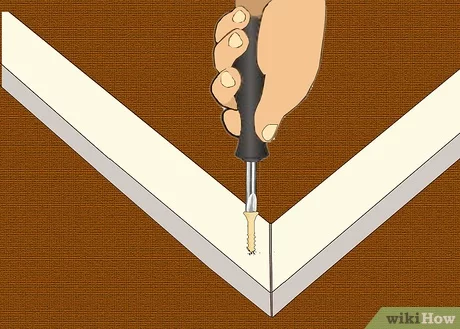
One technique you can try is using a screwdriver and a pair of pliers. Start by making a pilot hole in the wood with a nail or awl. Then, insert the screwdriver into the pilot hole and turn it clockwise to drive the screw in. If you’re having trouble getting enough torque, use the pliers to grip the screwdriver’s handle and give you extra leverage.
Another option is to use a hammer and a screwdriver. This technique is known as “screw hammering.” Begin by making a pilot hole as before. Then, place the tip of the screwdriver into the pilot hole and strike it with the hammer. Repeat this process until the screw is fully driven into the wood.
If you’re dealing with larger screws or tougher wood, you may need to use a different approach. One method is to use a manual screwdriver with a hexagonal socket. These screwdrivers have a hexagonal-shaped handle that allows for greater torque. Simply insert the tool into the pilot hole and turn it clockwise to tighten the screw.
Remember, screwing into wood without a drill may take a bit more effort and time compared to using a power tool. But with the right techniques and a little patience, you can still achieve successful results.

Screwdriver Selection and Prepping
When it comes to screwing into wood without a drill, one of the most important factors is selecting the right screwdriver for the job. Here are some tips to help you choose the right screwdriver and prepare it properly:
1. Choose the right type of screwdriver
There are various types of screwdrivers available, including flathead screwdrivers, Phillips screwdrivers, and Torx screwdrivers. Make sure to select the screwdriver that matches the type of screw you will be using.
2. Consider the screw size
The size of the screw will also determine the size of the screwdriver you should use. Larger screws require larger screwdrivers, while smaller screws require smaller screwdrivers. Using the wrong size screwdriver can result in damage to the screw or the wood.
3. Inspect the screwdriver tip
Before using a screwdriver, inspect the tip to ensure that it is in good condition and free from any damage. A damaged or worn-out screwdriver tip can slip and strip the screw head, making it difficult to drive the screw into the wood.
4. Prepare the screwdriver for use
Prior to using the screwdriver, it is recommended to magnetize the tip. This can be done by rubbing a magnet along the tip of the screwdriver a few times. Magnetizing the tip will help the screw to stay securely on the screwdriver, making it easier to start driving it into the wood.

Following these steps will help ensure that you have the right screwdriver and that it is ready for use when screwing into wood without a drill. Remember to use the screwdriver with proper technique and apply firm pressure to effectively drive the screw into the wood.
Choosing the Right Screw for the Job
When it comes to screwing into wood without a drill, it’s important to choose the right screw for the job. The right screw will ensure that the screw goes in smoothly and doesn’t damage the wood. Here are some factors to consider when choosing the right screw.
Type of wood
The type of wood you’re working with will determine the type of screw you should use. Soft woods like pine or cedar require screws with coarse threads to ensure a secure hold. Hard woods like oak or maple require screws with fine threads for a strong grip.
Screw length and diameter
The length and diameter of the screw should match the thickness of the wood you’re screwing into. If the screw is too short, it won’t provide enough grip and may not hold the wood securely. If the screw is too long, it may go through the wood or damage the surface. It’s important to choose screws that are the right length and diameter for your project.

Screw head type
The type of screw head you choose will depend on your personal preference and the type of screwdriver or drill bit you have. Common screw head types include Phillips, flat, and square. Make sure you have the appropriate screwdriver or drill bit for the screw head type you choose.
Material and finish
The material and finish of the screw can also affect its performance. For indoor projects, stainless steel screws are a popular choice as they are resistant to rust and corrosion. For outdoor projects, galvanized screws are recommended as they have a coating that protects against moisture and weathering. Additionally, screws with a self-drilling tip can make the process easier and prevent splitting of the wood.
Considerations for specific projects
Depending on the project, there may be specific considerations to keep in mind when choosing the right screw. For example, if you’re building furniture or cabinets, you may want to use screws with decorative heads that can be countersunk and covered with wood filler for a seamless finish. If you’re working with plywood or MDF, screws with a flat-bottomed head are recommended to prevent the head from sinking into the material.
By considering these factors and choosing the right screw for the job, you can ensure that your screwing into wood without a drill goes smoothly and produces a secure hold.
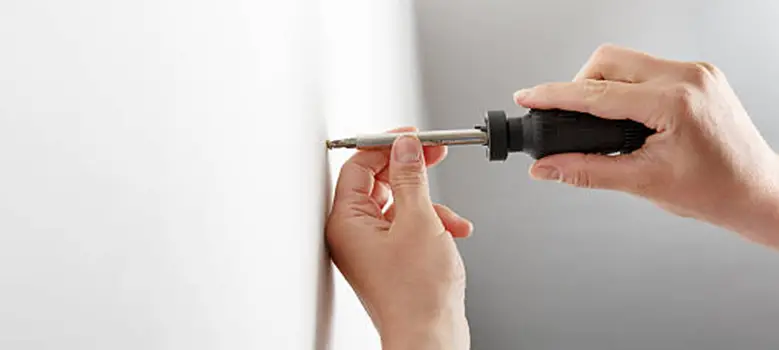
Using a Manual Screwdriver
When you don’t have access to a power drill, a manual screwdriver can be a useful tool for screwing into wood. While it may require more effort and time compared to using a drill, it can still get the job done. Here are some techniques and tips for using a manual screwdriver effectively:

1. Choose the right screwdriver:

Using the correct screwdriver is crucial for a successful screwing experience. Make sure to choose a manual screwdriver that matches the type and size of the screw you plan to use. Phillips head, flathead, and Robertson (square) are some common types of screwdriver heads available.
2. Choose the right screw length:
When using a manual screwdriver, it’s important to select the right screw length to ensure a secure and stable connection. The screw should be long enough to penetrate the wood properly but not too long that it protrudes from the other side.
3. Pre-drill pilot holes:
To make the screwing process easier, especially for harder wood or larger screws, pre-drilling pilot holes is recommended. Use a drill bit slightly smaller than the diameter of the screw to create pilot holes that guide the screw into the wood.
4. Apply downward pressure:
When screwing into wood manually, apply downward pressure on the screwdriver while turning it. This helps to prevent the screwdriver from slipping and ensures better control over the screwing process.

5. Use a screw starter:
A screw starter, also known as a screw holder or magnetic bit holder, can be attached to the end of the screwdriver to hold the screw in place. This helps to prevent the screw from falling off the screwdriver and makes it easier to position and start screwing into the wood.
6. Take breaks if necessary:
Using a manual screwdriver can be tiring, especially for longer screws or when working with dense wood. Take breaks when needed to avoid fatigue and maintain accuracy while screwing.
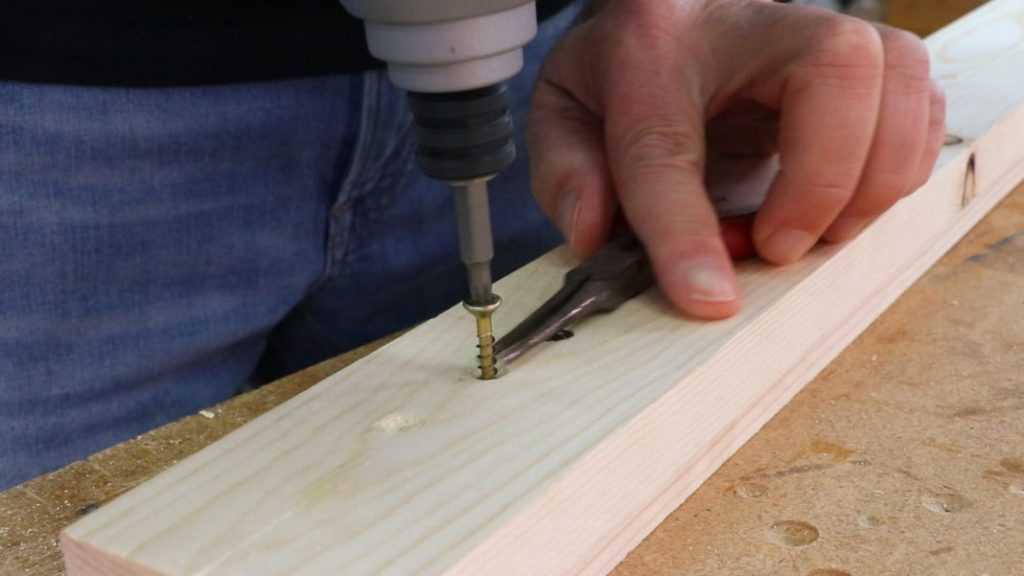
7. Use a backup tool:
If you encounter difficulty or resistance while screwing manually, you can use a wrench or pliers to provide extra torque and leverage. This can help you drive the screw deeper into the wood.
8. Double-check screw placement:
Before fully tightening the screw, double-check its placement to ensure it is aligned correctly. This will help prevent any mistakes and ensure a secure and professional finish.
While a power drill may offer convenience and speed, using a manual screwdriver can still achieve satisfactory results when screwing into wood. By following these techniques and tips, you can successfully use a manual screwdriver for your woodworking projects.
Applying Pressure Effectively
When screwing into wood without a drill, it’s important to apply pressure effectively to ensure a secure and tight connection. Here are some techniques and tips for applying pressure correctly:
1. Use a Screwdriver with a Comfortable Grip
Choose a screwdriver with a comfortable grip that allows you to exert more force without straining your hand or wrist. Look for one with an ergonomic handle design that provides a firm and comfortable grip.
2. Pre-drill Pilot Holes
Before screwing into wood, it’s helpful to pre-drill pilot holes to make the process easier. This will create a small hole for the screw to go into and will reduce the amount of force needed to drive it in.
3. Apply Pressure Parallel to the Screw
When applying pressure, make sure it is parallel to the screw. Pushing downwards at an angle can cause the screw to slip or strip the wood. Apply direct, even pressure in line with the screw to keep it straight and avoid any mishaps.
4. Use a Back-and-Forth Motion
Instead of simply pushing the screwdriver into the wood, try using a back-and-forth motion to create more friction and help the screw go in smoothly. This technique can also help you maintain control over the screw and prevent it from slipping.
5. Use a Second Hand for Extra Pressure
If you’re having trouble applying enough pressure with just one hand, consider using your other hand to provide additional support. Hold the screwdriver with one hand and place the palm of your other hand on top of the screwdriver handle, exerting extra pressure as needed.
6. Take Breaks if Needed
If you’re working on a large project or screwing in multiple screws, it’s important to listen to your body and take breaks if needed. Working for extended periods without rest can lead to fatigue and decrease your ability to apply pressure effectively.
7. Practice Patience
Screwing into wood without a drill can require some patience, especially if you’re working with dense or hardwoods. Take your time and apply pressure slowly and steadily. Rushing the process can lead to mistakes or a weaker connection.
By following these techniques and tips for applying pressure effectively, you’ll be able to successfully screw into wood without a drill and create secure connections.
Creating Pilot Holes with a Nail
If you don’t have a drill available, one alternative method to create pilot holes in wood is to use a nail. This technique can be useful in situations where you don’t have access to power tools or when you only need to make a small hole.
Here are the steps to create pilot holes with a nail:
- Choose an appropriate nail: Select a nail that is slightly smaller than the diameter of the screw you plan to use. This will ensure that the pilot hole is the right size to guide the screw without splitting the wood.
- Mark the desired location: Use a pencil or marker to mark the spot where you want to insert the screw. This will help you guide the nail accurately.
- Position the nail: Hold the nail perpendicular to the wood surface, with the tip of the nail resting on the marked spot. Make sure to firmly grip the nail so that it doesn’t slip while you’re hammering.
- Start hammering: Begin hammering the nail into the wood, applying steady and even pressure. The nail will start creating a hole as it penetrates the wood.
- Drive the nail: Continue hammering the nail until it is partially embedded in the wood. This will create a small pilot hole that can guide the screw.
- Remove the nail: Once the pilot hole is created, you can pull out the nail from the wood using a pair of pliers or by gripping it with your fingers and pulling it out.
It’s important to note that creating pilot holes with a nail may not be as precise or efficient as using a drill. The hole created by a nail may be slightly larger or less uniform, which could affect the stability and appearance of the screw connection. However, in situations where you only need a small hole and don’t have access to a drill, this method can be a useful and practical alternative. Remember to always exercise caution and wear appropriate safety gear when working with nails and hammers.
Using Anchors and Wall Plugs
Anchors and Wall Plugs: An Overview
Anchors and wall plugs are tools used to provide additional support and stability when screwing into wood without a drill. They are particularly useful when working with softer or weaker materials, such as drywall or plaster, where the screw alone may not hold securely.
Types of Anchors and Wall Plugs
There are several types of anchors and wall plugs available, each designed for specific applications and materials. Here are some common types:
- Plastic Expansion Anchors: These anchors expand when a screw is inserted, providing a secure hold in softer materials.
- Hollow Wall Anchors: Also known as Molly bolts, these anchors are used for hollow walls and require a pre-drilled hole.
- Toggle Bolts: Toggle bolts consist of a bolt and a spring-loaded wing that expands behind the wall, providing a strong anchor point.
- Self-Drilling Anchors: These anchors have a sharp, pre-drilling tip, eliminating the need for a separate drill hole.
Steps to Use Anchors and Wall Plugs
Using anchors and wall plugs is relatively simple. Here are the general steps to follow:
- Choose the appropriate anchor: Select the type of anchor that is suitable for your specific project and material.
- Locate the position: Decide where you want to screw into the wood and mark the spot with a pencil or marker.
- Prepare the hole: If required, drill a hole for the anchor according to the manufacturer’s instructions.
- Insert the anchor: Insert the anchor into the hole, ensuring it is flush with the surface of the wood or wall.
- Drive in the screw: Begin driving the screw into the anchor, applying steady pressure. Stop when the screw is secure.
- Test the anchor: Give the anchor a gentle tug to ensure it holds securely. If necessary, adjust or replace the anchor.
Tips for Using Anchors and Wall Plugs
Here are some additional tips to keep in mind when using anchors and wall plugs:
- Ensure you choose the appropriate size and type of anchor for your project and material.
- Always follow the manufacturer’s instructions for the specific anchor you are using.
- If using a hollow wall anchor, be careful not to overtighten, as this can cause damage to the wall.
- Consider using a wall anchor kit, which typically includes a variety of anchor types and sizes for different applications.
- If you encounter any difficulties or the anchor does not hold securely, consult a professional for assistance.
By following these steps and tips, you can successfully use anchors and wall plugs to securely screw into wood without a drill.
Tapping in Screws with a Hammer
If you don’t have a drill on hand or if you’re working with a small project, you may need to tap screws into wood using a hammer. While it may require more effort and precision, it’s still possible to achieve a secure and stable connection. Here are some techniques and tips for tapping screws with a hammer:
1. Choose the Right Screws
When tapping screws into wood with a hammer, it’s important to choose the right screws for the job. Opt for screws with a sharp and pointed tip, as they are easier to tap into wood without pre-drilling. Additionally, consider using screws with a coarser thread, as they provide more grip and stability.
2. Mark the Screw Holes
Before tapping in screws with a hammer, it’s essential to mark the screw holes on the wood. Use a pencil or a marker to make small dots where the screws will go. This will help you align the screws properly and ensure that they go in straight.
3. Create Pilot Holes
Although you won’t be using a drill, it can still be helpful to create pilot holes before tapping in screws with a hammer. You can use a nail or an awl to create small indentations at the marked screw holes. Pilot holes can make it easier to start the screws and reduce the risk of splitting or cracking the wood.
4. Start Slowly
When tapping in screws with a hammer, it’s best to start slowly and gently. Hold the screw in place and use the hammer to tap it into the pilot hole. Make sure to keep the screw straight and apply consistent pressure. Slow and controlled tapping will help prevent the screw from veering off or causing damage to the wood.
5. Gradually Increase Force
As you tap the screw into the wood, you can gradually increase the force applied by the hammer. This will help the screw penetrate deeper into the wood. Be careful not to exert too much force, as it could lead to the screw getting stuck or damaging the wood surface.
6. Check for Stability
Once the screw is fully tapped into the wood, check its stability by giving it a gentle tug. If the screw feels loose or wobbly, it may not be securely fastened. In that case, you might need to remove the screw and tap it in again with more force or consider using a different screw altogether.
7. Consider Using Pliers
If you find it challenging to tap the screw into the wood using just a hammer, you can also use a pair of pliers for additional leverage. Simply grip the screw firmly with the pliers and use the hammer to tap the pliers, driving the screw into the wood.
Remember that tapping screws into wood with a hammer can be more time-consuming and labor-intensive compared to using a drill. However, with the right techniques and tools, you can achieve a satisfactory result even without a power tool. Take your time, be patient, and practice on scrap wood if you’re new to this method.
Improving Grip with Wax or Soap
When you don’t have access to a drill, there are alternative methods to create a screw hole in wood. One technique is to improve the grip of the screw by using either wax or soap. This method can be particularly useful when working with harder types of wood or when the screw tends to slip.
Here are the steps to improve grip with wax or soap:
- Choose the right type of wax or soap: Look for wax or soap that is easy to apply and has a high friction coefficient. Beeswax is a popular choice, as it is easy to work with and provides a good grip. Soap can also be effective, but make sure it is a solid soap rather than a liquid one.
- Prepare the screw: Before using the wax or soap, clean the screw to remove any dirt or debris that may affect its grip. This can be done by wiping it down with a clean cloth or using a brush.
- Apply the wax or soap: Take the wax or soap and rub it along the threaded portion of the screw. Make sure to cover the entire length of the screw that will be inserted into the wood.
- Screw into the wood: With the wax or soap applied, start twisting the screw into the wood using a screwdriver or a manual screwdriver. Apply firm and steady pressure as you turn the screw.
Note: When using this technique, be aware that excessive pressure or force can cause the screw to break or damage the wood. It is important to use caution and ensure proper technique when screwing into wood without a drill.
Using wax or soap to improve grip can be a handy solution when you don’t have access to a drill. It provides added friction, making it easier to insert screws into wood and reduces the likelihood of them slipping or stripping the wood. However, it is important to note that this method may not be as effective as using a drill, especially for larger or more difficult screws.
FAQ:
What are some techniques for screwing into wood without a drill?
There are a few techniques you can use to screw into wood without a drill. One technique is to use a screwdriver and a hammer. You can start by making a small hole in the wood using a nail or awl, and then slowly drive the screw into the hole with a screwdriver and a hammer. Another technique is to use a screwdriver and pliers. You can grip the screw with the pliers and turn it into the wood using the screwdriver. Additionally, you can use a screwdriver and a wrench. Grip the screw with the wrench and turn it into the wood using the screwdriver.
Can I use a screwdriver and hammer to screw into any type of wood?
Yes, you can use a screwdriver and hammer to screw into any type of wood. However, it may be easier to screw into soft woods, such as pine, compared to harder woods, such as oak. If you are working with a harder wood, you may need to use more force when using a screwdriver and hammer to drive the screw into the wood.
Are there any tips for screwing into wood without a drill?
Yes, here are a few tips for screwing into wood without a drill. First, it is important to make a pilot hole before driving the screw into the wood. This will help prevent the wood from splitting. You can make a pilot hole by using a nail or awl to create a small indentation in the wood. Additionally, it may be helpful to apply some soap or wax to the screw threads before driving it into the wood. This will make it easier for the screw to go in smoothly. Finally, it is important to use the right size screwdriver for the job. Using a screwdriver that is too small or too large can make it difficult to drive the screw into the wood.
What are the benefits of using a drill instead of screwdriver?
Using a drill instead of a screwdriver has several benefits. First, a drill is generally faster and more efficient at driving screws into wood. It can quickly create pilot holes and drive screws with less effort. Additionally, a drill can provide more control over the depth and speed at which the screw is driven into the wood. This can be particularly useful when working with delicate or fragile materials. Finally, using a drill with the appropriate drill bit can help prevent the wood from splitting, as the drill bit can create a clean and precise hole.
Can I use pliers to screw into wood without any other tools?
Yes, you can use pliers to screw into wood without any other tools. Grip the head of the screw firmly with the pliers and turn it into the wood. However, using pliers alone may not provide enough leverage to drive the screw in with a lot of force. It may be more difficult to drive the screw into harder woods with only pliers.
Can I use a wrench to screw into wood?
Yes, you can use a wrench to screw into wood. Grip the head of the screw with the wrench and turn it into the wood. Using a wrench can provide more leverage and make it easier to drive the screw into the wood. However, it is important to ensure that the wrench is the right size and fits securely onto the head of the screw.
What kind of screws are best for screwing into wood without a drill?
When screwing into wood without a drill, it is best to use screws with a sharp point and coarse threads. These screws are designed to self-drill and self-tap into the wood, making them easier to drive in without the need for a drill. Additionally, screws with a smaller diameter are generally easier to drive in without a drill compared to larger diameter screws.
Video:

Best Saw Plot Twists

Meet Harrison Clayton, a distinguished author and home remodeling enthusiast whose expertise in the realm of renovation is second to none. With a passion for transforming houses into inviting homes, Harrison's writing at https://thehuts-eastbourne.co.uk/ brings a breath of fresh inspiration to the world of home improvement. Whether you're looking to revamp a small corner of your abode or embark on a complete home transformation, Harrison's articles provide the essential expertise and creative flair to turn your visions into reality. So, dive into the captivating world of home remodeling with Harrison Clayton and unlock the full potential of your living space with every word he writes.


